Note
Access to this page requires authorization. You can try signing in or changing directories.
Access to this page requires authorization. You can try changing directories.
The Azure MCP Server uses the Model Context Protocol (MCP) to standardize integrations between AI apps and external tools and data sources, allowing for AI systems to perform operations that are context-aware of your Azure resources.
This article covers:
- Install and authenticate with Azure MCP Server
- Connect to Azure MCP Server in Eclipse's AI development environment
- Run prompts to test operations and interact with Azure resources
Prerequisites
- Azure account with an active subscription
- Eclipse - the AI-powered code editor
- GitHub Copilot plugin
Authenticate to Azure
Azure MCP Server provides a seamless authentication experience using Azure accounts and Microsoft Entra ID. To use Azure MCP Server, you must first authenticate to Azure using local development tools such as the Azure CLI, Azure Developer CLI, Visual Studio, or Visual Studio Code. Azure MCP Server automatically discovers your credentials from these tools and uses them to authenticate to Azure services.
For example, to sign in using the Azure CLI:
az loginVerify your authentication status by running the following command to see which account and subscription you're currently signed in with:
az account showEnsure your user account has the appropriate role assignments for the Azure services you want to interact with. The Azure resources you intend to access with Azure MCP Server must already exist within your Azure subscription. For example, common role assignments include:
- Blob Storage Data Contributor - Read and write blob data in storage accounts.
- Storage Account Contributor - Manage storage account configurations.
- Contributor - General resource management across your subscription.
- Reader - Read-only access to Azure resources.
For more information about role assignments and local development authentication, see Authenticate .NET apps to Azure services during local development.
Install Azure MCP Server
Install and configure Azure MCP Server in Eclipse:
Go to Help > Eclipse Marketplace.
Search for Azure Toolkit in the Eclipse Marketplace window.
In the search results, select Install for Azure Toolkit.

Note
As part of the installation process, make sure both the GitHub Copilot and GitHub Copilot – Nightly plugins are updated to their latest versions.
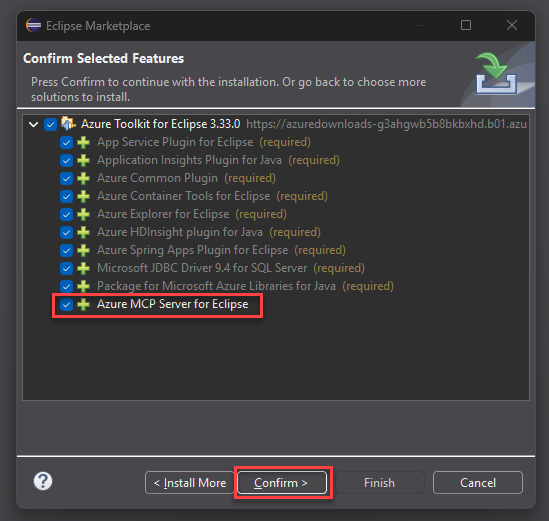
On the Confirm Selected Features window, check that Azure MCP Server for Eclipse is selected.
Select Confirm, and wait for the plugin to install. Eclipse restarts when installation finishes.
Verify and test the Azure MCP Server
After you install Azure Toolkit, approve Azure MCP Server registration in Copilot.
In the Copilot chat pane, select the Tools icon and select New MCP server found - approval needed.

In the Confirm MCP Server Registration window, select the Azure MCP Server row and select Approve.

In the Copilot chat pane, select the Tools icon again to open the preferences window.
Check that Azure MCP Server for Eclipse shows in the MCP Tools section.

Use prompts to test the Azure MCP Server
In the Copilot chat panel, enter a prompt that uses Azure MCP Server capabilities, such as the following.
List my Azure resource groupsNote
You can also ask Copilot to use Azure MCP Server tools directly with language like: Use the Azure MCP Server to list my Azure resource groups.
When Eclipse prompts you to run the tool
azuremcp/group_listto retrieve the resource groups, select Continue.The output resembles the following text.
The following resource groups are available for your subscription:

1. **DefaultResourceGroup-EUS** (Location: `eastus`)
2. **rg-testing** (Location: `centralus`)
3. **rg-azd** (Location: `eastus2`)
4. **msdocs-sample** (Location: `southcentralus`)
5. **ai-testing** (Location: `eastus2`)

Let me know if you need further details or actions related to any of these resource groups!
Explore more Azure MCP operations with prompts like the following.
List all storage accounts in my subscription
List available tables in my storage accounts
Show the configuration of my App Service instances