Note
Access to this page requires authorization. You can try signing in or changing directories.
Access to this page requires authorization. You can try changing directories.
Deploy the Azure MCP Server over HTTPS as a self-hosted remote server. This setup lets AI agents in Microsoft Foundry and Microsoft Copilot Studio can securely connect to and call MCP tools using the deployed Azure MCP Server to run Azure operations. This article focuses on the Copilot Studio connection scenario.
Prerequisites
- Power Platform license that includes:
- Copilot Studio
- Power Apps
- Azure subscription with Owner or User Access Administrator permissions
- Azure Developer CLI (azd)
- The list of Azure MCP Server tool areas (namespaces) you wish to enable (see azmcp-commands.md). The reference template in this article uses the
storagenamespace.
Azure MCP Server template
This article uses the Azure MCP Server - ACA with Copilot Studio agent azd template to deploy the server to Azure Container Apps. The template enables storage tools and a managed identity for secure access to Azure Storage. The Azure Developer CLI (azd) is an open source tool that simplifies provisioning and deploying Azure resources and offers concise commands (azd deploy, azd provision) that map to key stages in your development workflow.
Deploy the Azure MCP server
Deploy the Azure MCP server to Azure Container Apps:
Clone and initialize the
azmcp-copilot-studio-aca-mitemplate usingazd.azd init -t azmcp-copilot-studio-aca-miWhen prompted, enter an environment name.
Run the template with the
azd upcommand.azd upazdprompts you for the following:- Subscription: Select the subscription for the provisioned resources (listed below).
- Resource Group: The resource group in which to create the resources. You can create a new resource group on demand during this step.
azd uses the template files to provision the following resources and configurations:
- Azure Container App: Runs the Azure MCP Server and provides the storage namespace.
- User-assigned managed identity: A managed identity with the Subscription Reader role assigned to the container app and used by the Azure MCP server to make tool calls.
- Entra app registration (Azure MCP Server): Provides OAuth 2.0 authentication for clients, like agents, with the
Mcp.Tools.ReadWrite.Allrole. This role is assigned to the managed identity of the AI Foundry project specified by the AI Foundry resource ID input. - Entra App Registration (Client): For the Power Apps custom connector to connect to the remote Azure MCP Server.
- Application Insights: Provides telemetry and monitoring.
Deployment output and configuration
After deployment completes, retrieve
azdenvironment variables with theazd env get-valuescommand.azd env get-valuesExample output:
AZURE_RESOURCE_GROUP="<your-resource-group-name>"
AZURE_SUBSCRIPTION_ID="<your-subscription-id>"
AZURE_TENANT_ID="<your-tenant-id>"
CONTAINER_APP_NAME="<your-container-app-name>"
CONTAINER_APP_URL="https://azure-mcp-storage-server.<your-container-app-name>.westus3.azurecontainerapps.io"
ENTRA_APP_CLIENT_CLIENT_ID="<your-client-app-registration-client-id>"
ENTRA_APP_SERVER_CLIENT_ID="<your-server-app-registration-client-id>"
You also need to add the created API scope as one of the permissions of the client app registration. Go to Azure Portal and search for the client app registration using the
ENTRA_APP_CLIENT_CLIENT_IDoutput value.Go to the API permissions blade and select Add a permission.
In the My APIs tab, select the Server app registration and add the
Mcp.Tools.ReadWritescope.
Call tools from Copilot Studio agent
The Copilot Studio agent connects to MCP servers by using a custom connector.
Configure a custom connector
- Sign in to Power Apps and select the environment to host the custom connector.
- Create a new custom connector using the Create from blank option. To learn more about custom connector configuration, see create custom connector from scratch.
- Complete the following sections for each step of the connector creation workflow.
General
On the General step:
- Provide a descriptive Name and Description for the custom connector.
- Set Scheme to
HTTPS. - Set Host to the
CONTAINER_APP_URLvalue from theazdoutput.

Security
Skip the Security step for now and proceed to the Definition step.
Definition
Toggle Swagger editor to enter the editor view.
In the editor view:
Expose a POST method at the root path with a custom
x-ms-agentic-protocol: mcp-streamable-1.0property. This property is required for the custom connector to interact with the API by using the MCP protocol.Note
See the custom connector swagger example for a reference template.

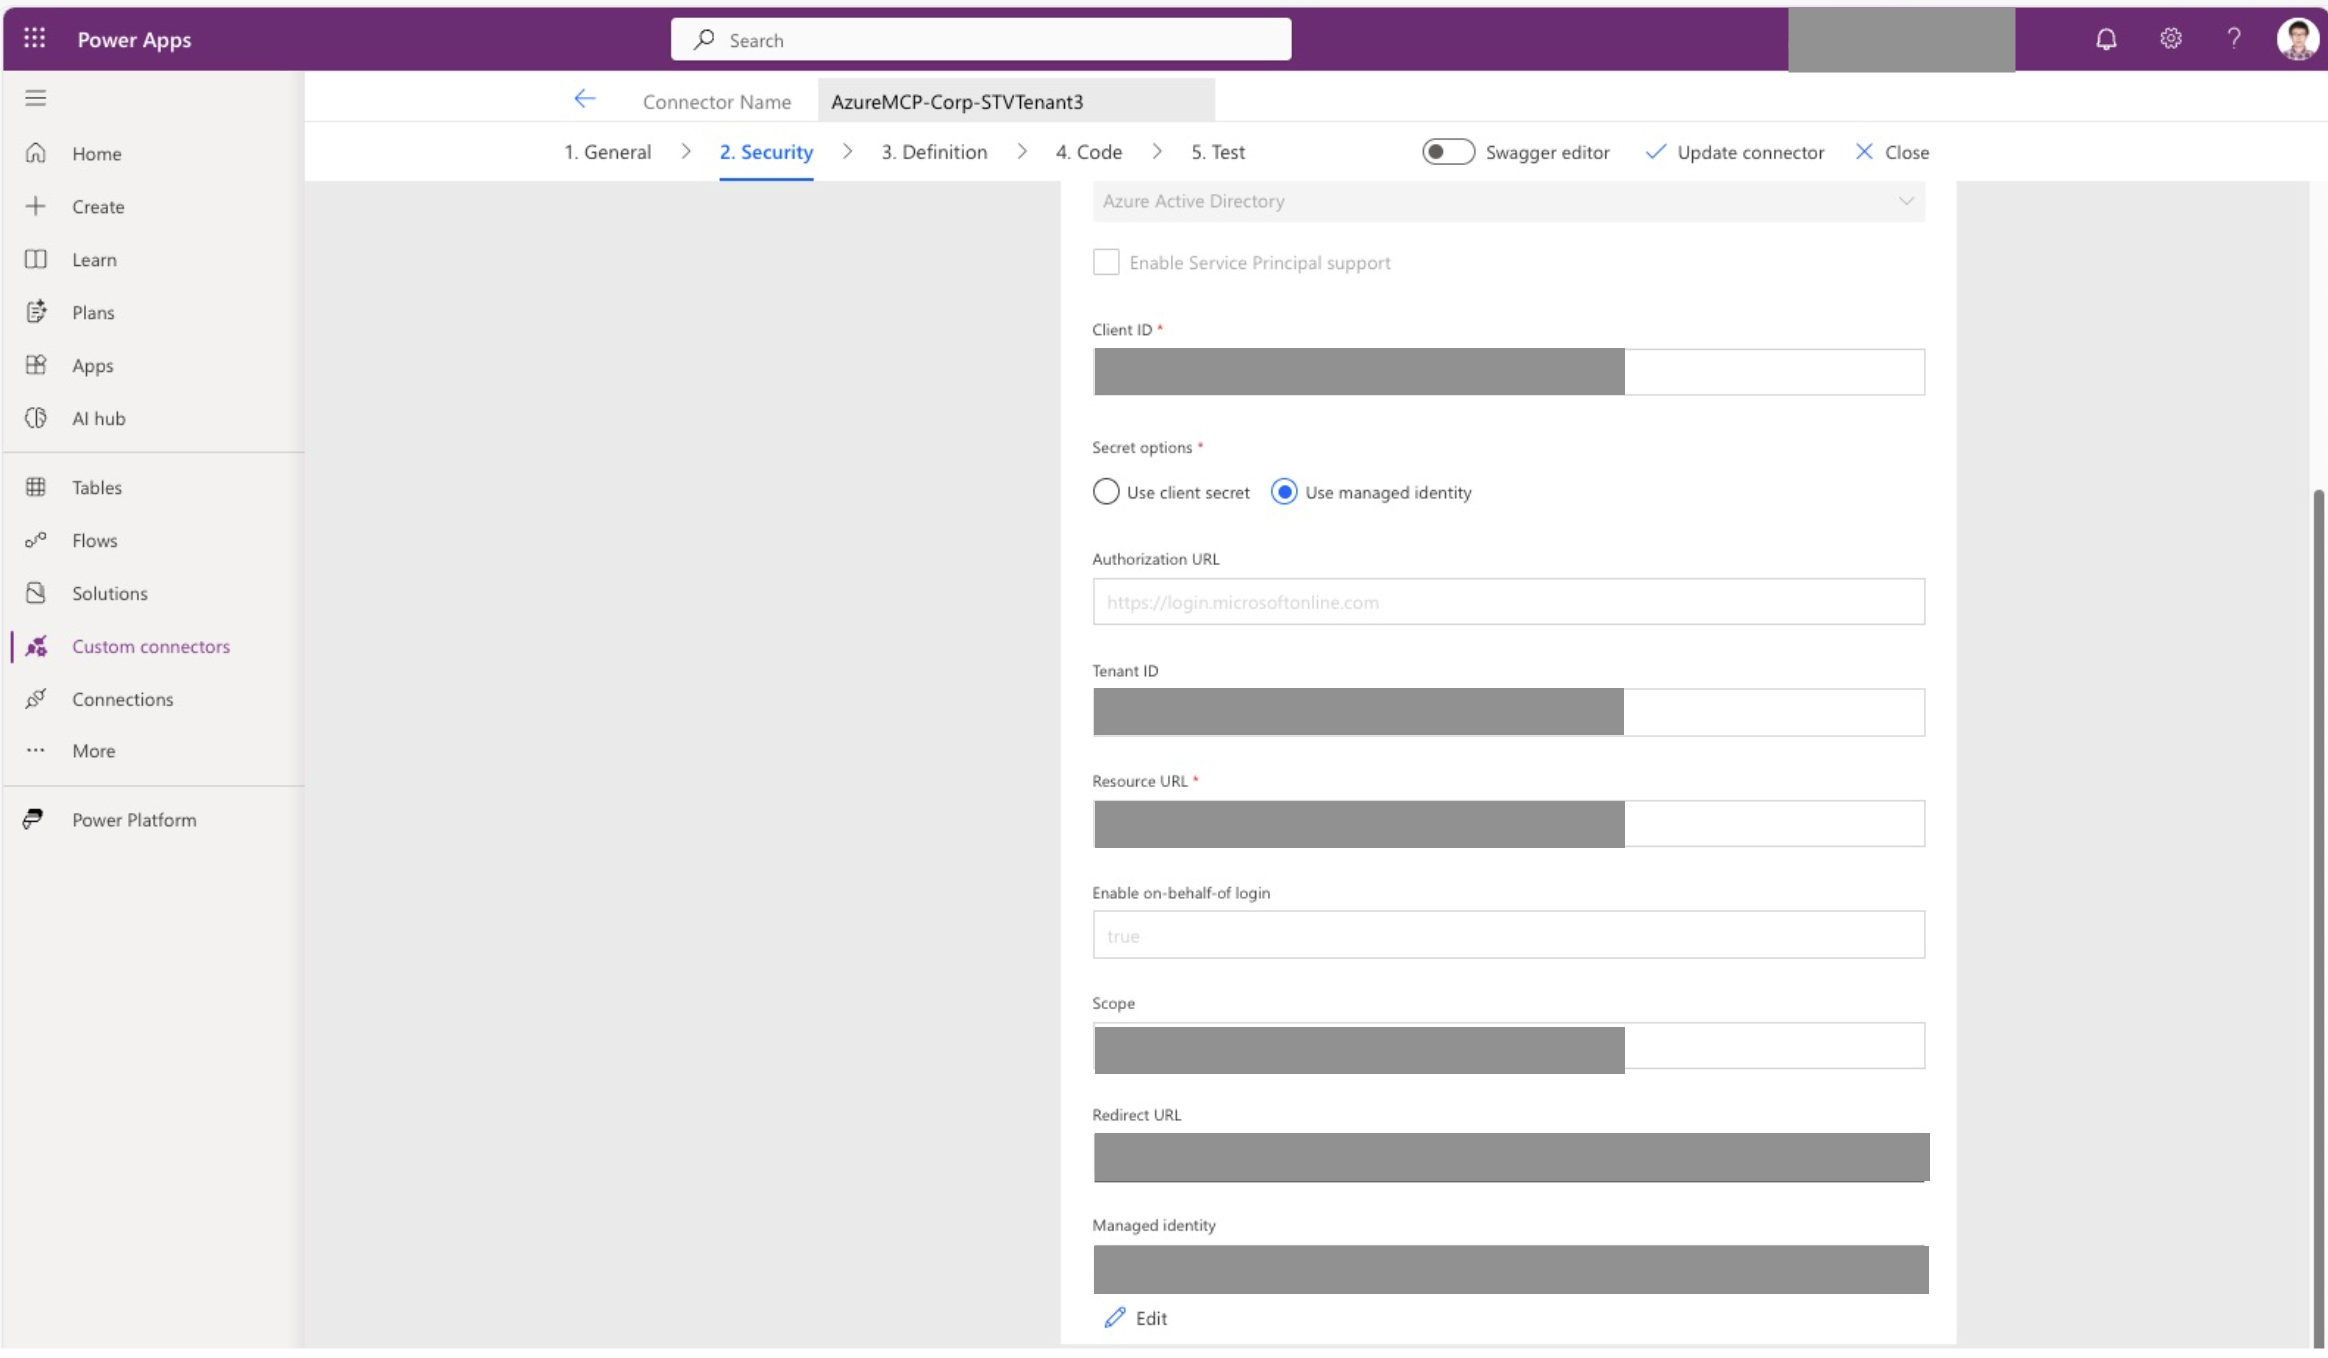
Security
On the Security step:
- Select OAuth 2.0 as the authentication type.
- Select Azure Active Directory as the identity provider.
- Set Client ID to the
ENTRA_APP_CLIENT_CLIENT_IDvalue from theazdoutput. - Choose Use client secret or Use managed identity as the secret option.
- If you choose a client secret, create a client secret under the client app registration in the Azure portal. Copy the secret value and paste it into the client secret field.
- If you choose managed identity, proceed with the remaining steps until the custom connector is created.
- Keep Authorization URL as
https://login.microsoftonline.com. - Set Tenant ID to the
AZURE_TENANT_IDvalue from theazdoutput. - Set Resource URL to the
ENTRA_APP_SERVER_CLIENT_IDvalue from theazdoutput. - Enable On-behalf-of login.
- Set Scope to
ENTRA_APP_SERVER_CLIENT_ID/.default.
Select Create connector and wait for completion. After creation, the UI shows a redirect URL and, if selected, a managed identity.
Configure the app registration
In the Azure portal, add a redirect URI under the Web platform in the client app registration.

If you chose Use managed identity on the Security step, create a federated credential in the client app registration.
- Select Other issuer as the scenario.
- Copy the
issuerandsubjectvalues from the custom connector into the credential fields. - Provide a descriptive Name and Description, then select Add.

Test connection
Open the custom connector, select Edit, and go to the Test step.
Select any operation and choose New connection.
Sign in with the user account you plan to use to access the MCP tools. You might see a dialog requesting consent or an admin approval prompt. If you are unsure, see Known issues.
If sign-in succeeds, the UI shows the connection is created successfully. If you encounter an error during sign-in, see Known issues and troubleshoot with your tenant admin.

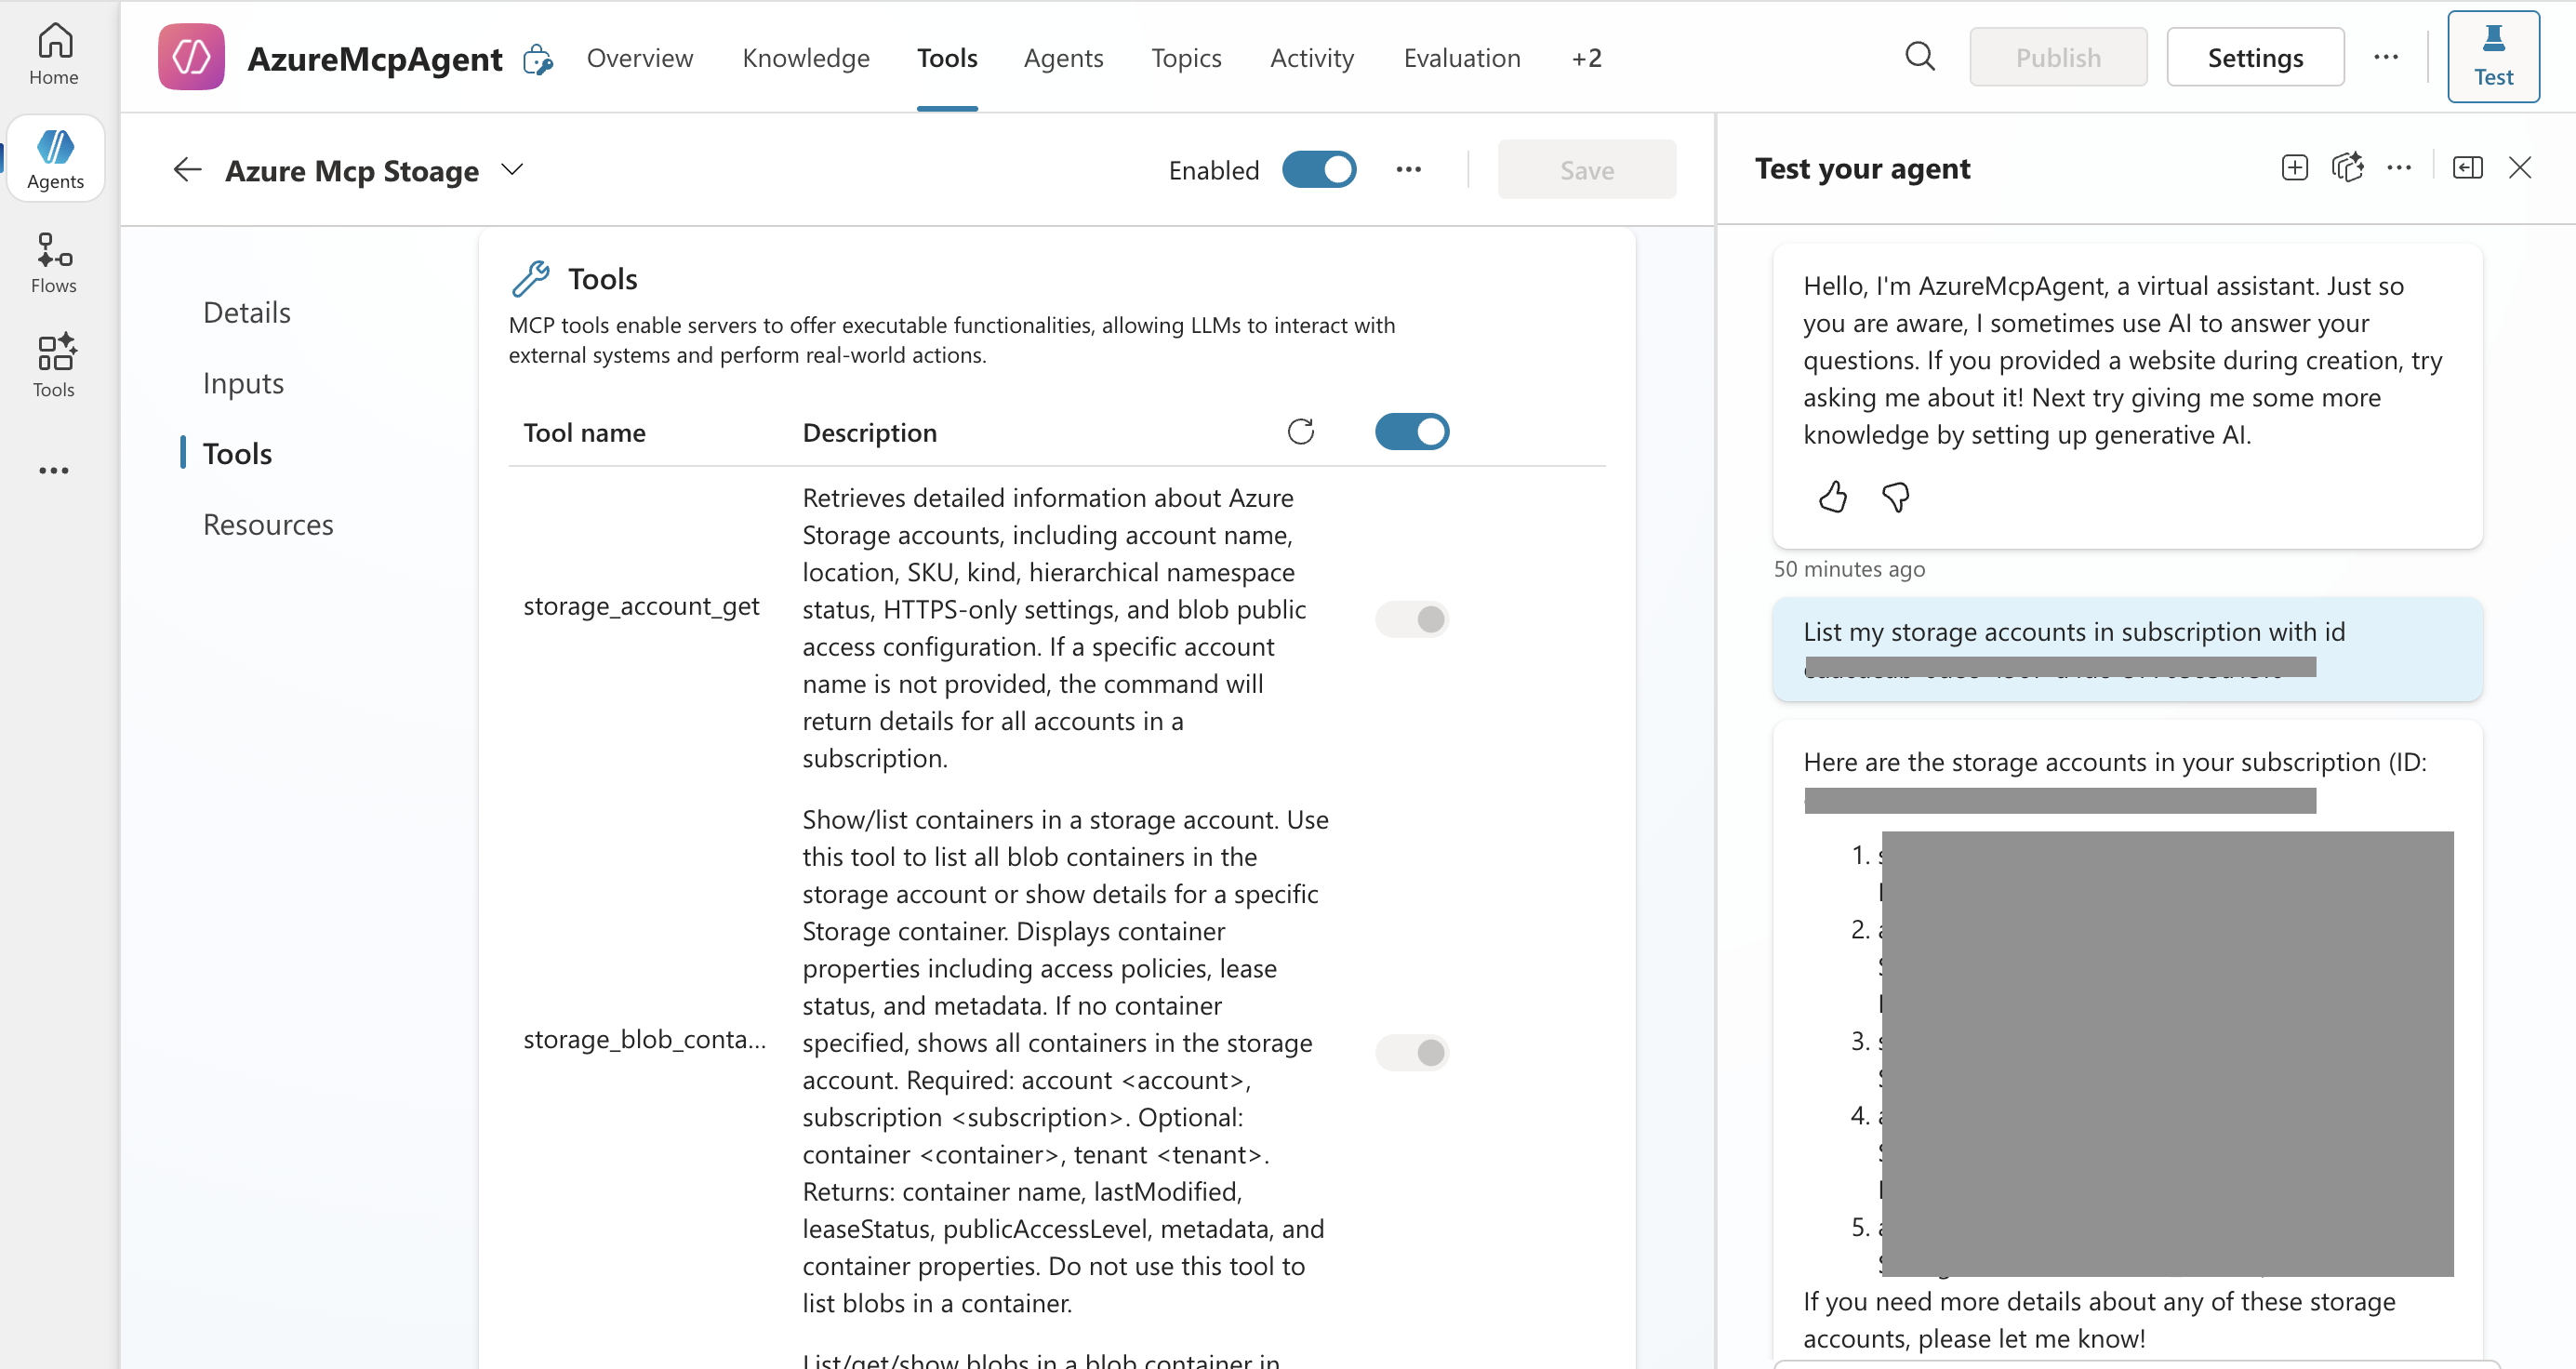
Call an Azure MCP tool in Copilot Studio test playground
Sign in to Copilot Studio and select the environment to host the Copilot Studio agent. Create a new agent or use an existing one.
Open the agent details and select the Tools tab.
Select Add a tool.
Search for your custom connector name and add it.
After you add the custom connector, the Copilot Studio Agent attempts to list the tools from the MCP server. If successful, you see the available tool list under the connector.
Select Test to start a test playground session.
Prompt the agent to call an MCP tool, for example to list storage accounts in the subscription.

Clean up resources
Run the following command to delete the Azure resources this template created when you don't need them.
azd down
Note
azd cannot delete the Entra app registrations created by this template. Delete the Entra app registrations by searching for the ENTRA_APP_CLIENT_CLIENT_ID and the ENTRA_APP_SERVER_CLIENT_ID values in the Azure Portal and then delete the corresponding app registrations.
Delete the Copilot Studio agent, Power Apps custom connector, and connection to clean up Power Platform resources.
Template structure
The azd template includes these Bicep modules:
main.bicep- Orchestrates deployment of all resources.aca-storage-managed-identity.bicep- Creates a user-assigned managed identity.aca-storage-subscription-role.bicep- Assigns an Azure RBAC role to the user-assigned managed identity. It defaults to the Subscription Reader role.aca-infrastructure.bicep- Deploys the Container App hosting the Azure MCP Server.entra-app.bicep- Creates Entra app registrations.application-insights.bicep- Deploys Application Insights for telemetry and monitoring when enabled.
Known issues
- The Power Apps custom connector doesn't support authenticating users from multiple tenants, so set the client app registration to accept only users from its tenant.
- During authentication, the user or a tenant admin grants the client app access to their data. Learn more in application consent experience. You can give consent in several ways.
- A user can give consent during sign-in just for that user. Tenant security policy might block this.
- A tenant admin can give consent for all users in the tenant in the client app registration under the API permissions blade in Azure portal.
- Add the client app registration as a preauthorized client app in the server app registration under the Expose an API blade in Azure portal.
- If the client app registration and server app registration are in different tenants, you might see the following error when you try to create the connection:
- "The app is trying to access a service 'server_app_registration_client_id'(server_app_registration_display_name) that your organization 'client_app_registration_tenant' lacks a service principal for." A tenant admin of the client app registration provisions a service principal for the server app registration in that tenant by running the Azure CLI command
az ad sp create --id <server_app_registration_client_id>. After provisioning, create the connection again. The consent flow triggers.
- "The app is trying to access a service 'server_app_registration_client_id'(server_app_registration_display_name) that your organization 'client_app_registration_tenant' lacks a service principal for." A tenant admin of the client app registration provisions a service principal for the server app registration in that tenant by running the Azure CLI command
- If the Power Apps environment has a tenant isolation policy, it blocks data flow when the client or server app registrations are in different tenants. Learn how to add exception rules to allow this data flow in cross tenant restrictions.