I accidently gave everyone access to everyones sections in onenote.

Deb Still 0 Reputation points
2025-08-02T01:27:35.3066667+00:00

As an owner I accidently changed the permission access in onenote. Everyone can see everyone elses sections. Some are stating they can't edit their own anymore. I need to return it to where everyone has access and editing to their own sections and the collaboration space only.

one note access

Microsoft Teams | Microsoft Teams for education | Class Notebook | Manage Class Notebook
0 comments No comments
{count} votes

3 answers

Sort by: Most helpful
  1. Jerald Felix 9,840 Reputation points
    2025-08-02T01:32:15.2266667+00:00

    Hello Deb Still,

    No worries—this happens more often than you’d think, and it’s fortunately easy to reverse. Here’s the quickest path back to the standard “private student sections + shared Collaboration Space” setup in your Class Notebook:


    1. Re-check everyone’s role in the Team
    2. Open Microsoft Teams and go to … > Manage team for your class.

    Make sure every student is listed as Member (not Owner). If anyone is an Owner, switch them back to Member and save.

    1. Run the built-in Fix Permissions tool

    From the same class in Teams:

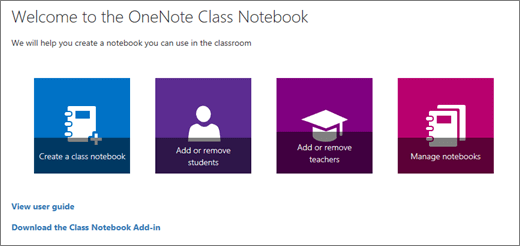
    Click the Class Notebook tab.

    Choose Class Notebook → Manage Notebook → Fix Permissions. This resets each student’s private section so only they (and teachers) can open it, while leaving the Collaboration Space editable by everyone.

    If you prefer the desktop OneNote add-in:

    Go to Class Notebook → Manage Notebooks → Reset All Permissions.

    1. Ask everyone to sync the notebook

    After the tool finishes, have students close and reopen—or simply hit Sync. They should now see:

    Their own section (full edit rights)

    Content Library (read-only)

    Collaboration Space (edit)

    Nothing else.

    1. (Optional) Lock or scope the Collaboration Space

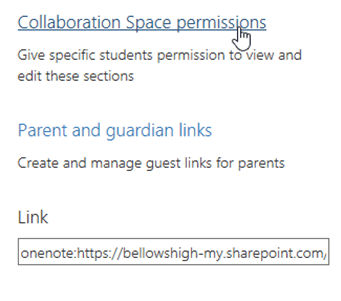
    While you’re in Manage Notebook, you can:

    Lock the Collaboration Space temporarily, or

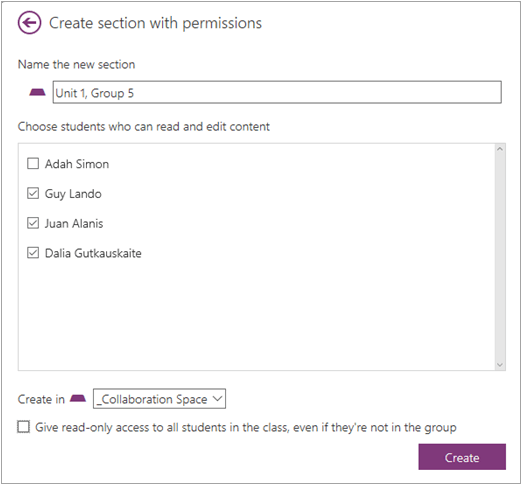
    Use Collaboration Space Permissions to give editing rights only to specific groups.

    1. Still seeing odd permissions?

    Open the notebook in OneDrive/SharePoint (Class Notebooks folder).

    Right-click the notebook → Manage access → Advanced.

    Remove any individual student entries at the notebook root—only the class “Students” group should have Read.

    Use Check Permissions on a sample student to confirm they no longer have access to other students’ sections.

    In the rare case the structure is beyond repair, create a new Class Notebook and drag each student’s section over—but nine times out of ten, the steps above fix everything.

    Best regards,

    Jerald Felix


  2. Vivian-HT 9,165 Reputation points Microsoft External Staff Moderator
    2025-08-02T07:26:42.77+00:00

    Dear @Deb Still,

    Thank you for posting your question in the Microsoft Q&A forum.

    Since you have already created sections in your Class Notebook Collaboration Space to facilitate student group work. Therefore, you can choose which students can view and edit within that section. Grant read-only permissions to the whole class if you'd like everyone to see a section but not edit it.

    • Sign in to Class Notebook Wizard with the log-in provided by your school.
    • Select Class Notebook.
    • Select Manage notebooks in the Class Notebook Wizard. This displays a page that shows all Class Notebooks created by you, as well as information for customizing each one.
    • Options include:

    OneNote Class Notebook Wizard with icons to Create a class notebook, Add or remove students, Add or remove teachers, and Manage notebooks.

    • Scroll to the notebook you'd like to modify and select Collaboration Space permissions.

    notebook

    • Use the checkboxes to choose its student members. Give read-only access to all students in the class by selecting the checkbox.

    notebook

    Moreover, you can Distribute pages and sections to Class Notebooks. Please follow these instructions via Distribute pages and sections to Class Notebooks

    I hope this information is helpful. Please follow the steps and let me know the outcome.

    If you have any questions, please feel free to reach out.

    Thank you for your patience and understanding. I'm looking forward for your reply.


    If my answer is helpful, please click "Accept Answer" and kindly upvote it. If you have extra questions about this answer, please click "Comment".   

    Note: Please follow the steps in our documentation to enable e-mail notifications if you want to receive the related email notification for this thread.User's image


  3. Vivian-HT 9,165 Reputation points Microsoft External Staff Moderator
    2025-08-06T07:57:10.7433333+00:00

    Dear @Deb Still,

    Thank you for your update!

    Based on your screenshot, the setting and this view is for managing student access/view. If you want to manage teacher permission, you can do it via Manage Notebooks, I recommend you remove users' permission and assign add users again.

    Option 1: Use Collaboration Space Permissions to:

    Assign edit rights only to specific users or groups.

    Lock or unlock the Collaboration Space.

    Option 2: Use Manage Notebooks to:

    Each OneNote Class Notebook is organized into three parts: 

    • Student Notebooks: a private space shared between the teacher and each individual student. Teachers can access every student notebook while students can only see their own. 
    • Content Library: a read-only space where teachers can share handouts with students. 
    • Collaboration Space: a space where everyone in your class can share, organize, and collaborate. 

    In this case, to ensure a teacher can edit and access only their own section in OneNote (and not others). Since there is some confusion in the web design, as I understanding that this note is only for teacher and you want to make sure that teacher can edit and access their own section, there are two options for you to manage permission (make sure you have assigned them correct permission):

    • Sign in to Class Notebook Wizard with the log-in provided by your school.
    • Select Class Notebook.
    • Or Open Teams OneNote
      • Open Teams > View more apps > OneNote
      User's image User's imageOption 1: Add or remove students (if you want the users for edit and access only their own section)
    • Remove all the user permissions
    • and then re-assign/re-add the users

    Untitled

    Option 2: Add or remove teachers (for OneNote owners and have full control in notebook)

    OneNote Class Notebook Wizard with icons to Create a class notebook, Add or remove students, Add or remove teachers, and Manage notebooks.

    I hope this information is helpful. Please follow the steps and let me know the outcome.

    If you have any questions, please feel free to reach out.

    Thank you for your patience and understanding. I'm looking forward for your reply.


    If my answer is helpful, please click "Accept Answer" and kindly upvote it. If you have extra questions about this answer, please click "Comment".   

    Note: Please follow the steps in our documentation to enable e-mail notifications if you want to receive the related email notification for this thread.User's image


Your answer

Answers can be marked as 'Accepted' by the question author and 'Recommended' by moderators, which helps users know the answer solved the author's problem.