Note
Access to this page requires authorization. You can try signing in or changing directories.
Access to this page requires authorization. You can try changing directories.
Workflows are UI-based tools in Microsoft Foundry. You can use them to create declarative, predefined sequences of actions that include agents, as in Microsoft Agent Framework workflows.
Workflows enable you to build intelligent automation systems that seamlessly blend AI agents with business processes in a visual manner. Traditional single-agent systems are limited in their ability to handle complex, multifaceted tasks. By orchestrating multiple agents, each with specialized skills or roles, you can create systems that are more robust, adaptive, and capable of solving real-world problems collaboratively.
Prerequisites
- An Azure account with an active subscription. If you don't have one, create a free Azure account, which includes a free trial subscription.
- A project in Microsoft Foundry.
Workflow concepts
To create a workflow in Foundry, you can begin with a blank workflow or select one of the templates of predefined orchestration patterns:
| Pattern | Description | Typical use case |
|---|---|---|
| Human in the loop | Asks the user a question and awaits user input to proceed | Creating approval requests during workflow execution and waiting for human approval, or obtaining information form the user |
| Sequential | Passes the result from one agent to the next in a defined order | Step-by-step workflows, pipelines, or multiple-stage processing |
| Group chat | Dynamically passes control between agents based on context or rules | Dynamic workflows, escalation, fallback, or expert handoff scenarios |
For more information, see Microsoft Agent Framework workflow orchestrations.
Create a workflow
The following steps show you how to create a sequential type of workflow as an example:
-
Sign in to Microsoft Foundry. Make sure the New Foundry toggle is on. These steps refer to Foundry (new).

On the upper-right menu, select Build.
Select Create new workflow > Sequential.
Assign an agent to the agent nodes by selecting each agent node in the workflow and either selecting the desired agent or creating a new one. For more information, see Add agents to your workflow later in this article.
Select Save in the visualizer to save the changes.
Important
Workflows aren't saved automatically. Select Save every time you want to save changes to your workflow.
Select Run Workflow.
Interact with the workflow in the chat window.
Optionally, add new nodes to your workflow. The next section in this article provides information about nodes.
Add nodes to your workflow
Nodes define the building blocks of your workflow. Common node types include:
- Agent: Invoke an agent.
- Logic: Use if/else, go to, or for each.
- Data transformation: Set a variable or parse a value.
- Basic chat: Send a message or ask a question to an agent.
When you select a prebuilt workflow, a workflow of nodes appears in the builder. Each node corresponds to a specific action or component, and it performs a step in sequence. You can modify the order of the nodes by selecting the three dots on a node and then selecting move. You can add new nodes by selecting the plus (+) icon in the workspace.
Add agents to your workflow
You can add any Foundry agent from your project to the workflow. Agent nodes also allow you to create new agents and give them customized capabilities by configuring their model, prompt, and tools.
For advanced options and comprehensive information about agent creation, go to the Foundry Agent tab in the Foundry portal.
Add an existing agent
In the workflow visualizer, select the plus sign.
In the pop-up dropdown list, select Invoke agent.
In the Create new agent window, select existing.
Enter the agent name to search for existing agents in your Foundry project.
Select the desired agent to add it into your workflow.
Create a new agent
In the workflow visualizer, select the plus sign.
In the pop-up dropdown list, select Invoke agent.
Enter an agent name and description of what the agent does.
Select Add.
In the Invoke an agent window, configure the agent.
Select Save.
Configure an output response format for invoking an agent
Create an Invoke agent node.
In the Invoke agent configuration window, select Create a new agent.
Configure the agent to send output as a JSON schema:
- Select Details.
- Select the parameter icon.
- For Text format, select JSON Schema.

Copy the desired JSON schema and paste it in the Add response format window. The following screenshot shows a math example. Select Save.

{
  "name": "math_response",
  "schema": {
    "type": "object",
    "properties": {
      "steps": {
        "type": "array",
        "items": {
          "type": "object",
          "properties": {
            "explanation": {
              "type": "string"
            },
            "output": {
              "type": "string"
            }
          },
          "required": [
            "explanation",
            "output"
          ],
          "additionalProperties": false
        }
      },
      "final_answer": {
        "type": "string"
      }
    },
    "additionalProperties": false,
    "required": [
      "steps",
      "final_answer"
    ]
  },
  "strict": true
}
Select Action settings. Then select Save output json_object/json_schema as.
Select Create new variable. Choose a variable name, and then select Done.


Use additional features
YAML visualizer view: When you set the YAML Visualizer View toggle to On, the workflow is stored in a YAML file. You can modify it in the visualizer and the YAML view. Saving creates a new version, and you have access to the version history.
The visualizer and the YAML are editable. Any changes to the YAML file are reflected in the visualizer.
Versioning: Each time you save your workflow, a new, unchangeable version is created. To view the version history or delete older versions, open the Version dropdown list to the left of the Save button.
Notes on your workflow visualizer: You can add notes on the workflow visualizer to add more context or information for your workflow. In the upper-left corner of the workflow visualizer, select Add note.
Create expressions by using Power Fx
Power Fx is a low-code language that uses Excel-like formulas. Use Power Fx to create complex logic that allows your agents to manipulate data. For instance, a Power Fx formula can set the value of a variable, parse a string, or use an expression in a condition. For more information, see the Power Fx overview and formula reference.
Use variables in a formula
To use a variable in a Power Fx formula, you must add a prefix to its name to indicate the variable's scope:
- For system variables, use
System. - For local variables, use
Local.
Here are the system variables:
| Name | Description |
|---|---|
Activity |
Information about the current activity |
Bot |
Information about the agent |
Conversation |
Information about the current conversation |
Conversation.Id |
Unique ID of the current conversation |
Conversation.LocalTimeZone |
Time zone of the user, in the IANA Time Zone Database format |
Conversation.LocalTimeZoneOffset |
Time offset from UTC for the current local time zone |
Conversation.InTestMode |
Boolean flag that represents if the conversation is happening on a test canvas |
ConversationId |
Unique ID of the current conversation |
InternalId |
Internal identifier for the system |
LastMessage |
Information about the previous message that the user sent |
LastMessage.Id |
ID of the previous message that the user sent |
LastMessage.Text |
Previous message that the user sent |
LastMessageId |
ID of the previous message that the user sent |
LastMessageText |
Previous message that the user sent |
Recognizer |
Information about intent recognition and the triggering message |
User |
Information about the user currently talking to the agent |
User.Language |
User language locale per conversation |
UserLanguage |
User language locale per conversation |
Use literal values in a formula
In addition to using variables in a Power Fx formula, you can enter literal values. To use a literal value in a formula, you must enter it in the format that corresponds to its type.
The following table lists the data types and the format of their corresponding literal values:
| Type | Format examples |
|---|---|
| String | "hi", "hello world!", "copilot" |
| Boolean | Only true or false |
| Number | 1, 532, 5.258,-9201 |
| Record and table | [1], [45, 8, 2], ["cats", "dogs"], { id: 1 }, { message: "hello" }, { name: "John", info: { age: 25, weight: 175 } } |
| Date and time | Time(5,0,23), Date(2022,5,24), DateTimeValue("May 10, 2022 5:00:00 PM") |
| Choice | Not supported |
| Blank | Only Blank() |
Common Power Fx formulas
The following table lists the Power Fx formulas that you can use with each data type.
| Type | Power Fx formulas |
|---|---|
| String | [Text function][1][Concat and Concatenate functions][2][Len function][3][Lower, Upper, and Proper functions][4][IsMatch, Match, and MatchAll functions][5][EndsWith and StartsWith functions][6][Find function][7][Replace and Substitute function][8] |
| Boolean | [Boolean function][9][And, Or, and Not functions][10][If and Switch functions][11] |
| Number | [Decimal, Float, and Value functions][12][Int, Round, RoundDown, RoundUp, and Trunc functions][13] |
| Record and table | [Concat and Concatenate functions][14][Count, CountA, CountIf, and CountRows functions][15][ForAll function][16][First, FirstN, Index, Last, and LastN functions][17][Filter, Search, and LookUp functions][18][JSON function][19][ParseJSON function][20] |
| Date and time | [Date, DateTime, and Time functions][21][DateValue, TimeValue, and DateTimeValue functions][22][Day, Month, Year, Hour, Minute, Second, and Weekday functions][23][Now, Today, IsToday, UTCNow, UTCToday, IsUTCToday functions][24][DateAdd, DateDiff, and TimeZoneOffset functions][25][Text function][26] |
| Blank | [Blank, Coalesce, IsBlank, and IsEmpty functions][27][Error, IfError, IsError, IsBlankOrError functions][28] |
Use Power Fx to set a variable
In this example, a Power Fx expression stores and outputs the customer's name in capital letters:
Create a workflow and add an Ask a question node.
On the pane that appears, in the Ask a question box, enter What is your name? or another message. In the Save user response as box, enter a variable name; for example,
Var01. Then select Done.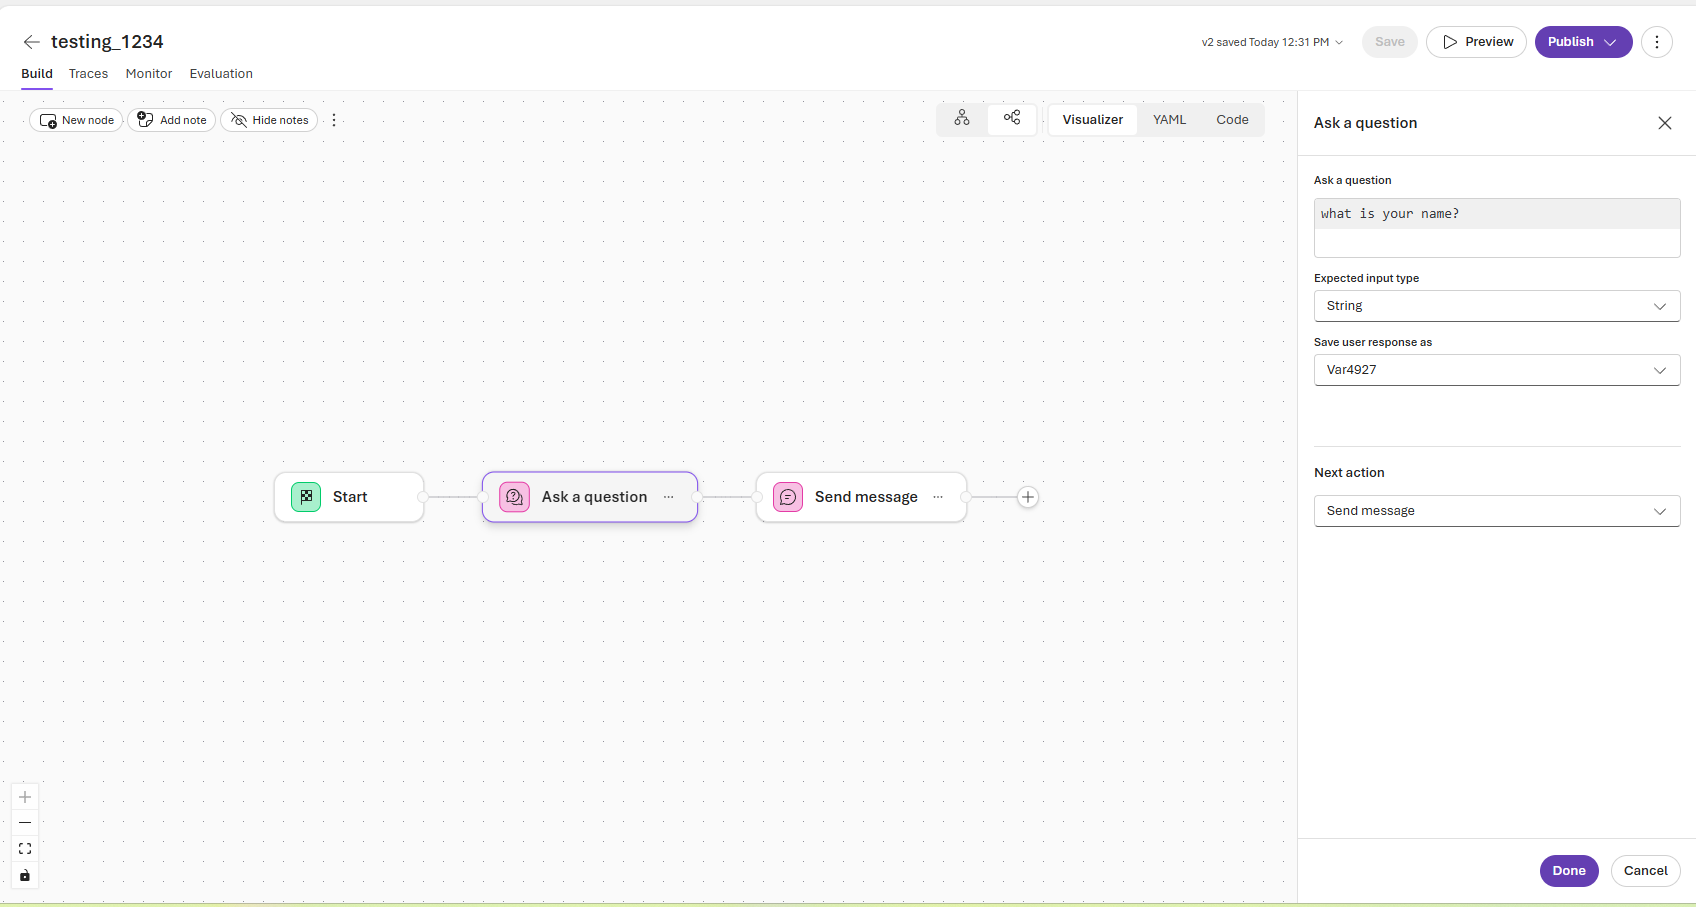
Add a Send message action. On the pane that appears, in the Message to send area, enter
{Upper(Local.Var01)}. Then select Done.
Select Preview.
On the preview pane, send a message to the agent to invoke the workflow.


Use Power Fx to create if/else flows
In this example, a Power Fx expression stores and outputs the customer's name in capital letters.
Create a workflow and add an Ask a question node.
Select the + icon and add an if/else flow.
Type
System.in the Condition text box to create a condition statement for each if/else combination.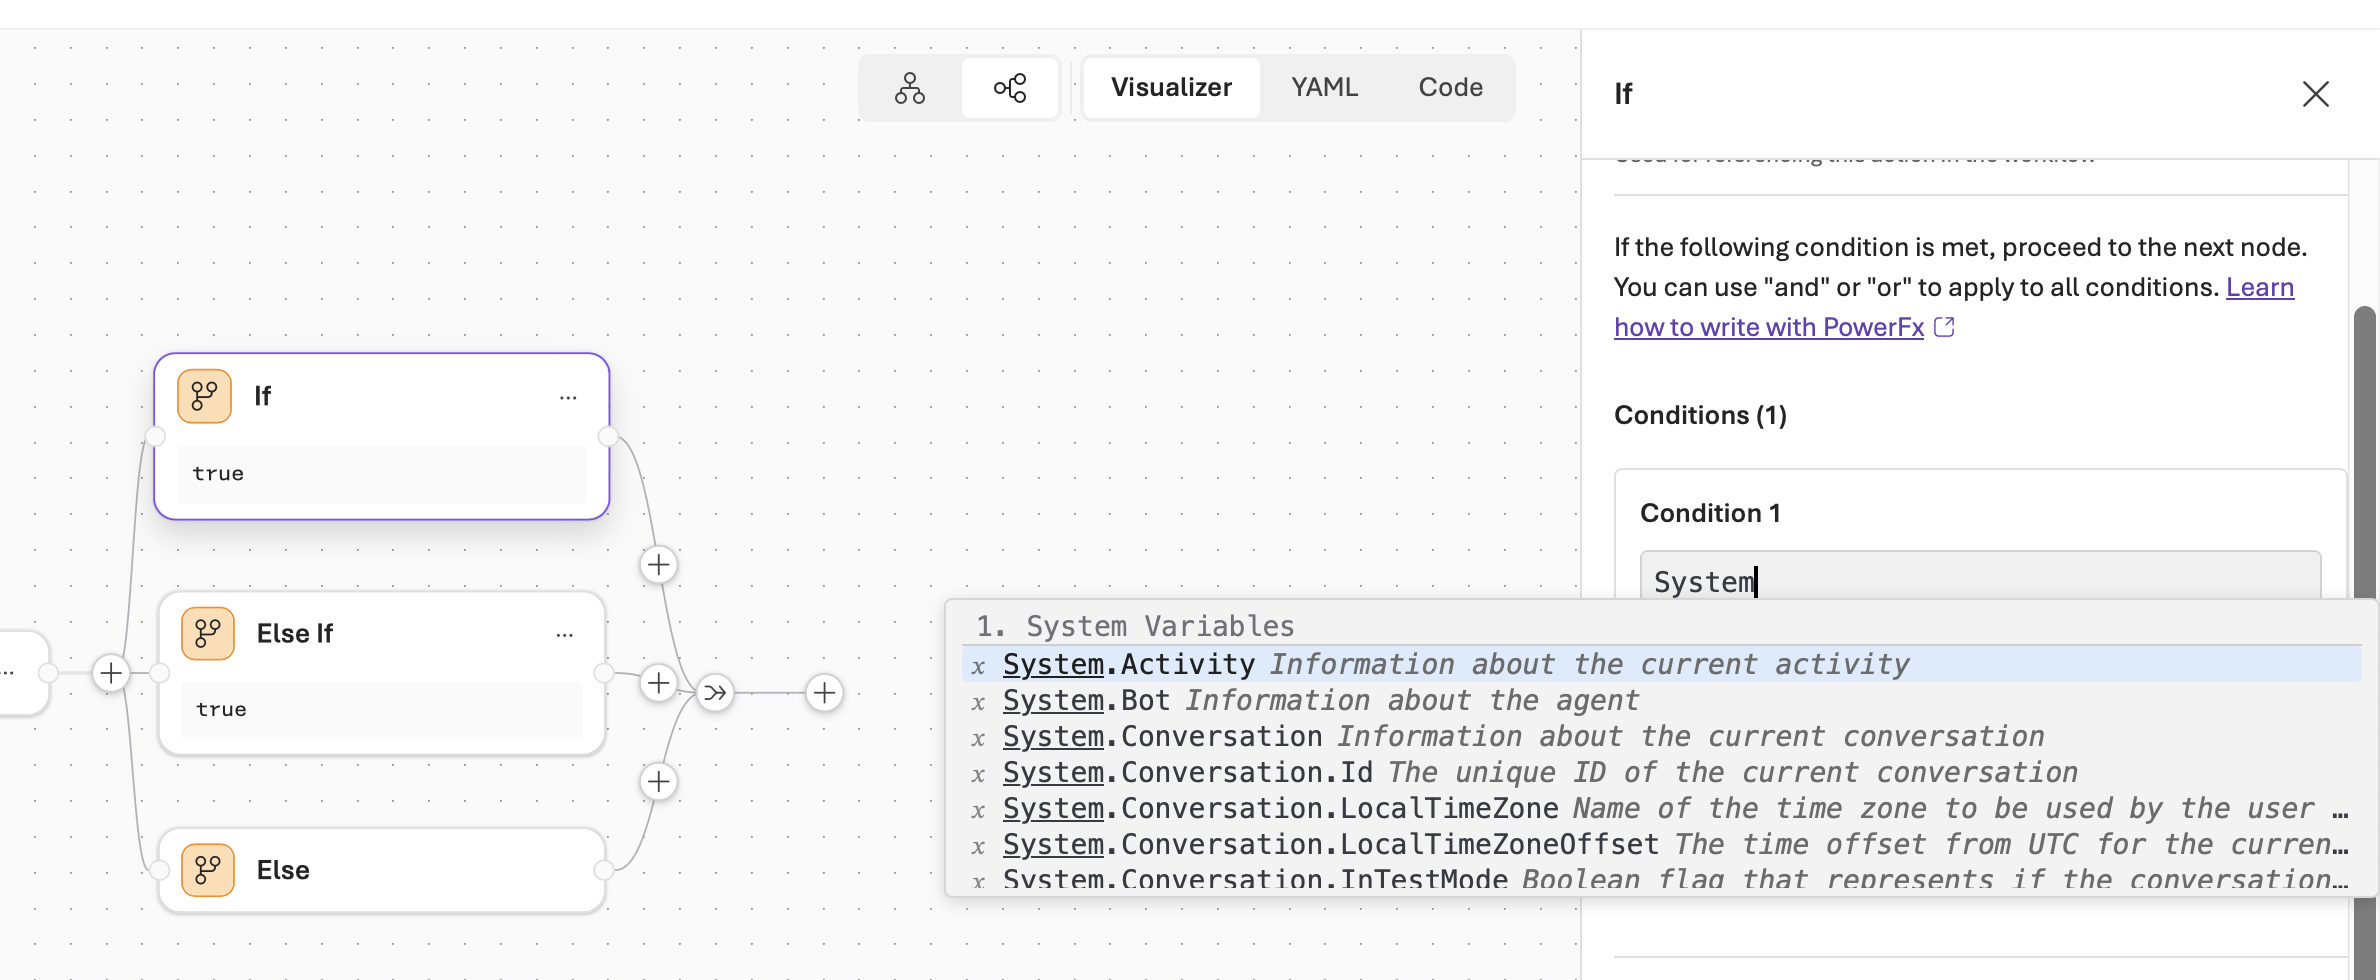
Select a Next Action for the next desired step in the workflow.
Select Done. Select Save to save your workflow
