Note
Access to this page requires authorization. You can try signing in or changing directories.
Access to this page requires authorization. You can try changing directories.
After you get started with the Microsoft Foundry for Visual Studio Code extension, use Foundry Agent Service to build agents. Agents are microservices that:
- Answer questions by using their training data or search other sources with retrieval-augmented generation (RAG).
- Perform specific actions.
- Automate complete workflows.
Agents combine AI models with tools to access and interact with your data.
Foundry developers can stay productive by developing, testing, and deploying agents in the familiar environment of Visual Studio Code (VS Code).
Important
Items marked (preview) in this article are currently in public preview. This preview is provided without a service-level agreement, and we don't recommend it for production workloads. Certain features might not be supported or might have constrained capabilities. For more information, see Supplemental Terms of Use for Microsoft Azure Previews.
Create and edit an Azure AI agent within the designer view
Follow these steps to create an Azure AI agent:
Deploy a model to use with your agent.
In the Foundry Extension view, find the Resources section.
Select the plus (+) icon next to the Agents subsection to create a new AI agent.

Interact with your agent in the designer
After you choose your save location, both the agent .yaml file and the designer view open so that you can edit your AI agent. Perform the following tasks in the agent designer:
In the prompt, enter a name for your agent.
In the dropdown list, select the name of your model deployment. The deployment name is what you chose when you deployed an existing model.
The extension generates the Id value. Configure the following fields:
- Add a description for your agent.
- Set system instructions.
- Configure tools for agent use.

To save the .yaml file, select File > Save on the VS Code menu bar.

Explore the Azure AI agent's .yaml definition
Your AI agent's .yaml file was opened at the same time that the designer was. This file contains the details and setup information for your agent. It's similar to the following .yaml file example:
# yaml-language-server: $schema=https://aka.ms/ai-foundry-vsc/agent/1.0.0
version: 1.0.0
name: my-agent
description: Description of the agent
id: ''
metadata:
  authors:
    - author1
    - author2
  tags:
    - tag1
    - tag2
model:
  id: 'gpt-4o-1'
  options:
    temperature: 1
    top_p: 1
instructions: Instructions for the agent
tools: []
Add tools to the Azure AI agent
Agent Service has the following set of tools that you can use to interact with your data sources. These tools are available in the Foundry for Visual Studio Code extension.
- Grounding with Bing search
- File search
- Code interpreter
- OpenAPI specified tools
- Model Context Protocol (MCP)
For more information about using MCP tools, see Work with Agent Service and MCP server tools in Visual Studio Code (preview).
Add a tool to the AI agent
In the designer, in the upper-right corner of the TOOL section, select Add tool. In the dropdown list, select the tool that you want to add.

The designer displays the appropriate pane to configure the tool, as shown in the following images:
Grounding with Bing search:

File search:

Code interpreter:

OpenAPI 3.0 specified tools:
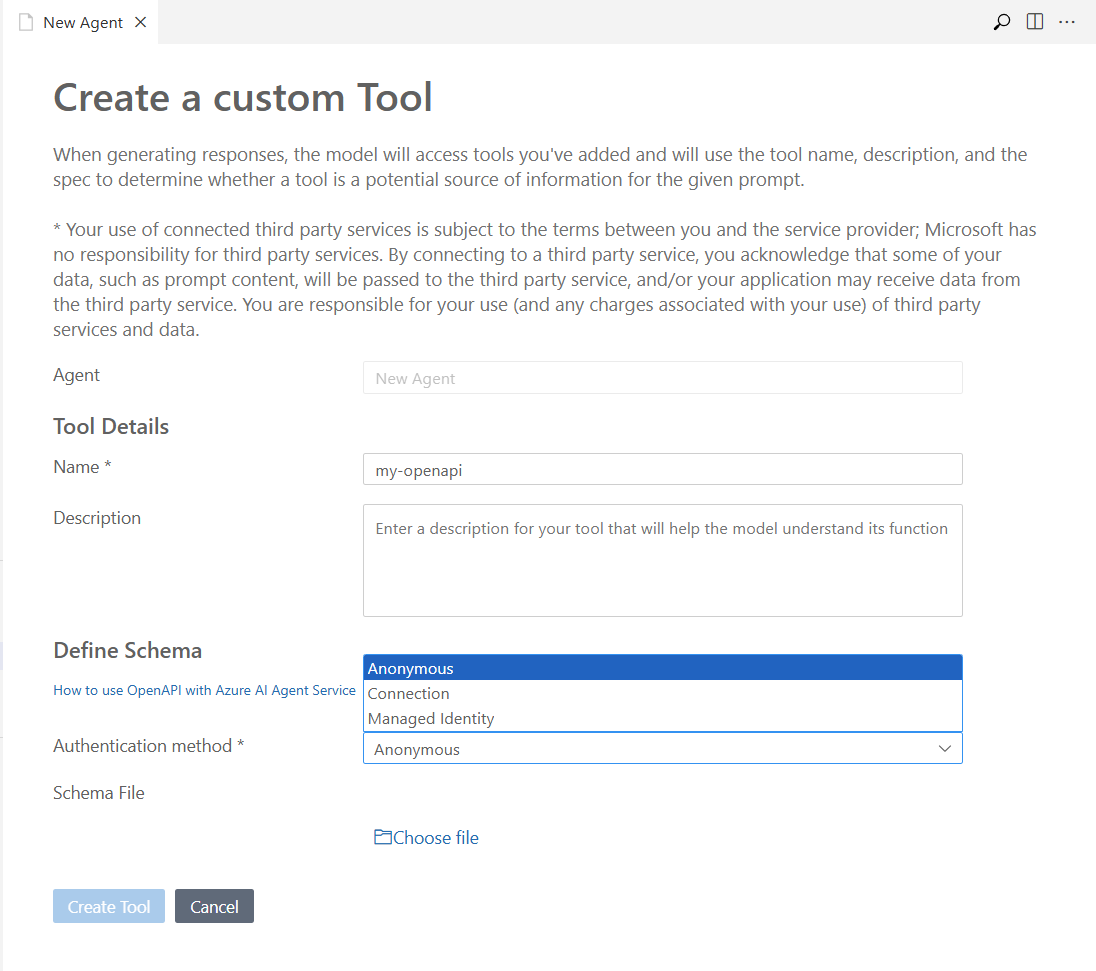
After you enter the required information, select Create and connect, Upload and save, or Create Tool. The button varies according to the pane.


When you add a tool, you can also add any new assets that it needs. For example, if you add a file search tool, you can use an existing vector store asset or make a new asset for your vector store to host your uploaded files.
Create an Azure AI agent on Foundry
Create your agent directly on Foundry by using the following steps:
In the designer, select the Create Agent on Foundry button.

In VS Code, refresh the Azure Resources view. The deployed agent appears in the Agents subsection.


View the details of the deployed AI agent
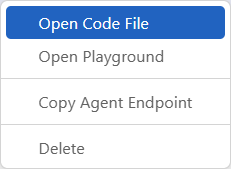
Selecting the deployed agent opens the AGENT PREFERENCES pane in a view-only mode. You can:
- Select the Edit Agent button to view the agent designer and the .yaml definition of the agent for editing.
- Select the Open Code File button to create a sample code file that uses the agent.
- Select the Open Playground button to open the agent playground.

Edit and update the deployed AI agent
On the AGENT PREFERENCES pane, select the Edit Agent button. The agent designer opens with the agent's .yaml file.
Edit the agent's configuration, such as the model, tools, and instructions.
After you finish editing, select the Update Agent on Foundry button to save your changes.

Create a sample code file
Right-click your deployed agent, and then select the Open Code File option. Or, on the AGENT PREFERENCES pane, select the Open Code File button.
In the Choose your preferred SDK dropdown list, select your preferred SDK for the agent code file, and then select the Enter key.

In the Choose a language dropdown list, select your preferred language for the agent code file, and then select the Enter key.

In the Choose an auth method dropdown list, select your preferred authentication method for the agent code file, and then select the Enter key.


Explore the sample code file
The following Python sample code file demonstrates a basic call to interact with the agent through the Foundry Projects API.

Interact with agents by using the agent playground
Right-click your deployed agent, and then select the Open Playground option.
Alternatively, select the Agent Playground link in the Tools subsection, and then select your agent from the dropdown list.
This step opens the Agent Playground pane and starts a thread with your agent so that you can send messages.

Enter your prompt and view the outputs.
This example uses Bing Grounding to illustrate a web search for information. The agent uses the model and tools that you configured in the agent designer. The source of the information appears in the section for agent annotations.


Explore threads
The Threads subsection displays the threads created during a run with your agent. In the Azure Resources view, expand the Threads subsection to view the list.

Keep these terms in mind as you explore threads:
A thread is a conversation session between an agent and a user. Threads store messages and automatically handle truncation to fit content into a model's context.
A message is a single interaction between the agent and the user. Messages can include text, images, and other files. Messages are stored as a list on the thread.
A run is a single execution of an agent. Each run can have multiple threads, and each thread can have multiple messages. The agent uses its configuration and a thread's messages to perform tasks by calling models and tools. As part of a run, the agent appends messages to the thread.
View thread details
To view the THREAD DETAILS pane, select a thread.

View run details
To view run information in a JSON file, select the View run info button on the THREAD DETAILS pane. The following screenshot shows an example JSON file.

Clean up resources
The Azure resources that you created in this article are billed to your Azure subscription. If you don't expect to need these resources in the future, delete them to avoid incurring more charges.
Delete your agents
Tip
Because you can customize the left pane in the Microsoft Foundry portal, you might see different items than shown in these steps. If you don't see what you're looking for, select ... More at the bottom of the left pane.
- In VS Code, refresh the Azure Resources view. Expand the Agents subsection to display the list of deployed agents.
- Right-click the deployed agent that you want to delete, and then select Delete.
Delete your models
In VS Code, refresh the Azure Resources view. Expand the Models subsection to display the list of deployed models.
Right-click the deployed model that you want to delete, and then select Delete.


Delete your connected tools
Open the Azure portal.
Select the Azure resource group that contains the tool.
Select the Delete button.
Related content
- Learn about the tools that you can use with Azure AI agents, such as file search or code interpreter.