Note
Access to this page requires authorization. You can try signing in or changing directories.
Access to this page requires authorization. You can try changing directories.
In this guide, we walk you through configuring your Azure AI resources and permissions for Microsoft Foundry tasks. We present two options:
Option 1: Configure a Foundry resource. Foundry offers a unified environment for building generative AI applications and using Foundry Tools. All essential tools are together in one environment for all stages of AI app development.
Option 2: Configure Azure Language in Foundry Tools and Azure OpenAI resources. Azure OpenAI allows users to access OpenAI's language models within the Azure platform, providing security, regulatory compliance, and integration with other Azure services.
Completing these setups is essential for fully integrating your environment with Foundry Tools. You only need to perform this setup once—afterward, you have seamless access to advanced, AI-powered conversational language understanding capabilities.
In addition, we show you how to assign the correct roles and permissions within the Azure portal. These steps help you get started quickly and effectively with Azure Language in Foundry Tools.
Prerequisites
Before you can set up your resources, you need:
An active Azure subscription. If you don't have one, you can create one for free.
Requisite permissions. Make sure the person establishing the account and project is assigned as the Azure AI Account Owner role at the subscription level. Alternatively, having either the Contributor or Cognitive Services Contributor role at the subscription scope also meets this requirement. For more information, see Role based access control (RBAC).
A Foundry resource or an Azure Language resource.
An Azure OpenAI resource (optional but required for option 2)
Note
We highly recommend that you use a Foundry resource in the Foundry; however, you can also follow these instructions using a Language resource.
Option 1: Configure a Foundry resource
Foundry offers a unified platform for building, managing, and deploying AI solutions with a wide array of models and tools. With this integration, you gain access to features like Quick Deploy for rapid model fine-tuning and suggest utterances to expand your training data with generative AI. New features are continually added, making Foundry is the recommended choice for scalable solutions.
Navigate to the Azure portal.
Go to your Foundry resource (select All resources to locate your resource).
Next, select Access Control (IAM) on the left panel, then select Add role assignment.

Search and select the Cognitive Services User role. Select Next.

Navigate to the Members tab and then select Managed Identity.

Choose Select members, then in the right panel, search for and choose your Foundry resource (the one you're using for this project), and choose Select.
Finally, select Review + assign to confirm your selection.
Your resources are now set up properly. Proceed with initializing the fine-tuning process and optimizing your AI models and solutions for advanced customization and deployment.
Option 2: Configure Azure Language resource and Azure OpenAI resources
Azure OpenAI is a cloud-based solution that brings the advanced capabilities of OpenAI's language models to the Azure platform. With this service, you can easily incorporate natural language processing features into your applications without extensive AI or machine learning expertise.
Step 1: Assign the correct role to the Azure OpenAI resource
Navigate to the Azure portal.
Go to your Azure OpenAI resource. (select All resources to locate your resource).
Next, select Access Control (IAM) on the left panel, then select Add role assignment.
Search and select the Cognitive Services User role, then select Next.
Navigate to the Members tab and then select Managed Identity.
Select Select members, then in the right panel, search for and choose your Foundry resource (the one you're using for this project), and choose Select.
Finally, select Review + assign to confirm your selection.
Step 2: Configure connections in Foundry
Foundry offers a unified platform where you can easily build, manage, and deploy AI solutions using a wide range of models and tools. Connections enable authentication and access to both Microsoft and external resources within your Foundry projects.
Sign into Foundry using your account and required subscription. Then, select the project containing your desired Foundry resource.
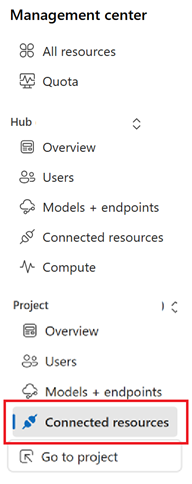
Next, navigate to the Management Center in the bottom left corner of the page.
Scroll to the Connected resources section of the Management center.
Select the + New connection button.

In the new window, select Azure Language as the resource type, then find your Azure Language resource.
Select Add connection in the corner of your selected Azure Language resource.
Select Azure OpenAI as the resource type, then find your desired Azure OpenAI resource.
Ensure Authentication is set to API key.
Select Add connection, then select Close.

Import an existing Foundry project
Foundry allows you to connect to your existing Foundry Tools resources. This means you can establish a connection within your Foundry project to the Azure Language resource where your custom models are stored.
To import an existing Foundry Tools project with Foundry, you need to create a connection to the Foundry Tools resource within your Foundry project. For more information, see Connect Foundry Tools projects to Foundry
Export a project
You can download a project as a config.json file:
Navigate to your project home page.
At the top of the page, select your project from the right page ribbon area.
Select Download config file.

That's it! Your resources are now set up properly. Continue with setting up the fine-tuning task and customizing your CLU project.