Note
Access to this page requires authorization. You can try signing in or changing directories.
Access to this page requires authorization. You can try changing directories.
A Power Automate connector is now available for interacting with Azure confidential ledger. This article explains how to build a workflow that adds an entry into a confidential ledger instance and saves the transaction ID in Azure Cosmos DB.
Prerequisites
- A confidential ledger instance. To create an instance, follow the steps in Create an Azure confidential ledger instance.
- A Power Automate Premium user license.
- The Azure CLI (optional).
Locate the Azure confidential ledger connector
Search for the confidential ledger connector in the Power Automate connectors list. To create a workflow, use the available actions.

Initial setup
Before you create actions in Power Automate, ensure that you have the necessary permissions and access to the confidential ledger instance. You need to configure authentication and authorization settings to allow Power Automate to interact with your ledger.
Currently, Power Automate supports only Microsoft Entra ID token-based user authentication with confidential ledger.
The connector performs read and write operations by using a user or service principal that has appropriate permission in the ledger. A unique object identifier (OID) identifies the service principal. Use the following command to get the OID. It's used in the following step to grant appropriate permission in the ledger.
az ad user show --id user@example.com --query id --output tsv
Depending on the workflow requirement, assign either a Reader or Contributor role to the service principal in the ledger. To assign a role, follow the next steps.
To validate change, go to the Azure portal. Select the confidential ledger instance, and then select Operations > Manage users (preview).

Use a confidential ledger connector in a workflow
- Sign in to the Power Automate platform.
- On the left pane, select Create.
- Choose either Automated cloud flow or Instant cloud flow.
- Select Create to start building the flow.
- In the flow editor, select New step to add an action.
- Search for Azure confidential ledger in the action search bar. Select the action that you want, such as Add Entry to Ledger.
- Configure the action by providing the necessary details like the ledger URL and entry data.
- Select Save to save the changes.
- Test your flow to ensure that it works as expected.
Supported actions
The confidential ledger connector supports the following actions.
Create a ledger entry
Write a ledger entry.
- Operation ID:
CreateLedgerEntry - Parameters:
- Ledger name: The name of your confidential ledger instance.
- Collection ID (optional): The collection where you want to add the entry.
- Entry contents: The data to be stored in the ledger entry (string format).
- Returns:
- Collection ID: The collection where the entry was stored.
- Transaction ID: Unique identifier for the transaction (returned in the response header
x-ms-ccf-transaction-id).

Get a ledger entry
Get a ledger entry by its transaction ID.
- Operation ID:
GetLedgerEntry - Parameters:
- Ledger name: The name of your confidential ledger instance.
- Transaction ID: The transaction ID of the entry to retrieve.
- Collection ID (optional): The collection ID from which to fetch the value.
- Returns:
- State: The query state (Loading or Ready).
- Entry: The ledger entry data (available only if the state is Ready).
- Contents: Contents of the ledger entry.
- Collection ID: The collection ID to which the entries belong.
- Transaction ID: The transaction ID.

Get the current ledger entry
Get the most recent ledger entry from a collection.
- Operation ID:
GetCurrentLedgerEntry - Parameters:
- Ledger name: The name of your confidential ledger instance.
- Collection ID (optional): The collection ID that corresponds to the entry.
- Returns:
- Contents: Contents of the most recent ledger entry.
- Collection ID: The collection ID to which the entries belong.
- Transaction ID: The transaction ID of the current entry.

List ledger entries
Get ledger entries by collection and range.
- Operation ID:
ListLedgerEntries - Parameters:
- Ledger name: The name of your confidential ledger instance.
- Collection ID (optional): The collection ID to which the entries belong.
- From transaction ID (optional): The starting transaction ID in the range.
- To transaction ID (optional): The ending transaction ID in the range.
- Returns:
- State: The query state (Loading or Ready).
- Entries: A collection of entries within the specified transaction ID range.
- Next link: A continuation link to retrieve the remaining entries.

Get a receipt
Get a cryptographic receipt for a transaction by transaction ID.
- Operation ID:
GetReceipt - Parameters:
- Ledger name: The name of your confidential ledger instance.
- Transaction ID: The transaction ID that corresponds to the receipt.
- Returns:
- State: The query state (Loading or Ready).
- Transaction ID: The transaction ID.
- Receipt: A cryptographic receipt containing:
- Node ID: Identifier of the node that processed the transaction.
- Signature: Digital signature.
- Proof: Cryptographic proof elements.
- Certificate: Node certificate.

Get the transaction status
Get the status of a transaction by transaction ID.
- Operation ID:
GetTransactionStatus - Parameters:
- Ledger name: The name of your confidential ledger instance.
- Transaction ID: The transaction ID to check.
- Returns:
- State: Transaction state (Committed or Pending).
- Transaction ID: The transaction ID.

Example workflow: Add an entry and store the transaction ID
The following section demonstrates how to use the connector to write a ledger entry.
Scenario
Create a workflow that:
- Adds a new entry to confidential ledger.
- Stores the transaction ID in Azure Cosmos DB for reference.
Workflow steps
Choose your preferred trigger (manual, scheduled, or event-based).
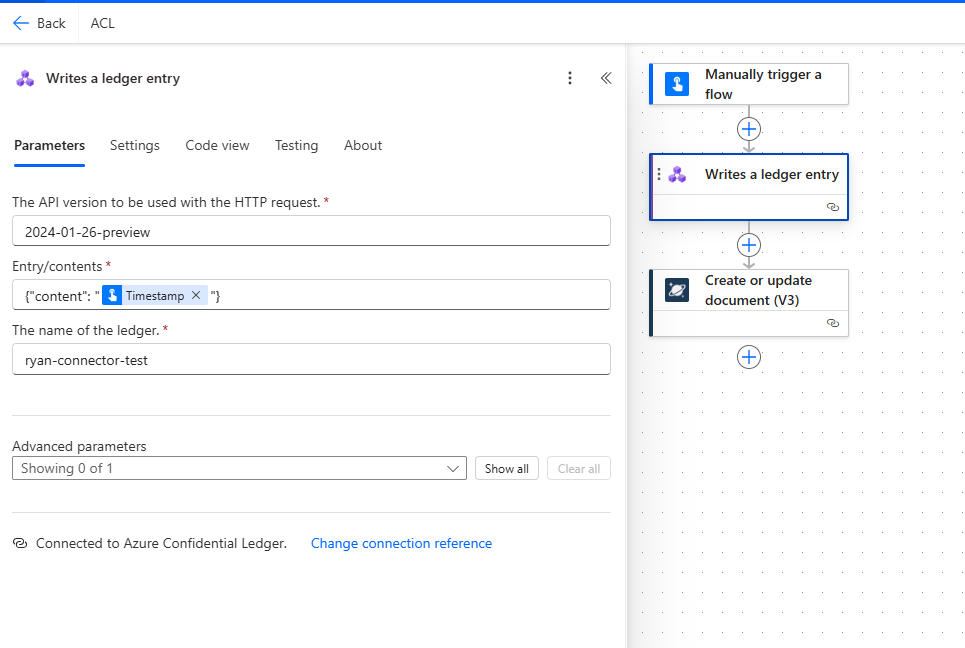
Create a ledger entry action:
Ledger name: Use
your-ledger-name(not the full URL, just the name).Collection ID: Use
audit-logs(optional: leave empty for default collection).Entry contents: Use the following command:
{"content": "entry_data_here"}
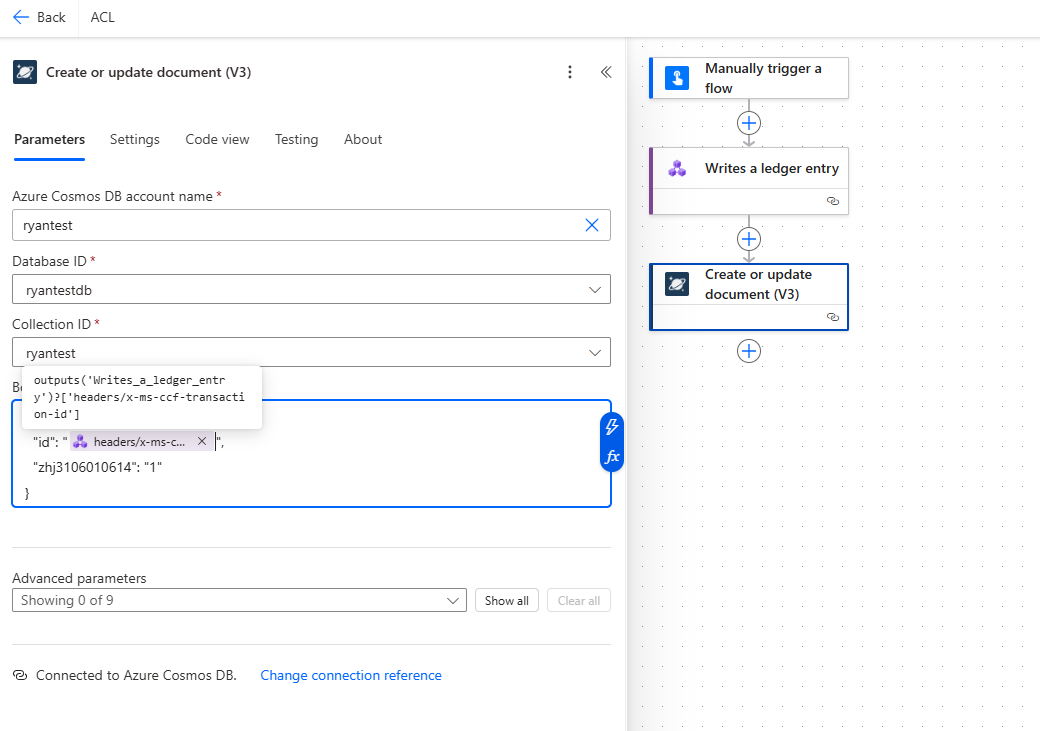
Parse the JSON action (to extract transaction ID from headers):
- Use
outputs('Create_Ledger_Entry')['headers']['x-ms-ccf-transaction-id']to get the transaction ID.
- Use
Store in the Azure Cosmos DB action:
- Use the parsed transaction ID from the previous step.
- Store it along with relevant metadata for future reference.
- For detailed information about the Azure Cosmos DB connector, see Azure Cosmos DB connector documentation.


Example entry content formats
The entry content must be a string with a specific JSON structure that contains a "content" field. Here are some common patterns:
JSON as string:
{"content": "{\"event\": \"user_login\", \"oid\": \"12345\", \"timestamp\": \"@{utcNow()}\"}"}
Plain text content:
{"content": "User login event for user @{variables('oid')} at @{utcNow()}"}
Base64 encoded data:
{"content": "@{base64(variables('binaryData'))}"}
Related content
- Learn more about Azure confidential ledger concepts.
- Explore authentication options for advanced scenarios.
- Review best practices for production workflows.