Note
Access to this page requires authorization. You can try signing in or changing directories.
Access to this page requires authorization. You can try changing directories.
Azure DevOps Services | Azure DevOps Server | Azure DevOps Server 2022
When you create a new project in Azure DevOps, you choose a process to tailor its components such as work item types and states to your team's specific needs. Built-in processes include Basic, Agile, Scrum, and CMMI. For more information, see About processes and process templates.
The Agile process has several advantages.
- More work item types. In the Agile process, you can create work items specifically for tracking code defects or bugs. The separate work item type lets you manage bugs independently from other work items like user stories and tasks.
- More workflow states. Agile has more and different workflow states, such as Active and Resolved. These states help you align with Agile principles and manage work items more effectively.
- More portfolio backlogs. Agile provides access to both Epic and Feature portfolio backlogs. Portfolio backlogs let you organize and prioritize work items at a higher level, making it easier to plan and manage your overall project.
- Customizable inherited process. You can customize and adopt an inherited process based on Agile principles. If your organization requires Agile, a customized Agile process lets you tailor the process to your team's needs while ensuring compliance with Agile practices.
You can switch between processes for existing projects. This article describes how to transition a project process from Basic to an inherited Agile process.
Prerequisites
| Category | Requirements |
|---|---|
| Permissions | - To create, delete, or edit a process: Member of the Project Collection Administrators group or specific collection-level permissions Create process, Delete process, Edit process, or Delete a field from organization. For more information, see Set permissions and access for work tracking, Customize an inherited process. - To update boards: Team Administrator or a member of the Project Administrators group. |
| Access | - Even if you have Basic or lower access, you can still change a process if someone gives you permissions to do so. - To update and change the type of your existing work items: Project member. |
Learn about the Agile process
Before you change your process, you should learn about the new process you're switching to. The Basic and Agile processes have some of the same work item types, like Task and Epic, but most values for the State and Reason fields are different. The following chart shows the different work item types and workflows between the Basic and Agile processes.
| Process | Work item types | Workflow |
|---|---|---|
| Basic | 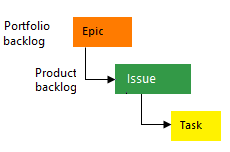 |
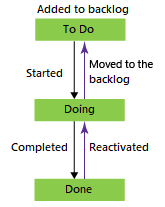 |
| Agile | 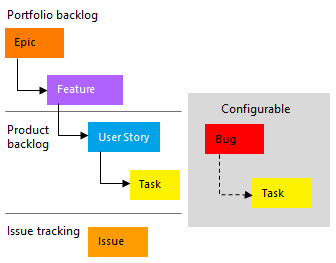 |
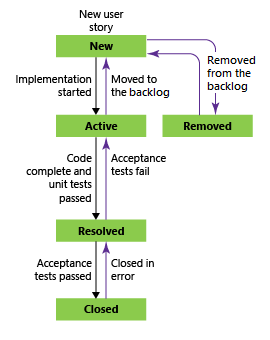 |
Change the process
To access project processes, select Organization settings from the left navigation menu of your Azure DevOps organization, and then select Process under Boards.

To access project processes, select Collection settings from the left navigation menu of your Azure DevOps organization, and then select Process under Boards.

To change the process for your Basic project to Agile:
On the All processes page, select Basic.

On the Basic page, select the Projects tab.
Select the More actions icon next to the project you want to change and select Change process.

Choose Agile from the dropdown menu, and then select Save.

When the process change completes successfully, the following screen appears. Review the steps about manually updating your work items and board settings and then select Close.

If the project has existing work items, manually update work items and board settings as described in the following sections.
- Update the column-to-state mapping for each team board.
- Update existing work items using the work item types set by the target process.
- Update existing work items using the correct state model for the target process.
Update board column-to-state settings
To update the board column-to-state mapping, follow these steps. For more information, see Plan and track work in Azure Boards.
In the changed project, open your team board by selecting Boards > Boards.
If your team board already had items in the old process, you see an error message that the columns aren't valid and the board can't be displayed. Select the Correct this now link or select the Settings icon.
On the Settings page under Boards, Columns displays an error icon, and each column shows an error for User story under State mapping.

Rename each of the columns to a valid Agile state name under Column name, and choose the correct column-to-state mapping under State mapping. For example, rename To Do to New and change the state mapping to New.
After you correct all columns, select Save. For more information, see Manage columns on your board.
Note
You can customize boards to add more columns or rearrange columns as needed. For each column added, you must choose a valid workflow state for the work item type to display on the board. For more information, see Workflow states and state categories.
Update work items
Update existing backlog work items to use the new work item types and states. For more information about bulk editing work items, see Bulk edit work items and Bulk add and modify work items in Excel.
Create a query to get a list of all work items in the project.
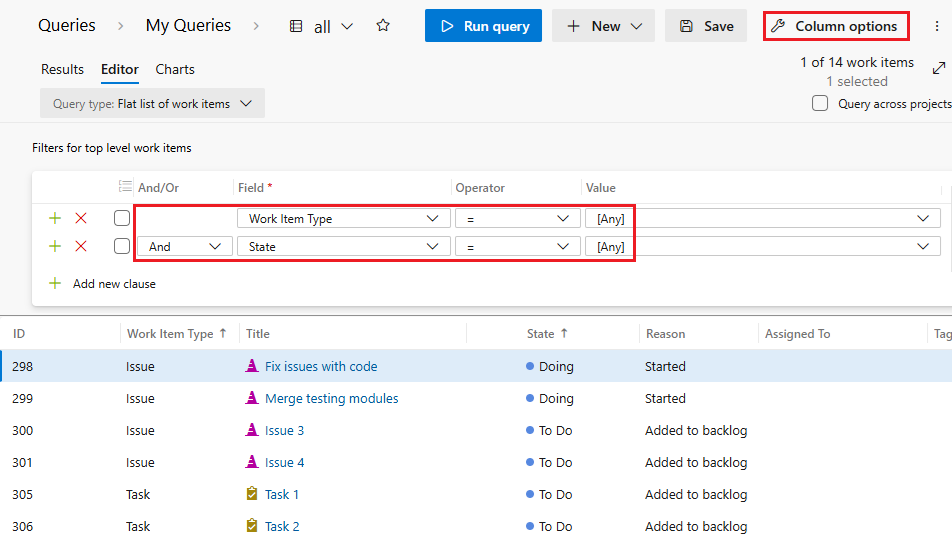
In the query editor, select Column options and make sure the State and Reason fields appear.
Select the Sorting tab of the Column options screen and set it to sort the list by Work item type and State. Select OK.

To change work items to types supported in Agile, on the query Results tab, shift-select to highlight all Issues. Select the More actions icon next to one of the highlighted items, and select Change type.

On the Change work item type screen, select User Story from the dropdown list and then select OK.

Because the User story work item type and states like To Do or Doing are mismatched, errors appear on the list and you can't save your changes.

Shift-select to highlight all work items with a mismatched state such as Doing, select the More actions icon next to one of the items, and select Edit from the context menu.
On the Edit work items screen, select the State field, select a valid state such as Active for the value, and then select OK.

Repeat these steps to change items with the Done state to Closed and items with the To Do state to New.
Select Save items to save your changes.
Verify your changes
Go to your team backlog and review the user stories.
If you want to change any user stories to bugs, select the More actions icon next to the user story, select Change type, select Bug, and then select OK.

If you want to show and manage bugs along with user stories on backlogs and boards, select the Backlog page Settings icon, scroll down to the Working with bugs section, select Bugs are managed with requirements, and select Save.
Bugs now appear along with user stories on your team backlog and board. For more information, see Show bugs on backlogs and boards.
Select View as Board to go to your team board and verify that the column settings are valid and all user stories and bugs appear correctly.
