Note
Access to this page requires authorization. You can try signing in or changing directories.
Access to this page requires authorization. You can try changing directories.
Applies to: Azure Logic Apps (Consumption + Standard)
When you exchange XML content with a trading partner in a business-to-business (B2B) integration, you must often encode the content before you send it. When you receive encoded XML content, you must decode that content before you can use it.
This guide shows how to encode and decode XML in your workflows by using the Flat File built-in connector actions and a flat file schema.
Connector technical reference
The Flat File encoding and decoding actions are available for Consumption logic app workflows and Standard logic app workflows.
| Logic app | Environment |
|---|---|
| Consumption | Multitenant Azure Logic Apps |
| Standard | Single-tenant Azure Logic Apps, App Service Environment v3 (Windows plans only), and hybrid deployment |
For more information, see Integration account built-in connectors.
Prerequisites
An Azure account and subscription. Get a free Azure account.
The logic app resource and workflow where you want to use the Flat File operations.
Flat File operations don't include any triggers. Your workflow can start with any trigger or use any action to bring in the source XML.
The examples in this article use the Request trigger named When an HTTP request is received.
For more information, see:
An integration account resource to define and store artifacts for enterprise integration and B2B workflows.
Both your integration account and logic app resource must exist in the same Azure subscription and Azure region.
Before you start working with Flat File operations, you must link your Consumption logic app or link your Standard logic app to the integration account for working with artifacts such as trading partners and agreements. You can link an integration account to multiple Consumption or Standard logic app resources to share the same artifacts.
Tip
If you're not working with B2B artifacts such as trading partners and agreements in Standard workflows, you might not need an integration account. Instead, you can upload schemas directly to your Standard logic app resource. Either way, you can use the same schema across all child workflows in the same logic app resource. To use the same schema across multiple logic app resources, you must use and link an integration account.
A flat file schema that specifies how to encode or decode XML content.
In Standard workflows, Flat File operations let you select a schema from a linked integration account or that you previously uploaded to your logic app, but not both.
For more information, see Add schemas to integration accounts.
Install or use a tool that can send HTTP requests to test your solution, for example:
- Visual Studio Code with an extension from Visual Studio Marketplace
- PowerShell Invoke-RestMethod
- Microsoft Edge - Network Console tool
- Bruno
- curl
Caution
For scenarios where you have sensitive data, such as credentials, secrets, access tokens, API keys, and other similar information, make sure to use a tool that protects your data with the necessary security features. The tool should work offline or locally, and not require sign in to an online account or sync data to the cloud. When you use a tool with these characteristics, you reduce the risk of exposing sensitive data to the public.
Limitations
XML content that you want to decode must be encoded in UTF-8 format.
In your flat file schema, make sure the contained XML groups don't have excessive numbers of the
max countproperty set to a value greater than 1. Avoid nesting an XML group with amax countproperty value greater than 1 inside another XML group with amax countproperty greater than 1.When Azure Logic Apps parses the flat file schema, and when the schema allows the choice of the next fragment, Azure Logic Apps generates a symbol and a prediction for that fragment. If the schema allows too many constructs, for example, more than 100,000, the schema expansion becomes very large, which consumes too much resources and time.
Upload schema
After you create your schema, upload the schema based on your workflow:
Consumption: Add schemas to integration accounts for Consumption workflows
Standard: Add schemas to integration accounts for Standard workflows
Add a flat file encoding action
In the Azure portal, open your logic app resource.
In the designer, open your workflow.
If your workflow doesn't have a trigger or any other actions that your workflow needs, add those operations first.
This example uses the Request trigger named When an HTTP request is received. To add a trigger, see Add a trigger to start your workflow.
In the designer, follow these general steps to add the built-in action named Flat File Encoding.
The action information pane opens with the Parameters tab selected.
In the action's Content parameter, provide the XML content to encode, which is either output from the trigger or from a previous action, by following these steps:
Select inside the Content box, then select the lightning icon to open the dynamic content list.
From the dynamic content list, select the XML content to encode.
The following example shows the opened dynamic content list, the output from the When an HTTP request is received trigger, and the selected Body content from the trigger output.

Note
If Body doesn't appear in the dynamic content list, next to the When an HTTP request is received section label, select See more. You can also directly enter the content to encode in the Content box.
From the Schema Name list, select your schema.
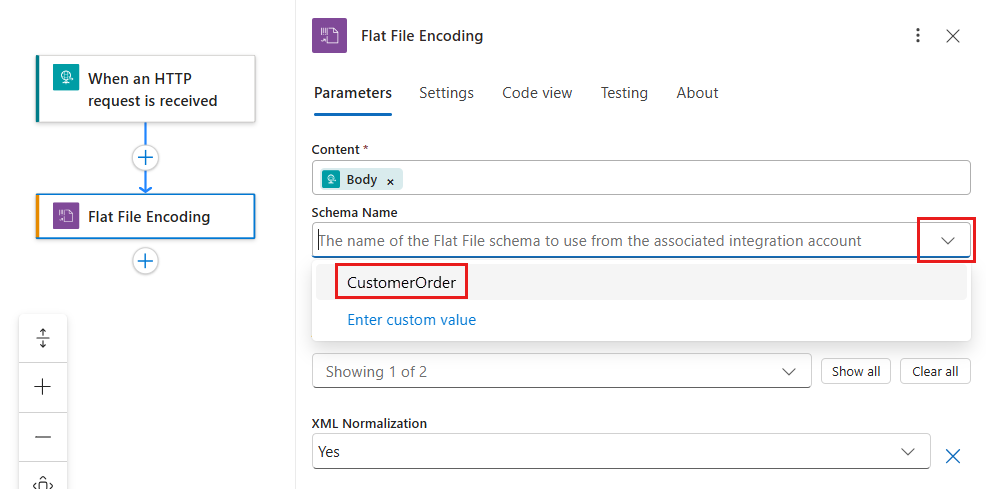
Note
If the schema list is empty, the cause might be:
- The logic app resource isn't linked to an integration account.
- The linked integration account doesn't contain any schema files.
- The logic app resource doesn't contain any schema files. This reason applies only to Standard logic apps.
To add other optional parameters to the action, select those parameters from the Advanced parameters list.
Parameter Value Description Mode of empty node generation ForcedDisabled or HonorSchemaNodeProperty or ForcedEnabled The mode to use for empty node generation with flat file encoding.
For BizTalk, the flat file schema has a property that controls empty node generation. You can follow the empty node generation property behavior for your flat file schema. Alternatively, you can use this setting to have Azure Logic Apps generate or omit empty nodes. For more information, see Tags for empty elements.XML Normalization Yes or No The setting to enable or disable XML normalization in flat file encoding. For more information, see XmlTextReader.Normalization. Save your workflow. On the designer toolbar, select Save.


Add a flat file decoding action
In the Azure portal, open your logic app resource.
In the designer, open your workflow.
If your workflow doesn't have a trigger or any other actions that your workflow needs, add those operations first.
This example uses the Request trigger named When an HTTP request is received. To add a trigger, see Add a trigger to start your workflow.
In the designer, follow these general steps to add the built-in action named Flat File Decoding.
In the action's Content parameter, provide the XML content to decode, either as output from the trigger or from a previous action by following these steps:
Select inside the Content box, then select the lightning icon to open the dynamic content list.
From the dynamic content list, select the XML content to decode.
The following example shows the opened dynamic content list, the output from the When an HTTP request is received trigger, and the selected Body content from the trigger output.

Note
If Body doesn't appear in the dynamic content list, select See more next to the When an HTTP request is received section label. You can also directly enter the content to decode in the Content box.
From the Schema Name list, select your schema.

Note
If the schema list is empty, the cause might be:
- The logic app resource isn't linked to an integration account.
- The linked integration account doesn't contain any schema files.
- The logic app resource doesn't contain any schema files. This reason applies only to Standard logic apps.
Save your workflow. On the designer toolbar, select Save.


You're now done with setting up your flat file decoding action. In a real world app, you might want to store the decoded data in a line-of-business (LOB) app, such as Salesforce. Or, you can send the decoded data to a trading partner. To send the output from the decoding action to Salesforce or to your trading partner, use the other connectors available in Azure Logic Apps:
Test your workflow
To trigger your workflow, follow these steps:
In the Request trigger, find the HTTP POST URL parameter, and copy the URL.
Open your HTTP request tool and use its instructions to send an HTTP request to the copied URL, including the method that the Request trigger expects.
This example uses the
POSTmethod with the URL.Include the XML content that you want to encode or decode in the request body.
After your workflow finishes running, go to the workflow's run history, and examine the Flat File action's inputs and outputs.