Note
Access to this page requires authorization. You can try signing in or changing directories.
Access to this page requires authorization. You can try changing directories.
This article describes how to create an Azure VMware Solution assessment for on-premises VMs in a VMware vSphere environment with Azure Migrate: Discovery and assessment.
Azure Migrate helps you to migrate to Azure. Azure Migrate provides a centralized hub to track discovery, assessment, and migration of on-premises infrastructure, applications, and data to Azure. The hub offers Azure Migrate tools for assessment and migration, along with partner independent software vendor (ISV) offerings.
Before you start
- Create an Azure Migrate project.
- Discover your on-premises inventory data using any of the following approaches:
- Import your RVTools XLSX file OR
- Import the server metadata in comma-separated values (CSV) format OR
- Set up an Azure Migrate appliance for VMware vSphere, which discovers the on-premises servers, and sends metadata and performance data to Azure Migrate: Discovery and assessment. Learn more.
Azure VMware Solution (AVS) Assessment overview
There are two types of sizing criteria that you can use to create Azure VMware Solution (AVS) assessments:
| Assessment | Details | Data |
|---|---|---|
| Performance-based | For RVTools and CSV file-based assessments and performance-based assessments, the assessment considers the utilized storage by each VM. For appliance-based assessments, the assessment considers the CPU & memory utilization data of each VM. | Recommended Node size: Based on CPU and memory utilization data along with node type, storage type, and storage policies that you select for the assessment. |
| As on-premises | Assessments based on on-premises VM's resource allocation. | Recommended Node size: Based on the on-premises server size along with the node type, storage type, and storage policies that you select for the assessment. |
Note
Azure VMware Solution (AVS) assessment can be created for virtual machines in VMware vSphere environment only.
Run an Azure VMware Solution (AVS) assessment
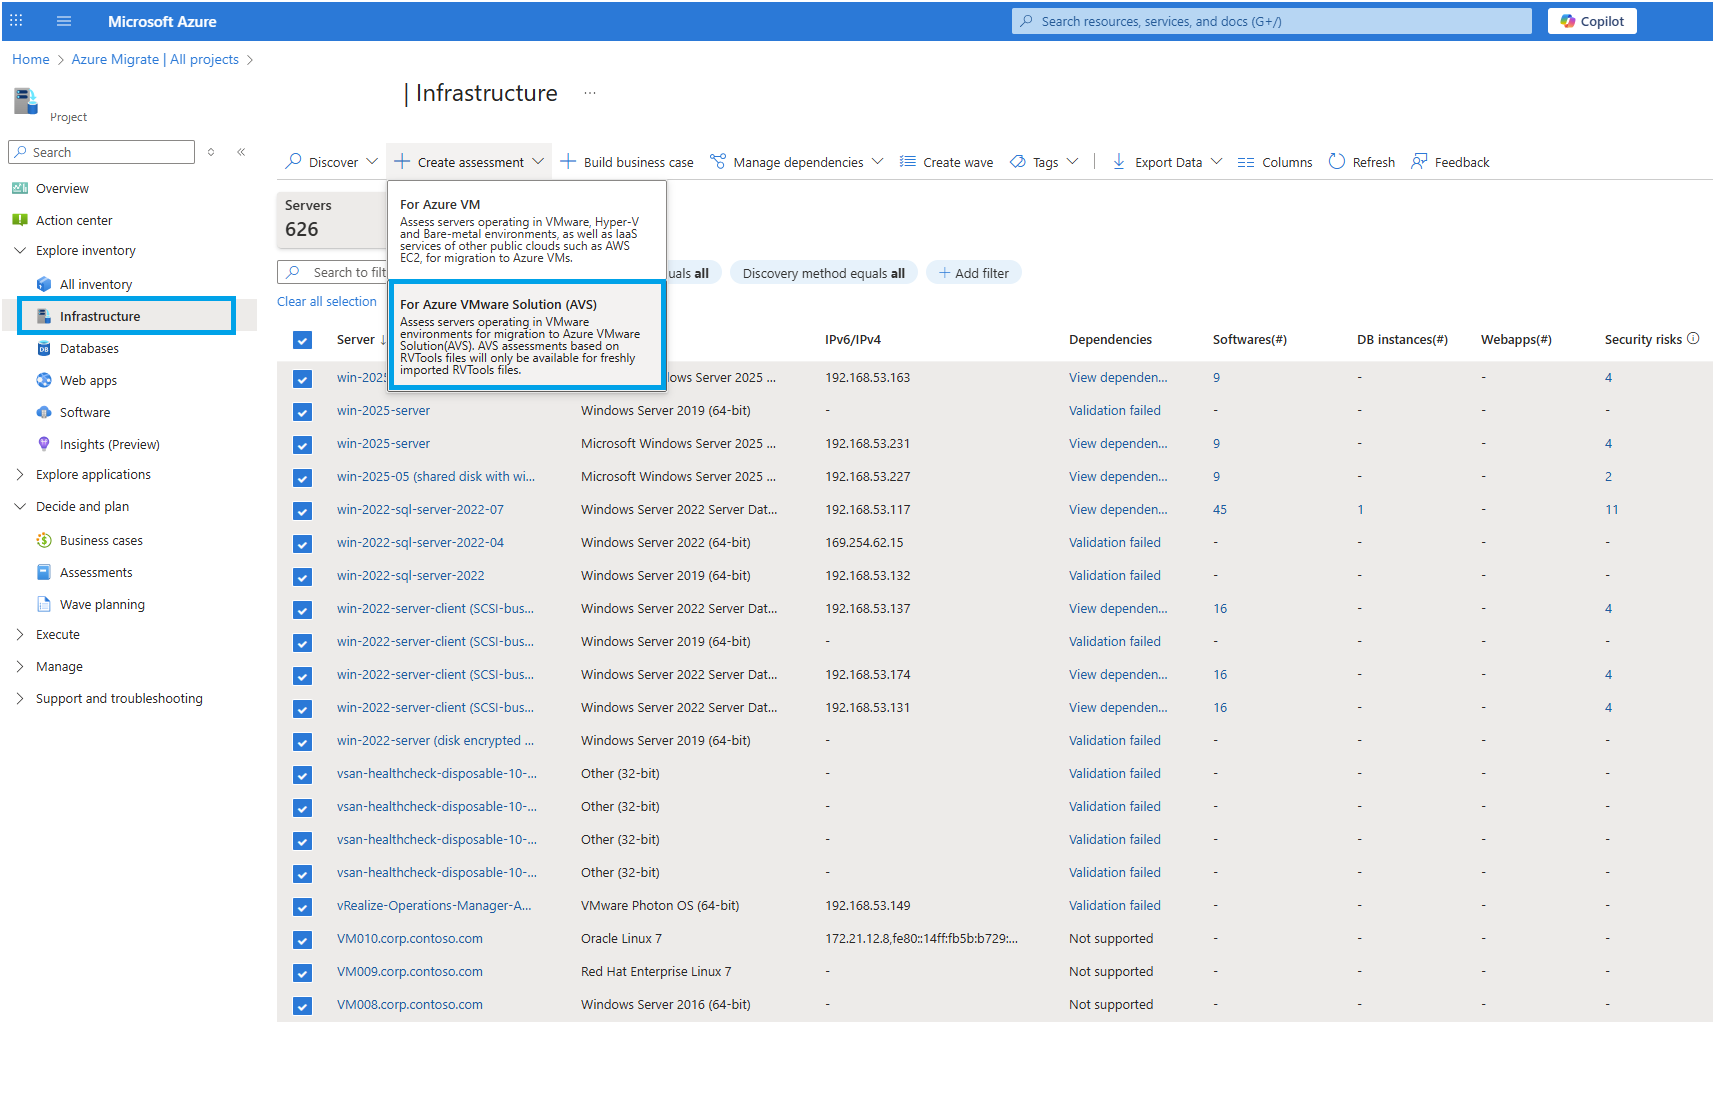
In Infrastructure, select the list of all workloads you want to assess the cost for.
From the top menu, click on Create assessment drop-down, select For Azure VMware Solution (AVS).
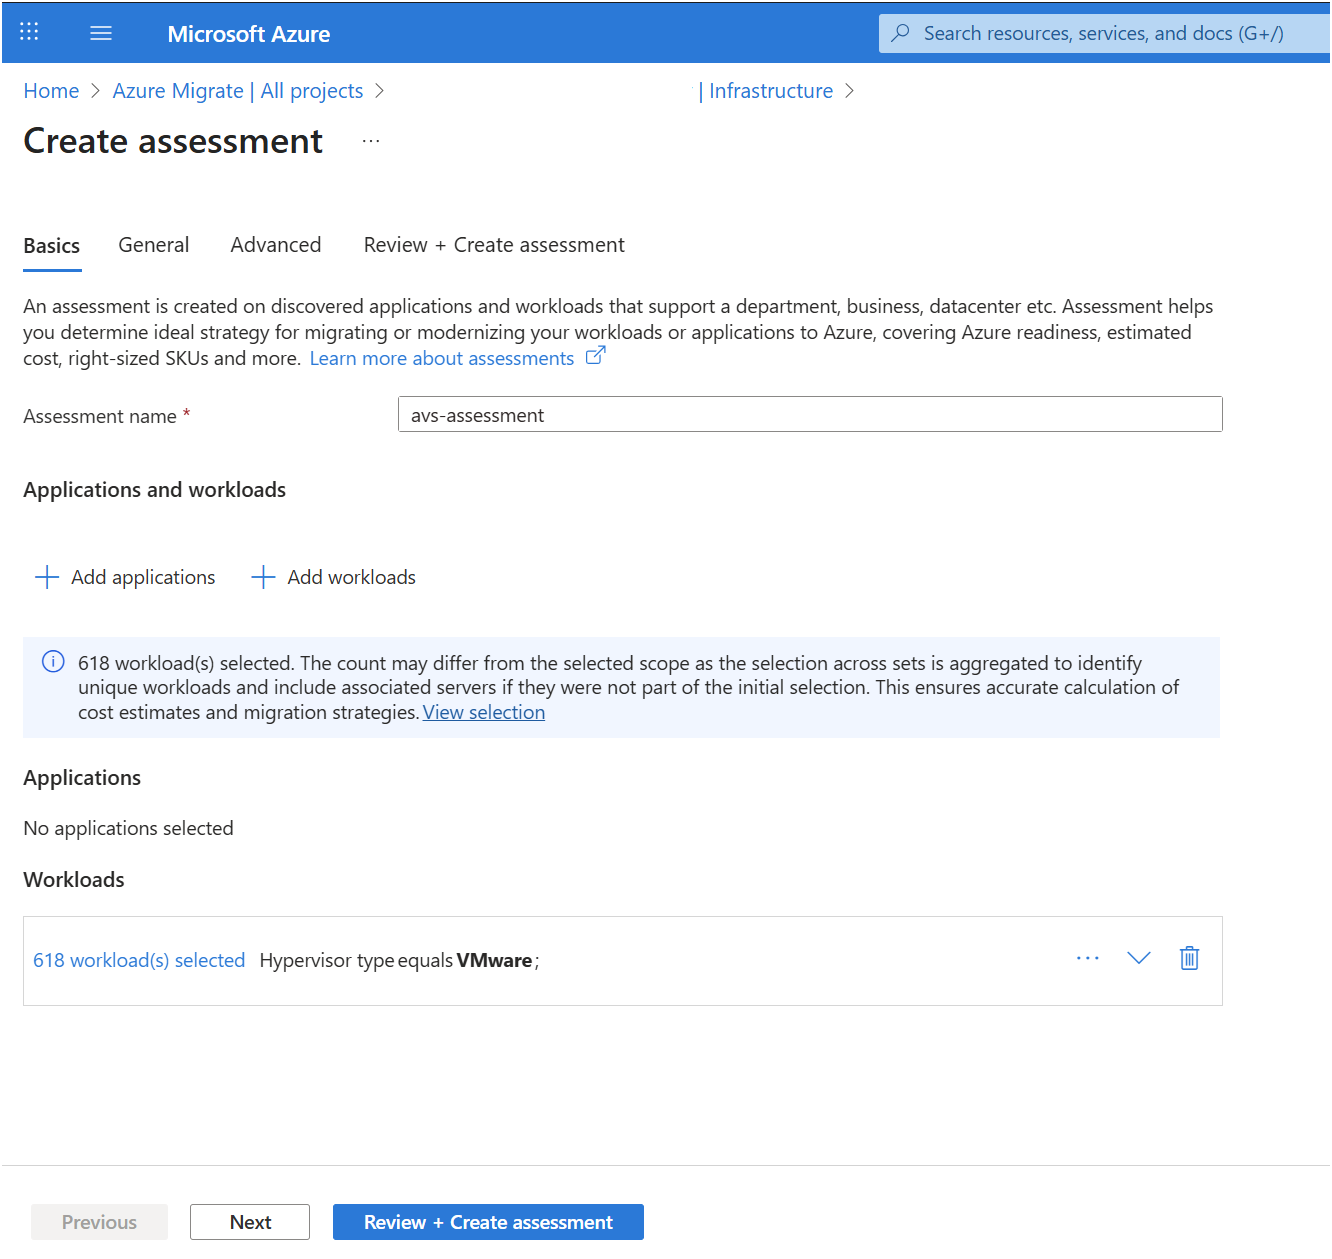
Provide Assessment name for the assessment. Click on Add workloads in case you need additional workloads for the assessment. Click on Next once the page is ready to proceed.
Under General settings, provide the Target location you want to provision your private cloud in, the Currency, Program/offer you want to have the assessment evaluated in, and other settings you may want to change.
In Default target location, specify the Azure region to which you plan to provision your AVS private cloud.
- Size and cost recommendations are based on the location that you specify.
In Currency, select the billing currency for your account.
In Program/Offer, Azure offer you're enrolled in is displayed. The Assessment estimates the cost for that offer.
In Discount (%), add any subscription-specific discounts you receive on top of the Azure offer. The default setting is 0%.
In Default savings option, specify whether you want to use reserve instances for Azure VMware Solution nodes when you migrate your VMs.
- If you select to use a reserved instance, you can't specify 'Discount (%)'. Learn more.
In Sizing criteria, select if you want to base the assessment on static metadata, or on performance-based data. If you use performance data:
- In Performance history, indicate the data duration on which you want to base the assessment. Performance history is not considered if you are importing data using RVTools or a CSV file.
- In Percentile utilization, specify the percentile value you want to use for the performance sample. Percentile utilization is not considered if you are importing data using RVTools or a CSV file.
In Comfort factor, indicate the buffer you want to use during assessment. This accounts for issues like seasonal usage, short performance history, and likely increases in future usage. For example, if you use a comfort factor of two:
Component Effective utilization Add comfort factor (2.0) Cores 2 4 Memory 8 GB 16 GB


In Advanced settings, click on Edit defaults and ensure the Target services has "Azure VMware Solution (AVS)" and then click on Edit defaults:
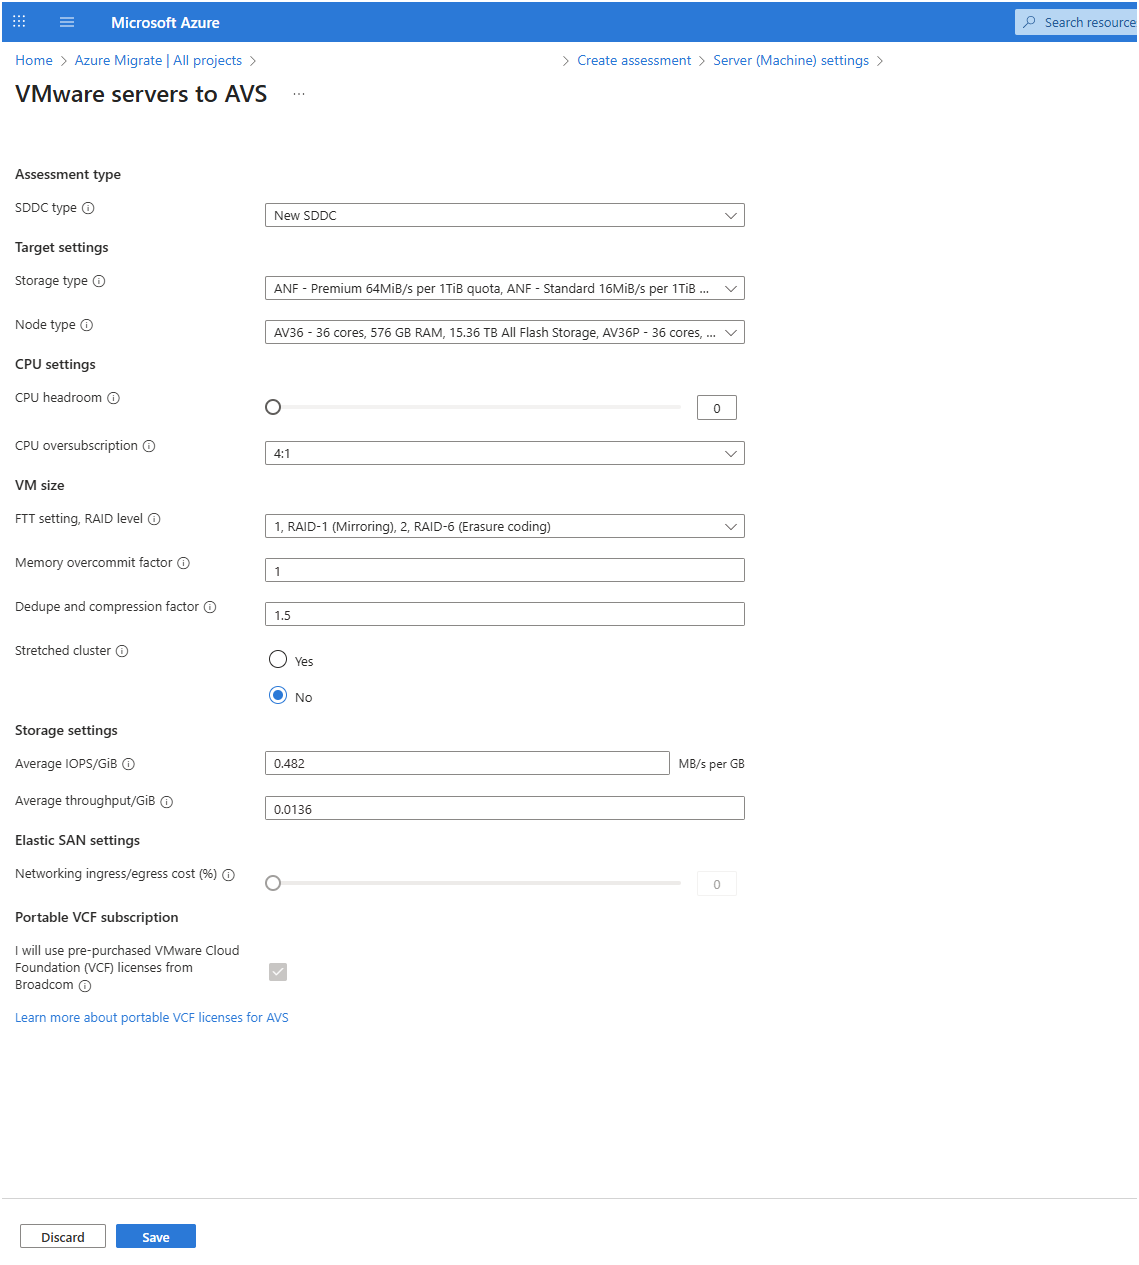
- In SDDC type, specify "New SDDC" if you are creating a new private cloud. Use "AVS SDDC expansion" if you already have an AVS private cloud with hosts deployed and want to add more VMs to the existing SDDC. When assessing for expanding a private cloud, it will not consider the available capacity in the AVS private cloud but will consider the capacity requirements for management appliances.
- The Storage type is defaulted to consider three supported storage solutions in AVS: vSAN, Elastic SAN and Azure NetApp Files (ANF) (Standard, Premium and Ultra tiers). Elastic SAN and ANF are external storage types in AVS that will be used when storage is the limiting factor considering the configuration/performance of the incoming VMs. Elastic SAN can be selected if assessment needs to be performed using vSAN & Elastic SAN as the storage datastores.
- When performance metrics are provided (IOPS and throughput) in settings or via data discovered using the Azure migrate appliance or in the imported CSV file, the assessment selects the tier that satisfies the performance requirements of the incoming VMs’ disks.
- If the assessment is performed using data from an RVTools file or if the Azure Migrate appliance is unable to discover performance metrics like throughput and IOPS, the most cost-effective storage solution and tier among Elastic SAN and ANF - Standard is considered for assessment.
In Storage Settings:
- In FTT setting, RAID level, select the Failure to Tolerate and RAID combination. FTT 1, RAID 1 & FTT 2, RAID 6 are selected by default. The selected FTT option, combined with the on-premises server disk requirement, determines the total vSAN storage required in AVS.
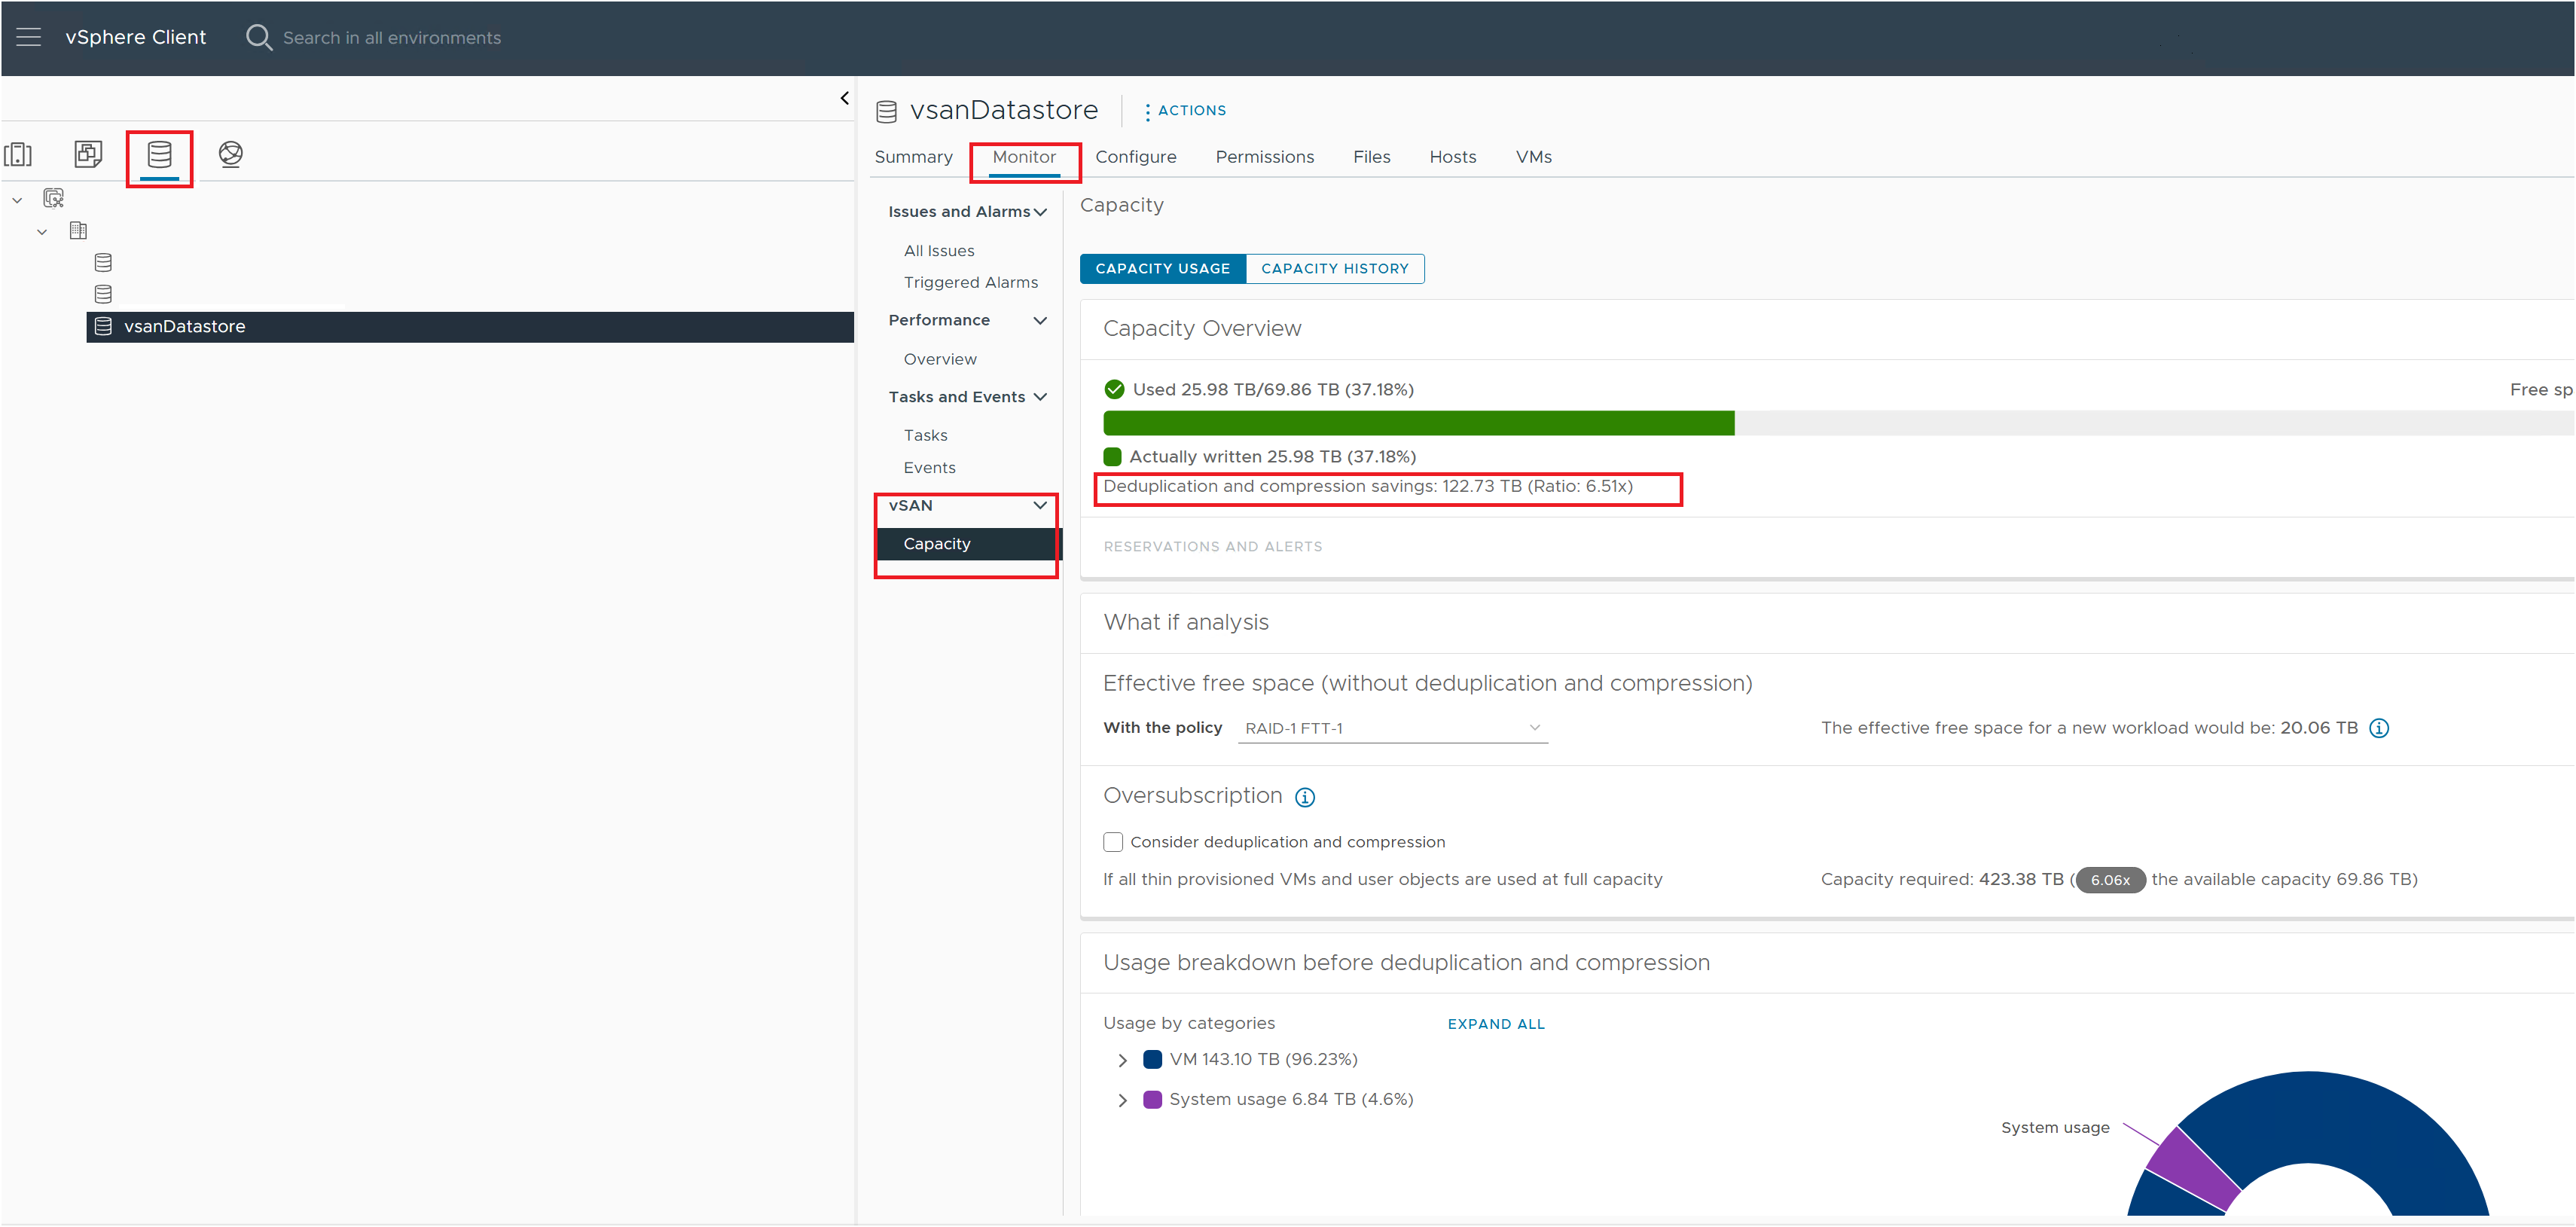
- In Dedupe and compression factor, specify the anticipated deduplication and compression factor for your workloads. Actual value can be obtained from on-premises vSAN or storage config and this might vary by workload. A value of 3 would mean 3x so for 300 GB disk only 100 GB storage would be used. A value of 1 would mean no dedupe or compression. You can only add values from 1 to 10 up to one decimal place.
- In IOPS per GiB, select the expected average read and write speed per gibibyte of the external storage device. This, along with the disk capacity requirement, helps Azure Migrate determine the external storage capacity needs.
- In Throughput per GiB, select the expected average amount of data transfer speed per gibibyte of the storage device. This, along with the disk capacity requirement would help Azure Migrate determine the external storage capacity requirements.
In Elastic SAN Settings:
- The Networking ingress/egress cost is used to determine the networking cost of attaching the Elastic SAN datastore to the AVS private cloud. It's defaulted to 15%.
In CPU Settings:
- In CPU Oversubscription, specify the ratio of virtual cores associated with one physical core in the AVS node. Oversubscription of greater than 4:1 might cause performance degradation, but can be used for web server type workloads.
- In CPU headroom, specify the CPU headroom you want to reserve for planned & unplanned management operations.
In VM Size:
- The Node type is defaulted to use all the SKUs available in the given region. SKUs supported for assessment are AV36, AV36P, AV48, AV52 & AV64 (both Gen 1 & Gen 2). Azure Migrate attempts to get the minimum number of nodes needed to host the VMs on the Azure VMware Solution private cloud. However, availability of the SKU will depend upon capacity availability.
- In Memory overcommit factor, specify the ratio of memory over commit on the cluster. A value of 1 represents 100% memory use, 0.5, for example, is 50%, and 2 would be using 200% of available memory. You can only add values from 0.5 to 10 up to one decimal place.
- In Memory overcommit factor, specify the ratio of memory over commit on the cluster. A value of 1 represents 100% memory use, 0.5, for example, is 50%, and 2 would be using 200% of available memory. You can only add values from 0.5 to 10 up to one decimal place.
AVS node costs in the assessment will be indicative of the SKU cost where VCF subscriptions are purchased through Broadcom and ported to the private cloud on AVS.
Select Save if you made changes.
Select Save if you made changes and select Review + Create assessment.
In Review + create assessment, review the assessment details, and select Create to run the assessment.
Note
For discovering data using the Azure migrate appliance for creating assessments, we recommend that you wait at least a day after starting discovery before you create an assessment. This provides time to collect performance data with higher confidence. Ideally, after you start discovery, wait for the performance duration you specify (day/week/month) for a high performance coverage.


Next steps
- Learn how to use dependency mapping to create high confidence groups.
- Learn more about how Azure VMware Solution assessments are calculated.