Note
Access to this page requires authorization. You can try signing in or changing directories.
Access to this page requires authorization. You can try changing directories.
This article walks you through the basic steps for using Azure Storage Discovery you can take to unlock deep insights about your Azure Storage estate.
In this tutorial, you:
- Deploy a Storage Discovery workspace.
- Configure the workspace to observe a portion of the data estate that's interesting to you.
- Use reports and Azure Copilot to dive into insights about your storage resources and the data they contain.
If you don't have an Azure subscription, create a free account before you begin.
Prerequisites
For Storage Discovery to be a useful service to you, you need to have access to storage account resources with data in them. Storage accounts may be located in Azure subscriptions different from where you deploy Storage Discovery. However, all subscriptions must be in the same Microsoft Entra tenant.
You need at least the permissions on storage resources that come with the Role Based Access Control (RBAC) role assignment Reader. More permissions that come with roles like Contributor or Owner are also OK. You can learn more about permissions in the planning guide.
This tutorial uses the Azure portal for all steps.
Deploy a Storage Discovery workspace
You deploy the Storage Discovery service by creating a Discovery workspace resource in one of your resource groups. As part of creating this resource, you also specify what portions of your Azure Storage estate you want to cover.
- Start the Discovery workspace create wizard.
- Decide what portion of the Azure Storage estate you want to cover by setting the
workspace root. - Configure a
scopein your workspace.
Tip
The planning a Storage Discovery deployment article shares more details worth considering. Reading this article isn't required for completing this tutorial.
1. Start the Discovery workspace create wizard
Open the Azure portal and launch the Storage Discovery workspace create wizard.
Choose the Subscription and Resource group in which to create the discovery workspace.
| Element | Description |
|---|---|
Name |
The name of the Discovery workspace resource. |
Description |
Optional. Description of the Discovery workspace resource. |
Region |
Azure region where the Discovery resource is created.1 |
Pricing plan |
Storage Discovery pricing plan.2 |
1 For information on regions covered, see Storage Discovery workspace regions. 2 For information on Storage Discovery pricing plan, see Understand Storage Discovery Pricing.
Stay on this page for the next step.
2. Set the workspace root
During the creation of a Storage Discovery workspace, you configure the workspace root. The management components article provides more details for this configuration. In the workspace root, you list at least one and at most 100 Azure resources of different types:
- subscriptions
- resource groups
The person deploying the workspace must have at least the Role Based Access Control (RBAC) role assignment Reader for every resource in the workspace root. Reader is the minimum permission level required. Contributor and Owner are also supported.
It's possible that you see a subscription listed in the Azure portal, for which you don't have this direct Reader role assignment. When you can see a resource you don't have a role assignment to, then most likely you have permissions to a sub resource in this subscription. In this case, the existence of this "parent" was revealed to you, but you have no rights on the subscription resource itself. This example can be extended to resource groups as well. Missing a Reader or higher direct role assignment disqualifies an Azure resource from being the basis (root) of a workspace.
Permissions are only validated when a workspace is created. Any change to permissions of the Azure account that created the workspace, including its deletion, has no effect on the workspace or the Discovery service functionality.
Up to 100 resources - subscriptions and/or resource groups can be included in the workspace root.
When you confirm your selection, the service runs an access check to verify that the user has Microsoft.Storage/storageAccounts/read on the added resources. The following image provides an example of an access check failure with the associated status message.

In such a case, remove the failed item from the list, then proceed to the next wizard step.
3. Configure a scope
A scope is a feature of a Discovery workspace. Scopes allow you to segment the storage resources included in your workspace root into logical units that you then get dedicated reports for.
For instance, your workspace root may cover storage accounts from HR and Marketing departments. You can define a scope for the Marketing department and receive a dedicated report for just the resources attributed to the marketing department.
By default, a workspace created in the Azure portal already has a scope that spans all resources covered by the workspace root. At least one scope is required to get a report, so the default scope is good to have. You can add more scopes for fine-grained reporting needs. In this tutorial, we assume a scenario where we need to report separately on all resources belonging to applications from the marketing department.
A scope is defined by specifying ARM resource tags that can be found on your storage resources.
This JSON structure illustrates the chosen example by showing the two different ways in which a scope can be defined. Storage resources are included in this scope when they have both ARM resource tags:
- The tag key
Departmentordepartmentwith case-matching valueMarketing. - The tag key
Apporapp, regardless of its value.
    "scopes": [
        {

            "displayName": "Marketing App Resources",

            "resourceTypes": [

                "Microsoft.Storage/storageAccounts"
            ],

            "tags": {

                "Department": "Marketing"

            },

            "tagsKeyOnly": [

                "App"

            ]

        }
    ]
To make this example work for you, select + Add scope on the wizard page in the Azure portal and fill in tags that make sense for your storage resources.
Then complete the workspace creation wizard by stepping through the remaining pages.
Note
In Azure, tag names (keys) are case-insensitive for operations. Tag values are case-sensitive.
Access your insights
To continue with this tutorial, you need to allow time for the Storage Discovery service to aggregate all the insights about your storage resources. Insight aggregation often completes within a few hours but can also take more than a day. You can check if enough time passed, by following the upcoming Azure portal report step.
You can get insights from Storage Discovery in two ways:
- Reports within your workspace in the Azure portal.
- Azure Copilot within the Azure portal.
Important
For newly created workspaces, insights typically appear within 24 hours. In some cases, initial aggregation could take a bit longer. Depending on the pricing plan, historic insights for weeks before workspace creation are also added to allow for trend analysis. All insights are retained for several months. The Understand Discovery pricing plans article has more details.
Access your insights through workspace reports in the Azure portal
In this section, you learn how to access prebuilt reports in the Azure portal for the scopes you previously created.
- Open the Azure portal.
- Navigate to your Discovery workspace resource.
- On the left, vertical menu: select
Reports.
Azure Storage Discovery reports organize insights into distinct categories that help you understand and manage your Azure Storage estate:
- Capacity: Includes insights for size and count (blobs, containers, subscriptions, regions, and resource groups count) for each scope.
- Activity Includes metrics for transactions, ingress, and egress to understand how your storage is accessed and utilized.
- Errors: Highlights failed operations and error codes to help identify patterns of issues.
- Configurations: Surfaces configuration patterns across your storage accounts.
- Security: Provides visibility into access controls and encryption settings.
- Consumption: Shows storage resources capacity and activity insights that help you understand how your usage corresponds to the cost incurred.

Capacity, Activity, and Errors reports use interactive charts to present data in a unified format, making it easier to explore trends, derive insights, and take action to optimize your storage estate.
Storage Discovery reports include top-level filters that help you focus on specific aspects of your storage estate. These filters apply across all reports and charts, allowing you to tailor the insights to your business context.
Each chart also offers other options to drill down or pivot into detailed views of your storage estate. These interactive features enhance your ability to explore trends, identify patterns, and take informed actions. Top-level filters include:
- Time range
- Subscriptions
- Storage accounts
- Region
- Performance type
- Encryption type
- Redundancy type
- Tags
To get to an insight that's interesting for you, use global filters above the report page navigation to filter all report pages. Alternatively, change the data pivots that you can find in dropdown menus above most charts. The get started with reports article has more details.
Access insights through Copilot in the Azure portal
In addition to the prebuilt reports in the Azure portal, you can ask Azure Copilot for insights about your storage estate. Asking Azure Copilot enables you to pivot data in ways that aren't available in the prebuilt reports. There are so many insights that they can't all be available in prebuilt reports after all.
Select the Copilot button in the top navigation bar of the Azure portal.
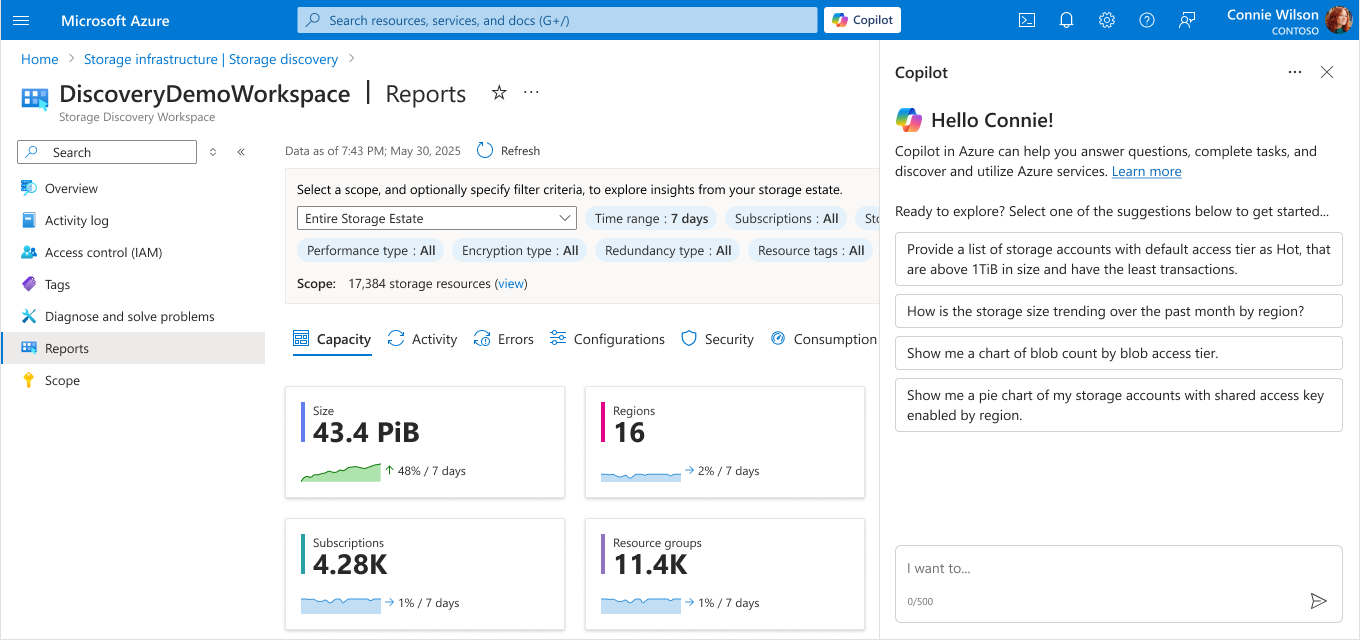
When you ask Azure Copilot a question, the answer must always come in the context of a Discovery workspace and a scope. Copilot asks you to select both before responding with the chart or table that illustrates the insight you requested.
Alternatively, you can enter the chat with the context of a workspace and scope by opening Azure Copilot chat from within a Discovery workspace report page.
A click on the Copilot button Ask Copilot, found next to any chart on a report page, can launch the chat with the needed context.
Tip
Asking well crafted prompts is important to unlock the insight you need. The article Discover insights with Azure Copilot has important details and sample prompts you can use and learn from for your successful Copilot interaction.
Clean up resources
If you no longer need your Discovery workspace, there are two ways to clean up your Storage Discovery deployment.
- Stop being billed for your Discovery workspace.
- Remove your Discovery resource.
To stop being billed for your workspace, you can select the Free pricing plan for your workspace.
- Open the Azure portal.
- Navigate to your Discovery workspace resource.
- You land on the
Overviewpage. In the Essentials section atop the page, selectchangenext to pricing plan. - Review the pricing plan options and select what works for you.
To delete your workspace, select the Delete command from the command bar of your workspace.
- Open the Azure portal.
- Navigate to your Discovery workspace resource.
- You land on the
Overviewpage. In the command bar atop the page, selectDelete. - Be sure that you want to remove the resource and all historic insights, then confirm your delete.