Note
Access to this page requires authorization. You can try signing in or changing directories.
Access to this page requires authorization. You can try changing directories.
Note
Community interest groups have now moved from Yammer to Microsoft Viva Engage. To join a Viva Engage community and take part in the latest discussions, fill out the Request access to Finance and Operations Viva Engage Community form and choose the community you want to join.
Use the Data management workspace to create and manage data import and export jobs. By default, the data import and export process creates a staging table for each entity in the target database. Staging tables let you verify, clean up, or convert data before you move it.
Note
This article assumes that you're familiar with data entities.
Data import and export process
Follow these steps to import or export data.
Create an import or export job and complete the following tasks:
- Define the project category.
- Identify the entities to import or export.
- Set the data format for the job.
- Sequence the entities, so that they're processed in logical groups and in an order that makes sense.
- Determine whether to use staging tables.
Validate that the source data and target data are mapped correctly.
Verify the security for your import or export job.
Run the import or export job.
Validate that the job ran as expected by reviewing the job history.
Clean up the staging tables.
The remaining sections of this article provide more information about each step of the process.
Note
To refresh the Data import/export form and see the latest progress, use the form refresh icon. Browser-level refresh isn't recommended because it interrupts any import or export jobs that aren't run in a batch.
Create an import or export job
Run a data import or export job one time or many times.
Define the project category
Select a project category that fits your import or export job. Project categories help you manage related jobs.
Identify the entities to import or export
Add specific entities to an import or export job, or select a template to apply. Templates fill a job with a list of entities. The Apply template option is available after you give the job a name and save the job.
Set the data format for the job
When you select an entity, you must select the format of the data that's exported or imported. You define formats by using the Data sources setup tile. A source data format is a combination of Type, File format, Row delimiter, and Column delimiter. Although there are other attributes, these attributes are the key attributes to understand. The following table lists the valid combinations.
| File Format | Row/Column delimiter | XML Style |
|---|---|---|
| Excel | Excel | -NA- |
| XML | -NA- | XML-Element XML-Attribute |
| Delimited, fixed width | Comma, semicolon, tab, vertical bar, colon | -NA- |
Note
It's important to select the correct value for Row delimiter, Column delimiter, and Text qualifier if you set the File format option to Delimited. Make sure that your data doesn't contain the character used as delimiter or qualifier, as this condition might result in errors during import and export.
Note
For XML-based file formats, make sure to only use legal characters. For more information about valid characters, see Valid Characters in XML 1.0. XML 1.0 doesn't allow any control characters except for tabs, carriage returns, and line feeds. Examples of illegal characters are square brackets, curly brackets, and backslashes.
To import or export data, use Unicode instead of a specific code page. This choice helps provide the most consistent results and eliminates data management job failures because they include Unicode characters. The system-defined source data formats that use Unicode all have Unicode in the source name. The Unicode format is applied by selecting a Unicode encoding ANSI code page as Code page in the Regional settings tab. Select one of the following code pages for Unicode:
| Code page | Display name |
|---|---|
| 1200 | Unicode |
| 12000 | Unicode (UTF-32) |
| 12001 | Unicode (UTF-32 Big-Endian) |
| 1201 | Unicode (Big-Endian) |
| 65000 | Unicode (UTF-7) |
| 65001 | Unicode (UTF-8) |
For more information about code pages, see Code Page Identifiers.
Sequence the entities
You can sequence entities in a data template, or in import and export jobs. When you run a job that contains more than one data entity, make sure that you correctly sequence the data entities. Sequence entities primarily to address any functional dependencies among entities. If entities don't have any functional dependencies, schedule them for parallel import or export.
Execution units, levels, and sequences
The execution unit, level in the execution unit, and sequence of an entity help control the order that the data is exported or imported in.
- In each execution unit, entities are processed in parallel.
- In each execution unit, entities are processed in parallel if they have the same level.
- In each level, entities are processed according to their sequence number in that level.
- After one level is processed, the next level is processed.
Resequencing
You might want to resequence your entities in the following situations:
- If you use only one data job for all your changes, use resequencing options to optimize the execution time for the full job. In these cases, use the execution unit to represent the module, the level to represent the feature area in the module, and the sequence to represent the entity. By using this approach, you can work across modules in parallel, but you can still work in sequence in a module. To help guarantee that parallel operations succeed, consider all dependencies.
- If you use multiple data jobs (for example, one job for each module), use sequencing to affect the level and sequence of entities for optimal execution.
- If there are no dependencies at all, sequence entities at different execution units for maximum optimization.
The Resequencing menu is available when you select multiple entities. Resequence based on execution unit, level, or sequence options. Set an increment to resequence the entities that you select. The unit, level, and sequence number selected for each entity updates by the specified increment.
Sorting
Use the Sort by option to view the entity list in sequential order.
Truncating
For import projects, you can choose to truncate records in the entities before import. Truncating is useful if you need to import your records into a clean set of tables. This setting is off by default.
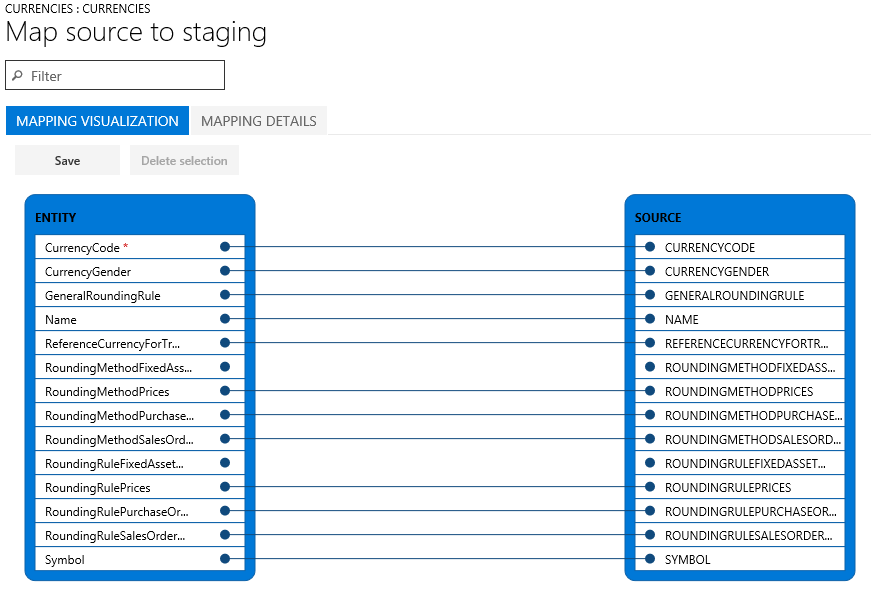
Validate that the source data and target data are mapped correctly
Mapping is a function that applies to both import and export jobs.
- In the context of an import job, mapping describes which columns in the source file become the columns in the staging table. Therefore, the system can determine which column data in the source file must be copied into which column of the staging table.
- In the context of an export job, mapping describes which columns of the staging table (that is, the source) become the columns in the target file.
If the column names in the staging table and the file match, the system automatically establishes the mapping, based on the names. However, if the names differ, columns aren't mapped automatically. In these cases, you must complete the mapping by selecting the View map option on the entity in the data job.
Two mapping views are available: Mapping visualization, which is the default view, and Mapping details. A red asterisk (*) identifies any required fields in the entity. You must map these fields before you can work with the entity. You can unmap other fields as you require when you work with the entity. To unmap a field, select the field in either the Entity column or the Source column, and then select Delete selection. Select Save to save your changes, and then close the page to return to the project. You can use the same process to edit the field mapping from source to staging after your import.
You can generate a mapping on the page by selecting Generate source mapping. A generated mapping behaves like an automatic mapping. Therefore, you must manually map any unmapped fields.
Verify the security for your import or export job
You can restrict access to the Data management workspace so that nonadministrator users can access only specific data jobs. Access to a data job implies full access to the execution history of that job and access to the staging tables. Therefore, make sure that you set appropriate access controls when you create a data job.
Secure a job by roles and users
Use the Applicable roles menu to restrict the job to one or more security roles. Only users in those roles can access the job.
You can also restrict a job to specific users. When you secure a job by users instead of roles, you have more control if multiple users are assigned to a role.
Secure a job by legal entity
Data jobs are global in nature. Therefore, if you create and use a data job in a legal entity, other legal entities in the system can see the job. You might prefer this default behavior in some application scenarios. For example, an organization that imports invoices by using data entities might provide a centralized invoice processing team that's responsible for managing invoice errors for all divisions in the organization. In this scenario, it’s useful for the centralized invoice processing team to have access to invoice import jobs from all legal entities. Therefore, the default behavior meets the requirement from a legal entity perspective.
However, an organization might want to have invoice processing teams per legal entity. In this case, a team in a legal entity should have access only to the invoice import job in its own legal entity. To meet this requirement, you can configure legal entity–based access control on the data jobs by using the Applicable legal entities menu inside the data job. After the configuration is done, users can see only jobs that are available in the legal entity that they're currently signed in to. To see jobs from another legal entity, users must switch to that legal entity.
You can secure a job by roles, users, and legal entity at the same time.
Run the import or export job
Run a job one time by selecting the Import or Export button after you define the job. To set up a recurring job, select Create recurring data job.
Note
To run an import or export job, select the Import or Export button. This action schedules a batch job to run only once. The job might not execute immediately if the batch service is throttling due to the load on the batch service. You can also run the jobs synchronously by selecting Import now or Export now. This action starts the job immediately and is useful if the batch doesn't start due to throttling. You can schedule the jobs to execute at a later time. This action can be done by choosing the Run in batch option. Batch resources are subject to throttling, so the batch job might not start immediately. Using a batch is the recommended option because it also helps with large volumes of data that need to be imported or exported. You can schedule batch jobs to run on a specific batch group, which allows more control from a load balancing perspective.
Automatic retry support during batch node restarts
Automatic retry support for import and export in batch jobs is implemented to enable retries when a batch restarts. This feature is available starting from version 10.0.42.
The following diagrams show an overview of the changes that were made by using the export flow as an example. A similar design was applied to import.
Previous design: One regular batch job with one runtime batch task.

New design: One regular batch job (Job1) that creates a new runtime child job (Job2). Add the regular batch task to Job2 instead of Job1.

Note
If you've customized your code that involves DMFBatchImporter, DMFImportTaskScheduler, DMFBatchExporter, DMFExportTaskScheduler classes, you might encounter issues with the import/export in batch feature under the new design. For example, if you have created your own custom batch task and are adding task to Job1 as per previous design, then you're adding tasks to the wrong job. You should now add your custom tasks to job2 instead of job1 as per new design.
Note
If you have any use case that depends on the enddateTime of the DMFBatchImporter or DMFBatchExporter tasks to track completion of DMF Execution, you might notice that these values now differ from the DMF execution end datetime. This change is due to the recent retry design updates: DMFBatchImporter and DMFBatchExporter now create a new batch Job2, mark it complete, and job2 handles adding and waiting for other required tasks to finish. As a result, if your use case depends on the enddatetime of DMFBatchImporter or DMFBatchExporter, you should now monitor the enddatetime of the last DMFImportTaskScheduler or DMFExportTaskScheduler task instead, as this provides accurate information about the completion of DMFExecution.
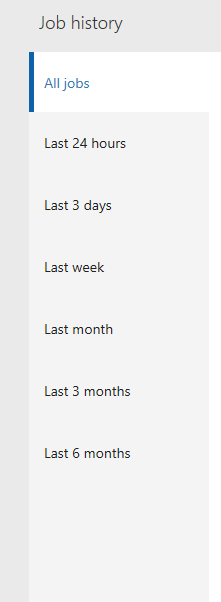
Validate that the job ran as expected
You can use the job history to troubleshoot and investigate both import and export jobs. The job history organizes historical job runs by time ranges.
Each job run provides the following details:
- Execution details
- Execution log
Execution details show the state of each data entity that the job processed. You can quickly find the following information:
- The entities that the job processed.
- For an entity, how many records the job successfully processed, and how many failed.
- The staged records for each entity.
You can download the staging data in a file for export jobs, or you can download it as a package for import and export jobs.
From the execution details, you can also open the execution log.
Parallel imports
To speed up the import of data, enable parallel processing for importing a file if the entity supports parallel imports. To configure the parallel import for an entity, follow these steps.
Go to System administration > Workspaces > Data management.
In the Import / Export section, select the Framework parameters tile to open the Data import/export framework parameters page.
On the Entity settings tab, select Configure entity execution parameters to open the Entity import execution parameters page.
Set the following fields to configure parallel import for an entity:
- In the Entity field, select the entity. If the entity field is empty, the empty value is the default setting for all subsequent imports, if the entity supports parallel import.
- In the Import threshold record count field, enter the threshold record count for import. This value determines the record count that each thread processes. If a file has 10,000 records, a record count of 2,500 with a task count of four means each thread processes 2,500 records.
- In the Import task count field, enter the count of import tasks. The count can't exceed the max batch threads allocated for batch processing in System administration >Server configuration.
Note
Adding too many parallel tasks causes the underlying infrastructure to use the resource capacity at 100% and impacts the environment performance and other operations. Understand the resource capacity of the environment and consumption based on the parallel import tasks configured and limit the number of tasks.
Job history cleanup
By default, the system automatically deletes job history entries and related staging table data that are older than 90 days. You can use the job history cleanup functionality in data management to set up periodic cleanup of the execution history with a retention period shorter than this default. This functionality replaces the previous staging table cleanup functionality, which is now deprecated. The cleanup process removes data from the following tables:
All staging tables
DMFSTAGINGVALIDATIONLOG
DMFSTAGINGEXECUTIONERRORS
DMFSTAGINGLOGDETAIL
DMFSTAGINGLOG
DMFDEFINITIONGROUPEXECUTIONHISTORY
DMFEXECUTION
DMFDEFINITIONGROUPEXUTION
Access the Execution history cleanup feature from Data management > Job history cleanup.
Scheduling parameters
When you schedule the cleanup process, specify the following parameters to define the cleanup criteria.
Number of days to retain history – Use this setting to control the amount of execution history to preserve. Specify the history in number of days. When you schedule the cleanup job as a recurring batch job, this setting acts like a continuously moving window, always leaving the history for the specified number of days intact while deleting the rest. The default is seven days.
Number of hours to execute the job – Depending on the amount of history to clean up, the total execution time for the cleanup job can vary from a few minutes to a few hours. Set this parameter to the number of hours that the job executes. After the cleanup job runs for the specified number of hours, the job exits and resumes the cleanup the next time it's run based on the recurrence schedule.
You can specify a maximum execution time by setting a max limit on the number of hours the job must run by using this setting. The cleanup logic goes through one job execution ID at a time in a chronologically arranged sequence, with the oldest being first for the cleanup of related execution history. It stops picking up new execution IDs for cleanup when the remaining execution duration is within the last 10% of the specified duration. In some cases, the cleanup job continues beyond the specified max time. This duration largely depends on the number of records to delete for the current execution ID that the job started before the 10% threshold was reached. The cleanup that the job started must be completed to ensure data integrity, which means that cleanup continues despite exceeding the specified limit. When complete, the job doesn't pick up new execution IDs and the cleanup job completes. The remaining execution history that wasn't cleaned up due to lack of enough execution time is picked up the next time the cleanup job is scheduled. The default and minimum value for this setting is set to two hours.
Recurring batch – Run the cleanup job as a one-time, manual execution, or schedule it for recurring execution in batch. Schedule the batch by using the Run in background settings, which is the standard batch setup.
Note
If you don't use the Job history cleanup feature, execution history older than 90 days is still automatically deleted. You can run job history cleanup in addition to this automatic deletion. Ensure that the cleanup job is scheduled to run in recurrence. As explained earlier, in any cleanup execution, the job only cleans up as many execution IDs as is possible within the provided maximum hours.
Job history cleanup and archival
Job history cleanup and archival functionality replace the previous versions of the cleanup functionality. This section explains these new capabilities.
One of the main changes to the cleanup functionality is the use of the system batch job for cleaning up the history. By using the system batch job, finance and operations apps can have the cleanup batch job automatically scheduled and running as soon as the system is ready. You no longer need to schedule the batch job manually. In this default execution mode, the batch job executes every hour starting at midnight and retains the execution history for the most recent seven days. The purged history is archived for future retrieval. Starting with version 10.0.20, this feature is always on.
The second change in the cleanup process is the archival of the purged execution history. The cleanup job archives the deleted records to the blob storage that DIXF uses for regular integrations. The archived file is in the DIXF package format and is available for seven days in the blob during which time it can be downloaded. You can change the default longevity of seven days for the archived file to a maximum of 90 days in the parameters.
Changing the default settings
This functionality is currently in preview. To use it, turn on the flight DMFEnableExecutionHistoryCleanupSystemJob. Also, turn on the staging cleanup feature in feature management.
To change the default setting for the longevity of the archived file, go to the data management workspace and select Job history cleanup. Set Days to retain package in blob to a value between 7 and 90 (inclusive). This change takes effect on the archives that are created after this change.
Download the archived package
This functionality is currently in preview. To use it, turn on the flight DMFEnableExecutionHistoryCleanupSystemJob. Also, turn on the staging cleanup feature in feature management.
To download the archived execution history, go to the data management workspace and select Job history cleanup. Select Package backup history to open the history form. This form shows the list of all archived packages. Select an archive and select Download package to download it. The downloaded package is in the DIXF package format and contains the following files:
- The entity staging table file
- DMFDEFINITIONGROUPEXUTION
- DMFDEFINITIONGROUPEXECUTIONHISTORY
- DMFEXECUTION
- DMFSTAGINGEXECUTIONERRORS
- DMFSTAGINGLOG
- DMFSTAGINGLOGDETAILS
- DMFSTAGINGVALIDATIONLOG
Sorting composite entity data by using xslt
This functionality lets you export a composite entity and apply xslt file to sort the data in xml file.
To sort composite entity data by using xslt, follow these steps:
- Create an xslt file to sort the data in XML format. For example, if you have an XSLT file for the out of the box entity Purchase orders composite V3, you can sort the XML attribute format data in order by INVOICEVENDORACCOUNTNUMBER for PURCHPURCHASEORDERHEADERV2ENTITY and order by LINENUMBER for PURCHPURCHASEORDERLINEV2ENTITY.
<xsl:stylesheet version='1.0' xmlns:xsl="http://www.w3.org/1999/XSL/Transform">
   <xsl:template match="/*">
        <xsl:copy>
            <xsl:apply-templates select="@*" />
<xsl:apply-templates>
     <xsl:sort select="@INVOICEVENDORACCOUNTNUMBER" data-type="text" order="ascending" />
</xsl:apply-templates>
        </xsl:copy>
   </xsl:template>
   <xsl:template match="PURCHPURCHASEORDERHEADERV2ENTITY">
           <xsl:copy>
<xsl:apply-templates select="@*"/>
    <xsl:apply-templates select="*">
        <xsl:sort select="@LINENUMBER" data-type="number" order="descending"/>
   </xsl:apply-templates>
          </xsl:copy>
    </xsl:template>
    <xsl:template match="@*|node()">
           <xsl:copy>
<xsl:apply-templates select="@*|node()"/>
           </xsl:copy>
    </xsl:template>
</xsl:stylesheet>
- Go to the Data management workspace.
- From the list of data export projects, select a project with XML data source and select View map.
- Select View map for any entity.
- Go to the Transformations tab
- Select New and upload the xslt file created in step 1.