Note
Access to this page requires authorization. You can try signing in or changing directories.
Access to this page requires authorization. You can try changing directories.
Note
Community interest groups have now moved from Yammer to Microsoft Viva Engage. To join a Viva Engage community and take part in the latest discussions, fill out the Request access to Finance and Operations Viva Engage Community form and choose the community you want to join.
In addition to the standard forecasting algorithms provided with Demand planning, you can also create your own custom algorithms and use them in your Demand planning forecast models. To do so, you must create and publish your algorithms using Microsoft Azure Machine Learning, set up a connection from Demand planning to Azure, and place one of the following types of steps to your forecast models as needed (instead of using the standard Forecast step):
- Custom step – Lets you use custom algorithms that you've created using Azure Machine Learning. Use the Custom step with custom algorithms that you haven't used with the legacy Supply Chain Management forecasting functionality. This type of step communicates with Azure through a batch endpoint and allows you to pass any custom parameters your algorithm requires, though no preconfigured parameters are set up by default.
- Finance and operations step – Lets you use custom Azure Machine Learning algorithms that you created for use with the legacy Supply Chain Management forecasting functionality, as described in Demand forecasting overview. This type of step communicates with Azure through a pipeline endpoint and is preconfigured to pass the parameters supported by legacy Supply Chain Management forecasting functionality.
This article describes the setup that is required to enable Demand planning to connect to your Azure Machine Learning workspace, including how to set up your Azure Machine Learning workspace, how to connect to that workspace in Demand planning, and how to set up your forecast models to run your custom algorithms.
Download sample code and other resources
To download sample code and other resources that demonstrate how to use custom Azure Machine Learning algorithms in Demand planning, go to the Custom-ML-in-DemandPlanning repository on GitHub. It provides insights into how to read input data, handle standard and custom parameters, and generate output that aligns with the application's consumption requirements. The repository consists of a readme file, a scoring script, and demonstrative videos.
Set up your Azure Machine Learning resources
You must develop your custom forecast algorithms to run in Azure Machine Learning and then set up Azure to make them available to Supply Chain Management. The following subsections explain how. If you've already been using your custom Azure Machine Learning algorithms with the legacy Supply Chain Management forecasting functionality, then these elements might already be set up. In that case, you can skip to the section Connect to the Azure Machine Learning service from Demand planning.
Set up a new Microsoft Entra application
Follow the steps in this section to create a new Microsoft Entra application in your Azure Machine Learning workspace. This resource in the Azure portal holds your algorithms. The Microsoft Entra application is an enterprise application that enables Demand planning to connect to your Azure Machine Learning algorithms. Learn more about how to set up a Microsoft Entra application in Register an application.
- Sign in to the Azure portal by using an account that has at least Cloud Application Administrator privileges.
- Register a new Microsoft Entra application as described in Create a Microsoft Entra application and service principal that can access resources.
- Follow the on-screen instructions to complete the wizard. Use the default settings.
- In the Certificates & secrets section of the new Microsoft Entra application, create a secret for the application as described in Add a client secret.
- Make a note of the application ID and its secret. You'll need these details later.
Grant access for the new Microsoft Entra application to the Azure Machine Learning workspace and Azure Machine Learning workspace storage account
Follow these steps to allow your new Microsoft Entra application to access the Azure Machine Learning workspace.
- In the Azure portal, go to the resource group that contains your Azure Machine Learning workspace.
- On the left navigation pane, select Access control.
- On the Role assignments tab, select Add to add a new role assignment.
- On the Privileged administrator roles tab, select Contributor.
- Select Next.
- Select the User, group, or service principal option.
- Select Select members. Use the filter on the menu on the right to find the name of the Microsoft Entra application that you created, and then select it.
- The application now appears in the Members list. Select Next.
- On the Review + assign tab, select Next.
Follow these steps to allow your new Microsoft Entra application to access the storage account that Azure Machine Learning workspace is connected to.
- In the Azure portal, go to the resource group that contains your storage account (the storage account that your Azure Machine Learning workspace is using).
- On the left navigation pane, select Access control.
- On the Role assignments tab, select Add to add a new role assignment.
- On the Job function roles tab, select Storage account contributor and Storage blob data contributor. To find these roles quickly, enter storage contributor into the Search field.
- Select Next.
- Select the User, group, or service principal option.
- Select Select members. Use the filter on the menu on the right to find the name of the Microsoft Entra application that you created, and then select it.
- The application now appears in the Members list. Select Next.
- On the Review + assign tab, select Next.
The application is now listed in the All section of the Role assignments tab on both the Azure Machine Learning workspace and the storage account.
Connect to the Azure Machine Learning service from Demand planning
Follow these steps to set up the Azure Machine Learning service connection in Demand planning.
Sign in to Demand planning.
On the left navigation pane, select Custom Azure ML.
In the toolbar, select New to create a new connection.
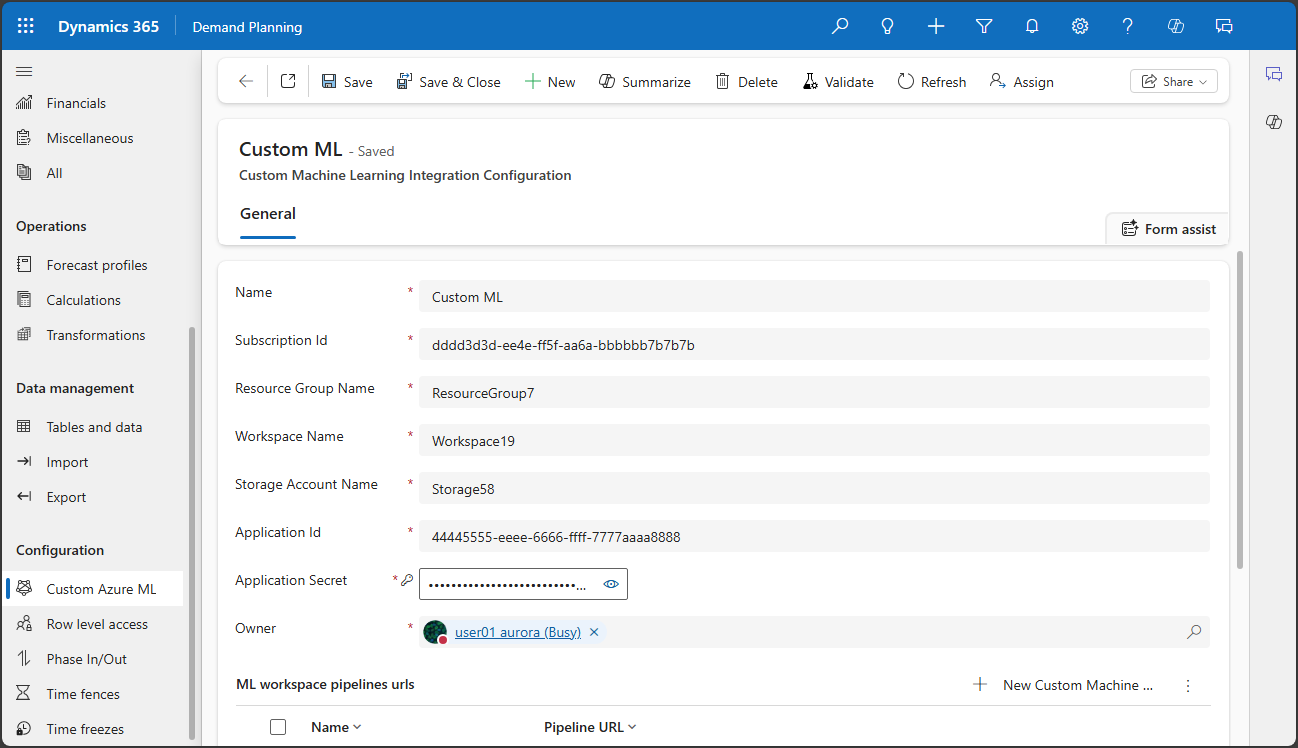
Make the following settings for the new connection:
- Name – Enter a name for the connection.
- Subscription ID – Enter the ID for your Azure subscription.
- Resource group name – Enter the name of the resource group that contains your Azure Machine Learning workspace.
- Workspace name – Enter the name of your Azure Machine Learning workspace.
- Storage Account Name – Enter the name of the Azure storage account that you specified when you ran the setup wizard in your Azure workspace.
- Application ID – Enter the application ID of the Microsoft Entra application that you created. This value is used to authorize API requests to the Azure Machine Learning service.
- Application secret – Enter the service principal application secret for the Microsoft Entra application that you created. This value is used to acquire the access token for the security principal that you created to perform authorized operations against Azure Storage and the Azure Machine Language workspace.
On the Action Pane, select Save.
On the ML workspace pipelines URLs FastTab, add a row for each Azure Machine Learning endpoint that you want to make available to Demand planning. Each endpoint requires a unique Name (which is only used internally in Demand planning) and a Pipeline URL, which is the full URL that Demand planning must use to access the endpoint.
- For Finance and operations steps, these must be Azure Machine Learning pipeline endpoints.
- For Custom steps, these must be Azure Machine Learning batch endpoints. Learn more in Batch endpoints.

Set up a forecast model that uses a custom Azure Machine Learning algorithm
Follow these steps to set up a forecast model that uses a custom Azure Machine Learning algorithm. This procedure applies both to new custom algorithms and to custom algorithms that you previously used with Supply Chain Management; the only difference is the type of forecast step you should use in your model (Custom or Finance and operations).
Create a new forecast profile as described in Create and manage forecast profiles.
On the Select a forecasting model preset page, select None.
After you've created and saved the profile, select the Forecast model tab. (Learn more in Design forecast models.)
Set up your model. Add a Finance and operations or Custom step in the position where you want to run your algorithm.
- Use a Custom step if you want to connect to an Azure Machine Learning algorithm that you haven't used with the legacy Supply Chain Management forecasting functionality.
- Use a Finance and operations step if you want to connect to an Azure Machine Learning algorithm that you created for use with the legacy Supply Chain Management forecasting functionality.
Open the Actions menu for the Finance and operations or Custom step and then select Settings.

In the Configure step dialog, make the following settings for the step:
- Step name – Enter a name for the step.
- Description – Enter a description for the step.
- Custom action configuration – Select the Custom Azure ML profile that you created to connect to your Azure Machine Learning resource.
- Azure ML endpoint – Select the Azure Machine Learning endpoint that triggers the machine learning algorithm that you want to use. The available endpoints must be defined as part of the Custom Azure ML profile that you created.
- Custom parameters – If you've designed your Azure Machine Learning forecast algorithm to accept input parameters, then add them as key/value pairs here as required.
- For Custom steps, no default parameters are provided. You must manually add each one that you require following the specifications of your algorithm.
- For Finance and operations steps, a collection of default parameter names are provided, so all you need to do is adjust the values as needed. These are the parameters used by the legacy Supply Chain Management forecasting functionality. For details about how to use these settings, see Default parameters and values for demand forecasting models.
Caution
You must only include parameters that your forecast algorithm is designed to accept. If you include parameters that your algorithm doesn't recognize, the forecast will fail when it runs.
Select Save to close the dialog.
Complete the model by adding a Save step.
