Note
Access to this page requires authorization. You can try signing in or changing directories.
Access to this page requires authorization. You can try changing directories.
In today's evolving threat landscape, organizations face challenges protecting sensitive data and systems from cyberattacks. Global Secure Access Advanced Threat Protection (ATP) combines Microsoft Security Service Edge (SSE) with Netskope's advanced threat detection and data loss prevention (DLP) capabilities to deliver a comprehensive security solution. This integration offers real-time protection against malware, zero-day vulnerabilities, and data leaks, and simplifies management through a unified platform.
This guide provides step-by-step instructions for configuring ATP and DLP policies to safeguard your organization. By following these steps, IT administrators can apply the power of Microsoft SSE and Netskope to enhance their organization's security posture and streamline threat management.
High-level architecture

Prerequisites
To complete these steps, make sure you have the following prerequisites:
- A Global Secure Access Administrator role in Microsoft Entra ID to configure Global Secure Access settings.
- A tenant configured with a Transport Layer Security (TLS) inspection policy as described in Configure Transport Layer Security Inspection.
- Devices or virtual machines running Windows 10 or Windows 11 that are joined or hybrid joined to a Microsoft Entra ID.
- Devices with the Global Secure Access client installed. See Global Secure Access client for Microsoft Windows for requirements and installation instructions.
- A Conditional Access Administrator role to configure Conditional Access policies.
- Trial Microsoft Entra Internet Access licenses. For licensing details, see the Global Secure Access Licensing overview. You can purchase licenses or get trial licenses. To activate an Internet Access trial, browse to aka.ms/InternetAccessTrial.
Important
Complete and verify the configuration steps marked Important before proceeding.
Enable the Internet access traffic profile
Sign in to the Microsoft Entra admin center.
Browse to Global Secure Access > Connect > Traffic forwarding and enable the Internet access profile.
Under Internet access profile > User and Group assignments, select View to choose the participating users.
For more information, see How to manage the Internet Access traffic forwarding profile.
Important
Before continuing, check that your client's internet traffic is routed through the Global Secure Access service.
On your test device, right-click the Global Secure Access icon in the system tray and select Advanced diagnostics.
On the Forwarding Profile tab, verify Internet Access rules are present in the Rules section. This configuration can take up to 15 minutes to apply to clients after you enable the Internet access traffic profile.

Enable TLS inspection
A large percentage of internet traffic is encrypted. Terminating TLS at the edge lets Global Secure Access inspect and apply security policies to decrypted traffic. This process enables threat detection, content filtering, and granular access controls.
To enable TLS inspection, follow the steps in Configure Transport Layer Security Inspection.
Caution
You must configure TLS inspection on your tenant before purchasing Netskope from the marketplace.
Enable and test ATP and DLP policies
You can create ATP and DLP policies powered by Netskope engines directly from the Microsoft Entra admin center by completing the following high-level steps. Details for each step follow.
- Activate the Netskope offer through the Global Secure Access marketplace
- Create an ATP policy
- Create a DLP policy
- Link an ATP, DLP, or TLS inspection policy to the security profile
- Create a conditional access policy to enforce ATP, DLP, and TLS inspection policies
- Test ATP policies
- Test DLP Policies
Activate a Netskope offer through the Global Secure Access marketplace
You can activate a free trial or contact Netskope for a private offer. Select the tab to follow the steps for your preferred option.
To activate a free trial of Netskope through the Global Secure Access marketplace:
- Sign in to the Microsoft Entra admin center as a Global Secure Access Administrator.
- Browse to Global Secure Access > Third Party Security Solutions > Marketplace.
- Select the Netskope Get it Now button.
- Select Try free for 30 days.

- Complete the form to request the trial.
- Netskope reaches out within two business days to alert you if they accepted or rejected the trial.
- If Netskope accepts your trial request, return to the Microsoft Entra admin center.
- Browse to Global Secure Access > Third Party Security Solutions > Marketplace.
- Select the Netskope Get it Now button.
- Select Validate Netskope license. This step provisions Netskope for your tenant and begins the 30-day trial period.
- After 30 days, the free trial expires.
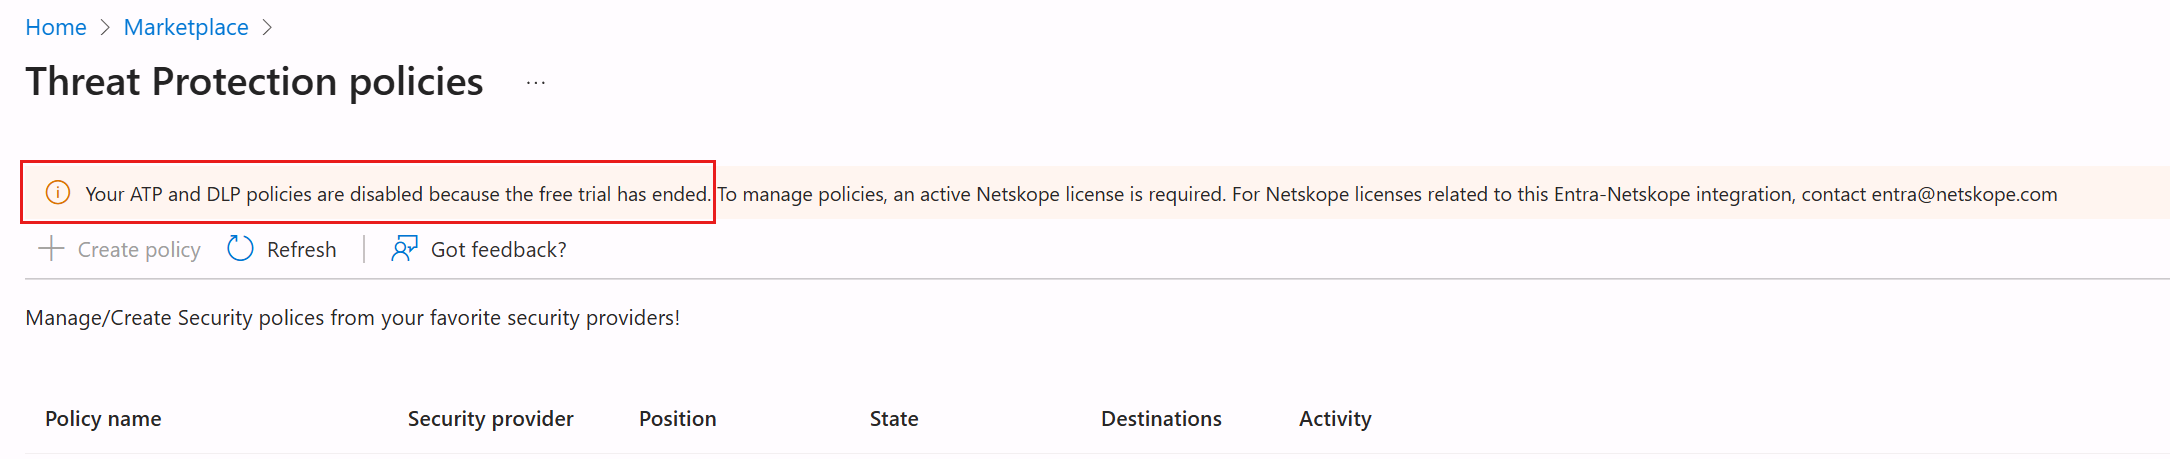


Create an ATP policy
Browse to Global Secure Access > Secure > Threat Protection policies.
Select + Create policy.
On the Basics tab:
- Set the Security provider to Netskope.
- Enter a Policy name.
- Select the policy Position.
- The position sets the policy priority when Netskope processes multiple ATP and DLP policies.
- Netskope's ATP and DLP policies share a common ordering list. The position you specify applies to both ATP and DLP policies in Netskope. For example, Netskope_ATP_Policy_1 might have a position of 1, followed by Netskope_DLP_Policy_1 with a position of 2, and Netskope_ATP_Policy_2 with a position of 3.
- If you assign a position that another Netskope ATP or DLP policy already uses, the positions of the lower policies automatically shift down by one.
- Set the State to enabled.
- Select Next.
On the Policy tab:
Select the Select destination link.
For Destination type, select category or application.
Search for and select the desired categories or applications. To determine which Netskope web category to select, refer to the Netskope URL categorization lookup.
Select Apply.
Select the type of Activity that triggers the policy: upload (data flowing from the user to the internet), download (data flowing from the internet to the user), or upload download.
For Action, select the Select action link and set the action for Low-, Medium-, and High-level threat severities. These settings direct the threat engine on which action to take for each threat severity.
Select Apply.
The Advanced settings allow you to select the Patient zero option, which signals the threat engine to run more diagnostics on the threat and blocks the user from uploading or downloading until the threat engine reaches a verdict. These diagnostics can take up to 15 minutes.
Note
Don't check the Patient zero check box unless you explicitly understand and want to include the feature behavior. When Patient zero is enabled, the policy matches only binary and executable file types. The implications for Patient zero are:
- If the file type is binary and executable, and the Netskope threat engine has a verdict, the threat engine takes the action that matches the policy.
- If the file type is binary and executable, and the Netskope threat engine doesn't have a verdict, the threat engine blocks the activity.
- If the file type isn't binary and executable, the file doesn't match the policy.
For ATP policy recommendations from Netskope, refer to the FAQ section of this document.
Select Next.
Review the details and select Submit.
Create a DLP policy
- Browse to Global Secure Access > Secure > Data Loss Prevention policies.
- Select + Create policy > Netskope policies.
- On the Basics tab:
- Enter a Name and Description (optional) for the policy.
- Select the policy Position. The position sets the policy priority when Netskope processes multiple ATP and DLP policies.
- Set the State to Enabled.
- Select Next.
- On the Policy tab:
- Select the Select destinations link.
- For Destination type, select Categories or Applications.
- Search for and select the desired categories or applications.
- Select Apply.
- Choose the type of Activity that should be subject to this policy. Select both Upload and Download. The activities available vary according to the categories and applications you select. In addition to Upload and Download, Netskope offers granular support for a wide range of activities for various applications and application categories. These categories allow you to apply comprehensive data loss prevention policies to secure data in your business-critical applications and application categories.
- To choose from and configure DLP profiles, select the Select profiles link. You can choose from DLP profiles that cover predefined data identifiers and personal identifiers such as financial data, medical data, biodata, inappropriate terms, and industry focused information.
- Select the DLP profiles that match your required information types and select the action to enforce for each. (For initial testing purposes, select DLP-PCI and DLP-PII.)
- Select Apply.
- Optionally, select the Select advanced settings link and select Continue policy evaluation. The Continue Policy evaluation option ensures DLP policy evaluation doesn't stop after a DLP policy match. Every DLP match raises an alert and policy evaluation continues for each of the remaining DLP policies. Alternatively, if you prefer to stop policy evaluation after the first DLP match and not continue with the rest of the DLP policies, don't select the Continue policy evaluation option.
- Select Apply.
- Select Next.
- Review the details and select Submit.
For instructions on how to create custom DLP profiles, see Create a custom DLP profile.
Link an ATP, DLP, or TLS inspection policy to the security profile
Use Security profiles and Conditional Access to assign ATP and DLP policies to users.
- Browse to Global Secure Access > Secure > Security profiles.
- Select the security profile you want to modify.
- Switch to the Link policies view.
- Link an ATP policy:
- Select + Link a policy > Existing Threat Protection policy.
- From the Policy name menu, choose the Threat Protection policy you created.
- Leave Position and State set to the defaults.
- Select Add.
- Link a DLP policy:
- Select + Link a policy > Existing Netskope DLP policy.
- From the Policy name menu, choose the DLP policy you created.
- Leave Position and State set to the defaults.
- Select Add.
- Link a TLS inspection policy:
- Select + Link a policy > Existing TLS inspection policy.
- From the Policy name menu, choose the TLS inspection policy you created.
- Leave Priority and State set to the defaults.
- Select Add.
- Close the Security Profile.
To prevent confusion between Microsoft and Netskope policies, Netskope policies include NS in their priority listing. The platform evaluates Microsoft security policies first. The traffic then goes to Netskope, which applies ATP and DLP policies before sending the traffic to its destination.

Note
Don't use the baseline security profile to enforce ATP and DLP policies, as the baseline security profile isn't supported during this preview.
Create a conditional access policy to enforce ATP, DLP, and TLS inspection policies
To enforce the Global Secure Access security profile and TLS inspection policy, create a conditional access policy with the following details. For more information, see Create and link Conditional Access policy.
| Policy detail | Description |
|---|---|
| Users | Select your test users. |
| Target resources | All internet resources with Global Secure Access. |
| Session | Use the Global Secure Access security profile you created. |
Validate your configuration
Because of token life validity on the Global Secure Access client, changes to the Security Profile policy or the ATP policy can take up to one hour to apply.
To ensure that TLS inspection works as expected, disable QUIC protocol support for your browsers. To disable QUIC, see QUIC not supported for Internet Access. For more detail, see the troubleshooting section TLS inspection only works on some sites.
Important
Before proceeding, validate your configuration settings.
To validate your configuration settings:
- Validate that the client device has the Global Secure Access client installed.
- Validate that the corresponding Security Profile using Conditional Access is enforced.
- Browse to netskope.com/url-lookup.
Success: If you see a search field and Search button, Netskope is analyzing your traffic and the policies are in effect.

Failure: If you see the message, "The URL Lookup is only available for Netskope customers. Use a Netskope steering method to access this service.", the test failed. Check the Troubleshooting section for guidance.

Test ATP policies
To test your ATP policies, use the European Institute for Computer Antivirus Research (EICAR) anti-malware test file. For more advanced testing, engage your security or red teams. For the EICAR test:
- Sign in to the test device by using a test user targeted by the Conditional Access policy you created.
- Download the EICAR test file. If Microsoft Defender SmartScreen blocks the download, select More actions, then select Keep.
- Disable QUIC protocol support for your browsers. To disable QUIC, see QUIC not supported for Internet Access.
Test DLP policies
To test the DLP policy:
- Validate DLP-PCI and DLP-PII DLP profiles as suggested in the Create a DLP policy section.
- Open a test file that contains PCI and PII data, such as dlptest.com/sample-data.pdf.
- If the policy is configured properly, the action is blocked with the following message:
'Non-compliant action. The current operation is blocked by your IT administrator.'
Monitoring and logging
Check alerts by going to Global Secure Access > Dashboard.
Threat alerts
To view threat alerts, go to Global Secure Access > Alerts.

More reporting might be available depending on the type of threat, such as Malware detected or Data loss prevention. Select the alert Description to inspect the alert type and view more details.
- Expand the Entities section.
- Switch to the File hash tab.
- To download the Structured Threat Information eXpression threat report, select Download malware STIX report.
- To download detonation images, if available, select Download additional malware details.

- To view the threat URL, switch to the URL tab.

Traffic logs
To view traffic logs, go to Global Secure Access > Monitor > Traffic logs.
To show all traffic subject to Netskope inspection:
- Go to the Transactions tab.
- Select Add filter.
- Search for or scroll to find the Vendor names filter.
- Enter
Netskopein the field to show only Netskope traffic. - Select Apply.


This sample shows an event triggered by an ATP policy with blocked content. Check the filteringProfileName and policyName to identify the policies responsible for the applied action.
{
    "action": "Block",
    "agentVersion": "1.7.669",
    "connectionId": "0000000000000000.0.0",
    "createdDateTime": "07/25/2024, 05:00 PM",
    "destinationFQDN": "secure.eicar.org",
    "destinationIp": "172.16.0.0",
    "destinationPort": "0000",
    "destinationWebCategory/displayName": "General,IllegalSoftware",
    "deviceCategory": "Client",
    "deviceId": "00001111-aaaa-2222-bbbb-3333cccc4444",
    "deviceOperatingSystem": "Windows 10 Pro",
    "deviceOperatingSystemVersion": "10.0.19045",
    "filteringProfileId": "11112222-bbbb-3333-cccc-4444dddd5555",
    "filteringProfileName": "ATP Profile",
    "headers/origin": "secure.eicar.org",
    "headers/referrer": "secure.eicar.org/text.html",
    "headers/xForwardedFor": "10.0.0.0",
    "initiatingProcessName": "chrome.exe",
    "networkProtocol": "IPv4",
    "policyId": "22223333-cccc-4444-dddd-5555eeee6666",
    "policyName": "Block Malware",
    "policyRuleId": "33334444-dddd-5555-eeee-6666ffff7777",
    "policyRuleName": "*",
    "receivedBytes": "14.78 KB",
    "resourceTenantId": "",
    "sentBytes": "0 bytes",
    "sessionId": "",
    "sourceIp": "clipped",
    "sourcePort": "00000",
    "tenantId": "44445555-eeee-6666-ffff-7777aaaa8888",
    "trafficType": "Internet",
    "transactionId": "55556666-ffff-7777-aaaa-8888bbbb9999",
    "transportProtocol": "TCP",
    "userId": "66667777-aaaa-8888-bbbb-9999cccc0000",
    "userPrincipalName": "user@contoso.com",
    "vendorNames": "Netskope"
}
Troubleshooting
Try the following recommendations if you experience issues while configuring or using the Global Secure Access Advanced Threat Protection (ATP) and DLP integration with Netskope.
I can't create a Netskope ATP or DLP policy
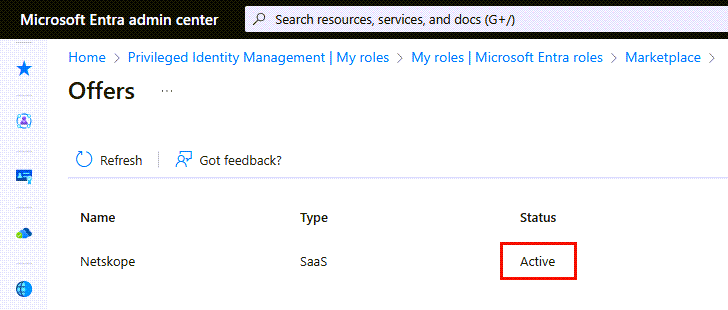
Check if you have an active Netskope offer.
I can't purchase a Netskope offer, or the status shows as failed
Important
You must set up TLS inspection before purchasing a Netskope offer from the marketplace.
To enable TLS inspection, follow the steps in Configure Transport Layer Security Inspection.
I configured TLS inspection and now get errors browsing the internet
If you see errors like "Your connection isn't private" or other certificate errors, check that
- You imported the Certificate Authority certificate used to sign the TLS inspection certificate to the device.
- You placed the Certificate Authority certificate in the correct certificate store, Trusted Root Certificate Authorities.
Check that TLS inspection is working correctly
To check if TLS inspection is working correctly, go to the website you'd like to check, select the View site information icon, and then select Connection is secure. Select the Show certificate icon and validate the issuer of the certificate is Microsoft Global Secure Access Intermediate. The presence of this certificate issuer indicates Microsoft intercepted the TLS session.

If you configured TLS inspection correctly, waited at least 10 minutes after configuring it, and still don't see TLS sessions issued by Microsoft Global Secure Access Intermediate, check the configuration of your host file.
TLS inspection only works on some sites
The Global Secure Access client doesn't currently intercept requests that use the QUIC protocol. The Global Secure Access client has a check for QUIC status within Advanced diagnostics > Health check. To disable QUIC in your browser, see QUIC not supported for Internet Access.
Check which Netskope web category a URL maps to
To ensure Netskope policies are set to the correct web or application categories, refer to the Netskope URL categorization lookup: www.netskope.com/url-lookup. To successfully access the lookup tool, the request must go through Netskope proxies, which requires at least one Netskope policy to be configured and linked to the security profile in use. Note: web categories Education, Government, Finance, and Health and Medicine aren't inspected by default.
Check if Netskope ATP is analyzing your traffic
To test if Netskope's ATP engine is analyzing traffic, check the test machine's egress IP address by going to iplocation.net. Check the ISP field to confirm whether traffic is routed through Netskope's ATP engine.

Note
If you can't access either of the lookup websites on the test machine with Netskope ATP policy active, and the policy has a default action set to block, the block might be due to policy rules.
Known limitations
Known limitations for Advanced Threat Protection include:
- The baseline security profile doesn't support enforcing ATP or DLP policies in this preview. Use Security Profiles and Conditional Access to assign threat protection policies to users.
- Firefox isn't supported.
Frequently asked questions (FAQ)
What threat efficacy does Netskope ATP provide?
Netskope ATP provides Fast Scan and Deep Scan options.
- Fast Scan is the default option. It provides real-time (T+0) scans using Netskope's standard threat protection.
- Deep Scan provides more thorough T+1-hour scans using Netskope's advanced threat protection.
Are there any recommended threat protection policies?
Yes, Netskope recommends creating these two category-based policies for threat protection:
| Policy | Destination categories | Activities | Severity-based action | Patient Zero |
|---|---|---|---|---|
| Policy 1 (without Patient Zero) | All (Select all the categories in the destinations list) | Upload and Download | 'Block' for all | Not enabled |
| Policy 2 (with Patient Zero) | Newly registered domains, Newly observed domains, Parked Domains, Uncategorized, Web Proxies/Anonymizers | Upload and Download | 'Block' for all | Enabled |
Note
For the Netskope advanced threat protection policy, the patient zero setting only applies to binary and executable files (for more detail, see Supported File Types for Detection). When the patient zero setting is enabled, only binary and executable files are sent for threat scanning. The threat engine blocks new files until it reaches a verdict. Because of the default blocking nature, it's a good practice to enable the threat protection policies in the preceding table.
What is the pricing of Microsoft products and Netskope functionality?
You can activate a free trial or contact Netskope for a private offer. For details, see Activate a Netskope offer through the Global Secure Access marketplace.
What activities do Netskope threat engines support?
Netskope threat engines support three activities: Upload, Download, and Browse.
By default, Netskope scans traffic categorized as 'Browse,' so you don't need to configure a policy. You can configure 'Upload' and 'Download' via policies that match your requirements. For more information on Netskope web activities and policy usage, see Netskope's documentation on Real-time Protection Policies.
How can I customize or modify DLP profiles to suit organizational policies?
For instructions on how to create custom DLP profiles, see Create a custom DLP profile.
Learn more about Netskope Threat Protection in these articles:
- Netskope Threat Protection overview
- Netskope Threat Protection documentation
- Netskope Data Loss Prevention