Note
Access to this page requires authorization. You can try signing in or changing directories.
Access to this page requires authorization. You can try changing directories.
Intelligent Local Access capability can help optimize the traffic flow from Microsoft Entra clients to Microsoft Entra Private Access apps when the client is on a corporate/private network. This article explains how to enable the Intelligent Private Network for Microsoft Entra Private Access.
Prerequisites
To configure a Global Secure Access (GSA) Private Networks, you must have:
Global Secure Access Administrator role or the Privileged Role Administrator role.
Product licensing. For details, see the licensing section of What is Global Secure Access. If needed, you can purchase licenses or get trial licenses.
Private Access overview
Today, Entra Private Access (PA) sends all traffic, both application and authentication, over the SSE / Private Access service, regardless of the user's location. This process, represented by the green workflow in the following diagram, results in network backhauling, which negatively impacts user experience by adding latency and slowing down the network significantly. With the Intelligent Local Access (ILA) feature, we aim to address this issue by enabling intelligent network routing. The GSA client determines how traffic is routed to private applications. This feature ensures a consistent security posture for employees, whether they work remote or on-premises. This adaptive local access significantly improves user experience by reducing latency and avoiding network hair pinning, represented by the blue workflow in the following diagram.

The GSA client uses DNS probes to determine if the client is inside the corporate network. Once the client identifies corpnet locations, you can define which Private Access applications should use ILA and bypass the traffic instead of sending it through the cloud backend
Enable Intelligent local access capability
To enable the Intelligent local access for Microsoft Entra Private Access, complete these steps. This procedure involves creating Private networks and adding application to the private network.
Sign in to the Microsoft Entra admin center.
Browse to Global Secure Access > Connect > Private networks.
Select Add Private network.

In the Add Private network panel that opens, define following:
Name - The friendly name of the network.
DNS Servers - Server address used for DNS resolution.
- Internet Protocol version 4 (IPv4) address, such as 10.10.2.1, that identifies a DNS server on the network.
Fully qualified domain name
- The fully qualified domain name (FQDN) that needs to be resolved.
Enter the appropriate details for the selected Resolved to IP address type. Depending on what you select, fill in an appropriate value in the subsequent field Resolved to IP address value.
| Resolved to IP address type | Resolved to IP address value |
|---|---|
| IP address | Internet Protocol version 4 (IPv4) address, such as 10.10.2.1, that identifies a device on the network. |
| IP address range (CIDR) | Classless Inter-Domain Routing (CIDR) represents a range of IP addresses where an IP address is followed by a suffix that indicates the number of network bits in the subnet mask. For example, 10.10.2.0/24 indicates that the first 24 bits of the IP address represent the network address, while the remaining 8 bits represents the host address. Provide the starting address and network mask. |
| IP address range (IP to IP) | Range of IP addresses from start IP (such as 10.10.2.1) to end IP (such as 10.10.2.10). Provide the IP address start and end. |
Select Target Resource.
- Select Quick Access or PA enterprise app which is locally bypassed when this private network is detected.
Select Create.

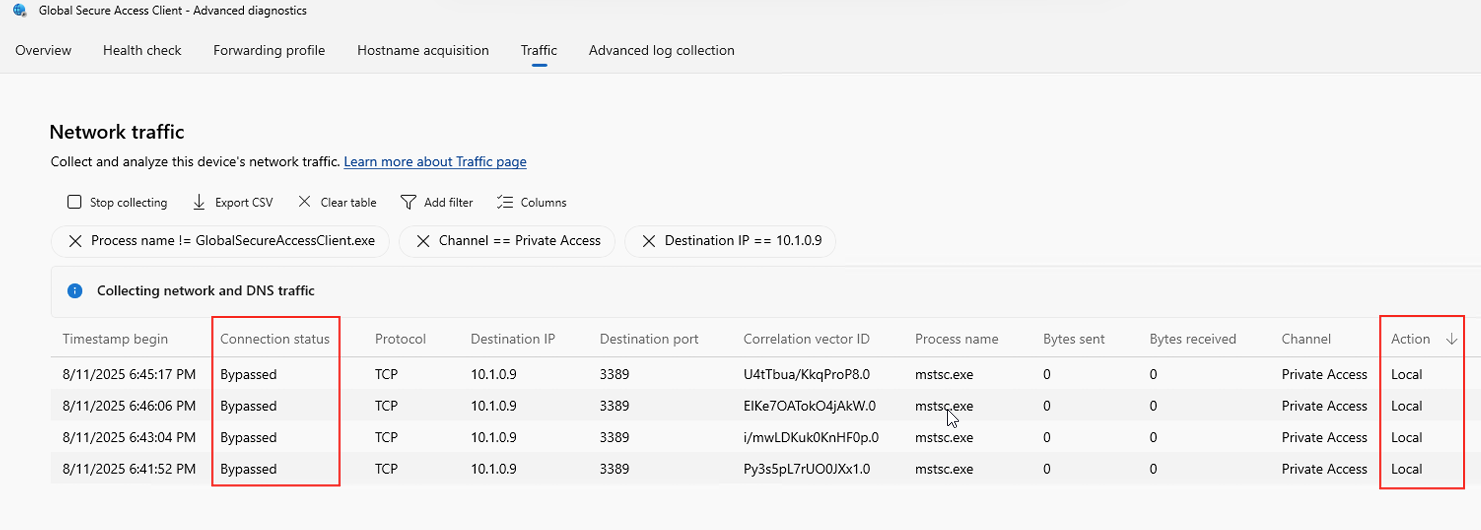
Verify ILA flow on the client
You can use the advanced diagnostic client in Global Secure Access to monitor the ILA network traffic.
Open Advanced diagnostics for client.
- Select Start Collecting Network traffic.
- Filter by Destination IP/FQDN for the end resource.
- Ensure the default filter for Action == Tunnel is removed.

- Access the application.
- Verify that the Connection Status is Bypassed and that Action is Local in the Network Traffic.