Note
Access to this page requires authorization. You can try signing in or changing directories.
Access to this page requires authorization. You can try changing directories.
This article walks you through how to configure alerts for anomaly detection events using the Real-Time hub in Microsoft Fabric. The alerts help you monitor specific events and trigger automated actions when those events occur.
Important
This feature is in preview.
How to set alerts on anomaly detection events
Launch the Set alert page
Select the Real-Time hub icon in the left navigation pane of the Fabric portal.
In the Real-Time hub, select Fabric events under the Subscribe to category.

In the Fabric events list, locate Anomaly detection event. Select either the ⚡ lightning icon or the ⋯ (three dots) menu next to the event, then select Set alert.


Details section
On the Add rule page, in the Details section, for Rule name, enter a name for the rule.

Monitor section
In the Add rule side panel, configure the following settings:
In the Monitor section, choose Select source events.

In the Configure connection settings page, choose your Fabric workspace. This workspace should contain the anomaly detection events you want to monitor.

Select the Item that you want to monitor. This item should be a Fabric workspace item that contains the anomaly detection events you want to track.

Select the Configuration option.
Set filters to narrow down the events you want to monitor. You can filter by specific attributes, including Field, Operator, and Value. Ideally, set the filter for when
data.ConfidenceScoreis greater than a specified value to ensure that only high-confidence anomaly detection events are tracked.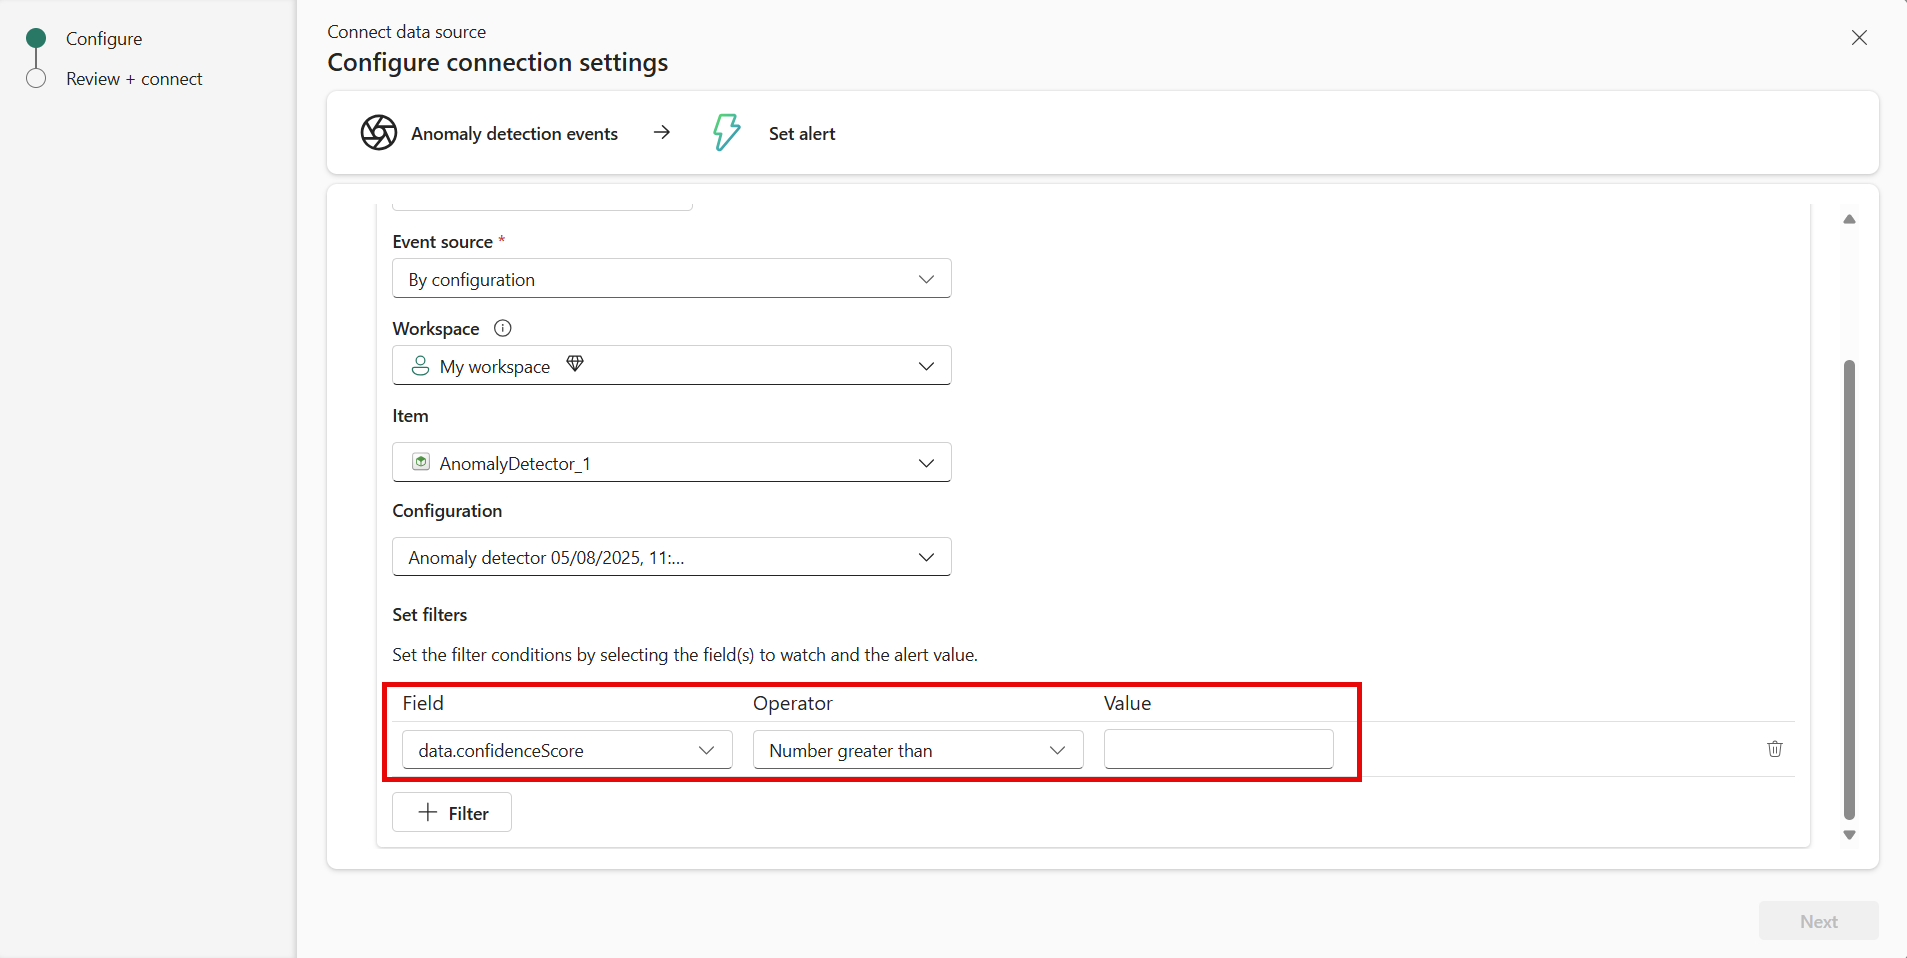
Select Next to proceed to the next step.
Review your selections on the Review + connect page. Ensure that the Fabric workspace and item are correct, and that the filters are set as desired. Select Save to confirm your selections or Back to edit.


Condition section
In the Condition section, for Check, select On each event.

Action section
In the Action section, select one of the following actions:
To configure the alert to send an email when the condition is met, follow these steps:
For Select action, select Send email.
For To, enter the email address of the receiver or use the drop-down list to select a property whose value is an email address.
For Subject, enter a subject for the email.
For Headline, enter a headline for the email.
For Notes, enter notes for the emails.
Note
When entering subject, headline, or notes, you can refer to properties in the data by typing
@or by selecting the button next to the text boxes. For example,@BikepointID.For Context, select values from the drop-down list that you want to include in the context.

Teams message
To configure the alert to send a Teams message to an individual or a group chat or a channel when the condition is met, follow these steps:
For Select action, select Teams -> Message to individuals or Group chat message, or Channel post.
Follow one of these steps depending on the option you selected in the previous step:
- If you selected the Message to individuals option, enter email addresses of receivers or use the drop-down list to select a property whose value is an email address. When the condition is met, a Teams message is sent to specified individuals.
- If you selected the Group chat message option, select a group chat from the drop-down list. When the condition is met, a message is posted to the group chat.
- If you selected the Channel post option, select a team and a channel. When the condition is met, a message is posted in the channel.
For Headline, enter a headline for the Teams message.
For Notes, enter notes for the Teams message.
Note
When entering headline or notes, you can refer to properties in the data by typing
@or by selecting the button next to the text boxes. For example,@BikepointID.For Context, select values from the drop-down list that you want to include in the context.

Run Fabric activities
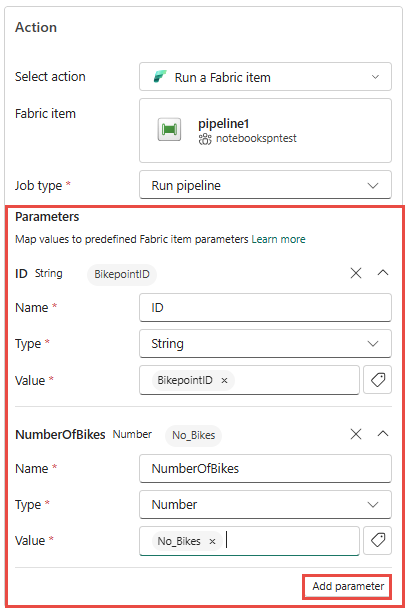
To configure the alert to launch a Fabric pipeline, notebook, or Spark job when the condition is met, follow these steps:
For Select action, select Run pipeline, Run notebook, Run Spark job, or Run Function (preview).

On Select Fabric item to run, select the Fabric item (pipeline, notebook, Spark job, or function) from the list.
For the Pipeline, Notebook, and Spark job types, select Add parameter and specify the name of the parameter for the Fabric item and a value for it. You can add more than one parameter.
If you selected Run function option, follow these steps:
For Function, select a function from the list.
For parameters to the function, specify values for each of the parameters defined for the function as shown in the following example:

You can use properties from the data by typing
@or by selecting the button next to the text boxes. For example,@BikepointID.
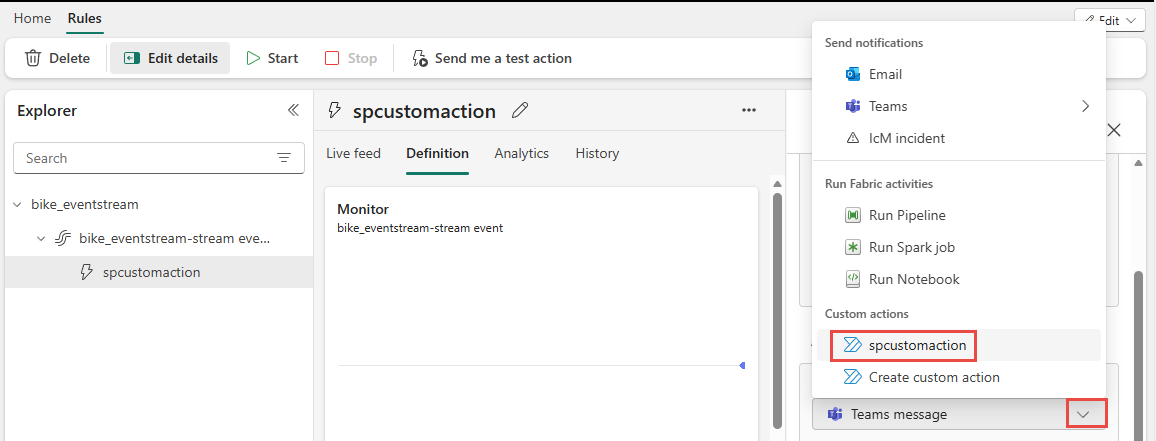
Custom action
To configure the alert to call a custom action when the condition is met, follow these steps:
For Select action, select Create custom action.

As mentioned in the Action section, create the rule first, and then complete the custom action setup by following steps from Trigger custom actions (Power Automate flows).

After you create the custom action, in the Definition pane of the rule, select the custom action from the Action drop-down list.

Save location section
In the Save location section, for Workspace, select the workspace where you want to Fabric activator item to be created or that already exists. If you're creating a new activator item, enter a name for the activator item.

Create alert
Select Create at the bottom of the page to create the alert.

You see the Alert created page with a link to open the rule in the Fabric activator user interface in a separate tab.

You see the Activator item in the Fabric Activator editor user interface. Select the rule if it's not already selected. You can update the rule in this user interface. For example, update the subject, headline, or change the action from email to Teams message.

