Note
Access to this page requires authorization. You can try signing in or changing directories.
Access to this page requires authorization. You can try changing directories.
After you secured and configured your network, you're ready to sync your on-premises Active Directory with Microsoft 365. This step is crucial for managing your users and groups in one place.
First, choose the right authentication method for your Microsoft Entra hybrid identity solution. Then, install Microsoft Entra Connect Sync or configure Active Directory Federated Services (AD FS).
Choose your authentication method
The following are the three ways to move your identities to Microsoft 365 using an on-premises Active Directory:
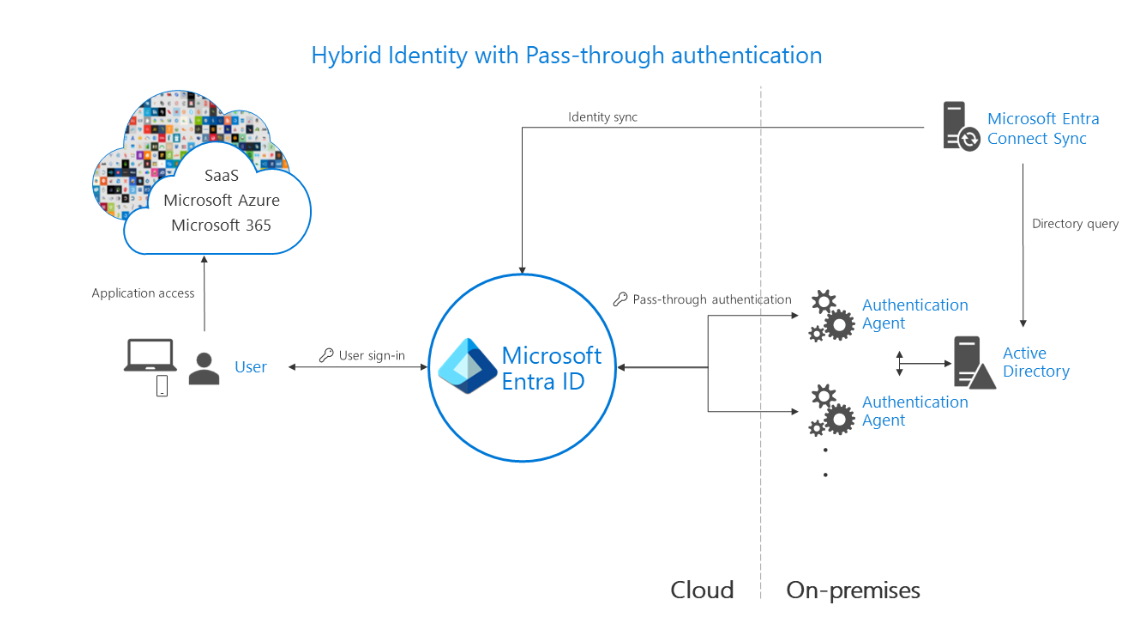
- Microsoft Entra Connect with password hash sync (Recommended path)

- Microsoft Entra Connect with passthrough authentication
- Active Directory Federated Services (AD FS)


Note
For education scenarios:
- Entra Connect Sync is only needed if you are syncing users between your on-premises active directory and the cloud Entra ID system.
- AD FS deployment is only needed if you need to create a federated authentication system for collaboration partners that reside outside your own tenant identity.
For more information, see Choose the right authentication method for your Microsoft Entra hybrid identity solution.
Install Microsoft Entra Connect Sync
To install either cloud sync or Microsoft Entra Connect:
- Sign in to the Microsoft Entra admin center as at least a Hybrid Administrator.
- Browse to Identity > Hybrid management > Microsoft Entra Connect > Cloud sync.

- On the left, select Agent.
- Select Download on-premises agent, and select Accept terms & download.
- After the Microsoft Entra provisioning agent package finishes downloading, run the AADConnectProvisioningAgentSetup.exe installation file from your downloads folder.
- On the splash screen, select I agree to the license and conditions, and then select Install.
- After the installation operation completes, the configuration wizard launches. Select Next to start the configuration.
- On the Select Extension screen, select HR-driven provisioning (Workday and SuccessFactors) / Microsoft Entra Connect cloud sync and select Next.
- Sign in with your Microsoft Entra Global Administrator account.
- On the Configure Service Account screen, select a group Managed Service Account (gMSA). This account is used to run the agent service. To continue, select Next.
- On the Connect Active Directory screen, if your domain name appears under Configured domains, skip to the next step. Otherwise, type your Active Directory domain name, and select Add directory.
- Sign in with your Active Directory domain administrator account. Select OK, then select Next to continue.
- Select Next to continue.
- On the Configuration complete screen, select Confirm.
- Once this operation completes, you should be notified that Your agent configuration was successfully verified. You can select Exit.
- If you still get the initial splash screen, select Close.

Configure Active Directory Federated Services (AD FS)
Use these links to see instructions on how to install AD FS role service, depending on your method of choice:
Next steps
Next, lets learn about user provisioning.