Note
Access to this page requires authorization. You can try signing in or changing directories.
Access to this page requires authorization. You can try changing directories.
The Temperature converter sample is a Progressive Web App (PWA) that demonstrates the basics of how to build a PWA. You can modify this sample to start creating your own PWA.
This article covers how to obtain the sample, install it on Windows, run the sample, and modify it. This sample works with multiple operating systems, including Windows. This article provides steps for Windows; other platforms have similar steps.
See also:
Step 1: Preview the app running in a browser window
To examine the user interface of the app:
In Microsoft Edge, go to the live Temperature converter sample web app in a new window or tab (hosted at github.io):

The sample Progressive Web App (PWA) is initially shown in the browser, as a web app, but also has an App available (
 ) button in the Address bar (don't click it yet).
In the temperature text box, type 22.
The displayed temperature changes to 71.6 F.
Click the from dropdown list, and then click outside of it.
Click the to dropdown list, and then click outside of it.
Available units are:
- Celsius
- Fahrenheit
- Kelvin
Close the browser tab for the app.
In a later step, after the sample Progressive Web App (PWA) is installed as a local app, the app runs in its own window:

The sample is a Progressive Web App, rather than a regular website. Therefore, you can install the Progressive Web App (PWA) as an app on the device, and the app's window contains the same app UI as within the full web browser.
The installed app's window is a browser-based window, without most of the browser UI. The installed app is integrated into the device's UI, such as the Windows taskbar and Windows Start menu.
The above instance of the sample app is hosted at github.io. In the sections below, you use a local server instead, to show how to locally test a Progressive Web App (PWA) while developing it. You'll access the web app from your local server (localhost) instead, and install it to your device from there.
Step 2: Install Visual Studio Code
Visual Studio Code enables viewing the sample code, modifying the sample, and creating your own Progressive Web App (PWA) by using the sample as a starting point.
Install (or optionally update) VS Code, as follows:
Press the Windows key, enter Visual Studio Code, and then click Open.
If Visual Studio Code isn't installed, go to Visual Studio Code and then download and install it.
Step 3: Install git
Install or update git, as follows:
Open Visual Studio Code.
In the View menu, select Terminal.
Enter the command:
git -vIf git is installed, a version number is displayed, such as
git version 2.51.0.windows.2.Go to Downloads at git-scm.com.
In the upper right, note the Latest version number, such as 2.51.1.
If git isn't installed yet, or you want to update it, download and install the latest version of git, from Downloads at git-scm.com. Otherwise, skip to the next section, below.
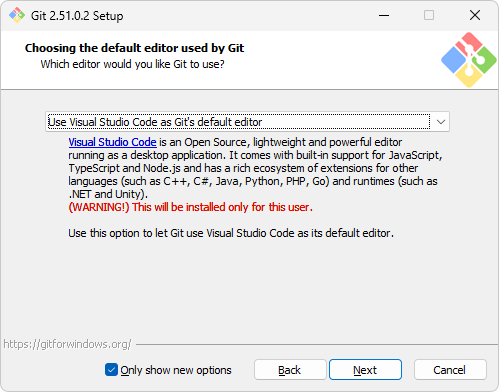
During installation, you can accept the defaults, except it's recommended that you change the default editor from vim to Visual Studio Code:
Step 4: Install Node.js
Node.js includes a web server that you'll use to run and test the sample locally.
Install or update Node.js, as follows:
Open Visual Studio Code.
In the View menu, select Terminal.
Enter the command:
node -vIf Node.js has been installed, a version number is output, such as v22.19.0.
Go to Node.js.
In the lower left, in the Latest LTS button, note the version number, such as v22.20.0.
If Node.js isn't installed yet, or you want to update it, click the Get Node.js button. Otherwise, skip to the next section, below.
You end up at a page such as Download Node.js.
Click the Windows Installer (.msi) button.
The Downloads window of Microsoft Edge opens, and displays a file name such as
node-v22.20.0-x64.msi.Click the open file link under the file name.
The Node.js Setup Wizard window opens.
Click the Next button, and follow the prompts. You can accept the defaults, and then click the Install button.
The Node.js Setup Wizard window closes.
In VS Code's terminal, enter the command:
node -vThe latest version number is displayed, such as v22.20.0.
Step 5: Fork and clone the "MicrosoftEdge / Demos" repo
Next, you'll get a local copy of the sample code, by forking the Microsoft Edge / Demos repo. Because you don't have permissions to directly push commits to the Demos open-source repo, you'll fork the Demos repo to create your own copy of the repo, instead of cloning the Demos repo.
You might be able to download the "main" branch of the Demos repo, and edit the files in the "main" branch, rather than forking and cloning the repo and then creating a working branch (test1) in which to edit the files. This article shows the more complex but flexible way: forking the repo.
Fork and clone the MicrosoftEdge / Demos repo, as follows:
Press Windows+E.
File Explorer opens.
Check whether Demos repo has been cloned:
Navigate to where you want the repo cloned to, such as:
C:\Users\localAccount\GitHub\If the repo hasn't been cloned yet, such as
C:\Users\localAccount\GitHub\Demos\, do the following steps; otherwise, skip to the next section.Fork the repo:
Open the MicrosoftEdge / Demos repo in a new window or tab.
In the upper right, click the down-arrow on the Fork button, and then select Create a new fork.
For more information, see Forking a repository in Fork a repository in GitHub Docs.
Click the Create fork button.
Clone your fork to the local drive:
On GitHub, navigate to your fork of the MicrosoftEdge / Demos repository.
Above the list of files, click the Code button.
In the HTTPS tab, click the Copy to clipboard (
 ) button.
Open Visual Studio Code.
In the View menu, select Terminal.
Change to the directory where you want to clone the Demos repo:
cd ~/GitHubOr enter the following command, specifying your local account:
cd c:/users/localAccount/GitHub/Type
git clone, and then paste the URL you copied earlier. It will look like this, with your GitHub username instead of YOUR-USERNAME:git clone https://github.com/YOUR-USERNAME/Demos.gitPress Enter.
A local clone of your forked Demos repo is created.
See also:
- Fork a repository
- Forking a repository in Fork a repository.
- Cloning your forked repository in Fork a repository.
- Cloning a repository
Step 6: Run the PWA as a web app on your local web server
Next, you'll run and test the sample Progressive Web App (PWA) on your local web server, in Microsoft Edge. You'll use http-server, a local development web server that can be run in Node.js.
While developing or testing a website or app, including a PWA, you can use a local web server. However, when the app is ready for users, you deploy the app to the web by using a web hosting provider. Like a regular website or app, a PWA is distributed to users by using a web server.
Change to the /temperature-converter/ directory of the cloned Demos repo, and start the http-server from there, as follows:
Open Visual Studio Code.
In the File menu, select Open Folder.
The Open Folder dialog opens.
Navigate to the cloned Demos repo folder, such as
C:\Users\localAccount\GitHub\Demos\, select the\temperature-converter\folder in it, and then click the Select Folder button.In the View menu, select Terminal.
The Terminal pane opens, with the prompt at
Demos\temperature-converter\, such asC:\users\localAccount\GitHub\Demos\temperature-converter.Enter the following command:
npx http-serverThe local development web server starts, using the
http-serverNPM package:
If you get a "running scripts is disabled" error (if VS Code's Terminal is using PowerShell), enter the execution policy PowerShell command, and then issue the npx command again:
Set-ExecutionPolicy -ExecutionPolicy Bypass -Scope CurrentUser
npx http-server
Example output:
Need to install the following packages:
http-server@14.1.1
Ok to proceed? (y)
If needed, press Y and then Enter.
Output is displayed, such as:
Starting up http-server, serving ./
...
Available on:
  http://10.0.1.2:8080
  http://127.0.0.1:8080
Hit CTRL-C to stop the server
In Microsoft Edge, go to http://localhost:8080 (or an equivalent URL that was output in the terminal, from the
npx http-servercommand).The temperature convertor app is displayed in the browser:

Step 7: Install the PWA from your localhost web server as a local app
Install the sample Progressive Web App (PWA) from your localhost web server as an app on Windows, as follows:
In the Address bar, click the App available. Install temperature converter (
) button.An Install app dialog opens:

Click the Install button.
The app is installed locally. The App installed dialog opens within the app:

Click the Allow button.
A Windows Apps dialog asks "Would you like to pin Temperature convertor to your taskbar? This request is coming from Temperature convertor."
Click the Yes button.
The Temperature convertor app's icon (
 ) appears on the Windows taskbar.
The Temperature convertor app is displayed within its own app window:
The window is a browser window without most of the browser UI.
Close the Temperature converter app window.
Step 8: Open the installed app
Run the sample Progressive Web App (PWA) as a local app on the device.
Press the Windows key, start typing Temperature converter, and then click Open.
The installed Temperature converter app opens in its own window.
Because you installed the app from
localhost, when you start the app, the right side of the title bar displays localhost:8080 for a few seconds:
If you had installed the app from the
github.ioserver, when you start the app, the right side of the title bar would instead display microsoftedge.github.io for a few seconds:
You can also open the installed app by other ways that are supported by the device, such as the Temperature convertor (
) button pinned to the Windows taskbar.In the temperature text box, enter 22.
The displayed temperature is updated to 71.6 F.
Click the from and to dropdown lists.
Available units are:
- Celsius
- Fahrenheit
- Kelvin
Step 9: Examine the service worker handling offline caching
The local app window for a Progressive Web App (PWA) is a browser-based window, so Microsoft Edge DevTools can be used to work with the PWA.
Confirm that the service worker (sw.js) is running when you open the PWA as a local app, as follows:
Open the installed Temperature converter app.
Right-click in the app window (below the title bar), and then select Inspect.
DevTools opens, in a separate window; undocked. (Other docking options are dimmed and not available.) The app window is a browser window that includes the DevTools Inspect command.
In DevTools, select the Application (
 ) tool.
In the tree on the left, in the Application section, select Service workers.
Information about the service worker is displayed:

The service worker's Source is
sw.js, with Status of activated and is running.In the tree on the left, in the Storage major section, expand Cache storage, and then select temperature-converter-v1:

The service worker cache is displayed. All of the resources that are cached by the service worker (or cached automatically by the browser) are listed:
/(index.html) - The HTML webpage of the app, defining layout of controls./converter.css- The styling for the webpage of the app./converter.js- The JavaScript file containing the app logic./icon512.png- The app icon image file to represent the app./manifest.json- The app manifest, containing basic information about the app, for the device's operating system to use.
The service worker adds three files to the cache, explicitly (
.html,.css, and.js). The icon (.png) and manifest (.json) are cached automatically by the browser.
Step 10: Use DevTools to turn off the internet connection and test the PWA offline
Try the Progressive Web App (PWA) as an offline app, as follows:
In the DevTools window, open the Network (
 ) tool.
Near the top, in the Throttling menu to the right of the Disable cache checkbox, change from No throttling to Offline:
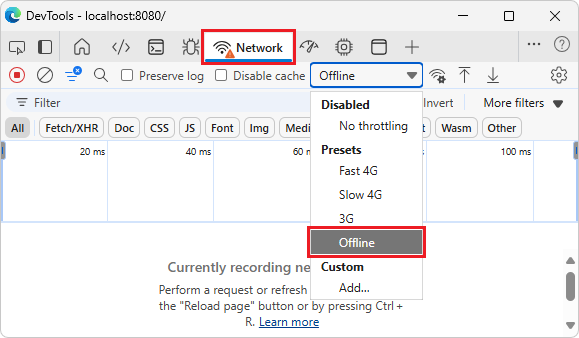
The Network tab adds a warning icon to remind you of this throttling.
In the Temperature convertor window, right-click and then select Refresh.
In the temperature text box, type 22.
The displayed temperature changes to 71.6 F. The app is still displayed correctly and still works correctly, by using locally cached resources that are managed by the service worker.
In the DevTools window, in the Throttling menu to the right of the Disable cache checkbox, change from Offline back to No throttling.
The throttling warning icon is removed from the Network tab.
Close the DevTools window.
Close the Temperature converter app window.
This same use of DevTools also works when the app is in Microsoft Edge as a web app, rather than an installed app. For more information, see Emulate offline in Network features reference.
Step 11: Uninstall the installed app
Uninstall the Progressive Web App (PWA), as follows:
Click the Temperature converter button pinned on the Windows taskbar.
The installed Temperature converter app opens.
In the title bar, click the Settings and more (
 ) button, and then click App settings.
In Microsoft Edge, the Apps tab opens (
edge://apps), displaying details about the Temperature converter app:
At the bottom, click the Uninstall button.
The Uninstall app from Microsoft Edge on all synced devices? dialog opens.
Select the Delete app history and data checkbox, and then click the Uninstall button.
Uninstalling a local app from the Windows Start menu
Note: As an example of OS integration, you could uninstall the app via the Windows Start menu, as follows:
Press the Windows key.
Start typing "temperature converter".
Click Uninstall:

Uninstalling a local app by starting from Microsoft Edge
Note: As an alternative, you could uninstall the sample Progressive Web App (PWA) by starting from Microsoft Edge, as follows:
In Microsoft Edge, select Settings and more (...) > More tools > Apps > View apps.
The Apps dialog opens within Microsoft Edge, listing any installed PWAs:

Right-click the Temperature converter card, and then click Manage app.
The All apps / Temperature converter page opens, at
edge://apps.At the bottom, click the Uninstall button.
Continue with the steps below.
Step 12: Modify the sample
You can modify the sample as a starting point for your own Progressive Web App (PWA). You'll change the name of the app from "Temperature converter" to "TC", in a working branch of the repo, and then install the modified app locally.
Create a working branch and switch to it, as follows:
Open Visual Studio Code.
Open the folder in VS Code
In the File menu, select Open Folder.
The Open Folder dialog opens.
Navigate to the cloned Demos repo folder, such as
C:\Users\localAccount\GitHub\Demos\, select thetemperature-converterfolder inside it, and then click the Select Folder button.In the Explorer pane, open
\temperature-converter\index.html.
In the lower left corner of Visual Studio Code, the main branch is indicated.
Create a working branch and switch to it
In Visual Studio Code, in the View menu, select Terminal.
Press Ctrl+C.
The localhost web server (http-server) stops, if it was running. The prompt shows the current path, such as:
PS C:\Users\localAccount\GitHub\Demos\temperature-converter>It's not necessary to stop the server, to modify the code and view the result. We're just temporarily stopping the server in Terminal in order to return to the prompt, to enter some git commands.
Enter the following command, to create a working branch of the repo and switch to it:
git checkout -b test1If the branch already exists, the command outputs: "fatal: a branch named 'test1' already exists".
If the branch already exists, enter the following command, to switch to the branch:
git checkout test1Example output:
Switched to a new branch 'test1'In the lower left of Visual Studio Code, the branch changes from main to test1.
Close the Terminal pane.
In the lower left corner of Visual Studio Code, the test1 branch is indicated:

Modify the files
In Visual Studio Code, in the Explorer pane, open
/temperature-converter/index.html.In
index.html, change the app's name in two lines from "Temperature converter" to "TC", as follows:Change from:
<title>Temperature converter</title>
<meta name="application-name" content="Temperature converter">
to:
<title>TC</title>
<meta name="application-name" content="TC">
Save the file.
In the Explorer pane, open
/temperature-converter/manifest.json.In
manifest.json, change the app's name in two lines from "Temperature converter" to "TC", as follows:Change from:
"name": "Temperature converter",
"short_name": "Temperature converter",
to:
"name": "TC",
"short_name": "TC",
Save the file.
Step 13: View the modified app in the browser
View the modified app in the browser, as follows:
In Visual Studio Code, in the View menu, select Terminal.
Start the server
We previously stopped the web server in Terminal, just to enter some git commands to switch to a working branch.
Enter the following command:
npx http-serverThe local development web server starts again.
View the web app
In Microsoft Edge, go to http://localhost:8080 (or an equivalent URL that was output in the terminal, from the
npx http-servercommand).Refresh (F5) the webpage.
This doesn't give the desired result. Refresh reloads the webpage from the browser's cache, so you see the app that was cached before at that URL (the tab title is Temperature converter).
Hard refresh (Shift+F5) the webpage.
Hard refresh shows the current content directly from the web server.
The tab title changes from Temperature converter to TC:

Step 14: Re-install the modified sample as a local app
Install the modified app from localhost in the browser onto the device, as follows:
Continuing from above: In Microsoft Edge, in the Address bar, click the App available. Install TC (
) button.An Install TC app dialog opens within the browser:

Click the Install button.
The modified app is installed locally. The App installed dialog opens within the app:

Click the Allow button.
A Windows Apps dialog asks "Would you like to pin TC to your taskbar? This request is coming from TC."
Click the Yes button.
The TC app's icon (
) appears on the Windows taskbar.The TC app is displayed within its own window, and the title bar now reads TC:

Step 15: Uninstall the modified local app
Uninstall the modified local app as follows:
In the TC app window, select Settings and more (...) > App settings.
In Microsoft Edge, the Apps tab opens, displaying details about the TC app.
At the bottom, click the Uninstall button.
The Uninstall app from Microsoft Edge on all synced devices? dialog opens.
Select the Delete app history and data checkbox, and then click the Uninstall button.
Step 16: Stop the development web server
In Visual Studio Code, in the View menu, select Terminal.
Press Ctrl+C.
The server stops, with output message:
http-server stopped.
This is the end of the steps for the sample.
Speeding up the modify/re-install cycle
You can skip some of the above steps each time you modify the app, depending on which files you modify:
If you modify an HTML file, CSS file, or the main JavaScript file, you can skip uninstalling and re-installing the app. Empyting the cache and refreshing the page is enough to reload HTML, CSS, and JavaScript changes.
If you modify the manifest file, you must uninstall and re-install the app.
PWA button in the Address bar
After the app has been installed, if you go to the web app in the browser, the PWA button in the Address bar has changed from an App available (![]() ) button to an Open in app (
) button to an Open in app (![]() ) button.
) button.
If you click the Open in app (![]() ) button, the Open Temperature converter dialog opens in the browser:
) button, the Open Temperature converter dialog opens in the browser:

Next steps
Next, you can:
Study the code; see Temperature converter source files.
Make additional minor modifications of the sample's code.
Copy and paste the entire sample directory
/Demos/temperature-converter/and modify the code to create your own Progressive Web App (PWA).
See also
- Use PWAs in Microsoft Edge
- Installing a PWA in Use PWAs in Microsoft Edge.
- Get started developing a PWA
- Temperature converter source files
- Emulate offline in DevTools Network features reference.
Localhost:
- http://localhost:8080 - or equivalent URLs output by the
npx http-servercommand.
GitHub:
- MicrosoftEdge / Demos repo.
- Temperature converter sample hosted at github.io.
- Fork a repository
- Forking a repository in Fork a repository.
- Cloning your forked repository in Fork a repository.
- Cloning a repository
VS Code:
git:
- Downloads at git-scm.com.
Node.js: