Note
Access to this page requires authorization. You can try signing in or changing directories.
Access to this page requires authorization. You can try changing directories.
This article provides information about the management of an Azure Local instance in System Center Virtual Machine Manager (VMM).
Starting with System Center 2025, VMM supports Azure Local machines that are updated to 2408.2, 2411 or later in the 23H2 (25398.xxxx) OS series. Learn more about the new Azure Local offering.
Important
Azure Local instances that are managed by Virtual Machine Manager must not join the preview channel yet. System Center (including Virtual Machine Manager, Operations Manager, and other components) does not currently support Azure Local preview versions. For the latest updates, see the System Center blog.
Supported Azure Local management scenarios with VMM
Addition and management of Azure Local instances. See detailed steps to add Azure Local instances to VMM.
Ability to provision and deploy VMs on the Azure Local instances and perform VM life cycle operations. VMs can be provisioned using VHD(x) files, templates, or from an existing VM. Learn more.
Management of storage pool settings, creation of virtual disks, creation of cluster shared volumes (CSVs), and application of QoS settings.
Moving VMs between Windows Server and Azure Local instances works via Network Migration and migrating an offline (shut down) VM. In this scenario, VMM does export and import under the hood, even though it's performed as a single operation.
The PowerShell cmdlets used to manage Windows Server clusters can be used to manage Azure Local instances as well.
Unsupported Azure Local management scenarios with VMM
Creation of Azure Local instance using SCVMM. See the deployment methods for Azure Local instances.
Configuring network settings of Azure Local hosts and clusters. Network ATC is enabled by default in Azure Local deployments and VMM doesn't support Network ATC. VMM can't recognize Arc-enabled Software Defined Networking configuration either.
Management of Azure Local hosts and clusters which are deployed with AD-less methods like local identity.
Management of Azure Local stretched clusters.
Registration and deregistration of Azure Local instances is supported only through Azure.
Azure Local instances shouldn't be used for other purposes like WSUS servers, WDS servers, or library servers. Refer to Use cases for Azure Local, When to use Azure Local, and Roles you can run without virtualizing. Azure Local machines are intended as virtualization hosts where you run all your workloads in virtual machines. Azure Local Product Terms enable you to run only what is required for hosting virtual machines.
Live migration between any version of Windows Server and Azure Local instances isn't supported.
Note
Live migration between Azure Local instances works, as well as between Windows Server clusters.
Manage the storage pool and create CSVs
After adding the Azure Local instance to SCVMM, you can modify the storage pool settings and create virtual disks and CSVs.
Select Fabric > Storage > Arrays.
Right-click the cluster > Manage Pool, and select the storage pool that was created by default. You can change the default name and add a classification.
To create a CSV, right-click the cluster > Properties > Shared Volumes.
In the Create Volume Wizard > Storage Type, specify the volume name and select the storage pool.
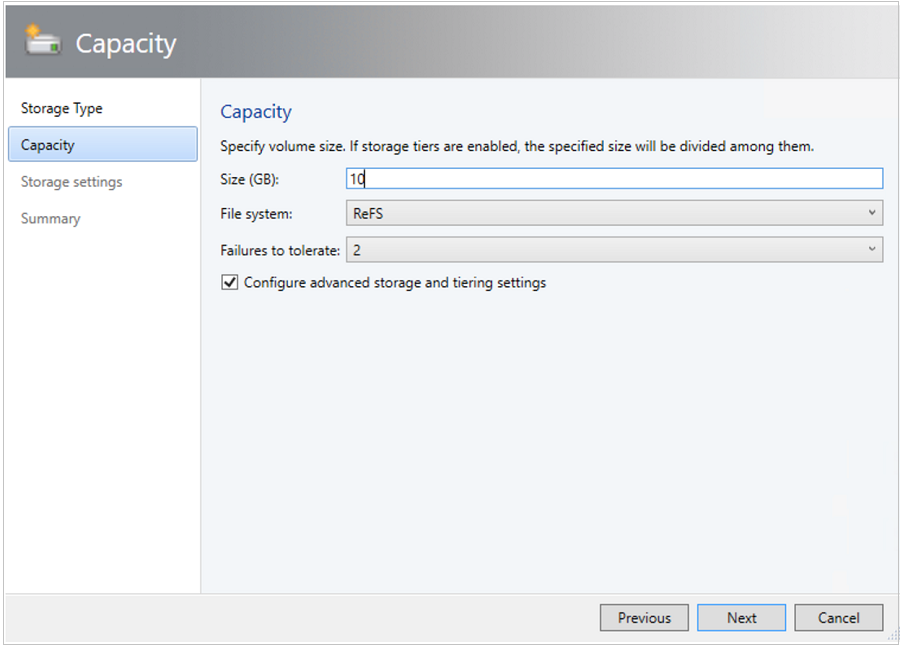
In Capacity, you can specify the volume size, file system, and resiliency (Failures to tolerate) settings. Select Configure advanced storage and tiering settings to set up these options.
In Storage settings, you can specify the storage tier split, capacity, and resiliency.

In Summary, verify settings and finish the wizard. A virtual disk will be created automatically when you create the volume.
Deploy VMs on the cluster
In a hyper-converged topology, VMs can be directly deployed on the cluster. Their virtual hard disks are placed on the volumes you created using S2D. You create and deploy these VMs just as you would create any other VM.
Migrate VMs from Windows Server to Azure Local instance
Use Network migration functionality in VMM to migrate workloads from Hyper-V (Windows Server 2019 and later) to Azure Local.
Note
Live migration between Windows Server and Azure Local isn’t supported. Network migration from Azure Local to Windows Server isn’t supported.
- Temporarily disable the live migration at the destination Azure Local host.
- Select VMs and Services > All Hosts, and then select the source Hyper-V host from which you want to migrate.
- Select the VM that you want to migrate. The VM must be in a turned off state.
- Select Migrate Virtual Machine.
- In Select Host, review and select the destination Azure Local host.
- Select Next to initiate network migration. VMM will perform imports and exports at the back end.
- To verify that the virtual machine is successfully migrated, check the VMs list on the destination host. Turn on the VM and re-enable live migration on the Azure Local host.