Manage tasks with To Do
The To Do app in new Outlook helps you stay organized by keeping your tasks and calendar in sync. Whether you're planning your day, tracking deadlines, or managing follow-ups, To Do gives you the tools to stay focused and in control—all from within the new Outlook for Windows.
View and manage your tasks
To get started, open To Do from the navigation pane in new Outlook.

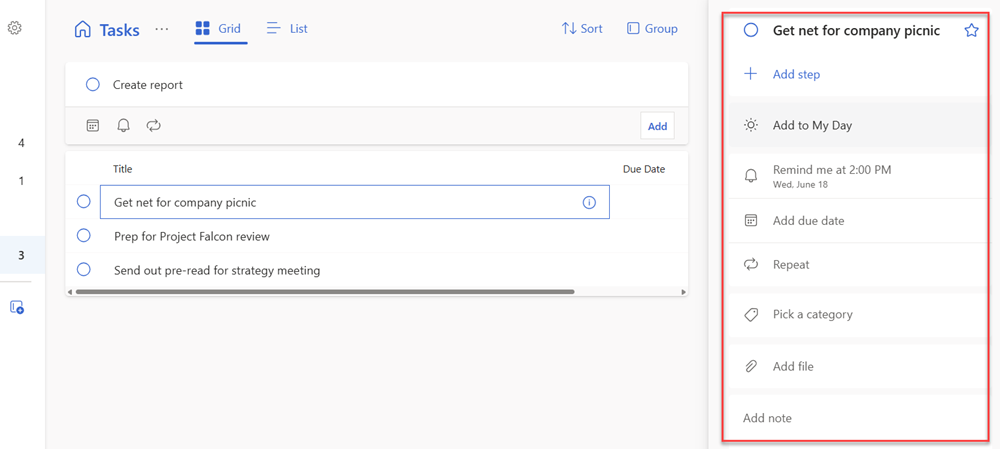
You see your task lists, smart lists, and flagged emails all in one place. Smart lists include My Day, Important, Planned, Completed, and more. Select any task to view its details and take action—like adding steps, reminders, or notes.
With everything in one view, it's easy to track what’s due, what’s important, and what’s already done.
Add tasks to a list
To create a new task, select a list and choose + Add a task. Enter a description, and your task is saved to that list. If you're in a smart list, the task is already linked to the default Tasks list.

Adding tasks is quick and flexible—just type and go.
Tip
You can also view and manage your tasks on the go by installing the To Do app.
Note
For more detailed information, review Create tasks with To Do in Outlook and Create and manage task lists with To Do in Outlook.
Set due dates and reminders
Stay on top of your schedule by assigning due dates and reminders to tasks.
- To add a reminder: Select a task, choose Remind me, and pick a time.
- To add a due date: Select a task, choose Add due date, and select when it’s due.
- To repeat a task: Choose Repeat and set the recurrence pattern.
With reminders and due dates, your tasks stay visible and actionable.
Organize tasks with steps, importance, notes, and tags
Break down significant tasks into smaller steps, mark priority items, and add context with notes and tags.
- Steps: Use + Add step to create subtasks.
- Importance: Star tasks to mark them as high priority.
- Notes: Add extra details in the Add a note field.
- Tags: Use hashtags like #work or #followup to group related tasks.
These tools help you personalize your task management and stay organized.
Categorize tasks and flagged emails
Use Outlook categories to visually group tasks. You can apply categories directly in To Do or sync them from flagged emails.
Categorize a flagged email
Categories on flagged emails sync between To Do tasks and new Outlook email, so you only need to modify a category in one location for it to be updated in the other. You can either flag an email that already has a category assigned, or assign a category after you flagged it. Flagging the email places the message in the Flagged email list, and from there you can view the task or move it to another list.
To categorize a flagged email, first flag the email in Outlook. Select the Categories icon in the menu bar, then assign a category and it syncs to To Do.

Tip
To create new categories to assign to tasks, go to new Outlook Settings > Accounts > Categories. Review Use categories in Outlook to learn more about creating or editing categories.
Important
Only Flagged emails assigned a category in new Outlook sync their categories with To Do. If you create a task from a message with a category previously assigned in new Outlook, the category won't sync to To Do unless you flag that message.
Categorize a task
To categorize a task, open the task, select Pick a category, and choose from your Outlook categories. Select a task in any list to see its details including all the categories you applied to a task in the list view.
To remove a category, select X on the category label, or move your cursor to the category selection and delete it.

Add files to tasks
Keep everything you need in one place by attaching files to your tasks. Add more context by uploading an image, document, or other file to your task. Microsoft To Do supports all file types, though file uploads are limited to 25 MB per task.
To attach files to tasks for added context—like documents, images, or reference materials—select a task, then choose + Add a file and upload from your device.

Tip
You can attach more than one file to a task, but can add them only one at a time.
Drag a task to your calendar
With the To Do integration in new Outlook, you can create tasks anywhere from the My Day pane. Need to schedule a time to do a task? Use the drag feature to book time to work on it. Here's how.
Use the My Day pane to create an event in your calendar from a task.
Tip
To learn more about using My Day with To Do in outlook, review Use My Day with To Do in Outlook.
- Go to Calendar in new Outlook.
- Open the My Day pane by selecting the My Day icon on the new Outlook toolbar.
- Select the To Do tab.
- Find the task that you want to create a calendar event from, then select and drag the task to your calendar.

Tip
Use Copilot to support task management
While Copilot doesn’t currently generate or manage tasks directly in the To Do pane, it can still help you stay organized. Use Copilot in Outlook to extract action items from emails, draft follow-up messages, and summarize threads that might contain tasks. These insights can guide your task planning and help you decide what to prioritize in To Do.
With Microsoft To Do integrated into new Outlook, managing your tasks is simple and seamless. You can create tasks, set reminders, organize with categories and tags, and even attach files—all without leaving your calendar. Whether you're planning your day or tracking long-term goals, To Do helps you stay focused and productive.