Note
Access to this page requires authorization. You can try signing in or changing directories.
Access to this page requires authorization. You can try changing directories.
This article walks through the process of creating and managing plans on Microsoft Learn. If you're unfamiliar with the plans feature, review the Overview of plans on Microsoft Learn article first.
Prerequisites
- You must be signed into your Learn profile to create or start a plan.
Note
Share with others, to invite them to start your plan, and monitor their progress.
Tip
Give the plan a thumb up or thumbs down on the review plan page to help improve the results of our AI model.
Create a plan with a collection
To create a plan, you have to start with a Collection. You can either create a Collection or copy someone else’s Collection to your Profile. To learn how to create or copy a Collection, read the article Create and manage Microsoft Learn Collections. Once you have a Collection that you want to use, you can proceed with copying it to a plan.
Converting a Collection to plan

Plan created
Once the plan is created, all information in the Title, Description, and Section Descriptions from the underlying Collection are moved over. Sections from your Collection become Milestones in plans. You can edit the Milestones at any time. The underlying Collection remains untouched. You can access that Collection under Profile at any time.
Initial view of the plan edit mode

Add learning outcomes
Learning outcomes are an optional field in a plan. We suggest adding at least one learning outcome for a plan although more is highly recommended. Write your learning outcome as a skill the learner gains upon completing the plan. To learn about best practices when creating plans, read Best practices for creating and managing plans.
Adding learning outcomes to a plan

Add days to milestone
'Days to milestone' is another optional field in a plan. As the creator of a plan, you can provide the number of days you recommend that a learner take when completing each milestone. To learn about best practices when creating plans, read Best practices for creating and managing plans.
Adding milestones to a plan

Add content to a plan
All content types in Learn are available to use in plans. While we recommend that you add all content in a Collection before copying to a plan, you may want to add some final content items to a plan before publishing it.
To add content to a plan:
- Find a page or content item you're interested in adding to the plan
- In the content, find and select the + icon (it's usually at the top)
- Go to the Plans tab and select the plan you would like to add the content to.
- Select Save


Manage milestones
Once you have created a plan, you can add and edit milestones in your plan. You can reorder the milestones, add or delete milestones, edit the milestone descriptions, and move items between milestones.
Managing milestones in a plan


Finalize your plan
Once you have finalized your plan, proofread and are sure that you have no more changes to make, you can share it with others. You can also continue to edit your plan at any time. Although it's important to note that you can't delete plans that other users have started.
Invite learners to your plan
When a plan is published, you can invite learners to your plan through the Manage > Invite learner flow. When the side panel appears, you can either copy the link to the plan or select to Email it to people. Selecting Email opens the mail application on your device to send the link to the plan through.
Inviting learners to a plan


Inviting learners to a plan via email


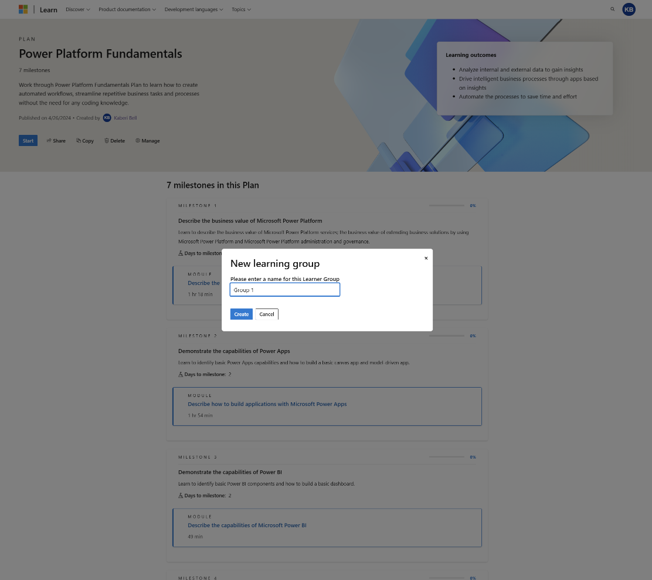
You can choose to create learning groups, which will create unique links to your plan that you can share with learners.
Creating a learning group

Viewing your learning groups in the share functionality

When learners start the plan through learning group link, their progress is associated with that learning group (see Track learner progress below). You can view, edit, and delete your learning groups at any time.
See plan in Learn user profile

If you delete a learning group, it will not affect learners who have started the plan using the unique link to the plan. It will also not affect any learners who might use that link in the future to join the plan.
Deleting a learning group

Track learner progress
If you wish to track the progress of learners who are completing your plan, go to Manage > Track Progress. The side panel gives you a summary. If you wish to download a detailed report with information for each learner, you can download a CSV file.
View learner progress through the Manage plans page

Share your plan
You can share your plan using the share control and share the plan to multiple networks or copy the link. Plans are accessible in your Microsoft Learn profile.
Share your plan via the Learn user profile
View and access all your created plans
To access all your plans, go to the Created tab within Profile > Plans.
View and access all your created plans via the Learn user profile

Delete a plan
You can delete any of your plans by going to the specific plans page while you're signed in and clicking the Delete button.
Note
You can't delete a plan once learners have started it.
Delete a plan before publishing through the manage plans page

Delete a plan after publishing through the manage plans page

Next Steps
Review the Best practices for creating and managing plans article to ensure that you create your plans in a way that creates the most impact.