Note
Access to this page requires authorization. You can try signing in or changing directories.
Access to this page requires authorization. You can try changing directories.
Visual Studio 2022 and later features enhanced trust settings functionality. If untrusted code is opened in the IDE, a warning dialog displays. Mark of the web (MotW) security warnings are also integrated into the overall trust functionality.
Software developers are increasingly being targeted by malware. The trust settings functionality aims to raise awareness about the risks of handling unfamiliar code, and helps protect against malicious actors, who are targeting scenarios ranging from opening content (for example, repositories, solutions, projects, and files) to building and running applications with Visual Studio.
By default, Visual Studio displays a security warning when the Mark of the Web identifier is detected. However, this default behavior can be customized to always show a security warning, regardless of the content's original location.
Customize trust settings
You can customize the trust policies to configure the security settings for opening content in Visual Studio.
When opening content from the web (Mark of the Web)
Visual Studio shows a security warning when you try to open content tagged with the Mark of the Web (MotW) identifier. The trust-related alert informs you of the possible security risks associated with opening files from potentially unsafe sources, such as internet downloads.

You can modify the default trust experience in the Tools > Options pane, under the All Settings > Environment > Security > Trust section.

You can modify the default trust experience in the Tools > Options dialog, under the Environment > Security section.

The Mark of the Web is a security feature used by Windows to identify files that originate from the internet. When you download a file, Windows adds this identifier to the file's metadata, signaling that the content might be unsafe to execute or open. Visual Studio uses this identifier to protect your development environment from potential threats.
Always require a trust decision
When you enable the Require a trust decision before opening content option and set the Trust decision prompt to Always ask, Visual Studio detects if you're attempting to open content that isn't designated as trusted. A dialog warns you about the security implications.
To enable the Always ask prompt, follow these steps:
Open the Tools > Options pane and expand the All Settings > Environment > Security > Trust section.
Select the Require a trust decision before opening content checkbox.
Use the dropdown list and set the Trust decision prompt option to Always ask.

Note
The Skip trust checks for temporary locations Visual Studio creates automatically option isn't enabled by default. This option has no effect unless the Trust decision prompt option is set to Always ask.
Always require a trust decision
When you enable the Always require a trust decision option, Visual Studio detects if you're attempting to open content that isn't designated as trusted. You see a dialog that warns you about the security implications.
To enable the Always require a trust decision feature, follow these steps:
Open the Tools > Options dialog and expand the Environment > Security section.
In the Trust Policies pane, select Always require a trust decision in the Require a trust decision dropdown.

Note
The Skip trust checks for temporary locations Visual Studio creates automatically option isn't enabled by default. It has no effect unless the Always require a trust decision option is also enabled.

Manage trust settings
Here's how to add trusted locations, and to remove them.
Add trusted locations
After you enable the trust settings, all content that you open with Visual Studio is considered untrusted until you add it to the list of trusted locations. You can trust a folder location directly from the warning dialog. Here's how:
Choose the folder you want to trust (the current folder or the parent folder) from the Trust level dropdown list.

Select Trust and continue on the dialog.
Visual Studio adds the folder path to the Trusted Locations list in the Tools > Options pane under the All Settings > Environment > Security > Trust section.
Select the Trust and continue button on the dialog.
Visual Studio adds the folder path to the Trusted locations list in the Tools > Options dialog under the Environment > Security section.
You can also add folders to the Trusted Locations from the Trust Settings dialog. Here's how:
Open the Tools > Options pane and expand the All Settings > Environment > Security > Trust section.
(The pane opens to the same location when you select Manage trust settings in the warning dialog.)
On the toolbar for the Trusted Locations list, select + Add.
In the Add item dialog, select More actions (...) for the Path setting. Browse to and select the folder you want to add to the trusted list, and then select Save.

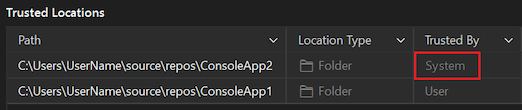
The folder path appears in the Trusted Locations list. In the Trusted By column, the folder you added shows User as the trust setting.

After you configure the Trust options, the folder path for any content you create in Visual Studio is automatically added to the Trusted Locations list. Every automatically added folder path shows System as the trust setting in the Trusted By column.
You can also add folders to Trusted locations from the Trust Settings dialog. Here's how:
Open the Tools > Options dialog and expand the Environment > Security section.
(The pane opens to the same location when you select Manage trust settings in the warning dialog.)
Next to the Trusted locations list, select Add a Folder.
In the Browse dialog, locate the folder you want to add to the trusted list, highlight the folder, and then select Select folder.
The folder path appears in the Trusted locations list. In the Trusted By column, the folder you added shows Local User as the trust setting.

After you configure the Trust options, the folder path for any content you create in Visual Studio is automatically added to the Trusted locations list. Every automatically added folder path shows System as the trust setting in the Trusted By column.

Remove trusted locations
To remove trusted locations, follow these steps:
Open the Tools > Options pane and expand the All Settings > Environment > Security > Trust section.
In the Trusted Locations list, highlight the path you want to remove, and then select Remove.
You can remove multiple entries at the same time with multi-select. Use Shift while you highlight the paths.
The selected paths are removed from the Trusted Locations list.
Open the Tools > Options dialog and expand the Environment > Security section.
In the Trusted locations list, highlight the path you want to remove, and then select Remove.
You can remove multiple entries at the same time with multi-select. Use Shift while you highlight the paths.
The selected paths are removed from the Trusted locations list.
Visual Studio prompts for user approval before opening projects that have the Mark of the Web. For added security, you can also configure Visual Studio to prompt for user approval before opening any file or folder that has the mark of the web attribute, or that isn't designated as trusted. File and folder checks are disabled by default.
Warning
You should still ensure that the file, folder, or solution comes from a trusted person or a trusted location before approving it.
Note
In Visual Studio 2022 and later, the Trust Settings functionality is enhanced to show a warning whenever you attempt to open untrusted code in files, folders, projects, and solutions in the IDE. This feature is disabled by default. To learn more, see the recent Visual Studio version of this page.
Configure trust settings
To change trust settings, follow these steps:
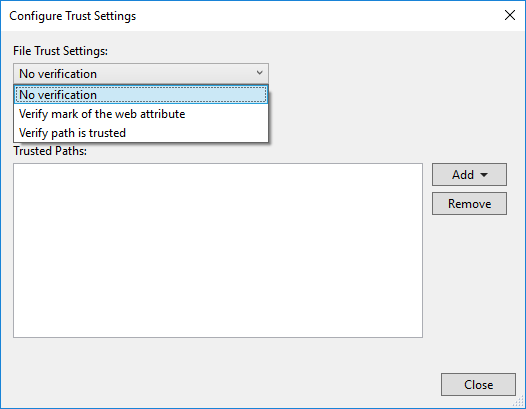
Open Tools > Options > Trust Settings and select the Configure Trust Settings link in the right-hand pane.
Choose the level of checks you'd like for files and folders. You can have different checks for each one. The options are:
No verification: Visual Studio doesn't perform any checks.
Verify mark of the web attribute: If the file or folder has the mark of the web attribute, Visual Studio blocks and asks for permission to open.
Verify path is trusted: If the file or folder path isn't part of the Trusted Paths list, Visual Studio blocks and asks for permission to open.
Add trusted paths
To add trusted paths, follow these steps:
Open Tools > Options > Trust Settings and select the Configure Trust Settings link in the right-hand pane.
Click Add in the Trust Settings dialog, and then select File or Folder.
Navigate to and select the file or folder you want to add to the trusted list.
The file or folder path appears in the Trusted Paths list.

Remove trusted paths
To remove trusted paths, follow these steps:
Open Tools > Options > Trust Settings and select the Configure Trust Settings link in the right-hand pane.
Select the path you'd like to remove in the Trusted Paths list, and then click Remove.
Tip
To select multiple entries, hold down Shift while you select the paths.
The selected paths are removed from the Trusted Paths list.