Note
Access to this page requires authorization. You can try signing in or changing directories.
Access to this page requires authorization. You can try changing directories.
Important
The VM Conversion extension is currently in PREVIEW. This document provides information about a prerelease product that might change substantially before its release. Microsoft makes no warranties, expressed or implied, with respect to the information provided here.
Important
As a preview extension, the VM Conversion extension is governed by the Windows Admin Center pre-release extension software license terms. Microsoft is not obligated under this agreement to provide any support services for the software. Issues, questions, and feedback not covered in this documentation can be filed here.
You can use Windows Admin Center to migrate VMware virtual machines from vCenter to Hyper-V with the VM Conversion extension. This lightweight tool enables online replication with minimal downtime for both Windows and Linux virtual machines. The conversion tool is easy and fast to set up, at no cost to customers.
In this article, you learn how to install and configure the extension, follow the synchronization and migration workflow, and find answers to common questions.
Feature overview
The VM Conversion extension provides the following key features:
Bulk migration: Supports a batch of 10 virtual machines migration at-a-time. This feature enables admins to group virtual machines based on:
- Application dependency – virtual machines that are part of the same application stack or service.
- Cluster dependency – virtual machines that need to be distributed on nodes within same cluster.
- Business boundaries – virtual machines servicing different business within a company. For example, test machines and preproduction machines.
- Rack dependency – virtual machines running on hosts on a rack.
Cluster-aware migration: Supports migration virtual machines from eSXI hosts to Windows Server Failover clusters.
Static IP configurations: Persists the static IP configurations of virtual machines from source to destination Hyper-V hosts. This functionality reduces post-migration tasks and enables seamless network continuity.
Secure Boot and UEFI template configuration: Provides enhanced security and compliance.
- Integrated osType across the migration flow for accurate secure boot and Unified Extensible Firmware Interface (UEFI) setup.
- Secure boot settings are dynamically configured based on OS, either Windows or Linux.
- Added error handling for unsupported OS types.
Localization support: Improves user experience using this tool in different languages.
Multiple vCenter connections: Users can add multiple vCenter endpoints in order to switch between vCenters.
Multi-disk support: Ensures all attached virtual disks are migrated and synchronized for virtual machines running complex workloads.
Prechecks: Catches failures early in replication, and migration phases.
Cleanup: Removes VMware Tools from Windows VMs post-migration.

Prerequisites
Before you begin, review the prerequisites and ensure your environment meets the requirements.
Windows Admin Center Gateway prerequisites
Install PowerCLI.
Open PowerShell as an administrator.
Run the following command to install the PowerCLI module:
Install-Module -Name VMware.PowerCLI- Verify that the module is installed:
Get-Module -Name VMware.PowerCLI -ListAvailable- Test the connection to a vCenter Server by running:
Connect-VIServer -Server "<vCenterServerFQDN_or_IP>" -User "<username>" -Password "<password>" -ForceNote
Replace
<vCenterServerFQDN_or_IP>,<username>, and<password>with your actual vCenter credentials.Install:
Download VMware Virtual Disk Development Kit (VDDK) version 8.0.3. Extract the contents, and copy to the directory: C:\Program Files\WindowsAdminCenter\Service\VDDK.
Note
Ensure you download VDDK version 8.0.3 specifically. Other versions aren't supported.
Ensure that the Hyper-V role is installed. This setting is typically enabled by default.
Use Windows Admin Center Gateway V2 – version
2410build number2.4.12.10
vCenter or ESXi host prerequisites
None.
Windows Server host prerequisites
None.
Supported vCenter versions
- The extension supports VMware VCenter version 6.x or 7.x or 8.x.
- To connect to vCenter from the extension, keep the following vCenter information at hand:
- Fully Qualified Domain Name (FQDN)
- Username
- Password
Supported guest operating systems
The following operating systems can use the VM Conversion extension:
Windows operating systems:
- Windows Server 2025, 2022, 2022 Azure Edition, 2019, 2016, 2012 R2
- Windows 10
Debian-based operating systems:
- Ubuntu Linux
- Ubuntu 20.04, 24.04
- Debian 11, 12
RHEL-based operating systems:
- Alma Linux
- CentOS
- Red Hat Linux 9.0
For Linux guests, Hyper-V drivers must be installed before initiating migration. The Hyper-V drivers are essential to ensure successful post-migration boot.
Install the VM Conversion (Preview) extension in Windows Admin Center
Complete the following steps to install the VM Conversion extension.
Open Windows Admin Center.
Select the Settings button in the top-right. In the left pane, select Extensions.
The Available Extensions tab lists the extensions on the feed that are available for installation.
Search for VM Conversion (Preview) in Available extensions and select Install.

Once installed, ensure VM Conversion extension is visible in the Windows Admin Center under: Extensions > VM Conversion (Preview).

Connect to vCenter
When you first visit the extension, you need to connect your vSphere client endpoint.
Select Connect to vCenter.

Enter the vCenter FQDN, vCenter username, and vCenter password.


Synchronize virtual machines using the VM Conversion (Preview) extension
Synchronization prechecks
A set of prechecks are run before the synchronization begins. Confirm you have all the following steps complete before continuing on with the steps to synchronize virtual machines:
No active snapshots exist on the virtual machine.
VMware PowerCLI is installed on the Windows Admin Center Gateway machine.
Microsoft Visual C++ Redistributable packages (versions 2013 and latest) are installed on the Windows Admin Center Gateway machine.
VDDK package is present at:
C:\Program Files\WindowsAdminCenter\Service\VDDKon the Windows Admin Center Gateway machine.Target disk path for synchronization is valid.
Destination Hyper-V host has sufficient memory and disk space.
Change Block Tracking (CBT) is supported on the VM.
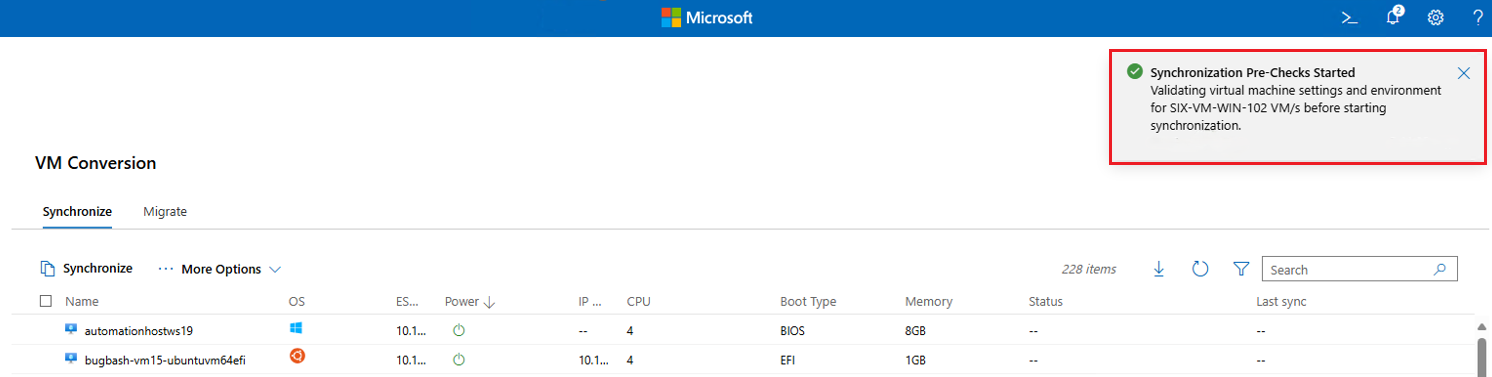
Synchronize virtual machines
Complete the following steps to synchronize VMware virtual machines in Windows Admin Center.
Connect to the Hyper-V server in Windows Admin Center that you want the VM to be migrated.
Go to the VM Conversion extension in the left panel under Extensions > VM Conversion (Preview).
In the virtual machine list, select up to 10 virtual machines to synchronize.
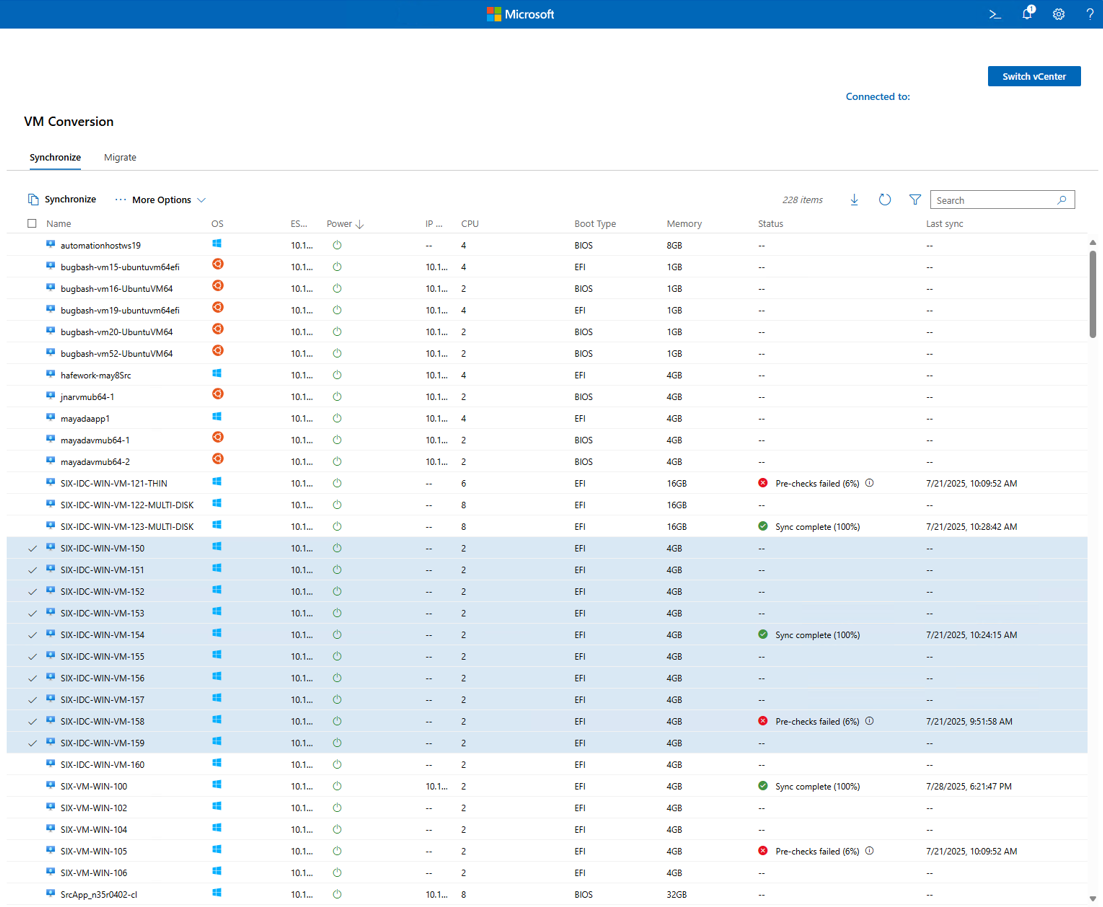
In the Synchronize VM window, enter in the Path to store data. Select Synchronize.
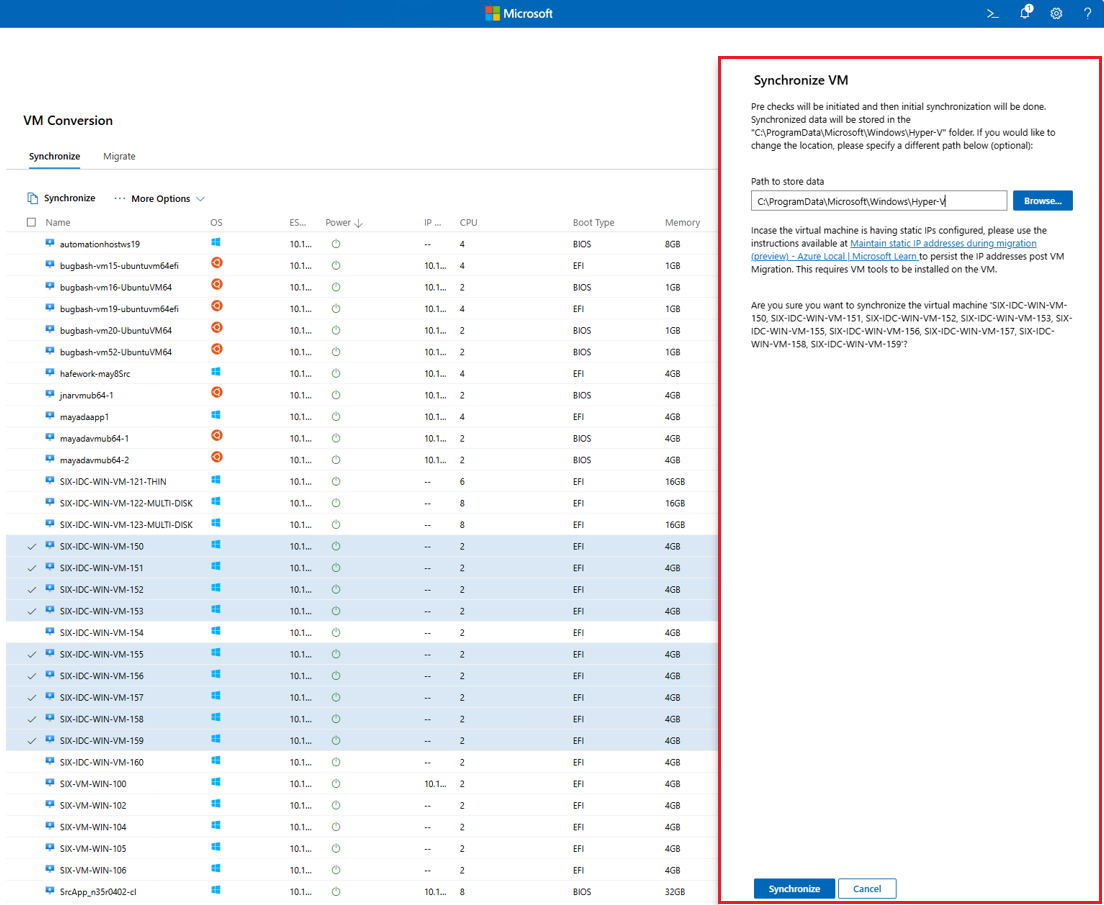
You see notifications appear with the progress for: running prechecks, preparing the environment, creating a snapshot, and finalizing synchronization. Confirm that the Hyper-V Virtual Hard Disk (VHDX) file is created in the folder path specified.
Wait for the sync to complete.


Migrate virtual machines using the VM Conversion (Preview) extension
Migration prechecks
A set of prechecks are run before the migration begins. Confirm you have all the following steps complete before continuing on with the steps to migrate virtual machines:
Destination Hyper-V host has sufficient vCPU availability.
No existing virtual machine with the same name on the destination Hyper-V host.
Hyper-V role is enabled on the target Hyper-V host.
Synchronized
.vhdxfile exists.No active snapshots on the virtual machine.
Migrate virtual machines
Complete the following steps to migrate VMware virtual machines to Hyper-V in Windows Admin Center.
Go to the Migrate tab, and select the VM to migrate. Select Migrate.

In the Migrate VM window, select Proceed to start the migration.

During the migration, the following steps are performed: run migration prechecks, ensure sufficient disk space, perform delta replication, power off source VM, execute final delta sync, and import VM into Hyper-V.
Wait for virtual machine migration to complete.

The migrated virtual machine can be managed using the Hyper-V Manager, or in Windows Admin Center.
Note
Migration requires the user to stay signed in with an active browser session. If the session is closed or times out, the migration may pause or stop progressing.


View logs
Browser console logs
- Open your browser settings, and navigate to More Tools > Developer Tools.
- Check the Console tab.
- Look for any error or warning messages and share them as needed.
Event viewer logs
- On the Windows Admin Center server, open Event Viewer.
- Expand Applications and Services Logs in the left pane.
- Select WindowsAdminCenter.
- Filter and review logs for Errors, Warnings, and Informational messages relevant to the VM Conversion extension.
VM conversion logs
- Connect to the Windows Admin Center server.
- Find the file located at
C:\ProgramFiles\WindowsAdminCenter\Service\VMConversion_log.txt.
Frequently asked questions
Does the tool support both Static and Dynamic Host Configuration Protocol (DHCP) IP addresses?
Yes, both DHCP and Static IP addresses are supported.
Static IP is supported using scripts. When a static IP is detected, the VM credentials are collected to run the script and capture the IP address details. This data persists on the target Hyper-V host after the cutover phase.
How does the tool handle VM boot types?
The tool automatically detects the source VM’s boot type. BIOS boot creates a Generation 1 VM on Hyper-V. UEFI boot creates a Generation 2 VM on Hyper-V.
Why are migrated VM disks showing as Dynamic instead of Static (Fixed)?
The VM Conversion tool currently migrates disks as dynamically expanding (thin provisioned) VHDX files, which means only the used portion of the disk is copied—not the full allocated size.
During migration, a VM with a provisioned size of 500 GB but actual usage of 250 GB results in a 250 GB dynamic VHDX on the destination. While this approach is space-efficient, it might cause storage management issues later.
After migration, customers should convert the VHDX to a fixed size to reflect the full provisioned storage using the PowerShell command:
Convert-VHD -Path "C:\VMs\MyDisk.vhdx" -DestinationPath "C:\VMs\MyDisk_Fixed.vhdx" -VHDType FixedIs VMware to Azure Local migration supported?
No, the tool doesn't support migration to Azure Local. Use Azure Migrate to migrate virtual machines to Azure Local.
Does the tool support virtual machines running on a virtual storage area network (vSAN)?
No, the tool doesn't support virtual machines running on vSAN?
Is this tool available in Windows Admin Center in the Azure portal?
No, the conversion tool is only available in Windows Admin Center on-premises.
How is memory configured during virtual machine migration?
During migration, memory is configured as static, even if the source virtual machine is set to use dynamic memory. This design choice to ensure migration stability and compatibility between VMware and Hyper-V memory management.
To re-enable dynamic memory of change RAM parameters after migration:
- Open Windows Admin Center.
- Navigate to the Virtual machines extension.
- Power off the migrated virtual machine.
- Select Settings.
- Update the required memory parameters: Startup memory, Enable dynamic memory, Minimum memory, Maximum memory, and Memory buffer.
- Save changes and power on the virtual machine.
What are the current limitations of this migration tool?
The Resync option provides the capability to do data synchronization between initial replication and delta replication. The Resync option isn't supported.
VMware Tools aren't automatically uninstalled post-migration—remove them manually if needed.
Hyper-V drivers must be installed on Linux machines before starting migration. Download and install Linux Integration Services v4.3 for Hyper-V and Azure.
During virtual machine conversion, the BIOS GUID on the destination virtual machine doesn't match the source virtual machine unless it's manually updated. This behavior might affect virtual machine identity synchronization, or licensing checks that rely on consistent BIOS-level identifiers. BIOS-level identifiers must be updated in virtual machine identity synchronization, and migration.
Expand this section and use the script provided to update the BIOS GUID on the migrated Hyper-V virtual machine.
To update the BIOS GUID for a Hyper-V virtual machine:
- Extract the following script into a file named
Update-VMBiosInfo.ps1. - Open PowerShell as Administrator.
- Run the script with the required parameters:
.\Update-VMBiosInfo.ps1 -VMName "VM Name" -BiosGuid "New BIOS GUID"
<#
.SYNOPSIS
Updates the BIOS GUID of a specified Hyper-V virtual machine.

.DESCRIPTION
This script stops a specified Hyper-V virtual machine, updates its BIOS GUID using CIM (Common Information Model), and WMIv2 (root\virtualization\v2), and then restarts the VM. It handles both synchronous and asynchronous operations triggered by the Hyper-V Management Service.

It's particularly useful in scenarios such as VM identity synchronization, VM migration, or reconfiguration where BIOS-level identifiers are required to be updated.

.PARAMETER VMName
The name of the Hyper-V virtual machine whose BIOS GUID is to be updated.

.PARAMETER BiosGuid
The new BIOS GUID to assign to the virtual machine. The script automatically formats the GUID with braces if not provided.

.EXAMPLE
.\Update-VMBiosInfo.ps1 -VMName "Contoso" -BiosGuid "{423A2700-F96D-561B-B421-C3088111A97B}"

This command updates the BIOS GUID of the virtual machine named "Contoso" to the specified GUID.

.NOTES
Author: MICROSOFT Corporation
Version: 1.0
Date: 2025-08-07
Requirements:
- Run with administrator privileges
- Requires Hyper-V and access to the root\virtualization\v2 namespace
- Tested on Windows Server 2019/2022 and Windows 10/11 with Hyper-V enabled

.RETURNS
Outputs success messages and job details. Throws descriptive errors in case of failure.

.LINK
https://learn.microsoft.com/windows-server/virtualization/hyper-v/

#>

param (
    [Parameter(Mandatory = $true)]
    [string]$VMName,

    [Parameter(Mandatory = $true)]
    [string]$BiosGuid
)

# Helper function to serialize
function ConvertTo-CimEmbeddedString {
    [CmdletBinding()]
    param(
        [Parameter(ValueFromPipeline)]
        [Microsoft.Management.Infrastructure.CimInstance]$CimInstance
    )

    if ($null -eq $CimInstance) {
        return ""
    }

    $cimSerializer = [Microsoft.Management.Infrastructure.Serialization.CimSerializer]::Create()
    $serializedObj = $cimSerializer.Serialize($CimInstance, [Microsoft.Management.Infrastructure.Serialization.InstanceSerializationOptions]::None)

    return [System.Text.Encoding]::Unicode.GetString($serializedObj)
}

# Stop VM
Write-Output "Stopping VM '$VMName'..."
Stop-VM -Name $VMName -Force

# Retrieve the VM's system settings data using its name
$vmSettingsData = Get-CimInstance -Namespace "root\virtualization\v2" -Query "select * from Msvm_VirtualSystemSettingData where ElementName = '$VMName'" -ErrorAction Stop

# Ensure BIOS GUID has { } format
if (-not ($BiosGuid.StartsWith("{") -and $BiosGuid.EndsWith("}"))) {
    $BiosGuid = "{$BiosGuid}"
}
# Set the BIOS GUID
$vmSettingsData.BIOSGUID = $BiosGuid

# Get the Virtual System Management Service object
$vmms = Get-CimInstance -Namespace root\virtualization\v2 -Class Msvm_VirtualSystemManagementService -ErrorAction Stop

# Apply the updated system settings using ModifySystemSettings
$result = $vmms | Invoke-CimMethod -Name "ModifySystemSettings" -Arguments @{
    "SystemSettings" = ($vmSettingsData | ConvertTo-CimEmbeddedString)
} -ErrorAction Stop

# Check the return value to determine if the operation succeeded
if ($result.ReturnValue -eq 0) {
    # Success: operation completed synchronously
    Write-Host "BIOS GUID successfully updated for VM: $VMName (synchronous)"
}
elseif ($result.ReturnValue -eq 4096) {

    # 4096 indicates the method started an asynchronous job
    $jobPath = $result.Job
    Write-Host "BIOS GUID update started asynchronously for VM: $VMName (job path: $jobPath)"
    # Get the job object using its path
    $job = Microsoft.PowerShell.Management\Get-CimInstance -CimInstance $jobPath

    # Poll the job state until it is no longer Running (4) or Starting (3)
    while ($job.JobState -eq 3 -or $job.JobState -eq 4) {
        Start-Sleep -Seconds 1
        $job = Microsoft.PowerShell.Management\Get-CimInstance -CimInstance $jobPath
    }

    # If job completes successfully
    if ($job.JobState -eq 7) {
        Write-Host "BIOS GUID updated successfully for VM: $VMName (asynchronous job completed)"
    }
    else {
        # Job failed or did not complete properly
        throw "Async job failed. JobState: $($job.JobState), ErrorDescription: $($job.ErrorDescription)"
    }
}
else {
    # Any other return value indicates a failure
    throw "ModifySystemSettings failed with ReturnValue: $($result.ReturnValue)"
}

Write-Output "BIOS GUID successfully updated for VM: $VMName"
# Start the VM again
Write-Output "Starting VM '$VMName'..."
Start-VM -Name $VMName
Note
This process updates only the BIOS GUID. The BIOS Serial Number isn't updated because VMware and Hyper-V use different formats:
- VMware BIOS Serial Number: UUID format (8-4-4-4-12) → 503a4411-be04-bd40-98ac-ffa42335cc22
- Hyper-V BIOS Serial Number: Custom format (4-4-4-4-4-4-2) → 3123-9812-5797-4305-8770-5953-62 If licensing in your environment depends on a combination of BIOS GUID and BIOS Serial Number, the source, and destination values won't match, even if the BIOS GUID is manually updated.
- Extract the following script into a file named
Troubleshooting guide
Note
For issues or questions not covered in this documentation, you can submit feedback here.
Issue 1: VM resync/remigrate required, or migration stuck at a certain percentage (session timeout)
Symptom:
- User wants to resync or remigrate a VM.
- Migration is stuck at a certain percentage due to a session timeout.
Resolution:
Delete the relevant entries from the following files on the Windows Admin Center gateway machine:
C:\Program Files\Windows Admin Center\Service\migrationStatus.jsonC:\Program Files\Windows Admin Center\Service\syncStatus.json
If the VM already exists in Hyper-V Manager, delete it before reinitiating the migration.
Issue 2: Cancel VM synchronization or migration in progress
Symptom:
- User wants to cancel a synchronization or migration while it is in progress.
Resolution: Cancellation isn't supported directly in the extension. As a workaround:
Stop the Windows Admin Center service.
Restart the service. This releases all running threads.
Delete the relevant entries from the following files to ensure status doesn't continue to show as "In Progress":
C:\Program Files\Windows Admin Center\Service\migrationStatus.jsonC:\Program Files\Windows Admin Center\Service\syncStatus.json
Issue 3: Migration precheck fails with error
Error message:
"Failed to retrieve the list of VMs from the destination server. Please ensure the destination server is reachable and retry the operation."
Resolution:
- Ensure there are no failed virtual machines present on the same destination server.
Issue 4: Static IP migration failure for Windows VMs
Symptom:
Static IP configuration doesn't migrate successfully for a Windows VM.
Resolution:
Download the static IP migration package (.zip), which contains scripts for both Windows and Linux VMs.
Extract the package to a specified path inside the guest VM after synchronization and before migration.
Open a PowerShell window as Administrator.
Navigate to the extracted path.
Run the following command:
.\Prepare-MigratedVM.ps1 -StaticIPMigration -Verbose
What's new
Version 1.8.0 (September 2025)
New Features
Bulk VM Migration with Queuing Support
To migrate multiple VMs, select up to 50 virtual machines per operation. Queuing improves performance and stability during large-scale migrations.
Note
Ensure you remain signed in to Windows Admin Center -> VM Conversion Extension -> vCenter, and refresh your session every 2 hours.
The browser session must remain active during the final migration step.Static IP Batch Support
Bulk migration now supports static IP migration for both Windows and Linux Virtual Machines. This feature automates network configuration, reducing manual reconfiguration after migration.
Batch Uninstall of VMware Tools (Windows VMs)
You can now uninstall VMware Tools from multiple Windows virtual machines in a single batch operation prior to migration, streamlining the preparation process.
Note
While batch uninstall for Windows VMs is supported, Linux VMs still require manual removal.
BIOS UUID Migration
The migration process now preserves the BIOS UUID from the source VM, ensuring improved compatibility and identity synchronization on Hyper-V.
Note
Only the BIOS UUID is migrated. BIOS Serial Number format differs between VMware and Hyper-V, which can affect licensing checks. For more information, see FAQ.
Standardized Destination Folder Structure
The destination VM folder structure now follows Hyper-V conventions. The Synchronization Confirmation dialog displays the folder path, helping administrators verify and predict destination locations.
Thick and Thin Disk Provisioning
During synchronization, VM disks are created as thick (fixed) or thin (dynamic) to match the source VM’s configuration, optimizing storage use, and simplifying post-migration management.
Bug Fixes
- Resolved migration error: Physical network adapter 'Ethernet' not found.
- Corrected VM listing issue where VMs already present in Hyper-V Manager were incorrectly marked as failed.
- Improved notification accuracy during migration progress.
- Enhanced prechecks for PowerCLI installation to catch failures early and provide clearer troubleshooting guidance.
User Experience Changes
Session Persistence for Bulk Migration
Stay logged in to Windows Admin Center -> VM Conversion Extension -> vCenter and keep your browser session active throughout migration.
The browser session must remain active during the final migration step.
Folder Structure Transparency
Destination folders now directly reflect Hyper-V layout.
-
- The Synchronization Confirmation dialog explicitly shows the destination path.
Linux VMs - Install Hyper-V drivers on the guest OS before migration.
Windows VMs - VMware Tools batch uninstall is supported only for Windows VMs.
Licensing Note - Differences in BIOS Serial Number may affect licensing. See FAQ for details.
Version 1.8.2 (October 2025)
New Features
vCenter Version Display:
You can now view the vCenter version directly on the vCenter List page for easier identification and management.Migration Reconnection Banner:
A new banner now appears, prompting users to stay signed in and refresh their session every 2 hours during migration to ensure continuity.Quick Access to Documentation:
The “Open in New Window” icon on the landing page now links directly to the official guide —
Migrate VMware Virtual Machines to Hyper-V in Windows Admin Center (Preview).
Other Improvements
- Enhanced telemetry for improved diagnostics and secure handling of environment information.
Version 1.8.3 (October 2025)
New features and enhancements
PowerCLI installation support
- Added a PowerCLI installation option on the landing page to help users set up required component on the gateway.
- Introduced an alert banner on the VM List and vSphere List pages that notifies users if PowerCLI is missing, with a direct link to install it.
Migration workflow improvements
- Improved stability, validation, and error handling for a smoother migration experience.
Bug fixes
- Fixed an issue where the Submit button in the vCenter credentials dialog could remain disabled after a failure.
- Resolved a problem where migrations could get stuck at 80% progress.