ユーザー ID とパスワードの組み合わせを超えてセキュリティで保護された認証を必要とする Windows アプリでは、認証に証明書を使用できます。 証明書認証は、ユーザーの認証時に高レベルの信頼性を提供します。 場合によっては、複数のアプリから複数のサービスのグループに対してユーザーを認証することがあります。 この記事では、同じ証明書を使用して複数の Windows アプリを認証する方法と、セキュリティで保護された Web サービスにアクセスするために提供された証明書をユーザーがインポートする方法を提供する方法について説明します。
アプリでは、証明書を使って Web サービスから認証を受けることができます。さらに、複数のアプリで証明書ストアにある 1 つの証明書を使って同じユーザーを認証できます。 証明書がストアに存在しない場合は、PFX ファイルから証明書をインポートするコードをアプリに追加できます。 このクイック スタートのクライアント アプリは WinUI アプリであり、Web サービスは ASP.NET Core Web API です。
ヒント
Microsoft Copilot は、Windows アプリの作成の開始やコア Web API の ASP.NET に関する質問がある場合に最適なリソースです。 Copilot は、コードの記述、例の検索、セキュリティで保護されたアプリの作成に関するベスト プラクティスの詳細を確認するのに役立ちます。
前提条件
- ASP.NET と Web 開発と WinUI アプリケーション開発のワークロードがインストールされた Visual Studio。
- 最新Windows ソフトウェア開発キット (SDK) 、WinUI アプリで Windows ランタイム (WinRT) API を使用します。
- 自己署名証明書を操作するための PowerShell 。
セキュリティで保護された Web サービスの作成と発行
Microsoft Visual Studio を開き、スタート画面から [新しいプロジェクトの作成 を選択します。
[新しいプロジェクトの作成] ダイアログで、[プロジェクトの種類の選択ドロップダウン リストで API を選択して、使用可能なプロジェクト テンプレートをフィルター処理します。
[ASP.NET Core Web API] テンプレートを選択し、 [次へ] を選択します。
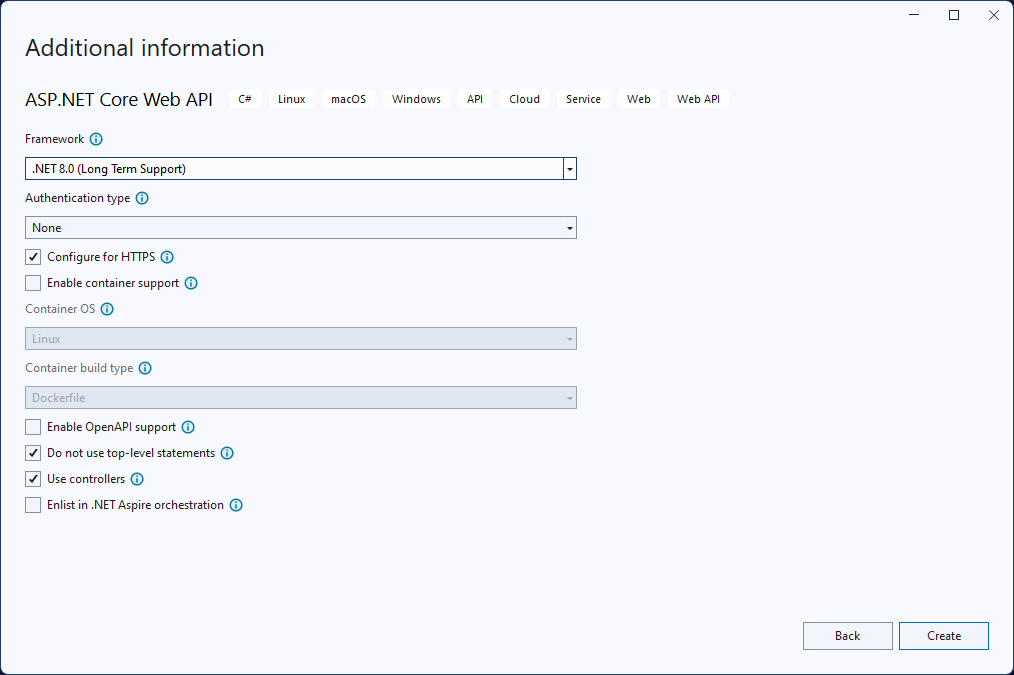
アプリケーションに "FirstContosoBank" という名前を付け、 Next を選択します。
Framework として .NET 8.0 以降を選択、 認証の種類を None に設定し、 HTTPS の構成がオンになっていることを確認し、 OpenAPI サポートを有効にする]、[最上位レベルのステートメントを使用しないとをオンにして、Create を選択します。
Controllers フォルダー内のWeatherForecastController.cs ファイルを右クリックし、Rename を選択します。 名前を BankController.cs に変更し、Visual Studio でクラスとクラスへのすべての参照の名前を変更します。
launchSettings.json ファイルで、値を使用する 3 つの構成すべてについて、"launchUrl" の値を "weatherforecast" から "bank" に変更します。
BankController.cs ファイルに、次の "Login" メソッドを追加します。
[HttpGet]
[Route("login")]
public string Login()
{
    // Return any value you like here.
    // The client is just looking for a 200 OK response.
    return "true";
}
NuGet パッケージ マネージャーを開き、最新の安定バージョンの Microsoft.AspNetCore.Authentication.Certificate パッケージを検索してインストールします。 このパッケージは、ASP.NET Core での証明書認証のミドルウェアを提供します。
SecureCertificateValidationService という名前のプロジェクトに新しいクラスを追加します。 次のコードをクラスに追加して、証明書認証ミドルウェアを構成します。
using System.Security.Cryptography.X509Certificates; public class SecureCertificateValidationService { public bool ValidateCertificate(X509Certificate2 clientCertificate) { // Values are hard-coded for this example. // You should load your valid thumbprints from a secure location. string[] allowedThumbprints = { "YOUR_CERTIFICATE_THUMBPRINT_1", "YOUR_CERTIFICATE_THUMBPRINT_2" }; if (allowedThumbprints.Contains(clientCertificate.Thumbprint)) { return true; } } }Program.csを開き、Main メソッドのコードを次のコードに置き換えます。
public static void Main(string[] args)
{
    var builder = WebApplication.CreateBuilder(args);

    // Add our certificate validation service to the DI container.
    builder.Services.AddTransient<SecureCertificateValidationService>();

    builder.Services.Configure<KestrelServerOptions>(options =>
    {
        // Configure Kestrel to require a client certificate.
        options.ConfigureHttpsDefaults(options =>
        {
            options.ClientCertificateMode = ClientCertificateMode.RequireCertificate;
            options.AllowAnyClientCertificate();
        });
    });

    builder.Services.AddControllers();

    // Add certificate authentication middleware.
    builder.Services.AddAuthentication(
    CertificateAuthenticationDefaults.AuthenticationScheme)
       .AddCertificate(options =>
    {
        options.AllowedCertificateTypes = CertificateTypes.SelfSigned;
        options.Events = new CertificateAuthenticationEvents
        {
            // Validate the certificate with the validation service.
            OnCertificateValidated = context =>
            {
                var validationService = context.HttpContext.RequestServices.GetService<SecureCertificateValidationService>();

                if (validationService.ValidateCertificate(context.ClientCertificate))
                {
                    context.Success();
                }
                else
                {
                    context.Fail("Invalid certificate");
                }

                return Task.CompletedTask;
            },
            OnAuthenticationFailed = context =>
            {
                context.Fail("Invalid certificate");
                return Task.CompletedTask;
            }
        };
     });

     var app = builder.Build();

     // Add authentication/authorization middleware.
     app.UseHttpsRedirection();
     app.UseAuthentication();
     app.UseAuthorization();

     app.MapControllers();
     app.Run();
 }
上記のコードでは、クライアント証明書を要求するように Kestrel サーバーを構成し、証明書認証ミドルウェアをアプリに追加します。 ミドルウェアは、
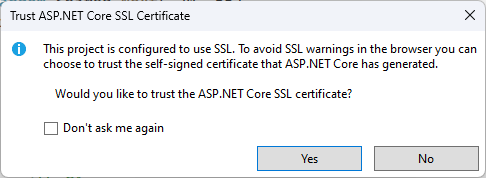
SecureCertificateValidationServiceクラスを使用してクライアント証明書を検証します。OnCertificateValidatedイベントは、証明書が検証されたときに呼び出されます。 証明書が有効な場合、イベントはSuccessメソッドを呼び出します。 証明書が無効な場合、イベントはエラー メッセージを使用してFailメソッドを呼び出します。このメソッドはクライアントに返されます。プロジェクトのデバッグを開始して Web サービスを起動します。 SSL 証明書の信頼とインストールに関するメッセージが表示される場合があります。 これらのメッセージごとに Yes をクリックして証明書を信頼し、プロジェクトのデバッグを続行します。

Web サービスは、
https://localhost:7072/bankで利用できるようになります。 Web ブラウザーを開き、Web アドレスを入力することで、Web サービスをテストできます。 生成された天気予報データが JSON 形式で表示されます。 クライアント アプリの作成時に Web サービスを実行したままにします。
ASP.NET Core コントローラー ベースの Web API の使用の詳細については、「ASP.NET Core を使用した Web API の作成を参照してください。
証明書認証を使用する WinUI アプリを作成する
これでセキュリティで保護された Web サービスが 1 つ以上できたので、証明書を使ってこれらの Web サービスから認証を受けるアプリを作成できます。 WinRT API から HttpClient オブジェクトを使用して認証された Web サービスに要求を行う場合、最初の要求にはクライアント証明書は含まれません。 認証 Web サービスは、応答としてクライアント認証を要求します。 この応答を受け取ると、Windows クライアントは自動的に証明書ストアを照会して、使用できるクライアント証明書を取得します。 ユーザーは、これらの証明書の中から Web サービスへの認証に使うものを選ぶことができます。 証明書によってはパスワードで保護されていることがあるので、証明書のパスワードを入力するための手段をユーザーに提供する必要があります。
注
証明書を管理するためのWindows アプリ SDK API はまだありません。 アプリで証明書を管理するには、WinRT API を使用する必要があります。 また、WinRT ストレージ API を使用して、PFX ファイルから証明書をインポートします。 多くの WinRT API は、パッケージ ID を持つ任意の Windows アプリ (WinUI アプリを含む) で使用できます。
実装する HTTP クライアント コードでは、NET の HttpClient。 WinRT API に含まれる HttpClient は、クライアント証明書をサポートしていません。
使用できるクライアント証明書がない場合は、ユーザーが証明書ストアに証明書を追加する必要があります。 そこで、クライアント証明書の PFX ファイルをユーザーに選んでもらい、その証明書をクライアント証明書ストアにインポートするコードをアプリに含めることができます。
ヒント
PowerShell コマンドレット New-SelfSignedCertificate Export-PfxCertificate を使用して 自己署名証明書を作成し、PFX ファイルにエクスポートして、このクイックスタートで使用できます。 詳細については、 New-SelfSignedCertificate および Export-PfxCertificate を参照してください。
証明書を生成するときは、検証のために Web サービスで使用する証明書の拇印を保存する必要があることに注意してください。
Visual Studio を開き、スタート ページから新しい WinUI プロジェクトを作成します。 新しいプロジェクトに "FirstContosoBankApp" という名前を付けます。 [作成] をクリックして、新しいプロジェクトを作成します。
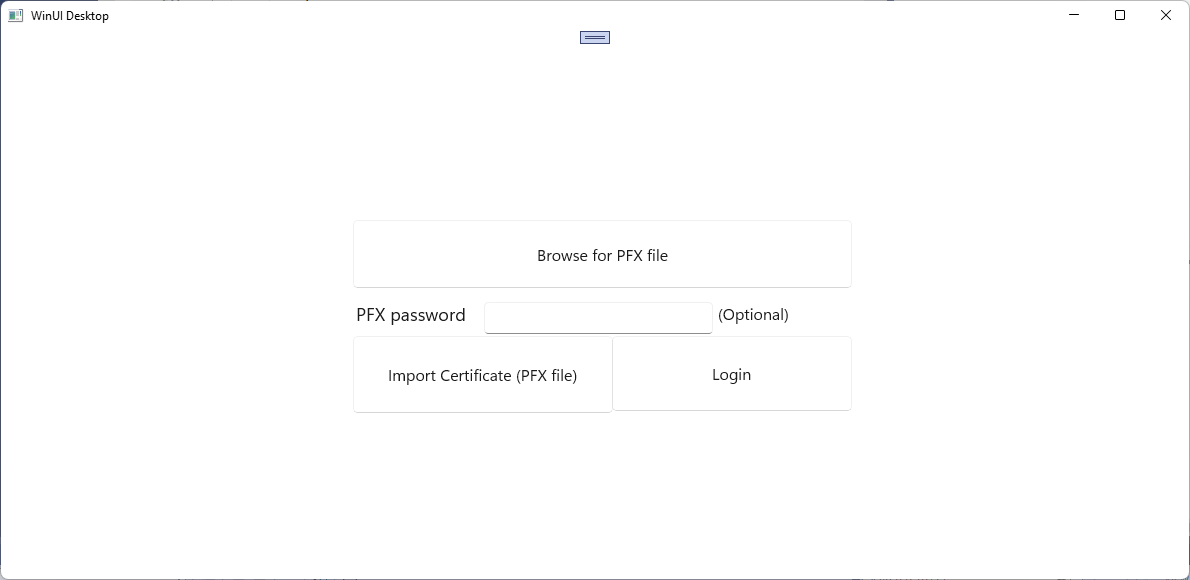
MainWindow.xaml ファイルで、次の XAML を Grid 要素に追加し、既存の StackPanel 要素とその内容を置き換えます。 この XAML には、インポートする PFX ファイルを参照するボタン、PFX ファイルがパスワードで保護されている場合にパスワードを入力するテキスト ボックス、選んだ PFX ファイルをインポートするボタン、セキュリティで保護された Web サービスにログインするボタン、現在の操作の状態を表示するテキスト ブロックが含まれています。
<Button x:Name="Import" Content="Import Certificate (PFX file)" HorizontalAlignment="Left" Margin="352,305,0,0" VerticalAlignment="Top" Height="77" Width="260" Click="Import_Click" FontSize="16"/> <Button x:Name="Login" Content="Login" HorizontalAlignment="Left" Margin="611,305,0,0" VerticalAlignment="Top" Height="75" Width="240" Click="Login_Click" FontSize="16"/> <TextBlock x:Name="Result" HorizontalAlignment="Left" Margin="355,398,0,0" TextWrapping="Wrap" VerticalAlignment="Top" Height="153" Width="560"/> <PasswordBox x:Name="PfxPassword" HorizontalAlignment="Left" Margin="483,271,0,0" VerticalAlignment="Top" Width="229"/> <TextBlock HorizontalAlignment="Left" Margin="355,271,0,0" TextWrapping="Wrap" Text="PFX password" VerticalAlignment="Top" FontSize="18" Height="32" Width="123"/> <Button x:Name="Browse" Content="Browse for PFX file" HorizontalAlignment="Left" Margin="352,189,0,0" VerticalAlignment="Top" Click="Browse_Click" Width="499" Height="68" FontSize="16"/> <TextBlock HorizontalAlignment="Left" Margin="717,271,0,0" TextWrapping="Wrap" Text="(Optional)" VerticalAlignment="Top" Height="32" Width="83" FontSize="16"/>MainWindowの変更を保存します。
MainWindow.xaml.cs ファイルを開き、次の
usingステートメントを追加します。using System; using System.Security.Cryptography.X509Certificates; using System.Diagnostics; using System.Net.Http; using System.Net; using System.Text; using Microsoft.UI.Xaml; using Windows.Security.Cryptography.Certificates; using Windows.Storage.Pickers; using Windows.Storage; using Windows.Storage.Streams;MainWindow.xaml.cs ファイルで、次の変数を MainWindow クラスに追加します。 "FirstContosoBank" Web サービスのセキュリティで保護された login サービス エンドポイントのアドレスと、証明書ストアにインポートする PFX 証明書を保持するグローバル変数を指定します。
<server-name>をlocalhost:7072に更新するか、API プロジェクトのlaunchSettings.json ファイルの "https" 構成で指定されているポートを更新します。private Uri requestUri = new Uri("https://<server-name>/bank/login"); private string pfxCert = null;MainWindow.xaml.cs ファイルに、セキュリティで保護された Web サービスにアクセスするためのログイン ボタンとメソッドの次のクリック ハンドラーを追加します。
private void Login_Click(object sender, RoutedEventArgs e)
{
    MakeHttpsCall();
}

private async void MakeHttpsCall()
{
    var result = new StringBuilder("Login ");

    // Load the certificate
    var certificate = new X509Certificate2(Convert.FromBase64String(pfxCert),
                                           PfxPassword.Password);

    // Create HttpClientHandler and add the certificate
    var handler = new HttpClientHandler();
    handler.ClientCertificates.Add(certificate);
    handler.ClientCertificateOptions = ClientCertificateOption.Automatic;

    // Create HttpClient with the handler
    var client = new HttpClient(handler);

    try
    {
        // Make a request
        var response = await client.GetAsync(requestUri);

        if (response.StatusCode == HttpStatusCode.OK)
        {
            result.Append("successful");
        }
        else
        {
            result = result.Append("failed with ");
            result = result.Append(response.StatusCode);
        }
    }
    catch (Exception ex)
    {
        result = result.Append("failed with ");
        result = result.Append(ex.Message);
    }

    Result.Text = result.ToString();
}
次に、ボタンの次のクリック ハンドラーを追加して PFX ファイルを参照し、選択した PFX ファイルを証明書ストアにインポートするボタンを追加します。
private async void Import_Click(object sender, RoutedEventArgs e)
{
    try
    {
        Result.Text = "Importing selected certificate into user certificate store....";
        await CertificateEnrollmentManager.UserCertificateEnrollmentManager.ImportPfxDataAsync(
              pfxCert,
              PfxPassword.Password,
              ExportOption.Exportable,
              KeyProtectionLevel.NoConsent,
              InstallOptions.DeleteExpired,
              "Import Pfx");

        Result.Text = "Certificate import succeeded";
    }
    catch (Exception ex)
    {
        Result.Text = "Certificate import failed with " + ex.Message;
    }
}

private async void Browse_Click(object sender, RoutedEventArgs e)
{
    var result = new StringBuilder("Pfx file selection ");
    var pfxFilePicker = new FileOpenPicker();
    IntPtr hwnd = WinRT.Interop.WindowNative.GetWindowHandle(this);
    WinRT.Interop.InitializeWithWindow.Initialize(pfxFilePicker, hwnd);
    pfxFilePicker.FileTypeFilter.Add(".pfx");
    pfxFilePicker.CommitButtonText = "Open";
    try
    {
        StorageFile pfxFile = await pfxFilePicker.PickSingleFileAsync();
        if (pfxFile != null)
        {
            IBuffer buffer = await FileIO.ReadBufferAsync(pfxFile);
            using (DataReader dataReader = DataReader.FromBuffer(buffer))
            {
                byte[] bytes = new byte[buffer.Length];
                dataReader.ReadBytes(bytes);
                pfxCert = System.Convert.ToBase64String(bytes);
                PfxPassword.Password = string.Empty;
                result.Append("succeeded");
            }
        }
        else
        {
            result.Append("failed");
        }
    }
    catch (Exception ex)
    {
        result.Append("failed with ");
        result.Append(ex.Message); ;
    }

    Result.Text = result.ToString();
}
Package.appxmanifest ファイルを開き、Capabilities タブに次の機能を追加します。
- エンタープライズ認証
- SharedUserCertificates (共有ユーザー証明書)
アプリを実行し、セキュリティで保護された Web サービスにログインして、PFX ファイルをローカル証明書ストアにインポートします。
これらの手順を繰り返すことで、同じユーザー証明書を使ってセキュリティで保護された同じ Web サービスや別の Web サービスにアクセスする複数のアプリを作成できます。
関連するコンテンツ
GitHub で Microsoft と共同作業する
このコンテンツのソースは GitHub にあります。そこで、issue や pull request を作成および確認することもできます。 詳細については、共同作成者ガイドを参照してください。

Windows developer