This article describes the general process to replace hardware components that are non hot-swappable. Actual replacement steps vary based on your original equipment manufacturer (OEM) hardware vendor. See your vendor's field replaceable unit (FRU) documentation for detailed steps that are specific to your Azure Stack Hub integrated system.
주의
펌웨어 평준화는 이 문서에 설명된 작업의 성공에 매우 중요합니다. Missing this step can lead to system instability, performance decrease, security threats, or prevent Azure Stack Hub automation from deploying the operating system. 하드웨어를 교체할 때 항상 하드웨어 파트너의 설명서를 참조하여 적용된 펌웨어가 Azure Stack Hub 관리자 포털표시된 OEM 버전과 일치하는지 확인합니다.
경고
Azure Stack Hub를 사용하려면 솔루션의 모든 서버 구성에 CPU(모델, 코어), 메모리 수량, NIC 및 링크 속도, 스토리지 디바이스 등의 구성이 동일해야 합니다. Azure Stack Hub는 하드웨어 교체 중 또는 배율 단위 노드를 추가할 때 CPU 모델의 변경을 지원하지 않습니다. 업그레이드와 같은 CPU를 변경하려면 각 배율 단위 노드에서 균일한 CPU와 Azure Stack Hub를 다시 배포해야 합니다.
Non hot-swappable components include the following items:
- CPU (must be of the same type (model, cores)*
- Memory*
- 마더보드/BMC(베이스보드 관리 컨트롤러)/비디오 카드
- Disk controller/host bus adapter (HBA)/backplane
- Network adapter (NIC)
- Graphics processing unit (GPU)
- Operating system disk*
- Data drives (drives that don't support hot swap, for example PCI-e add-in cards)*
*These components may support hot swap, but can vary based on vendor implementation. See your OEM vendor's FRU documentation for detailed steps.
The following flow diagram shows the general FRU process to replace a non hot-swappable hardware component.
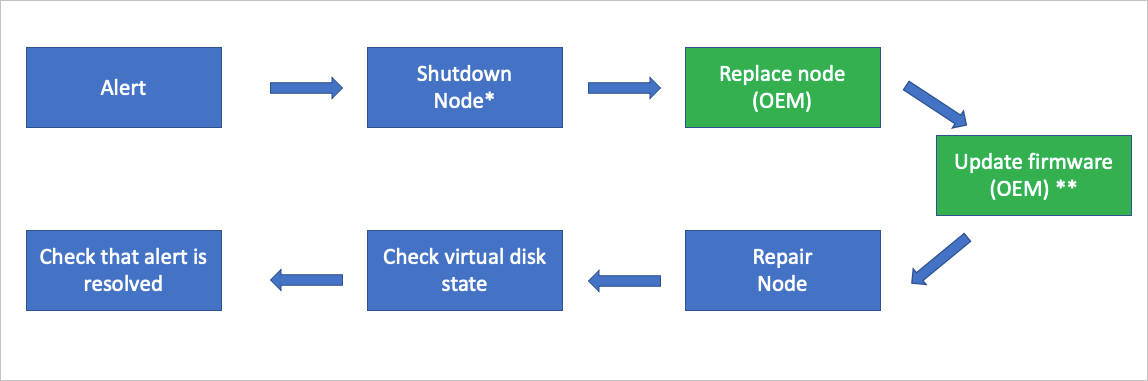
- 하드웨어의 물리적 조건에 따라 이 작업이 필요하지 않을 수 있습니다.
** Whether your OEM hardware vendor does the component replacement and updates the firmware could vary based on your support contract.
경고 정보 검토
The Azure Stack Hub health and monitoring system tracks the health of network adapters and data drives controlled by Storage Spaces Direct. It doesn't track other hardware components. For all other hardware components, alerts are raised in the vendor-specific hardware monitoring solution that runs on the hardware lifecycle host.
Component replacement process
The following steps provide a high-level overview of the component replacement process. Don't follow these steps without referring to your OEM-provided FRU documentation.
Use the Shutdown action to gracefully shut down the scale unit node. 하드웨어의 물리적 조건에 따라 이 작업이 필요하지 않을 수 있습니다.
In an unlikely case the shutdown action does fail, use the Drain action to put the scale unit node into maintenance mode. 하드웨어의 물리적 조건에 따라 이 작업이 필요하지 않을 수 있습니다.
비고
어쨌든 S2D(스토리지 공간 다이렉트)를 중단하지 않고 동시에 하나의 노드만 비활성화하고 전원을 끌 수 있습니다.
After the scale unit node is in maintenance mode, use the Power off action. 하드웨어의 물리적 조건에 따라 이 작업이 필요하지 않을 수 있습니다.
비고
In the unlikely case that the power off action doesn't work, use the baseboard management controller (BMC) web interface instead.
Replace the damaged hardware component. Whether your OEM hardware vendor does the component replacement could vary based on your support contract.
Update the firmware. Follow your vendor-specific firmware update process using the hardware lifecycle host to make sure the replaced hardware component has the approved firmware level applied. Whether your OEM hardware vendor does this step could vary based on your support contract.
Use the Repair action to bring the scale unit node back into the scale unit.
권한 있는 엔드포인트를 사용하여 가상 디스크 복구 상태을 확인합니다. 새 데이터 드라이브를 사용하면 전체 스토리지 복구 작업이 시스템 부하 및 사용된 공간에 따라 여러 시간이 걸릴 수 있습니다.
복구 작업이 완료되면 모든 활성 경고가 자동으로 닫혔는지 확인합니다.
다음 단계
- For information about replacing a hot-swappable physical disk, see Replace a disk.
- For information about replacing a physical node, see Replace a scale unit node.