중요합니다
이 기능은 공개 미리보기 단계에 있습니다.
이 페이지에서는 외부 사용자에 대한 포함 작동 방식, 포함된 대시보드의 안전한 공유를 위해 Azure Databricks 작업 영역을 구성하는 방법 및 샘플 애플리케이션을 사용하여 시작하는 방법을 설명합니다. 외부 사용자에 대한 포함은 서비스 주체 및 범위가 지정된 액세스 토큰을 사용하여 포함된 대시보드에 대한 액세스를 인증하고 권한을 부여합니다. 이 방법을 사용하면 해당 사용자에 대한 Azure Databricks 계정을 프로비전하지 않고도 파트너 및 고객과 같은 조직 외부의 뷰어와 대시보드를 공유할 수 있습니다.
조직 내 사용자에 대한 대시보드 포함을 비롯한 다른 포함 옵션에 대한 자세한 내용은 대시보드 포함을 참조하세요.
외부 사용자에 대한 포함 작동 방식
다음 다이어그램 및 번호 매기기 단계에서는 외부 사용자에 대한 대시보드를 포함할 때 사용자가 인증되고 대시보드가 사용자 범위의 결과로 채워집니다.
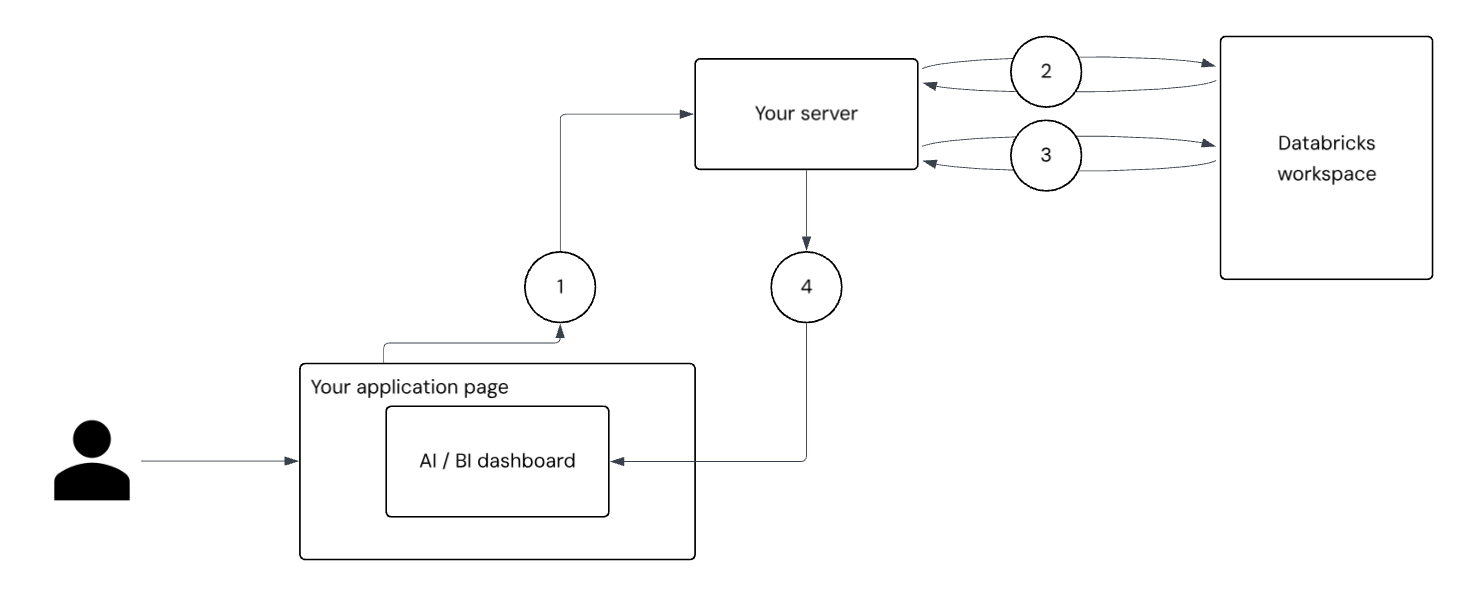
- 사용자 인증 및 요청: 사용자가 애플리케이션에 로그인합니다. 애플리케이션의 프런트 엔드는 대시보드 액세스 토큰에 대한 인증된 요청을 서버에 보냅니다.
-
서비스 주체 인증: 서버는 서비스 주체 비밀을 사용하여 Databricks 서버에서 OAuth 토큰을 요청하고 받습니다. Azure Databricks가 서비스 주체를 대신하여 액세스할 수 있는 모든 대시보드 API를 호출할 수 있는 광범위한 범위의 토큰입니다. 서버는 이 토큰을
/tokeninfo사용하여 엔드포인트를 호출하여 다음과 같은external_viewer_id기본 사용자 정보를 전달합니다external_value. 개별 사용자에게 안전하게 대시보드 표시를 참조하세요. -
사용자 범위 토큰 생성: 엔드포인트 및 OIDC(Databricks OpenID Connect) 엔드포인트의 응답을
/tokeninfo사용하여 서버는 전달한 사용자 정보를 인코딩하는 긴밀한 범위의 새로운 토큰을 생성합니다. -
대시보드 렌더링 및 데이터 필터링: 애플리케이션 페이지는 생성 중에 사용자 범위 토큰을
DatabricksDashboard인스턴스화@databricks/aibi-client하고 전달합니다. 대시보드는 사용자의 컨텍스트를 사용하여 렌더링됩니다. 이 토큰은 액세스 권한을 부여하고, 감사를external_viewer_id지원하고, 데이터 필터링을 수행합니다external_value. 대시보드 데이터 세트의 쿼리는 사용자별 필터를 적용하기 위해 참조__aibi_external_value할 수 있으므로 각 뷰어에서 볼 수 있는 데이터만 볼 수 있습니다.
개별 사용자에게 대시보드를 안전하게 표시
애플리케이션 서버를 구성하여 해당 토큰을 기반으로 각 사용자에 대해 고유한 사용자 범위 토큰을 생성합니다 external_viewer_id. 이렇게 하면 감사 로그를 통해 대시보드 보기 및 사용량을 추적할 수 있습니다. 대시보드 external_viewer_id 데이터 세트에 external_value사용되는 SQL 쿼리에 삽입할 수 있는 전역 변수 역할을 하는 쌍을 이 데이터 세트와 쌍으로 만듭니다. 이렇게 하면 각 사용자에 대해 대시보드에 표시되는 데이터를 필터링할 수 있습니다.
external_viewer_id 은 대시보드 감사 로그에 전달되며 개인 식별 정보를 포함해서는 안 됩니다. 이 값은 사용자별로 고유해야 합니다.
external_value 는 쿼리 처리에 사용되며 개인 식별 정보를 포함할 수 있습니다 .
다음 예제에서는 데이터 세트 쿼리에서 외부 값을 필터로 사용하는 방법을 보여 줍니다.
SELECT *
FROM sales
WHERE region = __aibi_external_value
설치 개요
이 섹션에는 외부 위치에 대시보드를 포함하도록 설정하기 위해 수행해야 하는 단계에 대한 개략적인 개념적 개요가 포함되어 있습니다.
외부 애플리케이션에 대시보드를 포함하려면 먼저 Azure Databricks에서 서비스 주체 를 만들고 비밀을 생성합니다. 서비스 주체에게 대시보드 및 해당 기본 데이터에 대한 읽기 권한이 부여되어야 합니다. 서버는 서비스 주체 비밀을 사용하여 서비스 주체를 대신하여 대시보드 API에 액세스할 수 있는 토큰을 검색합니다. 이 토큰을 사용하여 서버는 API 엔드포인트, OIDC(OpenID Connect) 엔드포인트를 호출 /tokeninfo 합니다. 이 엔드포인트는 기본 사용자 프로필 정보(external_value값 포함external_viewer_id)를 반환합니다. 이러한 값을 사용하면 요청을 개별 사용자와 연결할 수 있습니다.
서버는 서비스 주체에서 가져온 토큰을 사용하여 대시보드에 액세스하는 특정 사용자로 범위가 지정된 새 토큰을 생성합니다. 이 사용자 범위 토큰은 애플리케이션 페이지로 전달됩니다. 여기서 애플리케이션은 라이브러리에서 개체를 DatabricksDashboard@databricks/aibi-client 인스턴스화합니다. 토큰은 감사를 지원하는 사용자별 정보를 전달하고 필터링을 적용하여 각 사용자가 액세스 권한이 부여된 데이터만 볼 수 있도록 합니다. 사용자의 관점에서 애플리케이션에 로그인하면 올바른 데이터 표시 유형을 사용하여 포함된 대시보드에 자동으로 액세스할 수 있습니다.
속도 제한 및 성능 고려 사항
외부 포함의 속도 제한은 초당 20개의 대시보드 로드입니다. 한 번에 20개 이상의 대시보드를 열 수 있지만 20개 이하의 대시보드는 동시에 로드를 시작할 수 없습니다.
필수 조건
외부 포함을 구현하려면 다음 필수 구성 요소를 충족하는지 확인합니다.
- 게시된 대시보드에 대한 CAN MANAGE 권한이 있어야 합니다. 자습서: 샘플 대시보드를 사용하여 필요한 경우 예제 대시보드를 빠르게 만들고 게시합니다.
- Databricks CLI 버전 0.205 이상이 설치되어 있어야 합니다. 지침 은 Databricks CLI 설치 또는 업데이트를 참조하세요. OAuth 인증을 구성하고 사용하려면 OAuth U2M(사용자-컴퓨터) 인증을 참조하세요.
- 작업 영역 관리자는 포함된 대시보드를 호스트할 수 있는 승인된 도메인 목록을 정의해야 합니다. 지침은 대시보드 포함 관리를 참조하세요.
- 포함된 대시보드를 호스트하는 외부 애플리케이션입니다. 사용자 고유의 애플리케이션을 사용하거나 제공된 샘플 애플리케이션을 사용할 수 있습니다.
1단계: 서비스 주체 만들기
Azure Databricks 내에서 외부 애플리케이션의 ID 역할을 하는 서비스 주체를 만듭니다. 이 서비스 주체는 애플리케이션을 대신하여 요청을 인증합니다.
서비스 주체를 만들려면 다음을 수행합니다.
- 작업 영역 관리자로 Azure Databricks 작업 영역에 로그인합니다.
- Azure Databricks 작업 영역의 위쪽 표시줄에서 사용자 이름을 클릭하고 설정을 선택합니다.
- 왼쪽 창에서 ID를 클릭하고 액세스 합니다.
- 서비스 주체 옆에 있는관리를 클릭합니다.
- 서비스 주체 추가를 클릭합니다.
- 새로 추가를 클릭합니다.
- 서비스 주체에 대한 설명이 포함된 이름을 입력합니다.
- 추가를 클릭합니다.
- 서비스 주체 목록 페이지에서 방금 만든 서비스 주체를 엽니다. 필요한 경우 필터 텍스트 입력 필드를 사용하여 이름으로 검색합니다.
- 서비스 주체 세부 정보 페이지에서 애플리케이션 ID를 기록합니다. Databricks SQL 액세스 및 작업 영역 액세스 확인란이 선택되어 있는지 확인합니다.
2단계: OAuth 비밀 만들기
서비스 주체에 대한 비밀을 생성하고 외부 애플리케이션에 필요한 다음 구성 값을 수집합니다.
- 서비스 주체(클라이언트) ID
- 클라이언트 암호
서비스 주체는 OAuth 비밀을 사용하여 외부 애플리케이션에서 액세스 토큰을 요청할 때 해당 ID를 확인합니다.
비밀을 생성하려면 다음을 수행합니다.
- 서비스 주체 세부 정보 페이지에서 비밀을 클릭합니다.
- 비밀 생성을 클릭합니다.
- 새 비밀의 수명 값을 일 단위로 입력합니다(예: 1~730일).
- 비밀을 즉시 복사합니다. 이 화면을 나가면 이 비밀을 다시 볼 수 없습니다.
3단계: 서비스 주체에 사용 권한 할당
만든 서비스 주체는 애플리케이션을 통해 대시보드 액세스를 제공하는 ID 역할을 합니다. 해당 권한은 대시보드가 공유 데이터 사용 권한으로 게시 되지 않은 경우에만 적용됩니다. 공유 데이터 사용 권한을 사용하는 경우 게시자의 자격 증명은 데이터에 액세스합니다. 자세한 내용 및 권장 사항은 인증 방법 포함을 참조하세요.
- 작업 영역 사이드바에서 대시보드 를 클릭하여 대시보드 목록 페이지를 엽니다.
- 포함할 대시보드의 이름을 클릭합니다. 게시된 대시보드가 열립니다.
- 공유를 클릭합니다.
- 공유 대화 상자의 텍스트 입력 필드를 사용하여 서비스 주체를 찾은 다음 클릭합니다. 사용 권한 수준을 CAN RUN으로 설정합니다. 그런 다음 추가를 클릭합니다.
-
대시보드 ID를 기록합니다. 대시보드의 URL(예:
https://<your-workspace-url>/dashboards/<dashboard-id>)에서 대시보드 ID를 찾을 수 있습니다. Databricks 작업 영역 세부 정보를 참조하세요.
비고
개별 데이터 권한이 있는 대시보드를 게시하는 경우 서비스 주체에게 대시보드에서 사용되는 데이터에 대한 액세스 권한을 부여해야 합니다. 컴퓨팅 액세스는 항상 게시자의 자격 증명을 사용하므로 서비스 주체에게 컴퓨팅 권한을 부여할 필요가 없습니다.
데이터를 읽고 표시하려면 서비스 주체가 대시보드에서 참조하는 테이블 및 뷰에 대한 최소 SELECT 권한이 있어야 합니다.
권한을 관리할 수 있는 사용자를 참조하세요.
4단계: 예제 앱을 사용하여 토큰 인증 및 생성
예제 애플리케이션을 사용하여 대시보드를 외부에 포함하는 연습을 수행합니다. 애플리케이션에는 범위가 지정된 토큰을 생성하는 데 필요한 토큰 교환을 시작하는 지침과 코드가 포함됩니다. 다음 코드 블록에는 종속성이 없습니다. 다음 애플리케이션 중 하나를 복사하고 저장합니다.
파이썬
이 파일을 복사하여 이름이 지정된 example.py파일에 저장합니다.
#!/usr/bin/env python3

import os
import sys
import json
import base64
import urllib.request
import urllib.parse
from http.server import HTTPServer, BaseHTTPRequestHandler

# -----------------------------------------------------------------------------
# Config
# -----------------------------------------------------------------------------
CONFIG = {
    "instance_url": os.environ.get("INSTANCE_URL"),
    "dashboard_id": os.environ.get("DASHBOARD_ID"),
    "service_principal_id": os.environ.get("SERVICE_PRINCIPAL_ID"),
    "service_principal_secret": os.environ.get("SERVICE_PRINCIPAL_SECRET"),
    "external_viewer_id": os.environ.get("EXTERNAL_VIEWER_ID"),
    "external_value": os.environ.get("EXTERNAL_VALUE"),
    "workspace_id": os.environ.get("WORKSPACE_ID"),
    "port": int(os.environ.get("PORT", 3000)),
}

basic_auth = base64.b64encode(
    f"{CONFIG['service_principal_id']}:{CONFIG['service_principal_secret']}".encode()
).decode()

# -----------------------------------------------------------------------------
# HTTP Request Helper
# -----------------------------------------------------------------------------
def http_request(url, method="GET", headers=None, body=None):
    headers = headers or {}
    if body is not None and not isinstance(body, (bytes, str)):
        raise ValueError("Body must be bytes or str")

    req = urllib.request.Request(url, method=method, headers=headers)
    if body is not None:
        if isinstance(body, str):
            body = body.encode()
        req.data = body

    try:
        with urllib.request.urlopen(req) as resp:
            data = resp.read().decode()
            try:
                return {"data": json.loads(data)}
            except json.JSONDecodeError:
                return {"data": data}
    except urllib.error.HTTPError as e:
        raise RuntimeError(f"HTTP {e.code}: {e.read().decode()}") from None

# -----------------------------------------------------------------------------
# Token logic
# -----------------------------------------------------------------------------
def get_scoped_token():
    # 1. Get all-api token
    oidc_res = http_request(
        f"{CONFIG['instance_url']}/oidc/v1/token",
        method="POST",
        headers={
            "Content-Type": "application/x-www-form-urlencoded",
            "Authorization": f"Basic {basic_auth}",
        },
        body=urllib.parse.urlencode({
            "grant_type": "client_credentials",
            "scope": "all-apis"
        })
    )
    oidc_token = oidc_res["data"]["access_token"]

    # 2. Get token info
    token_info_url = (
        f"{CONFIG['instance_url']}/api/2.0/lakeview/dashboards/"
        f"{CONFIG['dashboard_id']}/published/tokeninfo"
        f"?external_viewer_id={urllib.parse.quote(CONFIG['external_viewer_id'])}"
        f"&external_value={urllib.parse.quote(CONFIG['external_value'])}"
    )
    token_info = http_request(
        token_info_url,
        headers={"Authorization": f"Bearer {oidc_token}"}
    )["data"]

    # 3. Generate scoped token
    params = token_info.copy()
    authorization_details = params.pop("authorization_details", None)
    params.update({
        "grant_type": "client_credentials",
        "authorization_details": json.dumps(authorization_details)
    })

    scoped_res = http_request(
        f"{CONFIG['instance_url']}/oidc/v1/token",
        method="POST",
        headers={
            "Content-Type": "application/x-www-form-urlencoded",
            "Authorization": f"Basic {basic_auth}",
        },
        body=urllib.parse.urlencode(params)
    )
    return scoped_res["data"]["access_token"]

# -----------------------------------------------------------------------------
# HTML generator
# -----------------------------------------------------------------------------
def generate_html(token):
    return f"""<!DOCTYPE html>
<html>
<head>
    <meta charset="UTF-8">
    <meta name="viewport" content="width=device-width, initial-scale=1.0">
    <title>Dashboard Demo</title>
    <style>
        body {{ font-family: system-ui; margin: 0; padding: 20px; background: #f5f5f5; }}
        .container {{ max-width: 1200px; margin: 0 auto; height:calc(100vh - 40px) }}
    </style>
</head>
<body>
    <div id="dashboard-content" class="container"></div>
    <script type="module">
        import {{ DatabricksDashboard }} from "https://cdn.jsdelivr.net/npm/@databricks/aibi-client@0.0.0-alpha.7/+esm";
        const dashboard = new DatabricksDashboard({{
            instanceUrl: "{CONFIG['instance_url']}",
            workspaceId: "{CONFIG['workspace_id']}",
            dashboardId: "{CONFIG['dashboard_id']}",
            token: "{token}",
            container: document.getElementById("dashboard-content")
        }});
        dashboard.initialize();
    </script>
</body>
</html>"""

# -----------------------------------------------------------------------------
# HTTP server
# -----------------------------------------------------------------------------
class RequestHandler(BaseHTTPRequestHandler):
    def do_GET(self):
        if self.path != "/":
            self.send_response(404)
            self.send_header("Content-Type", "text/plain")
            self.end_headers()
            self.wfile.write(b"Not Found")
            return

        try:
            token = get_scoped_token()
            html = generate_html(token)
            status = 200
        except Exception as e:
            html = f"<h1>Error</h1><p>{e}</p>"
            status = 500

        self.send_response(status)
        self.send_header("Content-Type", "text/html")
        self.end_headers()
        self.wfile.write(html.encode())

def start_server():
    missing = [k for k, v in CONFIG.items() if not v]
    if missing:
        print(f"Missing: {', '.join(missing)}", file=sys.stderr)
        sys.exit(1)

    server = HTTPServer(("localhost", CONFIG["port"]), RequestHandler)
    print(f":rocket: Server running on http://localhost:{CONFIG['port']}")
    try:
        server.serve_forever()
    except KeyboardInterrupt:
        sys.exit(0)

if __name__ == "__main__":
    start_server()
JavaScript
이 파일을 복사하여 이름이 지정된 example.js파일에 저장합니다.
#!/usr/bin/env node

const http = require('http');
const https = require('https');
const { URL, URLSearchParams } = require('url');

// This constant is just a mapping of environment variables to their respective
// values.
const CONFIG = {
  instanceUrl: process.env.INSTANCE_URL,
  dashboardId: process.env.DASHBOARD_ID,
  servicePrincipalId: process.env.SERVICE_PRINCIPAL_ID,
  servicePrincipalSecret: process.env.SERVICE_PRINCIPAL_SECRET,
  externalViewerId: process.env.EXTERNAL_VIEWER_ID,
  externalValue: process.env.EXTERNAL_VALUE,
  workspaceId: process.env.WORKSPACE_ID,
  port: process.env.PORT || 3000,
};

const basicAuth = Buffer.from(`${CONFIG.servicePrincipalId}:${CONFIG.servicePrincipalSecret}`).toString('base64');

// ------------------------------------------------------------------------------------------------
// Main
// ------------------------------------------------------------------------------------------------

function startServer() {
  const missing = Object.keys(CONFIG).filter((key) => !CONFIG[key]);
  if (missing.length > 0) throw new Error(`Missing: ${missing.join(', ')}`);

  const server = http.createServer(async (req, res) => {
    // This is a demo server, we only support GET requests to the root URL.
    if (req.method !== 'GET' || req.url !== '/') {
      res.writeHead(404, { 'Content-Type': 'text/plain' });
      res.end('Not Found');
      return;
    }

    let html = '';
    let status = 200;

    try {
      const token = await getScopedToken();
      html = generateHTML(token);
    } catch (error) {
      html = `<h1>Error</h1><p>${error.message}</p>`;
      status = 500;
    } finally {
      res.writeHead(status, { 'Content-Type': 'text/html' });
      res.end(html);
    }
  });

  server.listen(CONFIG.port, () => {
    console.log(`🚀 Server running on http://localhost:${CONFIG.port}`);
  });

  process.on('SIGINT', () => process.exit(0));
  process.on('SIGTERM', () => process.exit(0));
}

async function getScopedToken() {
  // 1. Get all-api token. This will allow you to access the /tokeninfo
  // endpoint, which contains the information required to generate a scoped token
  const {
    data: { access_token: oidcToken },
  } = await httpRequest(`${CONFIG.instanceUrl}/oidc/v1/token`, {
    method: 'POST',
    headers: {
      'Content-Type': 'application/x-www-form-urlencoded',
      Authorization: `Basic ${basicAuth}`,
    },
    body: new URLSearchParams({
      grant_type: 'client_credentials',
      scope: 'all-apis',
    }),
  });

  // 2. Get token info. This information is **required** for generating a token that is correctly downscoped.
  // A correctly downscoped token will only have access to a handful of APIs, and within those APIs, only
  // a the specific resources required to render the dashboard.
  //
  // This is essential to prevent leaking a privileged token.
  //
  // At the time of writing, OAuth tokens in Databricks are valid for 1 hour.
  const tokenInfoUrl = new URL(
    `${CONFIG.instanceUrl}/api/2.0/lakeview/dashboards/${CONFIG.dashboardId}/published/tokeninfo`,
  );
  tokenInfoUrl.searchParams.set('external_viewer_id', CONFIG.externalViewerId);
  tokenInfoUrl.searchParams.set('external_value', CONFIG.externalValue);

  const { data: tokenInfo } = await httpRequest(tokenInfoUrl.toString(), {
    headers: { Authorization: `Bearer ${oidcToken}` },
  });

  // 3. Generate scoped token. This call is very similar to what was issued before, but now we are providing the scoping to make the generated token
  // safe to pass to a browser.
  const { authorization_details, ...params } = tokenInfo;
  const {
    data: { access_token },
  } = await httpRequest(`${CONFIG.instanceUrl}/oidc/v1/token`, {
    method: 'POST',
    headers: {
      'Content-Type': 'application/x-www-form-urlencoded',
      Authorization: `Basic ${basicAuth}`,
    },
    body: new URLSearchParams({
      grant_type: 'client_credentials',
      ...params,
      authorization_details: JSON.stringify(authorization_details),
    }),
  });

  return access_token;
}

startServer();

// ------------------------------------------------------------------------------------------------
// Helper functions
// ------------------------------------------------------------------------------------------------

/**
 * Helper function to create HTTP requests.
 * @param {string} url - The URL to make the request to.
 * @param {Object} options - The options for the request.
 * @param {string} options.method - The HTTP method to use.
 * @param {Object} options.headers - The headers to include in the request.
 * @param {Object} options.body - The body to include in the request.
 * @returns {Promise<Object>} A promise that resolves to the response data.
 */
function httpRequest(url, { method = 'GET', headers = {}, body } = {}) {
  return new Promise((resolve, reject) => {
    const isHttps = url.startsWith('https://');
    const lib = isHttps ? https : http;
    const options = new URL(url);
    options.method = method;
    options.headers = headers;

    const req = lib.request(options, (res) => {
      let data = '';
      res.on('data', (chunk) => (data += chunk));
      res.on('end', () => {
        if (res.statusCode >= 200 && res.statusCode < 300) {
          try {
            resolve({ data: JSON.parse(data) });
          } catch {
            resolve({ data });
          }
        } else {
          reject(new Error(`HTTP ${res.statusCode}: ${data}`));
        }
      });
    });

    req.on('error', reject);

    if (body) {
      if (typeof body === 'string' || Buffer.isBuffer(body)) {
        req.write(body);
      } else if (body instanceof URLSearchParams) {
        req.write(body.toString());
      } else {
        req.write(JSON.stringify(body));
      }
    }
    req.end();
  });
}

function generateHTML(token) {
  return `<!DOCTYPE html>
<html>
<head>
    <meta charset="UTF-8">
    <meta name="viewport" content="width=device-width, initial-scale=1.0">
    <title>Dashboard Demo</title>
    <style>
        body { font-family: system-ui; margin: 0; padding: 20px; background: #f5f5f5; }
        .container { max-width: 1200px; margin: 0 auto; height:calc(100vh - 40px) }
    </style>
</head>
<body>
    <div id="dashboard-content" class="container"></div>
    <script type="module">
        /**
         * We recommend bundling the dependency instead of using a CDN. However, for demonstration purposes,
         * we are just using a CDN.
         *
         * We do not recommend one CDN over another and encourage decoupling the dependency from third-party code.
         */
        import { DatabricksDashboard } from "https://cdn.jsdelivr.net/npm/@databricks/aibi-client@0.0.0-alpha.7/+esm";

        const dashboard = new DatabricksDashboard({
            instanceUrl: "${CONFIG.instanceUrl}",
            workspaceId: "${CONFIG.workspaceId}",
            dashboardId: "${CONFIG.dashboardId}",
            token: "${token}",
            container: document.getElementById("dashboard-content")
        });

        dashboard.initialize();
    </script>
</body>
</html>`;
}
5단계: 예제 애플리케이션 실행
다음 값을 바꾼 다음 터미널에서 코드 블록을 실행합니다. 값은 꺾쇠 괄호()로 묶< > 합니다.
-
작업 영역 URL을 사용하여 다음 값을 찾아 바꿀 수 있습니다.
<your-instance><workspace_id><dashboard_id>
- 다음 값을 서비스 주체를 만들 때 만든 값으로 바꿉 있습니다(2단계).
<service_principal_id>-
<service_principal_secret>(클라이언트 암호)
- 다음 값을 외부 애플리케이션의 사용자와 연결된 식별자로 바꿉다.
<some-external-viewer><some-external-value>
- 이전 단계에서 만든 파일의
</path/to/example>.py경로로 바꿉.js습니다. 파일 확장자를 포함합니다.
비고
값에 PII(개인 식별 정보) EXTERNAL_VIEWER_ID 를 포함하지 마세요.
INSTANCE_URL='https://<your-instance>.databricks.com' \
WORKSPACE_ID='<workspace_id>' \
DASHBOARD_ID='<dashboard_id>' \
SERVICE_PRINCIPAL_ID='<service-principal-id>' \
SERVICE_PRINCIPAL_SECRET='<service-principal_secret>' \
EXTERNAL_VIEWER_ID='<some-external-viewer>' \
EXTERNAL_VALUE='<some-external-value>' \
~</path/to/example>

# Terminal will output: :rocket: Server running on http://localhost:3000