이 빠른 시작에서는 런타임 시 MIP SDK .NET 래퍼에서 사용하는 클라이언트 초기화 패턴을 구현하는 방법을 보여 줍니다.
비고
이 빠른 시작에 설명된 단계는 MIP .NET 래퍼의 보호 SDK를 사용하는 모든 클라이언트 애플리케이션에 필요합니다. 이러한 빠른 시작은 애플리케이션 초기화 및 인증 대리자 및 동의 대리자 클래스 구현 후에 직렬로 수행해야 합니다.
필수 조건
아직 없는 경우 다음을 수행해야 합니다.
- MIP(Microsoft Information Protection) SDK 설정 및 구성의 단계를 완료합니다. 이 "보호 프로필 및 엔진 설정" 빠른 시작은 적절한 SDK 설정 및 구성을 사용합니다.
- 필요:
- 프로필 및 엔진 개체를 검토합니다. 프로필 및 엔진 개체는 MIP 파일/정책/보호 SDK를 사용하는 클라이언트에서 요구하는 범용 개념입니다.
- 인증 개념을 검토하여 SDK 및 클라이언트 애플리케이션에서 인증 및 동의를 구현하는 방법을 알아봅니다.
Visual Studio 솔루션 및 프로젝트 만들기
먼저 다른 빠른 시작을 빌드할 초기 Visual Studio 솔루션 및 프로젝트를 만들고 구성합니다.
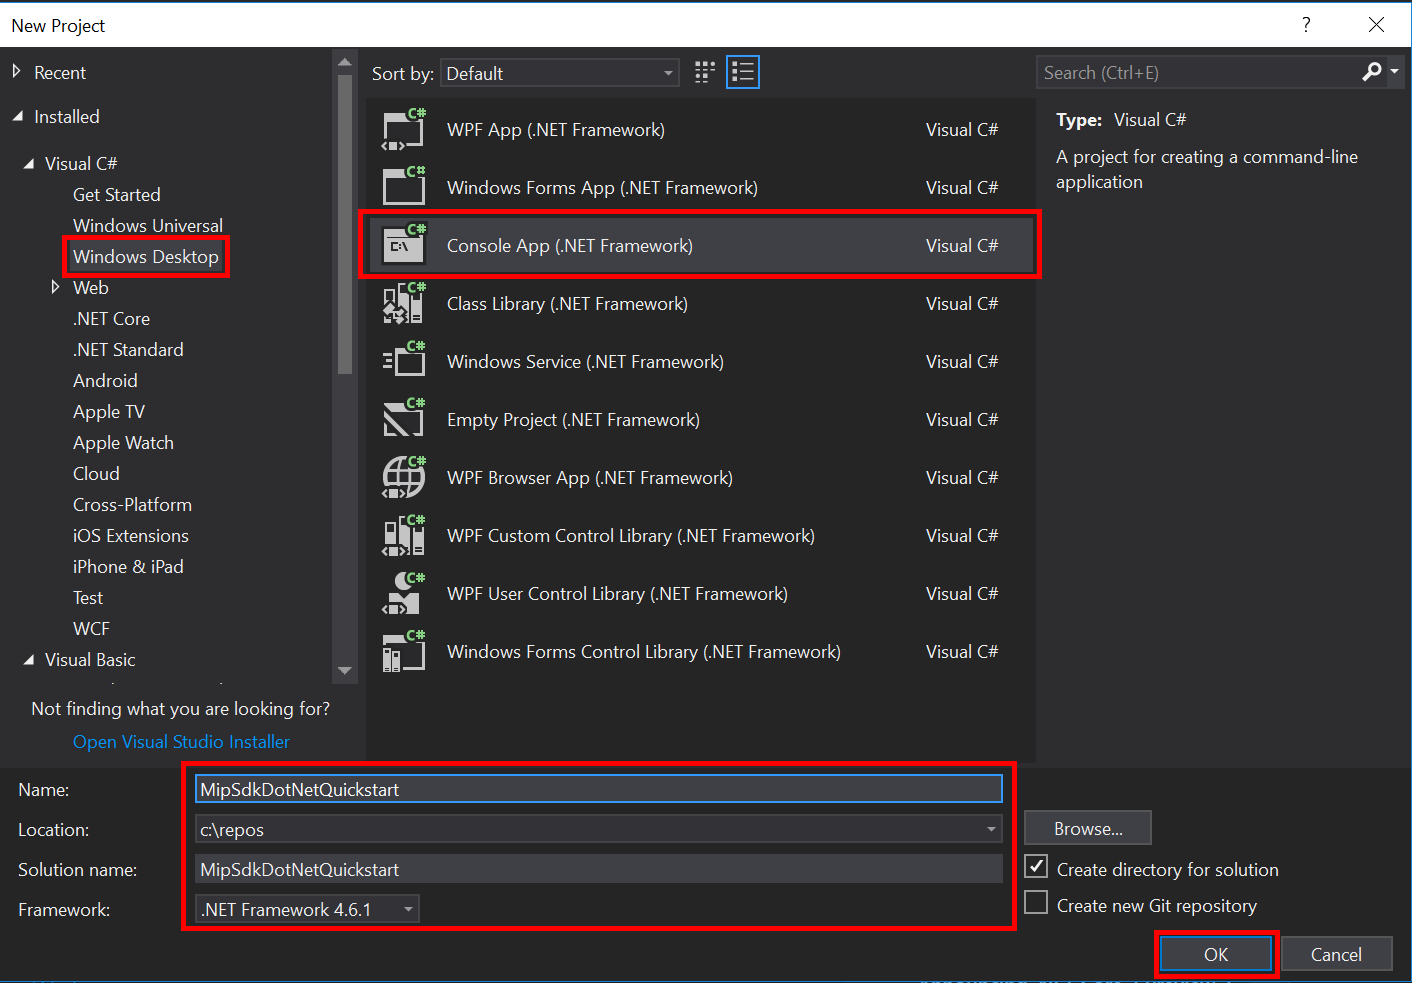
Visual Studio 2019 이상을 열고 파일 메뉴, 새로 만들기, 프로젝트를 선택합니다. 새 프로젝트 대화 상자에서 다음을 수행합니다.
왼쪽 창의 설치됨, Visual C#에서 Windows 데스크톱을 선택합니다.
가운데 창에서 콘솔 앱(.NET Framework)을 선택합니다.
아래쪽 창에서 프로젝트 이름, 위치 및 포함된 솔루션 이름을 적절하게 업데이트합니다.
완료되면 오른쪽 아래에 있는 확인 단추를 클릭합니다.
MIP 파일 SDK에 대한 NuGet 패키지를 프로젝트에 추가합니다.
- 솔루션 탐색기에서 프로젝트 노드(위쪽/솔루션 노드 바로 아래)를 마우스 오른쪽 단추로 클릭하고 NuGet 패키지 관리를 선택합니다.
- 편집기 그룹 탭 영역에서 NuGet 패키지 관리자 탭이 열리는 경우:
- 찾아보기를 선택합니다.
- 검색 상자에 "Microsoft.InformationProtection"을 입력합니다.
- "Microsoft.InformationProtection.File" 패키지를 선택합니다.
- "설치"를 클릭한 다음 미리 보기 변경 내용 확인 대화 상자가 표시되면 "확인"을 클릭합니다.
위의 단계를 반복하여 MIP Protection SDK 패키지를 추가하지만 대신 애플리케이션에 "Microsoft.IdentityModel.Clients.ActiveDirectory"를 추가합니다.

인증 대리자 및 동의 대리자 구현
아직 구현되지 않은 경우 인증 및 동의 대리자를 구현하기 위해 파일 SDK 애플리케이션 초기화 에 나열된 단계를 따릅니다.
MIP SDK 관리 래퍼 초기화
솔루션 탐색기에서 메서드 구현
Main()이 포함된 프로젝트에서 .cs 파일을 엽니다. 기본값은 프로젝트를 만드는 동안 지정한 이름을 포함하는 프로젝트와 동일합니다.생성된 .의 구현을 제거합니다
main().관리되는 래퍼에는 초기화,
Microsoft.InformationProtection.MIP프로필 만들기MipContext, 프로필 로드 및 리소스 해제에 사용되는 정적 클래스가 포함되어 있습니다. 파일 SDK 작업에 대한 래퍼를 초기화하려면 호출MIP.Initialize()하고, 전달MipComponent.Protection하여 보호 작업에 필요한 라이브러리를 로드합니다.Main()Program.cs 애플리케이션 ID>를 이전에 만든 Microsoft Entra 애플리케이션 등록의 ID로 바꿔<서 다음을 추가합니다.
using System;
using System.Threading.Tasks;
using Microsoft.InformationProtection;
using Microsoft.InformationProtection.Exceptions;
using Microsoft.InformationProtection.Protection;

namespace mip_sdk_dotnet_quickstart
{
    class Program
    {
        private const string clientId = "<application-id>";
        private const string appName = "<friendly-name>";

        static void Main(string[] args)
        {
            //Initialize Wrapper for Protection SDK operations
            MIP.Initialize(MipComponent.Protection);
        }
    }
}
보호 프로필 및 엔진 생성
언급했듯이 MIP API를 사용하는 SDK 클라이언트에는 프로필 및 엔진 개체가 필요합니다. 네이티브 DLL을 로드하는 코드를 추가한 다음 프로필 및 엔진 개체를 인스턴스화하여 이 빠른 시작의 코딩 부분을 완료합니다.
using System;
using System.Threading.Tasks;
using Microsoft.InformationProtection;
using Microsoft.InformationProtection.Exceptions;
using Microsoft.InformationProtection.Protection;

namespace mip_sdk_dotnet_quickstart
{
     class Program
     {
          private const string clientId = "<application-id>";
          private const string appName = "<friendly-name>";

          static void Main(string[] args)
          {
               // Initialize Wrapper for Protection SDK operations.
               MIP.Initialize(MipComponent.Protection);

               // Create ApplicationInfo, setting the clientID from Azure AD App Registration as the ApplicationId.
               ApplicationInfo appInfo = new ApplicationInfo()
               {
                    ApplicationId = clientId,
                    ApplicationName = appName,
                    ApplicationVersion = "1.0.0"
               };

               // Instantiate the AuthDelegateImpl object, passing in AppInfo.
               AuthDelegateImplementation authDelegate = new AuthDelegateImplementation(appInfo);

               // Create MipConfiguration Object
               MipConfiguration mipConfiguration = new MipConfiguration(appInfo, "mip_data", LogLevel.Trace, false);

               // Create MipContext using Configuration
               mipContext = MIP.CreateMipContext(mipConfiguration);

               // Initialize and instantiate the ProtectionProfile.
               // Create the ProtectionProfileSettings object.
               // Initialize protection profile settings to create/use local state.
               var profileSettings = new ProtectionProfileSettings(mipContext,
                                        CacheStorageType.OnDiskEncrypted,
                                        new ConsentDelegateImplementation());

               // Load the Profile async and wait for the result.
               var protectionProfile = Task.Run(async () => await MIP.LoadProtectionProfileAsync(profileSettings)).Result;

               // Create a ProtectionEngineSettings object, then use that to add an engine to the profile.
               var engineSettings = new ProtectionEngineSettings("user1@tenant.com", authDelegate, "", "en-US");
               engineSettings.Identity = new Identity("user1@tenant.com");
               var protectionEngine = Task.Run(async () => await protectionProfile.AddEngineAsync(engineSettings)).Result;

               // Application Shutdown
               // handler = null; // This will be used in later quick starts.
               protectionEngine = null;
               protectionProfile = null;
               mipContext = null;
          }
     }
}
다음 값을 사용하여 붙여넣은 소스 코드의 자리 표시자 값을 바꿉합니다.
Placeholder 가치 Example <application-id> "MIP SDK 설정 및 구성"(2개 인스턴스)에 등록된 애플리케이션에 할당된 Microsoft Entra 애플리케이션 ID입니다. 0edbblll-8773-44de-b87c-b8c6276d41eb <friendly-name> 애플리케이션에 대한 사용자 정의 이름입니다. AppInitialization 이제 애플리케이션의 최종 빌드를 수행하고 오류를 해결합니다. 코드가 성공적으로 빌드되어야 합니다.
다음 단계
이제 초기화 코드가 완료되었으므로 MIP Protection SDK를 경험할 수 있는 다음 빠른 시작을 준비했습니다.