Notitie
Voor toegang tot deze pagina is autorisatie vereist. U kunt proberen u aan te melden of de directory te wijzigen.
Voor toegang tot deze pagina is autorisatie vereist. U kunt proberen de mappen te wijzigen.
In dit onderwerp wordt uitgelegd hoe u een eenvoudige C# .NET-toepassing bouwt met WinUI 3- en Win32-interopmogelijkheden met behulp van Platform Invocation Services (PInvoke).
Prerequisites
Basis C#/.NET-beheerde app
In dit voorbeeld geven we de locatie en grootte van het app-venster op, converteren en schalen we dit voor de juiste DPI, schakelen we de minimaliseer- en maximaliseerknoppen van het venster uit, en voeren we ten slotte een query uit op het huidige proces om een lijst weer te geven van de modules die in het huidige proces zijn geladen.
We gaan onze voorbeeld-app bouwen beginnend met de initiële sjabloonapplicatie (zie Vereisten). Zie ook WinUI 3-sjablonen in Visual Studio.
Het bestand MainWindow.xaml
Met WinUI 3 kunt u exemplaren van de Windows-klasse maken in XAML-opmaak.
De XAML-vensterklasse is uitgebreid ter ondersteuning van bureaubladvensters, waardoor deze wordt omgezet in een abstractie van elk van de implementaties op laag niveau die worden gebruikt door de UWP- en desktop-app-modellen. CoreWindow voor UWP en venstergrepen (of HWNDs) voor Win32.
De volgende code toont het bestand MainWindow.xaml uit de eerste sjabloon-app, die de Windows-klasse gebruikt als het hoofdelement voor de app.
<Window
    x:Class="WinUI_3_basic_win32_interop.MainWindow"
    xmlns="http://schemas.microsoft.com/winfx/2006/xaml/presentation"
    xmlns:x="http://schemas.microsoft.com/winfx/2006/xaml"
    xmlns:local="using:WinUI_3_basic_win32_interop"
    xmlns:d="http://schemas.microsoft.com/expression/blend/2008"
    xmlns:mc="http://schemas.openxmlformats.org/markup-compatibility/2006"
    mc:Ignorable="d">

    <StackPanel Orientation="Horizontal" HorizontalAlignment="Center" VerticalAlignment="Center">
        <Button x:Name="myButton" Click="myButton_Click">Click Me</Button>
    </StackPanel>
</Window>
Configuration
Als u Win32-API's wilt aanroepen die zijn geëxporteerd uit
User32.dll, kunt u de C#/Win32 P/Invoke Source Generator gebruiken in uw Visual Studio-project. Klik op Tools>NuGet Package Manager>Manage NuGet Packages for Solution..., en zoek (op het tabblad Bladeren ) naar Microsoft.Windows.CsWin32. Zie Systeemeigen functies aanroepen vanuit beheerde codevoor meer informatie.U kunt eventueel bevestigen dat de installatie is geslaagd door te bevestigen dat Microsoft.Windows.CsWin32 wordt vermeld onder het knooppunt Afhankelijkhedenpakketten> in Solution Explorer.
U kunt eventueel ook dubbelklikken op het projectbestand van de toepassing (of met de rechtermuisknop klikken en projectbestand bewerken) selecteren om het bestand te openen in een teksteditor en bevestigen dat het projectbestand nu een NuGet-
PackageReferencebevat voor Microsoft.Windows.CsWin32.<Project Sdk="Microsoft.NET.Sdk"> <PropertyGroup> <OutputType>WinExe</OutputType> <TargetFramework>net8.0-windows10.0.19041.0</TargetFramework> <TargetPlatformMinVersion>10.0.17763.0</TargetPlatformMinVersion> <RootNamespace>WinUI_3_basic_win32_interop</RootNamespace> <ApplicationManifest>app.manifest</ApplicationManifest> <Platforms>x86;x64;ARM64</Platforms> <RuntimeIdentifiers>win-x86;win-x64;win-arm64</RuntimeIdentifiers> <PublishProfile>win-$(Platform).pubxml</PublishProfile> <UseWinUI>true</UseWinUI> <EnableMsixTooling>true</EnableMsixTooling> <Nullable>enable</Nullable> </PropertyGroup> <ItemGroup> <Content Include="Assets\SplashScreen.scale-200.png" /> <Content Include="Assets\LockScreenLogo.scale-200.png" /> <Content Include="Assets\Square150x150Logo.scale-200.png" /> <Content Include="Assets\Square44x44Logo.scale-200.png" /> <Content Include="Assets\Square44x44Logo.targetsize-24_altform-unplated.png" /> <Content Include="Assets\StoreLogo.png" /> <Content Include="Assets\Wide310x150Logo.scale-200.png" /> </ItemGroup> <ItemGroup> <Manifest Include="$(ApplicationManifest)" /> </ItemGroup> <!-- Defining the "Msix" ProjectCapability here allows the Single-project MSIX Packaging Tools extension to be activated for this project even if the Windows App SDK Nuget package has not yet been restored. --> <ItemGroup Condition="'$(DisableMsixProjectCapabilityAddedByProject)'!='true' and '$(EnableMsixTooling)'=='true'"> <ProjectCapability Include="Msix" /> </ItemGroup> <ItemGroup> <PackageReference Include="Microsoft.Windows.CsWin32" Version="0.3.183"> <PrivateAssets>all</PrivateAssets> <IncludeAssets>runtime; build; native; contentfiles; analyzers; buildtransitive</IncludeAssets> </PackageReference> <PackageReference Include="Microsoft.Windows.SDK.BuildTools" Version="10.0.26100.1742" /> <PackageReference Include="Microsoft.WindowsAppSDK" Version="1.6.250205002" /> </ItemGroup> <!-- Defining the "HasPackageAndPublishMenuAddedByProject" property here allows the Solution Explorer "Package and Publish" context menu entry to be enabled for this project even if the Windows App SDK Nuget package has not yet been restored. --> <PropertyGroup Condition="'$(DisableHasPackageAndPublishMenuAddedByProject)'!='true' and '$(EnableMsixTooling)'=='true'"> <HasPackageAndPublishMenu>true</HasPackageAndPublishMenu> </PropertyGroup> <!-- Publish Properties --> <PropertyGroup> <PublishReadyToRun Condition="'$(Configuration)' == 'Debug'">False</PublishReadyToRun> <PublishReadyToRun Condition="'$(Configuration)' != 'Debug'">True</PublishReadyToRun> <PublishTrimmed Condition="'$(Configuration)' == 'Debug'">False</PublishTrimmed> <PublishTrimmed Condition="'$(Configuration)' != 'Debug'">True</PublishTrimmed> </PropertyGroup> </Project>Voeg een tekstbestand toe aan uw project en geef het
NativeMethods.txteen naam. De inhoud van dit bestand informeert de C#/Win32 P/Invoke Source Generator de functies en typen waarvoor u P/Invoke-broncode wilt genereren. Met andere woorden, welke functies en typen u gaat aanroepen en gebruiken in uw C#-code.GetDpiForWindow GetWindowLong SetWindowPos SetWindowLong HWND_TOP WINDOW_STYLE
Code
In het
App.xaml.csbestand code-behind krijgen we een ingang naar het venster met behulp van de interopmethode WindowNative.GetWindowHandle WinRT COM (zie Een venstergreep ophalen (HWND)).Deze methode wordt aangeroepen vanuit de OnLaunched-handler van de app, zoals hier wordt weergegeven:
/// <summary>
/// Invoked when the application is launched.
/// </summary>
/// <param name="args">Details about the launch request and process.</param>
protected override void OnLaunched(Microsoft.UI.Xaml.LaunchActivatedEventArgs args)
{
    m_window = new MainWindow();

    var hwnd = WinRT.Interop.WindowNative.GetWindowHandle(m_window);

    SetWindowDetails(hwnd, 800, 600);

    m_window.Activate();
}
Vervolgens wordt een
SetWindowDetailsmethode aangeroepen, waarbij de venstergreep en voorkeursdimensies worden doorgegeven.In deze methode:
- We roepen GetDpiForWindow aan om de dpi-waarde (dots per inch) voor het venster op te halen (Win32 gebruikt fysieke pixels, terwijl WinUI 3 effectieve pixels gebruikt). Deze dpi-waarde wordt gebruikt om de schaalfactor te berekenen en toe te passen op de breedte en hoogte die voor het venster is opgegeven.
- Vervolgens roepen we SetWindowPos aan om de gewenste locatie van het venster op te geven.
- Ten slotte roepen we SetWindowLong aan om de knoppen Minimaliseren en Maximaliseren uit te schakelen.
private static void SetWindowDetails(IntPtr hwnd, int width, int height)
{
    var dpi = Windows.Win32.PInvoke.GetDpiForWindow((Windows.Win32.Foundation.HWND)hwnd);
    float scalingFactor = (float)dpi / 96;
    width = (int)(width * scalingFactor);
    height = (int)(height * scalingFactor);

    _ = Windows.Win32.PInvoke.SetWindowPos((Windows.Win32.Foundation.HWND)hwnd,
                                Windows.Win32.Foundation.HWND.HWND_TOP,
                                0, 0, width, height,
                                Windows.Win32.UI.WindowsAndMessaging.SET_WINDOW_POS_FLAGS.SWP_NOMOVE);

    var nIndex = Windows.Win32.PInvoke.GetWindowLong((Windows.Win32.Foundation.HWND)hwnd,
              Windows.Win32.UI.WindowsAndMessaging.WINDOW_LONG_PTR_INDEX.GWL_STYLE) &
              ~(int)Windows.Win32.UI.WindowsAndMessaging.WINDOW_STYLE.WS_MINIMIZEBOX &
              ~(int)Windows.Win32.UI.WindowsAndMessaging.WINDOW_STYLE.WS_MAXIMIZEBOX;

    _ = Windows.Win32.PInvoke.SetWindowLong((Windows.Win32.Foundation.HWND)hwnd,
           Windows.Win32.UI.WindowsAndMessaging.WINDOW_LONG_PTR_INDEX.GWL_STYLE,
           nIndex);
}
In het bestand MainWindow.xaml gebruiken we een ContentDialog met een ScrollViewer om een lijst weer te geven met alle modules die voor het huidige proces zijn geladen.
<StackPanel Orientation="Horizontal" HorizontalAlignment="Center" VerticalAlignment="Center">
    <Button x:Name="myButton" Click="myButton_Click">Display loaded modules</Button>

    <ContentDialog x:Name="contentDialog" CloseButtonText="Close">
        <ScrollViewer>
            <TextBlock x:Name="cdTextBlock" TextWrapping="Wrap" />
        </ScrollViewer>
    </ContentDialog>

</StackPanel>
Vervolgens vervangen we de
MyButton_Clickgebeurtenis-handler door de volgende code.Hier krijgen we een verwijzing naar het huidige proces door GetCurrentProcess aan te roepen. Vervolgens doorlopen we de verzameling modules en voegen we de bestandsnaam van elke ProcessModule toe aan onze weergavetekenreeks.
private async void myButton_Click(object sender, RoutedEventArgs e)
{
    myButton.Content = "Clicked";

    var description = new System.Text.StringBuilder();
    var process = System.Diagnostics.Process.GetCurrentProcess();
    foreach (System.Diagnostics.ProcessModule module in process.Modules)
    {
        description.AppendLine(module.FileName);
    }

    cdTextBlock.Text = description.ToString();
    await contentDialog.ShowAsync();
}
Compileer en voer de app uit.
Nadat het venster wordt weergegeven, selecteert u de knop 'Geladen modules weergeven'.
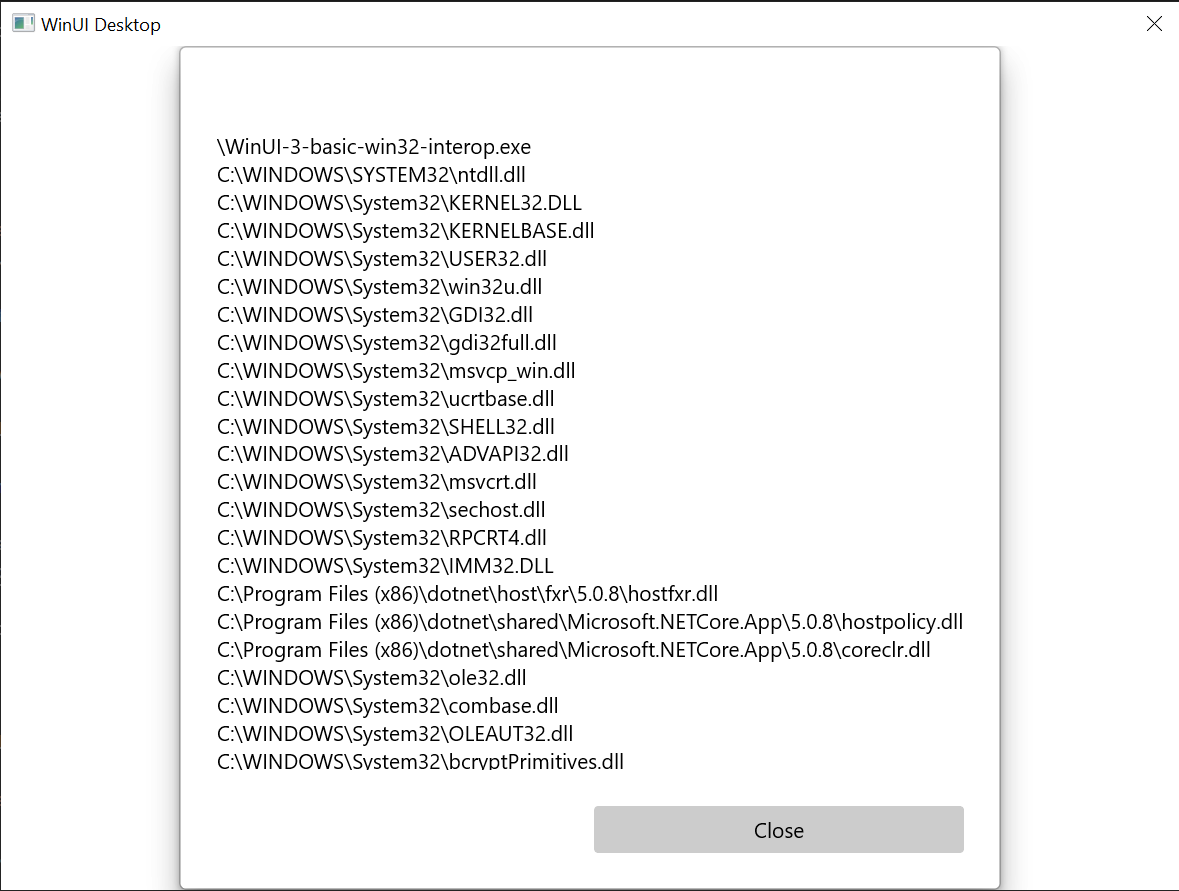
De eenvoudige Win32-interoperabiliteitstoepassing die in dit onderwerp wordt beschreven.
Summary
In dit onderwerp hebben we het gebruik van de onderliggende vensterimplementatie besproken (in dit geval Win32 en HWND's) en het gebruik van Win32-API's, samen met de WinRT-API's. Dit laat zien hoe u bestaande bureaubladtoepassingscode kunt gebruiken bij het maken van nieuwe WinUI 3-bureaublad-apps.
Zie het AppWindow-galerievoorbeeld in de Voorbeelden van de Windows App SDK GitHub-opslagplaats voor een uitgebreider voorbeeld.
Een voorbeeld om de titelbalk van het venster aan te passen
In dit tweede voorbeeld laten we zien hoe u de titelbalk en de inhoud van het venster kunt aanpassen. Bekijk de volgende onderwerpen voordat u deze volgt:
Een nieuw project maken
- Maak in Visual Studio een nieuw C# of C++/WinRT-project op basis van de Blanco App, Verpakt (WinUI 3 in Desktop) projectsjabloon.
Configuration
Raadpleeg opnieuw het NuGet-pakket Microsoft.Windows.CsWin32 , net zoals in het eerste voorbeeld.
Voeg een
NativeMethods.txttekstbestand toe aan uw project.LoadImage SendMessage SetWindowText WM_SETICON
MainWindow.xaml
Note
Als u een pictogrambestand nodig hebt voor deze handleiding, kunt u het computer.ico bestand downloaden van de WirelessHostednetwork voorbeeld app. Plaats dat bestand in uw Assets map en voeg het bestand als inhoud toe aan uw project. Vervolgens kunt u naar het bestand verwijzen met behulp van de URL Assets/computer.ico.
Anders kunt u een pictogrambestand gebruiken dat u al hebt en wijzig de twee verwijzingen ernaar in de onderstaande codevermeldingen.
- In de onderstaande codevermelding ziet u dat in
MainWindow.xamlwe twee knoppen hebben toegevoegd en dat u voor elk van deze knoppen klikhandlers hebt opgegeven. In de klikhandler voor de eerste knop (basicButton_Click) stellen we het titelbalkpictogram en de tekst in. In de tweede (customButton_Click) laten we een significantere aanpassing zien door de titelbalk te vervangen door de inhoud van het StackPanel met de naam customTitleBarPanel.
<?xml version="1.0" encoding="utf-8"?>
<Window
    x:Class="window_titlebar.MainWindow"
    xmlns="http://schemas.microsoft.com/winfx/2006/xaml/presentation"
    xmlns:x="http://schemas.microsoft.com/winfx/2006/xaml"
    xmlns:local="using:window_titlebar"
    xmlns:d="http://schemas.microsoft.com/expression/blend/2008"
    xmlns:mc="http://schemas.openxmlformats.org/markup-compatibility/2006"
    mc:Ignorable="d"
    Title="Basic WinUI 3 Window title bar sample">

    <Grid x:Name="rootElement" RowDefinitions="100, *, 100, *">

        <StackPanel x:Name="customTitleBarPanel" Grid.Row="0" Orientation="Horizontal" HorizontalAlignment="Stretch" VerticalAlignment="Top" Visibility="Collapsed">
            <Image Source="Images/windowIcon.gif" />
            <TextBlock VerticalAlignment="Center" Text="Full customization of title bar"/>
        </StackPanel>

        <StackPanel x:Name="buttonPanel"  Grid.Row="2" Orientation="Horizontal" HorizontalAlignment="Center">
            <Button x:Name="basicButton" Click="basicButton_Click" Margin="25">Set the Window title and icon</Button>
            <Button x:Name="customButton" Click="customButton_Click" Margin="25">Customize the window title bar</Button>
        </StackPanel>

    </Grid>
</Window>
MainWindow.xaml.cs/cpp
- In de onderstaande codevermelding voor de basicButton_Click handler , om de aangepaste titelbalk verborgen te houden, vouwen we de customTitleBarPanel StackPanel samen en stellen we de eigenschap ExtendContentIntoTitleBar in op
false. - Vervolgens noemen we IWindowNative::get_WindowHandle (voor C#, met behulp van de interop-helpermethode GetWindowHandle) om de venstergreep (HWND) van het hoofdvenster op te halen.
- Vervolgens stellen we het toepassingspictogram (voor C# met behulp van het NuGet-pakket PInvoke.User32 ) in door de functies LoadImage en SendMessage aan te roepen.
- Ten slotte roepen we SetWindowText aan om de titelbalktekenreeks bij te werken.
private void basicButton_Click(object sender, RoutedEventArgs e)
{
    // Ensure the custom title bar content is not displayed.
    customTitleBarPanel.Visibility = Visibility.Collapsed;

    // Disable custom title bar content.
    ExtendsContentIntoTitleBar = false;

    //Get the Window's HWND
    var hwnd = WinRT.Interop.WindowNative.GetWindowHandle(this);

    var hIcon = Windows.Win32.PInvoke.LoadImage(
        null,
        "Images/windowIcon.ico",
        Windows.Win32.UI.WindowsAndMessaging.GDI_IMAGE_TYPE.IMAGE_ICON,
        20, 20,
        Windows.Win32.UI.WindowsAndMessaging.IMAGE_FLAGS.LR_LOADFROMFILE);

    Windows.Win32.PInvoke.SendMessage(
        (Windows.Win32.Foundation.HWND)hwnd,
        Windows.Win32.PInvoke.WM_SETICON,
        (Windows.Win32.Foundation.WPARAM)0,
        (Windows.Win32.Foundation.LPARAM)hIcon.DangerousGetHandle());

    Windows.Win32.PInvoke.SetWindowText((Windows.Win32.Foundation.HWND)hwnd, "Basic customization of title bar");
}
// pch.h
...
#include <microsoft.ui.xaml.window.h>
...

// MainWindow.xaml.h
...
void basicButton_Click(Windows::Foundation::IInspectable const& sender, Microsoft::UI::Xaml::RoutedEventArgs const& args);
...

// MainWindow.xaml.cpp
void MainWindow::basicButton_Click(IInspectable const&, RoutedEventArgs const&)
{
    // Ensure the that custom title bar content is not displayed.
    customTitleBarPanel().Visibility(Visibility::Collapsed);

    // Disable custom title bar content.
    ExtendsContentIntoTitleBar(false);

    // Get the window's HWND
    auto windowNative{ this->m_inner.as<::IWindowNative>() };
    HWND hWnd{ 0 };
    windowNative->get_WindowHandle(&hWnd);

    HICON icon{ reinterpret_cast<HICON>(::LoadImage(nullptr, L"Assets/computer.ico", IMAGE_ICON, 0, 0, LR_DEFAULTSIZE | LR_LOADFROMFILE)) };
    ::SendMessage(hWnd, WM_SETICON, 0, (LPARAM)icon);

    this->Title(L"Basic customization of title bar");
}
- In de customButton_Click handler stellen we de zichtbaarheid van customTitleBarPanel StackPanel in op Visible.
- Vervolgens stellen we de eigenschap ExtendsContentIntoTitleBar in en roepen SetTitleBar aan om de customTitleBarPanelStackPanel weer te geven als onze aangepaste titelbalk.
private void customButton_Click(object sender, RoutedEventArgs e)
{
    customTitleBarPanel.Visibility = Visibility.Visible;

    // Enable custom title bar content.
    ExtendsContentIntoTitleBar = true;
    // Set the content of the custom title bar.
    SetTitleBar(customTitleBarPanel);
}
// MainWindow.xaml.h
...
void customButton_Click(Windows::Foundation::IInspectable const& sender, Microsoft::UI::Xaml::RoutedEventArgs const& args);
...

// MainWindow.xaml.cpp
void MainWindow::customButton_Click(IInspectable const&, RoutedEventArgs const&)
{
    customTitleBarPanel().Visibility(Visibility::Visible);

    // Enable custom title bar content.
    ExtendsContentIntoTitleBar(true);

    // Set the content of the custom title bar.
    SetTitleBar(customTitleBarPanel());
}
App.xaml
- Direct na de
App.xaml-opmerking in het<!-- Other app resources here -->-bestand hebben we een aantal op maat gemaakte penselen toegevoegd voor de titelbalk, zoals hieronder weergegeven.
<?xml version="1.0" encoding="utf-8"?>
<Application
    x:Class="window_titlebar.App"
    xmlns="http://schemas.microsoft.com/winfx/2006/xaml/presentation"
    xmlns:x="http://schemas.microsoft.com/winfx/2006/xaml"
    xmlns:local="using:window_titlebar">
    <Application.Resources>
        <ResourceDictionary>
            <ResourceDictionary.MergedDictionaries>
                <XamlControlsResources xmlns="using:Microsoft.UI.Xaml.Controls" />
                <!-- Other merged dictionaries here -->
            </ResourceDictionary.MergedDictionaries>
            <!-- Other app resources here -->
            <SolidColorBrush x:Key="WindowCaptionBackground">Green</SolidColorBrush>
            <SolidColorBrush x:Key="WindowCaptionBackgroundDisabled">LightGreen</SolidColorBrush>
            <SolidColorBrush x:Key="WindowCaptionForeground">Red</SolidColorBrush>
            <SolidColorBrush x:Key="WindowCaptionForegroundDisabled">Pink</SolidColorBrush>
        </ResourceDictionary>
    </Application.Resources>
</Application>
Als u deze stappen in uw eigen app hebt gevolgd, kunt u uw project nu bouwen en de app uitvoeren. U ziet een toepassingsvenster dat lijkt op het volgende (met het pictogram van de aangepaste app):

Sjabloon-app.
Dit is de standaard aangepaste titelbalk:

sjabloon-app met aangepast toepassingspictogram.Dit is de volledig aangepaste titelbalk:

Sjabloon-app met aangepaste titelbalk.
Zie ook
Met ons samenwerken op GitHub
De bron voor deze inhoud vindt u op GitHub, waar u ook problemen en pull-aanvragen kunt maken en controleren. Bekijk onze gids voor inzenders voor meer informatie.

Windows developer