Nuta
Dostęp do tej strony wymaga autoryzacji. Możesz spróbować się zalogować lub zmienić katalog.
Dostęp do tej strony wymaga autoryzacji. Możesz spróbować zmienić katalogi.
Wprowadzenie
This tutorial describes how to connect to, set up, and activate your Data Box Gateway device by using the local web UI.
The setup and activation process can take around 10 minutes to complete.
Z tego samouczka dowiesz się, jak wykonywać następujące działania:
- Connect to a virtual device
- Set up and activate the virtual device
Wymagania wstępne
Before you configure and set up your Data Box Gateway, make sure that:
- You've provisioned a virtual device and obtained a connected URL to it as detailed in the Provision a Data Box Gateway in Hyper-V or Provision a Data Box Gateway in VMware.
- You have the activation key from the Data Box Gateway service that you created to manage Data Box Gateway devices. For more information, go to Prepare to deploy Azure Data Box Gateway.
Connect to the local web UI setup
Open a browser window and access the local web UI of the device at:
https://ip-address-of-network-interface
Use the connection URL noted in the previous tutorial. Zostanie wyświetlony błąd lub ostrzeżenie wskazujące, że występuje problem z certyfikatem zabezpieczeń witryny internetowej.
Wybierz pozycję Przejdź do tej strony internetowej. Te kroki mogą się różnić w zależności od używanej przeglądarki.

Sign in to the web UI of your virtual device. Domyślne hasło to Password1.

At the prompt, change the device password. Nowe hasło musi zawierać od 8 do 16 znaków. It must contain 3 of the following: uppercase, lowercase, numeric, and special characters.

You're now at the Dashboard of your device.
Set up and activate the virtual device
Your dashboard displays the various settings that are required to configure and register the virtual device with the Data Box Gateway service. Nazwa urządzenia, Ustawienia sieci, Ustawienia serwera proxy sieci Webi Ustawienia czasu są opcjonalne. Jedynymi wymaganymi ustawieniami są ustawienia chmury.

In the left-pane, select Device name, and then enter a friendly name for your device. The friendly name must contain from 1 to 15 characters long and have letter, numbers, and hyphens.

(Optional) In the left-pane, select Network settings and then configure the settings. On your virtual device, you'll see at least one network interface and more depending on how many you configured in the underlying virtual machine. The Network settings page for a virtual device with one network interface enabled is as shown below.

As you configure network settings, keep in mind:
- Jeśli protokół DHCP jest włączony w danym środowisku, interfejsy sieciowe są konfigurowane automatycznie. Adres IP, podsieć, brama i system DNS są przypisywane automatycznie.
- Jeśli protokół DHCP nie jest włączony, możesz w razie potrzeby przypisać statyczne adresy IP.
- Interfejs sieciowy można skonfigurować jako protokół IPv4.
Uwaga
Zalecamy, aby nie przełączać lokalnego adresu IP interfejsu sieciowego ze statycznego na DHCP, chyba że masz inny adres IP, aby nawiązać połączenie z urządzeniem. Jeśli używasz jednego interfejsu sieciowego i przełączasz się na protokół DHCP, nie będzie można określić adresu DHCP. Jeśli chcesz zmienić adres DHCP, poczekaj na zarejestrowanie urządzenia w usłudze, a następnie zmień. You can then view the IPs of all the adapters in the Device properties in the Azure portal for your service.
(Optional) configure your web proxy server. Although web proxy configuration is optional, if you use a web proxy, you can configure it only on this page.

On the Web proxy page, do the following:
- W polu adresu URL serwera proxy sieci Web wprowadź adres URL w następującym formacie:
http://<host-IP address or FQDN>:Port number. Adresy URL HTTPS nie są obsługiwane. - Under Authentication, select None or NTLM.
- If you're using authentication, enter a Username and Password.
- To validate and apply the configured web proxy settings, select Apply.
Uwaga
Pliki automatycznej konfiguracji serwera proxy (PAC) nie są obsługiwane. Plik PAC definiuje sposób, w jaki przeglądarki internetowe i inni agenci użytkownika mogą automatycznie wybierać odpowiedni serwer proxy (metoda dostępu) do pobierania danego adresu URL. Serwery proxy, które próbują przechwycić i odczytać cały ruch (a następnie ponownie podpisać wszystko przy użyciu własnego certyfikatu), nie są zgodne, ponieważ certyfikat serwera proxy nie jest zaufany. Typically transparent proxies work well with Azure Data Box Gateway.
- W polu adresu URL serwera proxy sieci Web wprowadź adres URL w następującym formacie:
(Opcjonalnie) W okienku po lewej stronie wybierz Ustawienia czasu, a następnie skonfiguruj strefę czasową oraz podstawowe i pomocnicze serwery NTP dla urządzenia.
Serwery NTP są wymagane, ponieważ urządzenie musi synchronizować czas, aby można było uwierzytelnić się u dostawców usług w chmurze.

In the Time settings page, do the following:
In the Time zone drop-down list, select the time zone that corresponds to the geographic location in which the device is deployed. Domyślną strefą czasową urządzenia jest PST. Urządzenie będzie używać tej strefy czasowej dla wszystkich zaplanowanych operacji.
Specify a Primary NTP server for your device or accept the default value of
time.windows.com.
Ensure that your network allows NTP traffic to pass from your datacenter to the Internet.Opcjonalnie w polu Pomocniczy serwer NTP wprowadź serwer pomocniczy dla urządzenia.
To validate and apply the configured time settings, select Apply.
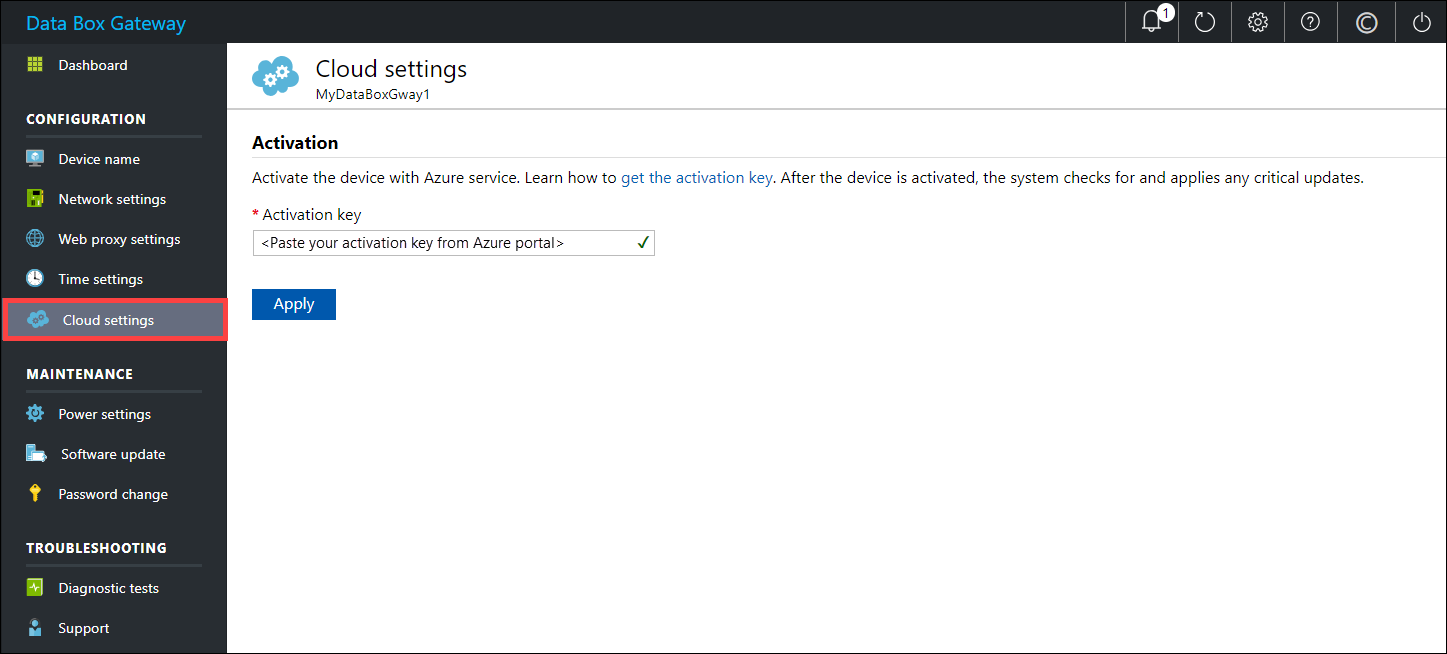
In the left pane, select Cloud settings, and then activate your device with the Data Box Gateway service in Azure portal.
In the Activation key box, enter the Activation key that you got in Get the activation key for Data Box Gateway.
Wybierz Aktywuj.
The device is activated and critical updates, if available, are automatically applied. Zobaczysz powiadomienie o tym. Monitor the update progress via the Azure portal.

The dialog also has a recovery key that you should copy and save in a safe location. Ten klucz służy do odzyskiwania danych w przypadku, gdy urządzenie nie może się uruchomić.
You may need to wait several minutes for the update to successfully complete. After the update is complete, sign in to the device. The Cloud settings page updates to indicate that the device is successfully activated.

Konfiguracja urządzenia została ukończona. You can now add shares on your device.
Następne kroki
W tym samouczku nauczyłeś się następujących rzeczy:
- Connect to a virtual device
- Set up and activate the virtual device
To learn how to transfer data with your Data Box Gateway, see: