หมายเหตุ
การเข้าถึงหน้านี้ต้องได้รับการอนุญาต คุณสามารถลอง ลงชื่อเข้าใช้หรือเปลี่ยนไดเรกทอรีได้
การเข้าถึงหน้านี้ต้องได้รับการอนุญาต คุณสามารถลองเปลี่ยนไดเรกทอรีได้
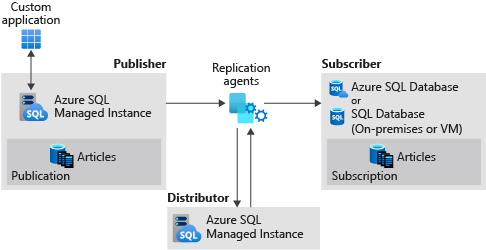
Applies to: ![]() Azure SQL Managed Instance
Azure SQL Managed Instance
Transactional replication allows you to replicate data from one database to another hosted on either SQL Server or Azure SQL Managed Instance. SQL Managed Instance can be a publisher, distributor, or subscriber in the replication topology. See transactional replication configurations for available configurations.
In this tutorial, you learn how to:
- Configure a SQL managed instance as a replication publisher.
- Configure a SQL managed instance as a replication distributor.
- Configure SQL Server as a subscriber.
This tutorial is intended for an experienced audience and assumes the user is familiar with deploying and connecting to both SQL managed instances and SQL Server VMs within Azure.
Note
This article describes the use of transactional replication in Azure SQL Managed Instance. It's unrelated to failover groups, an Azure SQL Managed Instance feature that allows you to create complete readable replicas of individual instances. There are additional considerations when configuring transactional replication with failover groups.
Prerequisites
To complete the tutorial, make sure you have the following prerequisites:
- An Azure subscription.
- Experience with deploying two SQL managed instances within the same virtual network.
- A SQL Server subscriber, either on-premises or on an Azure VM. This tutorial uses an Azure VM.
- SQL Server Management Studio (SSMS) 18.0 or later.
- The latest version of Azure PowerShell.
- Ports 445 and 1433 allow SQL traffic on both the Azure firewall and the Windows Firewall.
Required names and network settings
This tutorial uses the following resource names and settings:
| Resource | Name | Notes |
|---|---|---|
| Publisher SQL managed instance | sql-mi-publisher |
Append random characters for uniqueness |
| Publisher virtual network | vnet-sql-mi-publisher |
Hosts the publisher instance |
| Distributor SQL managed instance | sql-mi-distributor |
Must be in same VNet as publisher |
| SQL Server VM (subscriber) | sql-vm-subscriber |
Use a supported SQL Server version per the supportability matrix |
| Subscriber virtual network | sql-vm-subscriber-vnet |
Requires VNet peering to publisher VNet |
| Private DNS zone | repldns.com |
Arbitrary name for DNS routing |
| Required ports | 445 (SMB), 1433 (SQL) | Must be open on Azure Firewall and Windows Firewall |
Create the resource group
Use the following PowerShell code snippet to create a new resource group.
Set your variables:
$ResourceGroupName = "SQLMI-Repl"
$Location = "East US 2"
Create the resource group:
New-AzResourceGroup -Name $ResourceGroupName -Location $Location
Verify the resource group was created:
Get-AzResourceGroup -Name $ResourceGroupName | Select-Object ResourceGroupName, Location
Create two SQL managed instances
Create two SQL managed instances within this new resource group using the Azure portal.
The name of the publisher SQL managed instance should be
sql-mi-publisher(along with a few characters for randomization), and the name of the virtual network should bevnet-sql-mi-publisher.The name of the distributor SQL managed instance should be
sql-mi-distributor(along with a few characters for randomization), and it should be in the same virtual network as the publisher SQL managed instance.
For more information about creating a SQL managed instance, see Quickstart: Create Azure SQL Managed Instance.
Note
For simplicity, this tutorial places the distributor SQL managed instance in the same virtual network as the publisher. However, you can create the distributor in a separate virtual network with appropriate VNet peering.
Create a SQL Server VM
Create a SQL Server virtual machine using the Azure portal. The SQL Server virtual machine should have the following characteristics:
- Name:
sql-vm-subscriber - Image: SQL Server version that supports transactional replication with Azure SQL Managed Instance, per the supportability matrix
- Resource group: the same as the SQL managed instance
- Virtual network:
sql-vm-subscriber-vnet
For more information about deploying a SQL Server VM to Azure, see Quickstart: Create SQL Server on a Windows virtual machine in the Azure portal.
Configure VNet peering
Configure VNet peering to enable communication between the virtual network of the two SQL managed instances, and the virtual network of SQL Server.
Set your variables:
$SubscriptionId = '<SubscriptionID>'
$resourceGroup = 'SQLMI-Repl'
$pubvNet = 'sql-mi-publisher-vnet'
$subvNet = 'sql-vm-subscriber-vnet'
$pubsubName = 'Pub-to-Sub-Peer'
$subpubName = 'Sub-to-Pub-Peer'
Retrieve the virtual networks:
$virtualNetwork1 = Get-AzVirtualNetwork -ResourceGroupName $resourceGroup -Name $pubvNet
$virtualNetwork2 = Get-AzVirtualNetwork -ResourceGroupName $resourceGroup -Name $subvNet
Configure VNet peering from publisher to subscriber:
Add-AzVirtualNetworkPeering `
  -Name $pubsubName `
  -VirtualNetwork $virtualNetwork1 `
  -RemoteVirtualNetworkId $virtualNetwork2.Id
Configure VNet peering from subscriber to publisher:
Add-AzVirtualNetworkPeering `
  -Name $subpubName `
  -VirtualNetwork $virtualNetwork2 `
  -RemoteVirtualNetworkId $virtualNetwork1.Id
Verify peering status on the publisher VNet (should return Connected):
Get-AzVirtualNetworkPeering -ResourceGroupName $resourceGroup -VirtualNetworkName $pubvNet | Select-Object PeeringState
Verify peering status on the subscriber VNet (should return Connected):
Get-AzVirtualNetworkPeering -ResourceGroupName $resourceGroup -VirtualNetworkName $subvNet | Select-Object PeeringState
Once VNet peering is established, test connectivity by launching SQL Server Management Studio (SSMS) on the SQL Server host and connecting to both SQL managed instances. For more information on connecting to a SQL managed instance using SSMS, see Use SSMS to connect to SQL Managed Instance.

Create a private DNS zone
A private DNS zone allows DNS routing between the SQL managed instances and SQL Server.
Create a private zone
Sign into the Azure portal.
Select Create a resource to create a new Azure resource.
Search for
private dns zoneon Azure Marketplace.Choose the Private DNS zone resource published by Microsoft, and then select Create to create the DNS zone.
Choose the subscription and resource group from the dropdown list.
Provide an arbitrary name for your DNS zone, such as
repldns.com.
Select Review + create. Review the parameters for your private DNS zone, and then select Create to create your resource.

Create an A record
Go to your new Private DNS zone and select Overview.
Select + Record set to create a new A record.
Provide the name of your SQL Server VM as well as the private internal IP address.

Select OK to create the A record.

Link the virtual network
Go to your new Private DNS zone and select Virtual network links.
Select + Add.
Provide a name for the link, such as
Pub-link.Select your subscription from the dropdown list, and then select the virtual network for your publisher SQL managed instance.
Check the box next to Enable auto registration.

Select OK to link your virtual network.
Repeat these steps to add a link for the subscriber virtual network, with a name such as
Sub-link.

Create an Azure storage account
Create an Azure storage account for the working directory, and then create a file share within the storage account.
Storage configuration values
You need the following values when configuring distribution:
- Working directory path format:
\\<storage-account-name>.file.core.windows.net\<file-share-name> - Storage connection string format:
DefaultEndpointsProtocol=https;AccountName=<Storage-Account-Name>;AccountKey=<key>;EndpointSuffix=core.windows.net
Important
Use only backslashes (\) in the working directory path. Forward slashes (/) cause connection errors.
Example values used in this tutorial:
| Parameter | Example value |
|---|---|
| Working directory | \\replstorage.file.core.windows.net\replshare |
| Connection string | DefaultEndpointsProtocol=https;AccountName=replstorage;AccountKey=123456789aBcDeFgHiJkLmNoPqRsTuVwXyZ==;EndpointSuffix=core.windows.net |
For more information, see Manage storage account access keys.
Create a database
Create a new database on the publisher SQL managed instance. To do so, follow these steps:
- Launch SQL Server Management Studio on SQL Server.
- Connect to the publisher SQL managed instance (
sql-mi-publisher). - Open a New Query window, and execute the following T-SQL queries.
Drop the database if it exists and create a new one:
USE [master];
GO

IF EXISTS (SELECT * FROM sys.sysdatabases WHERE name = 'ReplTutorial')
BEGIN
    DROP DATABASE ReplTutorial;
END
GO

CREATE DATABASE [ReplTutorial];
GO
Create the replication test table:
USE [ReplTutorial];
GO

CREATE TABLE ReplTest (
   ID INT NOT NULL PRIMARY KEY,
   c1 VARCHAR(100) NOT NULL,
   dt1 DATETIME NOT NULL DEFAULT getdate()
);
GO
Insert sample data:
USE [ReplTutorial];
GO

INSERT INTO ReplTest (ID, c1) VALUES (6, 'pub');
INSERT INTO ReplTest (ID, c1) VALUES (2, 'pub');
INSERT INTO ReplTest (ID, c1) VALUES (3, 'pub');
INSERT INTO ReplTest (ID, c1) VALUES (4, 'pub');
INSERT INTO ReplTest (ID, c1) VALUES (5, 'pub');
GO
Verify the data was inserted:
SELECT * FROM ReplTest;
GO
Expected output: 5 rows with IDs 2, 3, 4, 5, and 6.
Configure distribution
Once connectivity is established and you have a sample database, you can configure distribution on your distributor SQL managed instance (sql-mi-distributor).
Distribution configuration parameters
Collect the following values before configuring distribution:
| Parameter | Description | Example |
|---|---|---|
| Distributor DNS name | FQDN of the distributor instance | sql-mi-distributor.b6bf57.database.windows.net |
| Publisher DNS name | FQDN of the publisher instance | sql-mi-publisher.b6bf57.database.windows.net |
@working_directory |
Azure Files share path (use backslashes only) | \\replstorage.file.core.windows.net\replshare |
@storage_connection_string |
Storage account connection string | DefaultEndpointsProtocol=https;AccountName=replstorage;... |
@security_mode |
Authentication mode (0 = SQL auth) | 0 |
@login / @password |
SQL login credentials | azureuser |
Configure the distributor instance
- Launch SQL Server Management Studio on SQL Server.
- Connect to the distributor SQL managed instance (
sql-mi-distributor). - Open a New Query window and run the following commands.
Add the distributor:
EXECUTE sp_adddistributor
    @distributor = 'sql-mi-distributor.b6bf57.database.windows.net',
    @password = '<distributor_admin_password>';
Create the distribution database:
EXECUTE sp_adddistributiondb @database = N'distribution';
Verify the distribution database was created:
SELECT name FROM sys.databases WHERE name = 'distribution';
Add the publisher to the distributor:
EXECUTE sp_adddistpublisher
    @publisher = 'sql-mi-publisher.b6bf57.database.windows.net',
    @distribution_db = N'distribution',
    @security_mode = 0,
    @login = N'azureuser',
    @password = N'<publisher_password>',
    @working_directory = N'\\replstorage.file.core.windows.net\replshare',
    @storage_connection_string = N'DefaultEndpointsProtocol=https;AccountName=replstorage;AccountKey=123456789aBcDeFgHiJkLmNoPqRsTuVwXyZ==;EndpointSuffix=core.windows.net';
Note
Use only backslashes (\) for the @working_directory parameter. Forward slashes (/) cause connection errors.
Register the distributor at the publisher
- Connect to the publisher SQL managed instance (
sql-mi-publisher). - Open a New Query window and run the following command to register the distributor:
USE master;
GO

EXECUTE sys.sp_adddistributor
    @distributor = 'sql-mi-distributor.b6bf57.database.windows.net',
    @password = '<distributor_admin_password>';
Verify the distributor is registered:
SELECT * FROM sys.servers WHERE is_distributor = 1;
Create the publication
Once distribution has been configured, you can create the publication. To do so, follow these steps:
Launch SQL Server Management Studio on SQL Server.
Connect to the publisher SQL managed instance (
sql-mi-publisher).In Object Explorer, expand the Replication node and right-click the Local Publication folder. Select New Publication....
Select Next to move past the welcome page.
On the Publication Database page, select the
ReplTutorialdatabase you created previously. Select Next.On the Publication type page, select Transactional publication. Select Next.
On the Articles page, check the box next to Tables. Select Next.
On the Filter Table Rows page, select Next without adding any filters.
On the Snapshot Agent page, check the box next to Create snapshot immediately and keep the snapshot available to initialize subscriptions. Select Next.
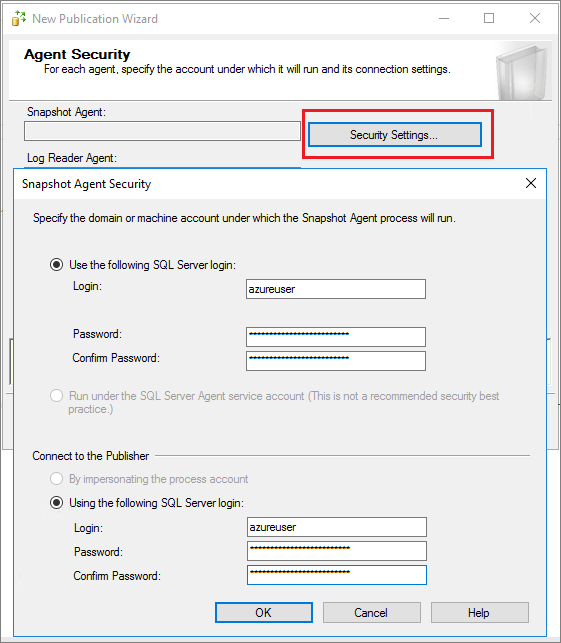
On the Agent Security page, select Security Settings.... Provide SQL Server login credentials to use for the Snapshot Agent and to connect to the publisher. Select OK to close the Snapshot Agent Security page. Select Next.
On the Wizard Actions page, choose to Create the publication and (optionally) choose to Generate a script file with steps to create the publication if you want to save this script for later.
On the Complete the Wizard page, name your publication
ReplTest, and select Next to create your publication.Once your publication has been created, refresh the Replication node in Object Explorer and expand Local Publications to see your new publication.
Create the subscription
Once the publication has been created, you can create the subscription. To do so, follow these steps:
- Launch SQL Server Management Studio on SQL Server.
- Connect to the publisher SQL managed instance (
sql-mi-publisher). - Open a New Query window and run the following Transact-SQL commands. Use the DNS name configured in the private DNS zone as part of the subscriber name.
Subscription parameters
| Parameter | Value | Description |
|---|---|---|
@subscriber |
sql-vm-subscriber.repldns.com |
Subscriber DNS name (from private DNS zone) |
@destination_db |
ReplSub |
Database on the subscriber |
@subscription_type |
Push |
Distributor pushes changes to subscriber |
@sync_type |
automatic |
Automatic initial synchronization |
Add the subscription:
USE [ReplTutorial];
GO

EXEC sp_addsubscription
    @publication = N'ReplTest',
    @subscriber = N'sql-vm-subscriber.repldns.com',
    @destination_db = N'ReplSub',
    @subscription_type = N'Push',
    @sync_type = N'automatic',
    @article = N'all',
    @update_mode = N'read only',
    @subscriber_type = 0;
Add the push subscription agent:
EXEC sp_addpushsubscription_agent
    @publication = N'ReplTest',
    @subscriber = N'sql-vm-subscriber.repldns.com',
    @subscriber_db = N'ReplSub',
    @job_login = N'azureuser',
    @job_password = '<Complex Password>',
    @subscriber_security_mode = 0,
    @subscriber_login = N'azureuser',
    @subscriber_password = '<Complex Password>',
    @dts_package_location = N'Distributor';
GO
Verify the subscription was created:
SELECT * FROM distribution.dbo.MSsubscriptions;
Test replication
Once replication has been configured, you can test it by inserting new items on the publisher and watching the changes propagate to the subscriber.
View initial data on the subscriber
Connect to the SQL Server subscriber and run the following query:
USE ReplSub;
GO

SELECT * FROM dbo.ReplTest;
Expected output: 5 rows with IDs 2, 3, 4, 5, and 6 (the initial data from the publisher).
Insert new data on the publisher
Connect to the publisher SQL managed instance (sql-mi-publisher) and insert a new row:
USE ReplTutorial;
GO

INSERT INTO ReplTest (ID, c1) VALUES (15, 'pub');
Verify the insert on the publisher:
SELECT * FROM ReplTest WHERE ID = 15;
Verify replication to the subscriber
After a few moments, connect to the subscriber and verify the new row replicated:
USE ReplSub;
GO

SELECT * FROM dbo.ReplTest WHERE ID = 15;
Expected output: 1 row with ID 15 and c1 value 'pub'.
Clean up resources
- Navigate to your resource group in the Azure portal.
- Select the SQL managed instances, and then select Delete. Type
yesin the text box to confirm you want to delete the resource, and then select Delete. This process might take some time to complete in the background, and until it's done, you'll not be able to delete the virtual cluster or any other dependent resources. Monitor the delete in the Activity tab to confirm your SQL managed instance has been deleted. - Once the SQL managed instance is deleted, delete the virtual cluster by selecting it in your resource group, and then choosing Delete. Type
yesin the text box to confirm you want to delete the resource, and then select Delete. - Delete any remaining resources. Type
yesin the text box to confirm you want to delete the resource, and then select Delete. - Delete the resource group by selecting Delete resource group, typing in the name of the resource group
myResourceGroup, and then selecting Delete.
Known errors
Windows logins are not supported
Exception Message: Windows logins are not supported in this version of SQL Server.
The agent was configured with a Windows login and needs to use a SQL Server login instead. Use the Agent Security page of the Publication properties to change the login credentials to a SQL Server login.
Failed to connect to Azure Storage
Connecting to Azure Files Storage '\\replstorage.file.core.windows.net\replshare' Failed to connect to Azure Storage '' with OS error: 53.
2019-11-19 02:21:05.07 Obtained Azure Storage Connection String for replstorage
2019-11-19 02:21:05.07 Connecting to Azure Files Storage '\\replstorage.file.core.windows.net\replshare'
2019-11-19 02:21:31.21 Failed to connect to Azure Storage '' with OS error: 53.
This is likely because port 445 is closed in either the Azure firewall, the Windows Firewall, or both.
Connecting to Azure Files Storage '\\replstorage.file.core.windows.net\replshare' Failed to connect to Azure Storage '' with OS error: 55.
Using a forward slash instead of backslash in the file path for the file share can also cause this error.
- This is acceptable:
\\replstorage.file.core.windows.net\replshare - This can cause an OS 55 error:
\\replstorage.file.core.windows.net/replshare
Couldn't connect to Subscriber
The process could not connect to Subscriber 'SQL-VM-SUBSCRIBER
Could not open a connection to SQL Server [53].
A network-related or instance-specific error has occurred while establishing a connection to SQL Server. Server is not found or not accessible. Check if instance name is correct and if SQL Server is configured to allow remote connections.
Possible solutions:
- Ensure port 1433 is open.
- Ensure TCP/IP is enabled on the subscriber.
- Confirm the DNS name was used when creating the subscriber.
- Verify that your virtual networks are correctly linked in the private DNS zone.
- Verify your A record is configured correctly.
- Verify your VNet peering is configured correctly.
No publications to which you can subscribe
When you're adding a new subscription using the New Subscription wizard, on the Publication page, you might find that there are no databases and publications listed as available options, and you might see the following error message:
There are no publications to which you can subscribe, either because this server has no publications or because you do not have sufficient privileges to access the publications.
While it's possible that this error message is accurate, and there really aren't publications available on the publisher you connected to or you're lacking sufficient permissions, an older version of SQL Server Management Studio could also cause this error. Try upgrading to SQL Server Management Studio 18.0 or later to rule this out as a root cause.