หมายเหตุ
การเข้าถึงหน้านี้ต้องได้รับการอนุญาต คุณสามารถลอง ลงชื่อเข้าใช้หรือเปลี่ยนไดเรกทอรีได้
การเข้าถึงหน้านี้ต้องได้รับการอนุญาต คุณสามารถลองเปลี่ยนไดเรกทอรีได้
Note
Community interest groups have now moved from Yammer to Microsoft Viva Engage. To join a Viva Engage community and take part in the latest discussions, fill out the Request access to Finance and Operations Viva Engage Community form and choose the community you want to join.
This article reviews the process to build projects and full build of model packages.
You must build the elements of a model before the application can use them. You can build the elements in a project. You can also build all the elements in a model. The following actions are performed during a build operation:
- Metadata validation
- X++ code validation
- Best practice checks
- Report RDL generation
- Compilation, IL generation, and creation of the .NET assemblies
- Label assembly generation and deployment of other resource files
- Database synchronization
Build a project
When you build a project, the build process builds only new or changed elements. To build a project, follow these steps:
- In Solution Explorer, select the project.
- On the Build menu, select Build <project name> to start the build process. Alternatively, right-click the project in Solution Explorer, and then select Build.
During the build process, you might notice that the process builds some elements that aren't part of the project. This behavior is required because of the way that assemblies are created. When you build an element, you actually build the .NET module that the element is included in. A single .NET module contains multiple model elements, and a single assembly contains multiple .NET modules. The build process can create the assembly only if all the .NET modules in the assembly are built and up to date. If any elements in any of the .NET modules for an assembly aren't built or aren't up to date, the build process builds them, even if they aren't included in the current project.
Note
If you delete an element from a project, you must rebuild the project or perform a full build on the model before the deletion takes effect.
Rebuild a project
If you want to build all the elements in a project, regardless of whether they changed, perform a rebuild operation. To rebuild a project, follow these steps:
- In Solution Explorer, select the project.
- On the Build menu, select Rebuild <project name> to start the rebuild process. Alternatively, right-click the project in Solution Explorer, and then select Rebuild.
Synchronize the database at each build
A project property lets you specify that the synchronize operation for the database should be performed every time that you build the project. This can be useful when you’re making changes to the table structure for an application. Each time that you build, you know that the database is synchronized with the tables as they're defined in the project. For information about how to set project properties, see finance and operations project type in Visual Studio. If your application has a large number of tables, and you aren’t yet testing the application, you can set the Synchronize database on build property to false. This change reduces the time that is required to build the project. Then, when you begin testing, be sure to set this property back to true. If you must manually synchronize the tables in a project, you can right-click the project in Solution Explorer and then select Synchronize <project name> with database. To synchronize the entire database, which can be a long process, on the Dynamics 365 menu, select Synchronize database.
Note
If you try to synchronize the database before you fully compile assemblies, the Visual Studio database synchronization tool displays a message that synchronization completed successfully, when in fact, the synchronization wasn't successful.
You can't synchronize tables and views against the database until they're fully compiled. After you complete a full build of the Application Platform, Application Foundation, and Application Suite, you can complete a Database Synchronization from the Dynamics 365 menu in Visual Studio.
Build a model's package
You might want to build all the elements in a specific model. To do this, perform a full build on the package that the model belongs to. Follow these steps:
On the Dynamics 365 menu, select Build models.
In the Packages list, select the packages to build.
- Package names are listed alphabetically.
- Models belonging to the package are shown in brackets.
If you want to build the dependent packages first, select Build referenced packages. The list shows any dependent package that must be built.
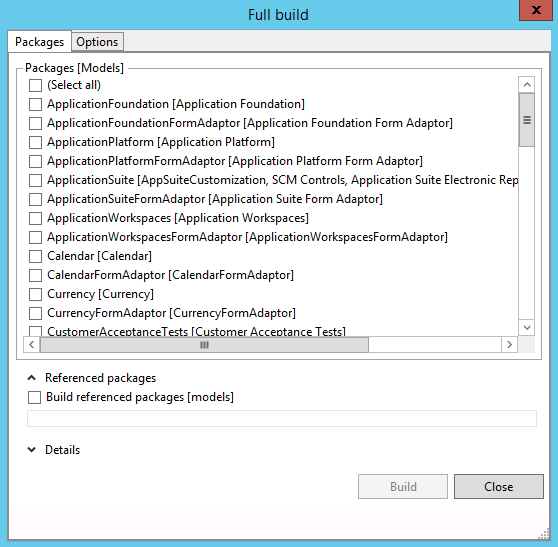
On the Options tab, review the options for the build process. The following options are available.
Option Description Build Pre-Compiled Forms Static HTML is generated for each form during the build process. This option allows faster rendering of forms at run time. Build Reports Reports are built. Build Aggregate Measurements Aggregate measurements are built. Run Best Practice Checks Best practice checks are performed during the build process. Synchronize Database The build process updates the schema of the SQL database (after compilation of the metadata and source code), so that it matches the metadata. Build cross reference data The build process updates the data for the cross-reference feature. Cross reference data enables developers to find references to code and metadata during development. Select Build to start the build process.
Expand the Details tab to follow details of the build process.
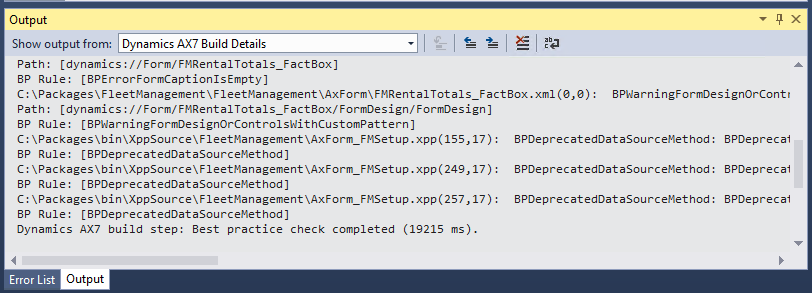
Build results
After a build operation finishes, you see the results in Microsoft Visual Studio. The Output pane in Visual Studio shows the status of the build. You can use the Show output from field to switch between the standard build information and the build details.
The Error List pane in Visual Studio shows the build errors and warnings that occurred during the build process. If you see any build errors, you must fix them and then build again, so that valid assemblies are created for the application. Many of the warnings that appear in the Error List pane are best practice checks that inform you of revisions that you should make to your application so that it conforms to the best practices for application development. Ideally, you should address all the best practice warnings for an application.
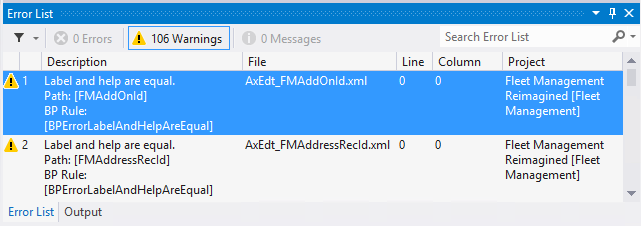
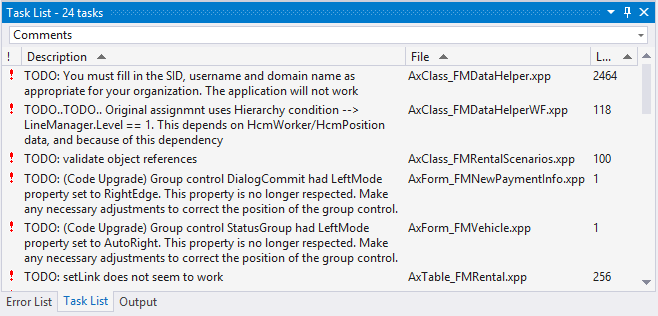
You can double-click most errors and warnings to see the source of the issue. The element designer or code editor opens, where you can see what property setting or code is causing the error or warning. The Task List pane in Visual Studio shows tasks that are flagged by using "TODO" comments in code. For example, the following comment indicates that some object references still require validation.
// TODO: validate object references
When the code is built, these "TODO" comments appear in the Task List pane. To view the Task List pane, on the View menu, select Task List.
To make resolution easier, add the elements that the error or task affects to the current project or to a new project. In the Error List pane or the Task List pane, select the rows for the errors or tasks that you want to fix, right-click, and then select Add to project or Add to new project. This step saves you the effort of finding the affected elements in the application.
