适用于:✅Microsoft Fabric 中的数据工程和数据科学
了解如何使用 Livy API for Fabric 数据工程提交 Spark 批处理作业。 Livy API 目前不支持 Azure 服务主体(SPN)。
先决条件
远程客户端,例如带有 Jupyter Notebooks、PySpark 和适用于 Python 的 Microsoft 身份验证库 (MSAL) 的 Visual Studio Code。
访问 Fabric Rest API 需要 Microsoft Entra 应用令牌。 将应用程序注册到 Microsoft 标识平台。
对于湖屋中的一些数据,此示例使用纽约市出租车和豪华轿车委员会 green_tripdata_2022_08,这是加载到湖屋中的一个 parquet 文件。
Livy API 定义用于操作的统一终结点。 按照本文中的示例操作时,请将占位符 {Entra_TenantID}、{Entra_ClientID}、{Fabric_WorkspaceID} 和 {Fabric_LakehouseID} 替换为相应的值。
为 Livy API 批处理配置 Visual Studio Code
在 Fabric Lakehouse 中选择“Lakehouse 设置”。

导航到“Livy 终结点”部分。

将批处理作业连接字符串(图像中的第二个红色框)复制到代码。
导航到 Microsoft Entra 管理中心,并将应用程序(客户端)ID 和目录(租户)ID 复制到代码。


创建 Spark Batch 代码并上传到 Lakehouse
在 Visual Studio Code 中创建
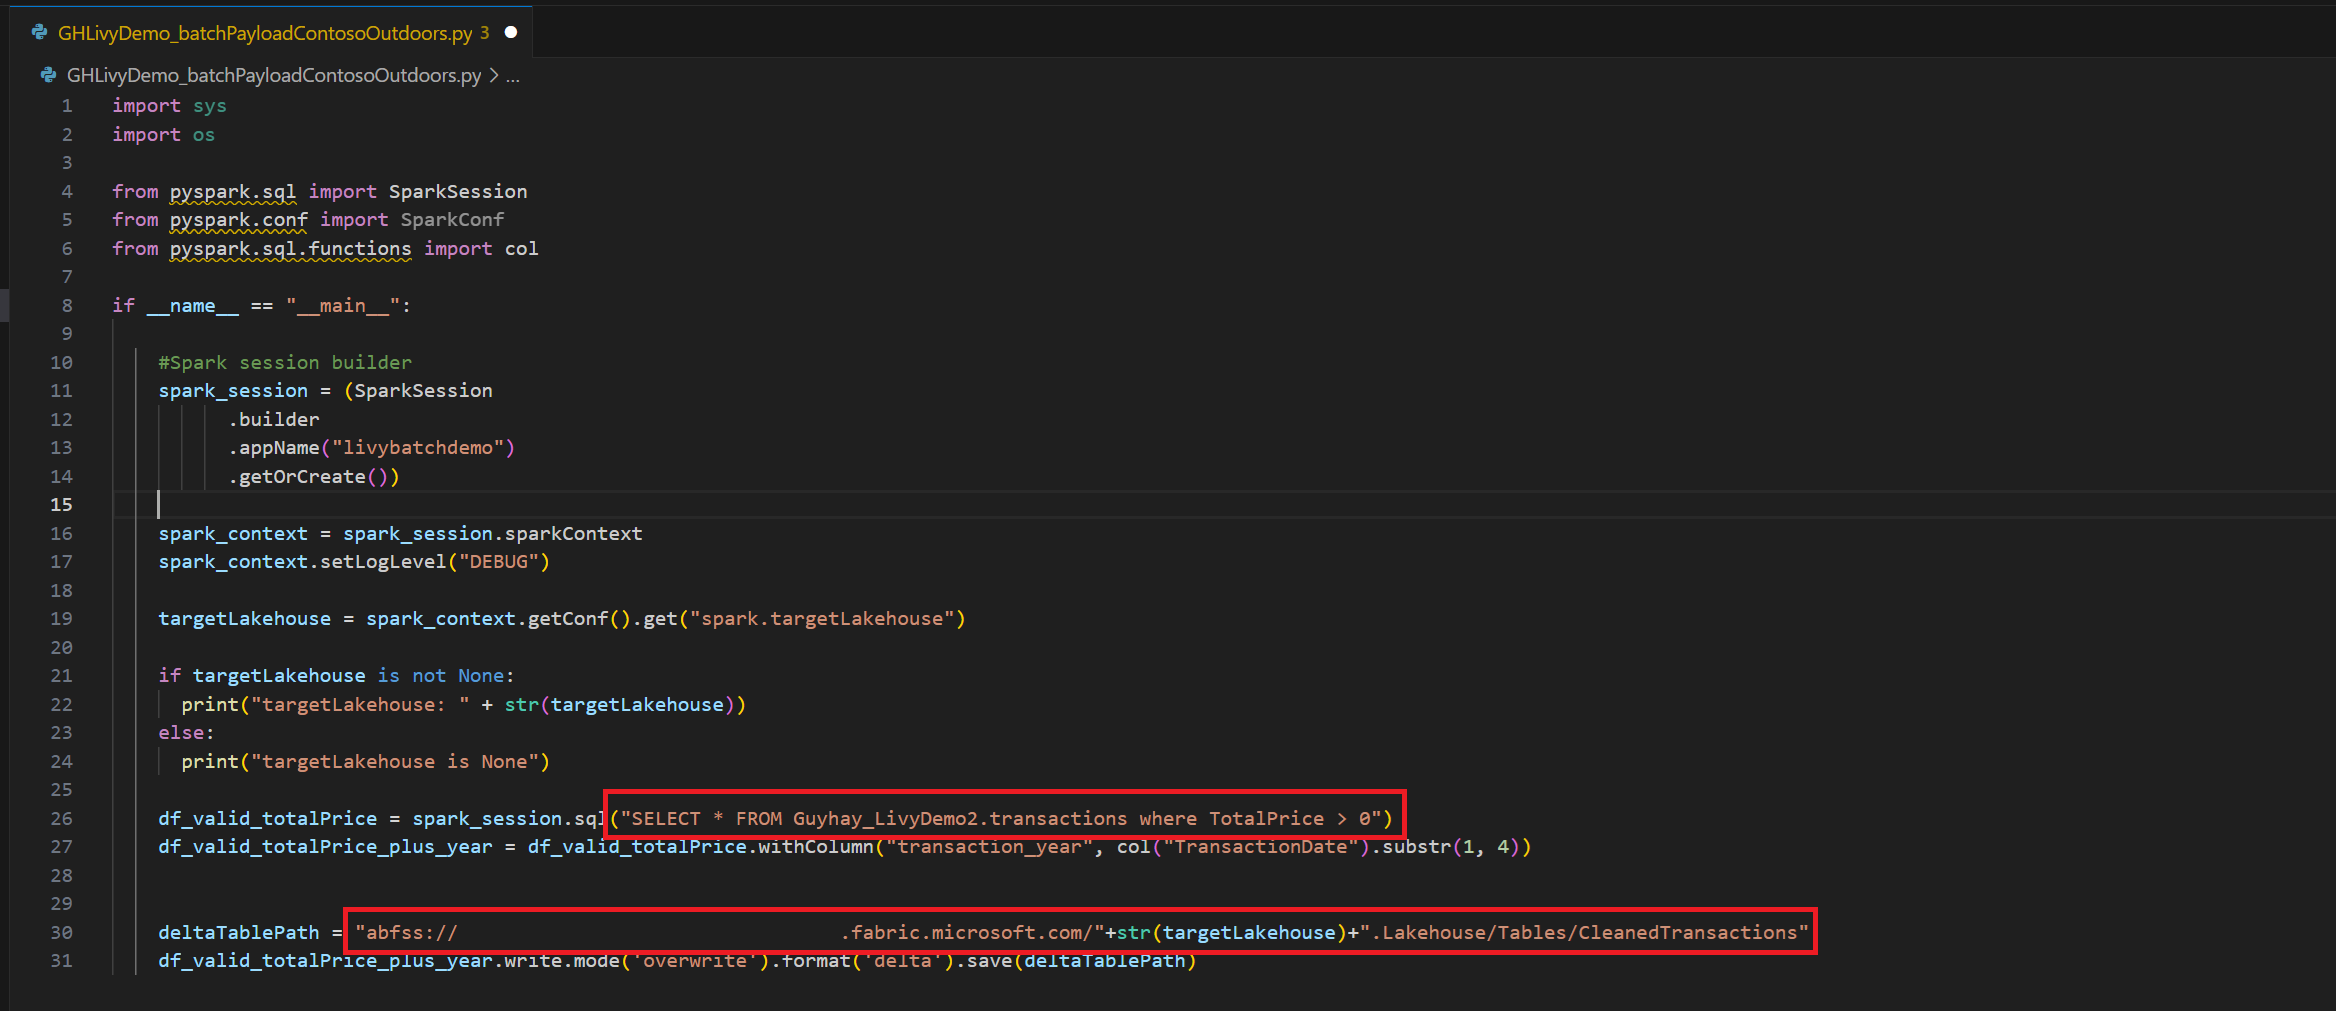
.ipynb笔记本并插入以下代码import sys import os from pyspark.sql import SparkSession from pyspark.conf import SparkConf from pyspark.sql.functions import col if __name__ == "__main__": #Spark session builder spark_session = (SparkSession .builder .appName("batch_demo") .getOrCreate()) spark_context = spark_session.sparkContext spark_context.setLogLevel("DEBUG") tableName = spark_context.getConf().get("spark.targetTable") if tableName is not None: print("tableName: " + str(tableName)) else: print("tableName is None") df_valid_totalPrice = spark_session.sql("SELECT * FROM green_tripdata_2022 where total_amount > 0") df_valid_totalPrice_plus_year = df_valid_totalPrice.withColumn("transaction_year", col("lpep_pickup_datetime").substr(1, 4)) deltaTablePath = f"Tables/{tableName}CleanedTransactions" df_valid_totalPrice_plus_year.write.mode('overwrite').format('delta').save(deltaTablePath)在本地保存 Python 文件。 此 Python 代码有效负载包含两个处理湖屋中数据的 Spark 语句,需要上传到湖屋。 您需要 ABFS 路径来在 Visual Studio Code 中的 Livy API 批处理作业中引用负载,以及在 Select SQL 语句中引用 Lakehouse 表名称。
将 Python 负载上传到 Lakehouse 的“文件”部分。 在 Lakehouse 资源管理器中,选择 “文件”。 然后选择“ >获取数据>上传文件”。 通过文件选取器选择文件。
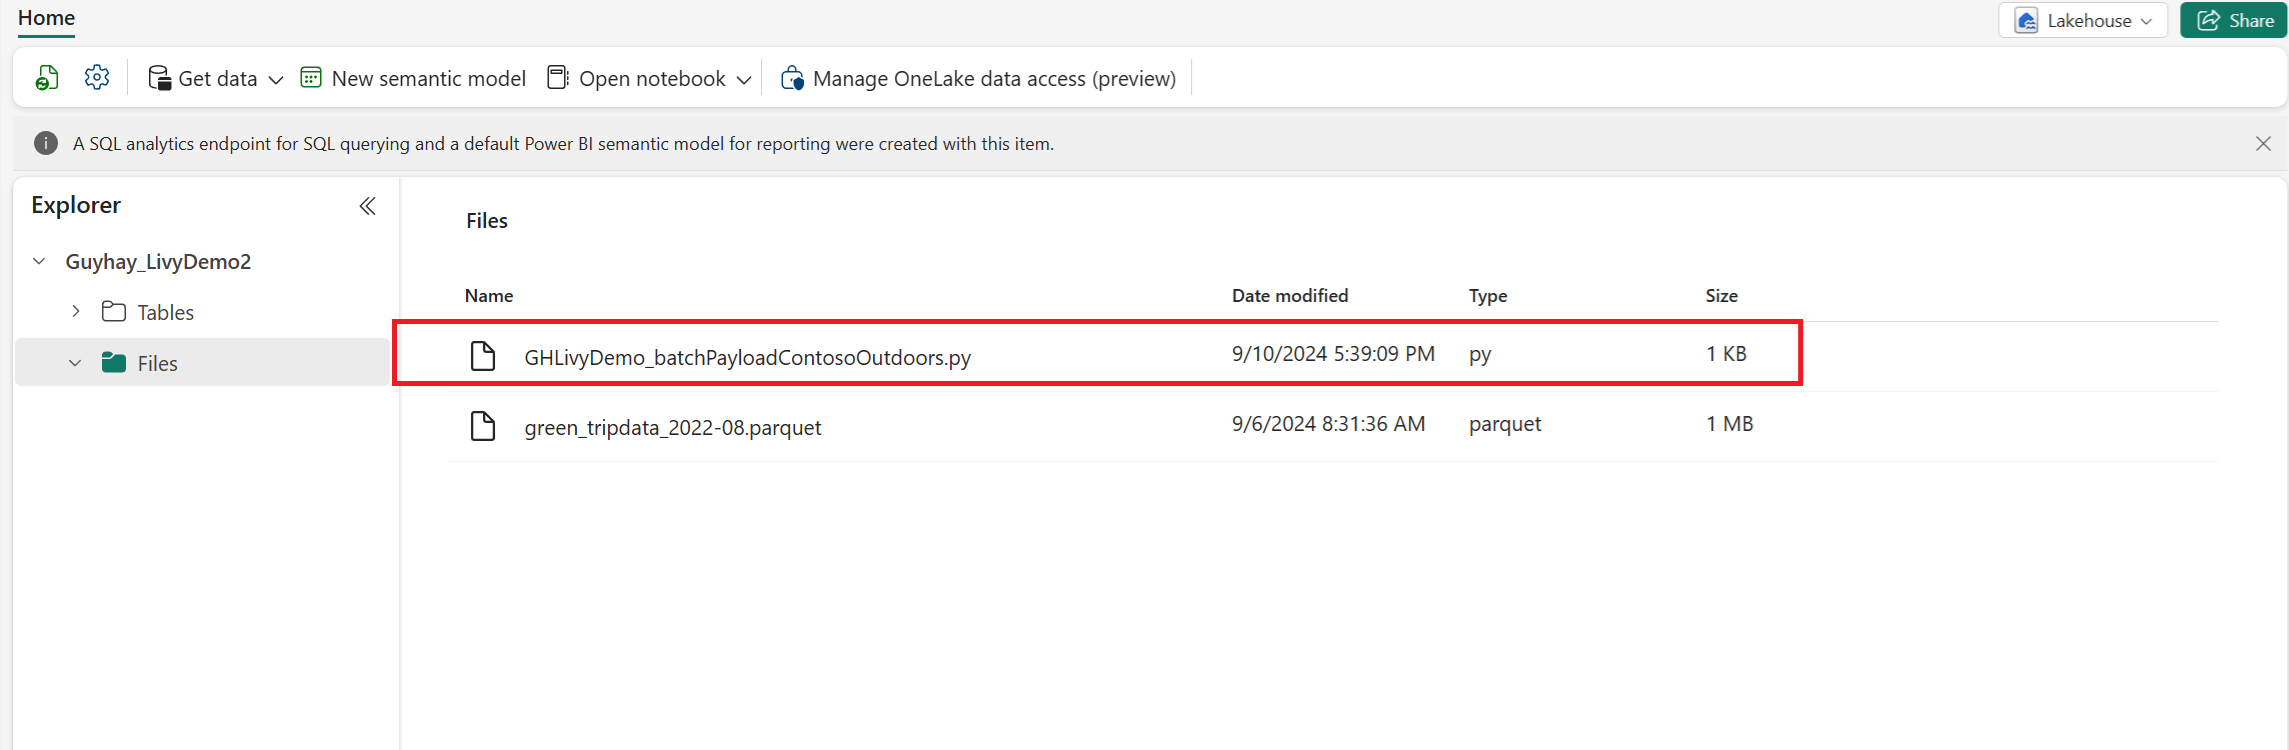
在文件位于湖屋的“文件”部分中后,请单击有效负载文件名右侧的三个点并选择“属性”。

将此 ABFS 路径复制到步骤 1 中的笔记本单元格。


使用 Microsoft Entra 用户令牌或 Microsoft Entra SPN 令牌对 Livy API Spark 批处理会话进行身份验证
使用 Microsoft Entra SPN 令牌对 Livy API Spark 批处理会话进行身份验证
在 Visual Studio Code 中创建
.ipynb笔记本并插入以下代码。import sys from msal import ConfidentialClientApplication # Configuration - Replace with your actual values tenant_id = "Entra_TenantID" # Microsoft Entra tenant ID client_id = "Entra_ClientID" # Service Principal Application ID # Certificate paths - Update these paths to your certificate files certificate_path = "PATH_TO_YOUR_CERTIFICATE.pem" # Public certificate file private_key_path = "PATH_TO_YOUR_PRIVATE_KEY.pem" # Private key file certificate_thumbprint = "YOUR_CERTIFICATE_THUMBPRINT" # Certificate thumbprint # OAuth settings audience = "https://analysis.windows.net/powerbi/api/.default" authority = f"https://login.windows.net/{tenant_id}" def get_access_token(client_id, audience, authority, certificate_path, private_key_path, certificate_thumbprint=None): """ Get an app-only access token for a Service Principal using OAuth 2.0 client credentials flow. This function uses certificate-based authentication which is more secure than client secrets. Args: client_id (str): The Service Principal's client ID audience (str): The audience for the token (resource scope) authority (str): The OAuth authority URL certificate_path (str): Path to the certificate file (.pem format) private_key_path (str): Path to the private key file (.pem format) certificate_thumbprint (str): Certificate thumbprint (optional but recommended) Returns: str: The access token for API authentication Raises: Exception: If token acquisition fails """ try: # Read the certificate from PEM file with open(certificate_path, "r", encoding="utf-8") as f: certificate_pem = f.read() # Read the private key from PEM file with open(private_key_path, "r", encoding="utf-8") as f: private_key_pem = f.read() # Create the confidential client application app = ConfidentialClientApplication( client_id=client_id, authority=authority, client_credential={ "private_key": private_key_pem, "thumbprint": certificate_thumbprint, "certificate": certificate_pem } ) # Acquire token using client credentials flow token_response = app.acquire_token_for_client(scopes=[audience]) if "access_token" in token_response: print("Successfully acquired access token") return token_response["access_token"] else: raise Exception(f"Failed to retrieve token: {token_response.get('error_description', 'Unknown error')}") except FileNotFoundError as e: print(f"Certificate file not found: {e}") sys.exit(1) except Exception as e: print(f"Error retrieving token: {e}", file=sys.stderr) sys.exit(1) # Get the access token token = get_access_token(client_id, audience, authority, certificate_path, private_key_path, certificate_thumbprint)运行笔记本单元后,您应该会看到返回的 Microsoft Entra 令牌。


使用 Microsoft Entra 用户令牌对 Livy API Spark 会话进行身份验证
在 Visual Studio Code 中创建
.ipynb笔记本并插入以下代码。from msal import PublicClientApplication import requests import time # Configuration - Replace with your actual values tenant_id = "Entra_TenantID" # Microsoft Entra tenant ID client_id = "Entra_ClientID" # Application ID (can be the same as above or different) # Required scopes for Microsoft Fabric API access scopes = [ "https://api.fabric.microsoft.com/Lakehouse.Execute.All", # Execute operations in lakehouses "https://api.fabric.microsoft.com/Lakehouse.Read.All", # Read lakehouse metadata "https://api.fabric.microsoft.com/Item.ReadWrite.All", # Read/write fabric items "https://api.fabric.microsoft.com/Workspace.ReadWrite.All", # Access workspace operations "https://api.fabric.microsoft.com/Code.AccessStorage.All", # Access storage from code "https://api.fabric.microsoft.com/Code.AccessAzureKeyvault.All", # Access Azure Key Vault "https://api.fabric.microsoft.com/Code.AccessAzureDataExplorer.All", # Access Azure Data Explorer "https://api.fabric.microsoft.com/Code.AccessAzureDataLake.All", # Access Azure Data Lake "https://api.fabric.microsoft.com/Code.AccessFabric.All" # General Fabric access ] def get_access_token(tenant_id, client_id, scopes): """ Get an access token using interactive authentication. This method will open a browser window for user authentication. Args: tenant_id (str): The Azure Active Directory tenant ID client_id (str): The application client ID scopes (list): List of required permission scopes Returns: str: The access token, or None if authentication fails """ app = PublicClientApplication( client_id, authority=f"https://login.microsoftonline.com/{tenant_id}" ) print("Opening browser for interactive authentication...") token_response = app.acquire_token_interactive(scopes=scopes) if "access_token" in token_response: print("Successfully authenticated") return token_response["access_token"] else: print(f"Authentication failed: {token_response.get('error_description', 'Unknown error')}") return None # Uncomment the lines below to use interactive authentication token = get_access_token(tenant_id, client_id, scopes) print("Access token acquired via interactive login")运行笔记本单元格后,浏览器中应会弹出一个窗口,允许您选择用于登录的身份。

选择要登录的标识后,需要批准Microsoft Entra 应用注册 API 权限。
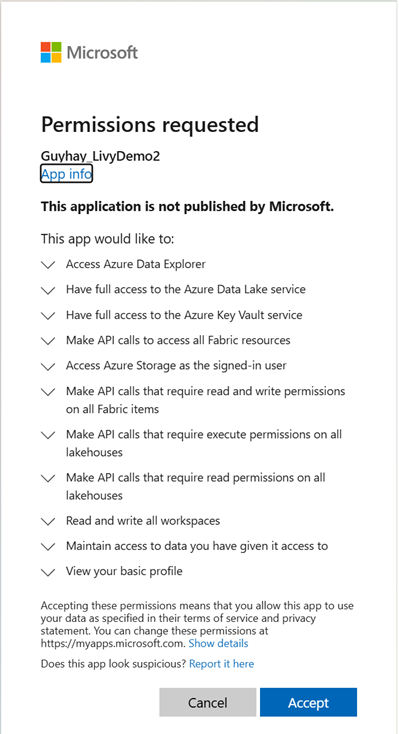
完成身份验证后,请关闭浏览器窗口。

在 Visual Studio Code 中,应会看到返回的 Microsoft Entra 令牌。


提交 Livy Batch 并监视批处理作业。
添加另一个笔记本单元格并插入此代码。
# submit payload to existing batch session

import requests
import time
import json

api_base_url = "https://api.fabric.microsoft.com/v1"  # Base URL for Fabric APIs

# Fabric Resource IDs - Replace with your workspace and lakehouse IDs
workspace_id = "Fabric_WorkspaceID"
lakehouse_id = "Fabric_LakehouseID"

# Construct the Livy Batch API URL
# URL pattern: {base_url}/workspaces/{workspace_id}/lakehouses/{lakehouse_id}/livyApi/versions/{api_version}/batches
livy_base_url = f"{api_base_url}/workspaces/{workspace_id}/lakehouses/{lakehouse_id}/livyApi/versions/2023-12-01/batches"

# Set up authentication headers
headers = {"Authorization": f"Bearer {token}"}

print(f"Livy Batch API URL: {livy_base_url}")

new_table_name = "TABLE_NAME"  # Name for the new table

# Configure the batch job
print("Configuring batch job parameters...")

# Batch job configuration - Modify these values for your use case
payload_data = {
    # Job name - will appear in the Fabric UI
    "name": f"livy_batch_demo_{new_table_name}",

    # Path to your Python file in the lakehouse
    "file": "<ABFSS_PATH_TO_YOUR_PYTHON_FILE>",  # Replace with your Python file path

    # Optional: Spark configuration parameters
    "conf": {
        "spark.targetTable": new_table_name,  # Custom configuration for your application
    },
}

print("Batch Job Configuration:")
print(json.dumps(payload_data, indent=2))

try:
    # Submit the batch job
    print("\nSubmitting batch job...")
    post_batch = requests.post(livy_base_url, headers=headers, json=payload_data)

    if post_batch.status_code == 202:
        batch_info = post_batch.json()
        print("Livy batch job submitted successfully!")
        print(f"Batch Job Info: {json.dumps(batch_info, indent=2)}")

        # Extract batch ID for monitoring
        batch_id = batch_info['id']
        livy_batch_get_url = f"{livy_base_url}/{batch_id}"

        print(f"\nBatch Job ID: {batch_id}")
        print(f"Monitoring URL: {livy_batch_get_url}")

    else:
        print(f"Failed to submit batch job. Status code: {post_batch.status_code}")
        print(f"Response: {post_batch.text}")

except requests.exceptions.RequestException as e:
    print(f"Network error occurred: {e}")
except json.JSONDecodeError as e:
    print(f"JSON decode error: {e}")
    print(f"Response text: {post_batch.text}")
except Exception as e:
    print(f"Unexpected error: {e}")
运行笔记本单元格,应会看到在创建并运行 Livy 批处理作业时打印了几行。

若要查看更改,请导航回 Lakehouse。

与 Fabric 环境集成
默认情况下,此 Livy API 会话针对工作区的默认初学者池运行。 或者,你可以使用 Fabric 环境。在 Microsoft Fabric 中创建、配置并使用环境来自定义由 Livy API 会话用于这些 Spark 作业的 Spark 池。 若要使用 Fabric 环境,请使用此一行更改更新之前的笔记本单元。
payload_data = {
    "name":"livybatchdemo_with"+ newlakehouseName,
    "file":"abfss://YourABFSPathToYourPayload.py",
    "conf": {
        "spark.targetLakehouse": "Fabric_LakehouseID",
        "spark.fabric.environmentDetails" : "{\"id\" : \""EnvironmentID"\"}"  # remove this line to use starter pools instead of an environment, replace "EnvironmentID" with your environment ID
        }
    }
在监视中心查看作业
可以通过在左侧导航链接中选择“监视”来访问监视中心,以查看各种 Apache Spark 活动。
批处理作业处于完成状态后,可以通过导航到“监视”来查看会话状态。

选择并打开最新活动名称。

在此 Livy API 会话案例中,可以看到以前的批处理提交、运行详细信息、Spark 版本和配置。 请注意右上角的已停止状态。


若要回顾整个过程,您需要一个远程客户端(例如 Visual Studio Code)、Microsoft Entra 应用令牌、Livy API 端点 URL、对 Lakehouse 的身份验证、Lakehouse 中的 Spark 有效负载,以及批处理 Livy API 会话。