注意事項
如果你是美國政府客戶,請使用 適用於端點的 Microsoft Defender for US Government 客戶中列出的 URI。
提示
為了提升效能,建議不要用 api.security.microsoft.com,選擇離你地理位置更近的伺服器:
- us.api.security.microsoft.com
- eu.api.security.microsoft.com
- uk.api.security.microsoft.com
- au.api.security.microsoft.com
- swa.api.security.microsoft.com
- ina.api.security.microsoft.com
- aea.api.security.microsoft.com
使用 PowerShell 腳本接收警報
看完這個範例需要多久?
只需5分鐘,分兩步完成:
- 申請註冊
- 舉例說明:只需要複製/貼上一個簡短的 PowerShell 腳本
我需要取得連線許可嗎?
在應用程式註冊階段,您必須在您的 Microsoft Entra 租戶中指定適當的角色。 欲了解更多職務細節,請參閱 權限選項。
步驟 1 - 在 Microsoft Entra ID 中建立應用程式
登入 Azure 入口網站。
導航至 Microsoft Entra ID>應用程式註冊>新註冊。

在報名表單中,選擇申請名稱,然後選擇 註冊。
允許你的應用程式存取 Defender for Endpoint,並賦予 它「Read all alerts」 權限:
在你的應用程式頁面,選擇 API 權限>新增我組織使用的>權限 > API,輸入 WindowsDefenderATP,然後選擇 WindowsDefenderATP。
注意事項
WindowsDefenderATP 不會出現在原始清單中。 你需要先在文字框裡寫下它的名字,這樣它才會出現。

選擇 應用程式權限>Alert.Read.All,然後選擇 「新增權限」。

重要事項
你需要選擇相關的權限。 Read All Alerts 只是一個例子。
例如:
選擇 授權同意。
注意事項
每次新增權限時,你必須點擊 「授予同意 」,新權限才會生效。

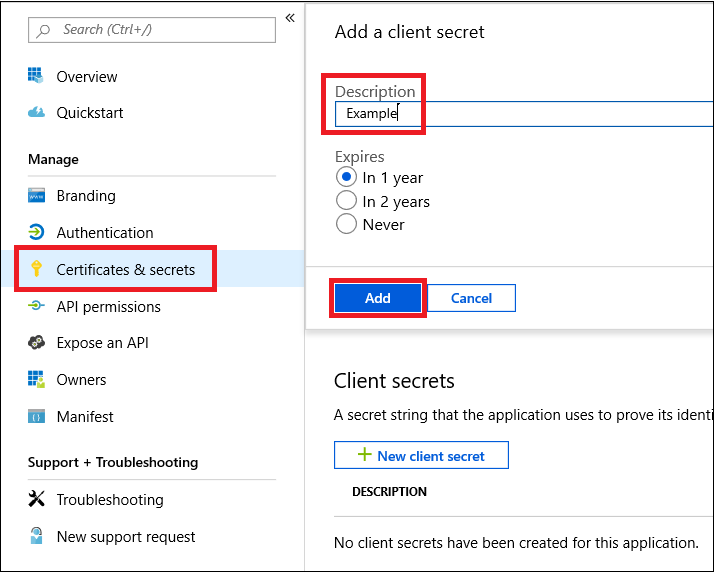
在應用程式中加入一個秘密。
選擇 「憑證 & 秘密」,為秘密新增描述,然後選擇 「新增」。
重要事項
點擊新增後, 複製產生的秘密值。 你離開後就拿不回來了!
寫下你的申請編號和租戶編號。
在申請頁面上,請前往 「概覽 」並複製以下內容:


完成! 您已成功註冊申請!
步驟二 - 透過應用程式取得一個令牌,並用這個令牌來存取 API。
將以下腳本複製到 PowerShell ISE 或文字編輯器,並儲存為
Get-Token.ps1。執行此腳本會產生一個權杖,並將其存於工作
Latest-token.txt資料夾中,名稱為 。# That code gets the App Context Token and save it to a file named "Latest-token.txt" under the current directory # Paste below your Tenant ID, App ID and App Secret (App key). $tenantId = '' ### Paste your tenant ID here $appId = '' ### Paste your Application ID here $appSecret = '' ### Paste your Application secret here $resourceAppIdUri = 'https://api.security.microsoft.com/' $oAuthUri = "https://login.microsoftonline.com/$TenantId/oauth2/token" $authBody = [Ordered] @{ resource = "$resourceAppIdUri" client_id = "$appId" client_secret = "$appSecret" grant_type = 'client_credentials' } $authResponse = Invoke-RestMethod -Method Post -Uri $oAuthUri -Body $authBody -ErrorAction Stop $token = $authResponse.access_token Out-File -FilePath "./Latest-token.txt" -InputObject $token return $token理智檢查:
- 執行指令碼。
- 在你的瀏覽器中,請前往: https://jwt.ms/。
- 將標記複製 (Latest-token.txt 檔案內容) 。
- 黏貼在最上面的盒子裡。
- 找找「角色」那一欄。 找到 Alert.Read .All 角色。


我們來接警報!
以下腳本用於
Get-Token.ps1存取 API,並接收過去 48 小時的警示。把這個腳本存到你之前儲存腳本
Get-Token.ps1的同一個資料夾裡。腳本會建立兩個檔案 (json 和 csv) ,資料放在與腳本相同的資料夾中。
# Returns Alerts created in the past 48 hours.

$token = ./Get-Token.ps1       #run the script Get-Token.ps1  - make sure you are running this script from the same folder of Get-Token.ps1

# Get Alert from the last 48 hours. Make sure you have alerts in that time frame.
$dateTime = (Get-Date).ToUniversalTime().AddHours(-48).ToString("o")

# The URL contains the type of query and the time filter we create above
# Read more about [other query options and filters](get-alerts.md).
$url = "https://api.security.microsoft.com/api/alerts?`$filter=alertCreationTime ge $dateTime"

# Set the WebRequest headers
$headers = @{
    'Content-Type' = 'application/json'
    Accept = 'application/json'
    Authorization = "Bearer $token"
}

# Send the webrequest and get the results.
$response = Invoke-WebRequest -Method Get -Uri $url -Headers $headers -ErrorAction Stop

# Extract the alerts from the results.
$alerts =  ($response | ConvertFrom-Json).value | ConvertTo-Json

# Get string with the execution time. We concatenate that string to the output file to avoid overwrite the file
$dateTimeForFileName = Get-Date -Format o | foreach {$_ -replace ":", "."}

# Save the result as json and as csv
$outputJsonPath = "./Latest Alerts $dateTimeForFileName.json"
$outputCsvPath = "./Latest Alerts $dateTimeForFileName.csv"

Out-File -FilePath $outputJsonPath -InputObject $alerts
($alerts | ConvertFrom-Json) | Export-CSV $outputCsvPath -NoTypeInformation
你都完成了! 您已成功:
- 創建、註冊與應用
- 已授權該應用程式讀取警報
- 連接 API
- 使用 PowerShell 腳本回傳過去 48 小時內產生的警示
相關文章
- 適用於端點的 Microsoft Defender APIS
- Access 適用於端點的 Microsoft Defender 與應用程式上下文
- 適用於端點的 Microsoft Defender 與使用者情境
提示
想要深入了解? Engage 與 Microsoft Security 社群互動,加入我們的技術社群:適用於端點的 Microsoft Defender Defender 技術社群。