本快速入門說明如何在運行時間實作 MIP C++ SDK 所使用的用戶端初始化模式。
備註
使用 MIP 保護 SDK 的任何用戶端應用程式都需要本快速入門中所述的步驟。 這些快速入門指南應在應用程式初始化和驗證委派處理及同意委派處理類別的實作後,按順序完成。
先決條件
如果您尚未這麼做,請務必:
- 完成 Microsoft 信息保護 (MIP) SDK 設定和設定配置中的步驟。 本「用戶端應用程式初始化」快速入門依賴適當的 SDK 安裝和設定。
- 選擇:
建立 Visual Studio 方案和專案
首先,我們會建立並設定初始的Visual Studio方案和專案,其他範例將以其為基礎構建。
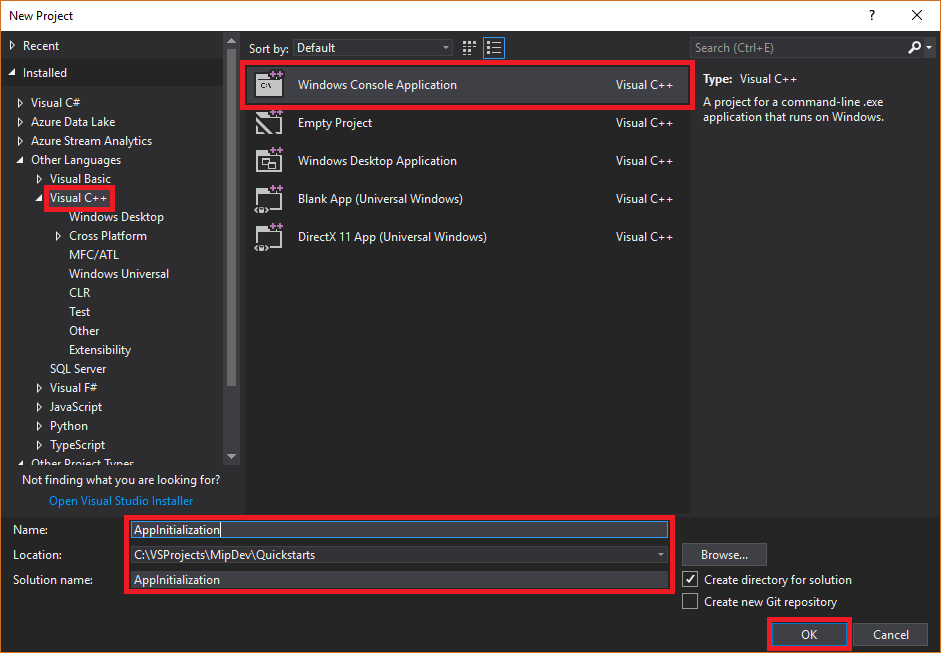
開啟 Visual Studio 2019 或更新版本,選取 [ 檔案 ] 功能表、[ 新增]、[ 專案]。 在 [ 新增專案] 對話框中:
在左窗格中的 [ 已安裝] 底下,選取 [ 其他語言],選取 [Visual C++]。
在中央窗格中,選取 [Windows 控制台應用程式]
在底部窗格中,據以更新專案 [名稱]、[ 位置] 和包含 的方案名稱 。
完成後,按下右下角的 [ 確定] 按鈕。
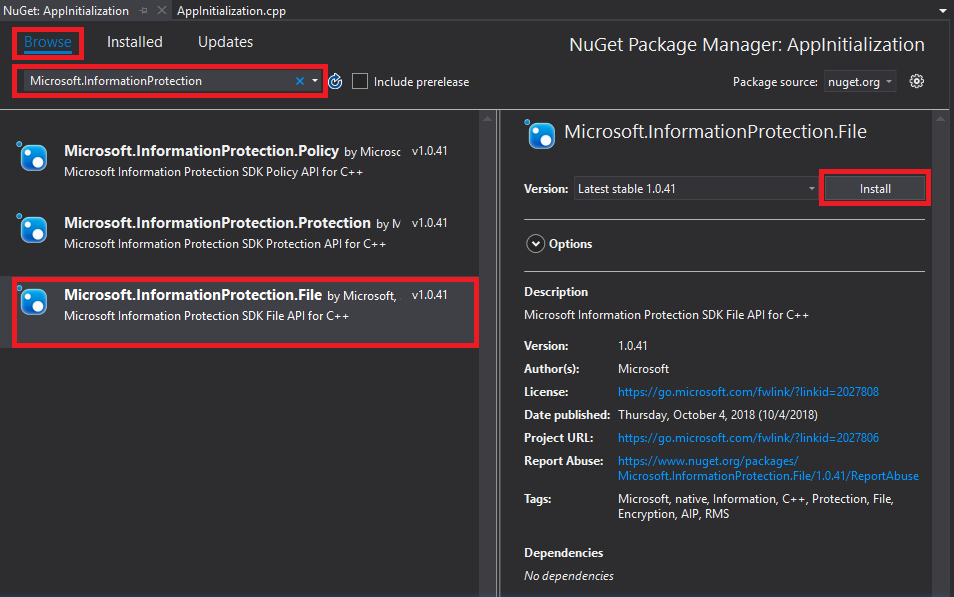
將 MIP 保護 SDK 的 NuGet 套件新增至您的專案:
在 [方案總管] 中,以滑鼠右鍵按兩下項目節點(直接在頂端/方案節點下),然後選取 [ 管理 NuGet 套件...] :
當 NuGet 套件管理員 索引標籤在 [編輯器群組] 索引標籤區域中開啟時:
- 選擇瀏覽。
- 在搜尋方塊中輸入 「Microsoft.InformationProtection」。。
- 選取 「Microsoft.InformationProtection.Protection」 套件。
- 按兩下 [安裝],然後在 [預覽變更 確認] 對話框顯示時按兩下 [確定]。


實作觀察者類別來監視保護配置檔和引擎物件
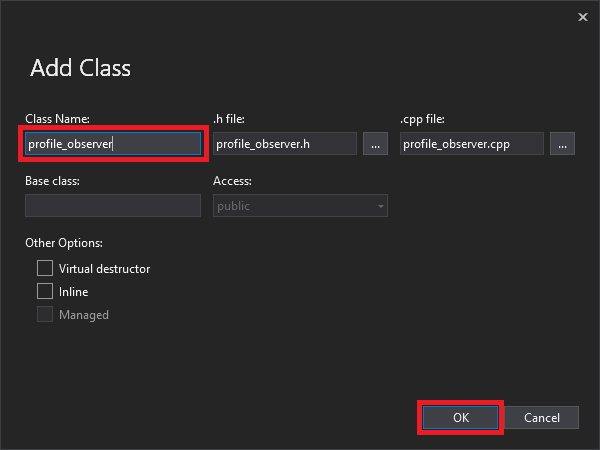
現在,透過擴充 SDK 的mip::ProtectionProfile::Observer類別,建立一個保護配置文件觀察者類別的基本實作。 觀察者會具現化及稍後使用,以監視保護配置檔物件的載入,並將引擎物件新增至配置檔。
將新類別新增至您的專案,這會為您產生標頭/.h 和實作/.cpp檔案:
在 方案總管中,再次以滑鼠右鍵按兩下項目節點,選取 [ 新增],然後選取 [ 類別]。
在 [ 新增類別 ] 對話框中:
- 在 [ 類別名稱] 欄位中,輸入 「profile_observer」。 請注意,根據您輸入的名稱,會自動填入 .h 檔案 和 .cpp檔案 欄位。
- 完成後,按兩下 [ 確定] 按鈕。
產生 類別的 .h 和 .cpp 檔案之後,這兩個檔案都會在 [編輯器群組] 索引卷標中開啟。 現在更新每個檔案以實作新的觀察者類別:
選取/刪除產生的
profile_observer類別,以更新 “profile_observer.h”。 請勿 移除上一個步驟所產生的預處理器指示詞(#pragma、#include)。 然後在任何現有的預處理器指令之後,將下列原始碼複製/貼到檔案中。#include <memory> #include "mip/protection/protection_profile.h" using std::exception_ptr; using std::shared_ptr; class ProtectionProfileObserver final : public mip::ProtectionProfile::Observer { public: ProtectionProfileObserver() { } void OnLoadSuccess(const std::shared_ptr<mip::ProtectionProfile>& profile, const std::shared_ptr<void>& context) override; void OnLoadFailure(const std::exception_ptr& Failure, const std::shared_ptr<void>& context) override; void OnAddEngineSuccess(const std::shared_ptr<mip::ProtectionEngine>& engine, const std::shared_ptr<void>& context) override; void OnAddEngineFailure(const std::exception_ptr& Failure, const std::shared_ptr<void>& context) override; };選取/刪除產生的
profile_observer類別實作,以更新 “profile_observer.cpp”。 請勿 移除上一個步驟所產生的預處理器指示詞(#pragma、#include)。 然後在任何現有的預處理器指令之後,將下列原始碼複製/貼到檔案中。#include <future> using std::promise; using std::shared_ptr; using std::static_pointer_cast; using mip::ProtectionEngine; using mip::ProtectionProfile; void ProtectionProfileObserver::OnLoadSuccess(const shared_ptr<ProtectionProfile>& profile, const shared_ptr<void>& context) { auto promise = static_pointer_cast<std::promise<shared_ptr<ProtectionProfile>>>(context); promise->set_value(profile); } void ProtectionProfileObserver::OnLoadFailure(const std::exception_ptr& error, const shared_ptr<void>& context) { auto promise = static_pointer_cast<std::promise<shared_ptr<ProtectionProfile>>>(context); promise->set_exception(error); } void ProtectionProfileObserver::OnAddEngineSuccess(const shared_ptr<ProtectionEngine>& engine, const shared_ptr<void>& context) { auto promise = static_pointer_cast<std::promise<shared_ptr<ProtectionEngine>>>(context); promise->set_value(engine); } void ProtectionProfileObserver::OnAddEngineFailure(const std::exception_ptr& error, const shared_ptr<void>& context) { auto promise = static_pointer_cast<std::promise<shared_ptr<ProtectionEngine>>>(context); promise->set_exception(error); }
遵循 1 中的步驟。 將新類別 "engine_observer" 新增至您的專案,作為保護引擎的觀察者,此操作會自動為您生成標頭 (.h) 與實作 (.cpp) 檔案。
產生 類別的 .h 和 .cpp 檔案之後,這兩個檔案都會在 [編輯器群組] 索引卷標中開啟。 現在更新每個檔案以實作新的觀察者類別:
選取/刪除產生的
engine_observer類別,以更新 “engine_observer.h”。 請勿 移除上一個步驟所產生的預處理器指示詞(#pragma、#include)。 然後在任何現有的預處理器指令之後,將下列原始碼複製/貼到檔案中。#include <memory> #include "mip/protection/protection_engine.h" using std::vector; using std::exception_ptr; using std::shared_ptr; class ProtectionEngineObserver final : public mip::ProtectionEngine::Observer { public: ProtectionEngineObserver() {} void OnGetTemplatesSuccess(const vector<std::shared_ptr<mip::TemplateDescriptor>>& templateDescriptors, const shared_ptr<void>& context) override; void OnGetTemplatesFailure(const exception_ptr& Failure, const shared_ptr<void>& context) override; };選取/刪除產生的
engine_observer類別實作,以更新 “engine_observer.cpp”。 請勿 移除上一個步驟所產生的預處理器指示詞(#pragma、#include)。 然後在任何現有的預處理器指令之後,將下列原始碼複製/貼到檔案中。#include "mip/protection/protection_profile.h" #include "engine_observer.h" using std::promise; void ProtectionEngineObserver::OnGetTemplatesSuccess(const vector<shared_ptr<mip::TemplateDescriptor>>& templateDescriptors,const shared_ptr<void>& context) { auto loadPromise = static_cast<promise<vector<shared_ptr<mip::TemplateDescriptor>>>*>(context.get()); loadPromise->set_value(templateDescriptors); }; void ProtectionEngineObserver::OnGetTemplatesFailure(const exception_ptr& Failure, const shared_ptr<void>& context) { auto loadPromise = static_cast<promise<shared_ptr<mip::ProtectionProfile>>*>(context.get()); loadPromise->set_exception(Failure); };
您可以選擇性地使用 Ctrl+Shift+B (建置方案)來執行解決方案的測試編譯/連結,以確保它會成功建置,然後再繼續。

實作身份驗證代理和同意代理
MIP SDK 會使用類別擴充性來實作驗證,以提供與用戶端應用程式共用驗證工作的機制。 客戶端必須取得適當的 OAuth2 存取令牌,並在運行時間提供給 MIP SDK。
透過繼承 SDK 的 mip::AuthDelegate 類別,並覆寫或實作 mip::AuthDelegate::AcquireOAuth2Token() 純虛擬函式,來建立驗證委派的實現。 請遵循 檔案 SDK 應用程式初始化快速入門下詳述的步驟。 驗證委派會由保護配置檔和保護引擎物件具現化及稍後使用。
實作同意委派
現在,通過擴充 SDK 的 mip::ConsentDelegate 類別並覆寫或實作 mip::AuthDelegate::GetUserConsent() 純虛擬函式,來建立同意委派的實作。 請遵循 檔案 SDK 應用程式初始化快速入門下詳述的步驟。 同意委派會由保護配置檔和保護引擎物件具現化及稍後使用。
建構保護配置檔和引擎
如前所述,使用 MIP API 的 SDK 用戶端需要設定檔和引擎物件。 藉由新增程式代碼來具現化配置檔和引擎物件,以完成本快速入門的程式代碼部分:
從 [方案總管] 中,開啟專案中包含 方法實作
main()的 .cpp 檔案。 預設名稱為包含它的專案的同一名稱,而這是在您建立專案時指定的。移除生成的實作
main()。 請勿 在專案建立期間移除 Visual Studio 所產生的預處理器指示詞(#pragma、#include)。 在任何預處理器指示詞之後附加下列程序代碼:
#include "mip/mip_init.h"
#include "mip/mip_context.h"
#include "auth_delegate.h"
#include "consent_delegate.h"
#include "profile_observer.h"
#include"engine_observer.h"

using std::promise;
using std::future;
using std::make_shared;
using std::shared_ptr;
using std::string;
using std::cout;
using mip::ApplicationInfo;
using mip::ProtectionProfile;
using mip::ProtectionEngine;

int main(){

  // Construct/initialize objects required by the application's profile object
  // ApplicationInfo object (App ID, name, version)
  ApplicationInfo appInfo{"<application-id>",
                          "<application-name>",
                          "<application-version>"};

  std::shared_ptr<mip::MipConfiguration> mipConfiguration = std::make_shared<mip::MipConfiguration>(mAppInfo,
				                                                                                               "mip_data",
                                                                                      			         mip::LogLevel::Trace,
                                                                                                     false);

  std::shared_ptr<mip::MipContext> mMipContext = mip::MipContext::Create(mipConfiguration);

  auto profileObserver = make_shared<ProtectionProfileObserver>(); // Observer object
  auto authDelegateImpl = make_shared<AuthDelegateImpl>("<application-id>"); // Authentication delegate object (App ID)
  auto consentDelegateImpl = make_shared<ConsentDelegateImpl>(); // Consent delegate object

  // Construct/initialize profile object
  ProtectionProfile::Settings profileSettings(
    mMipContext,
    mip::CacheStorageType::OnDisk,
    consentDelegateImpl,
    profileObserver);

  // Set up promise/future connection for async profile operations; load profile asynchronously
  auto profilePromise = make_shared<promise<shared_ptr<ProtectionProfile>>>();
  auto profileFuture = profilePromise->get_future();
  try
  {
    mip::ProtectionProfile::LoadAsync(profileSettings, profilePromise);
  }
  catch (const std::exception& e)
  {
    cout << "An exception occurred... are the Settings and ApplicationInfo objects populated correctly?\n\n"
          << e.what() << "'\n";
    system("pause");
    return 1;
  }

  auto profile = profileFuture.get();

  // Construct/initialize engine object
  ProtectionEngine::Settings engineSettings(
     mip::Identity("<engine-account>"),         // Engine identity (account used for authentication)
     authDelegateImpl,                          // Reference to mip::AuthDelegate implementation
     "",                                        // ClientData field
     "en-US");                                  // Locale (default = en-US)

  // Set the engineId so it can be cached and reused.
  engineSettings.SetEngineId("<engine-account>");

  // Set up promise/future connection for async engine operations; add engine to profile asynchronously
  auto enginePromise = make_shared<promise<shared_ptr<ProtectionEngine>>>();
  auto engineFuture = enginePromise->get_future();
  profile->AddEngineAsync(engineSettings, enginePromise);
  std::shared_ptr<ProtectionEngine> engine;

  try
  {
    engine = engineFuture.get();
  }
  catch (const std::exception& e)
  {
    cout << "An exception occurred... is the access token incorrect/expired?\n\n"
         << e.what() << "'\n";
    system("pause");
    return 1;
  }

  // Application shutdown. Null out profile and engine, call ReleaseAllResources();
  // Application may crash at shutdown if resources aren't properly released.
  engine = nullptr;
  profile = nullptr;
  mipContext.Shutdown();
  mipContext = nullptr;

  return 0;
}
使用字串常數取代您剛貼上的原始程式碼中的所有佔位符值。
佔位符 價值 範例 <應用程式識別碼> 在「MIP SDK 設定與配置」(setup-configure-mip.md) 文章的步驟 2 中註冊的應用程式被指派的 Microsoft Entra 應用程式識別碼 (GUID)。 取代 2 個實例。 "0edbblll-8773-44de-b87c-b8c6276d41eb"<應用程式名稱> 為您的應用程式設定的使用者友好名稱。 必須包含有效的 ASCII 字元(不包括 』;'),而且最好符合您在 Microsoft Entra 註冊中使用的應用程式名稱。 "AppInitialization"<應用程式版本> 應用程式的使用者定義版本資訊。 必須包含有效的 ASCII 字元(不包括 』;')。 "1.1.0.0"<引擎帳戶> 用於引擎身份識別的帳戶。 當您在令牌擷取期間使用使用者帳戶進行驗證時,必須符合此值。 "user1@tenant.onmicrosoft.com"<引擎狀態> 使用者定義的狀態將與引擎相關聯。 "My App State"現在請執行應用程式的最終組建,並解決任何錯誤。 您的程式代碼應該會順利建置,但在您完成下一個快速入門之前,尚未正確執行。 如果您執行應用程式,您會看到類似下列的輸出。 應用程式將成功建構保護設定檔和保護引擎,但驗證模組尚未啟動,您也尚未取得存取權杖,直到您完成下一步快速入門為止。
 C:\MIP Sample Apps\ProtectionQS\Debug\ProtectionQS.exe (process 8252) exited with code 0.
 To automatically close the console when debugging stops, enable Tools->Options->Debugging->Automatically close the console when debugging stops.
 Press any key to close this window . . .
後續步驟
現在您的初始化程式代碼已完成,您已準備好進行下一個快速入門,開始體驗 MIP 保護 SDK。