本快速入門將示範如何在運行時間實作 MIP SDK .NET 包裝函式所使用的用戶端初始化模式。
備註
使用 MIP .NET 包裝函式保護 SDK 的任何用戶端應用程式都需要本快速入門中所述的步驟。 這些快速入門應該在應用程式初始化和實作驗證委派和同意委派類別之後循序完成。
先決條件
如果您尚未這麼做,請務必:
- 完成 Microsoft 資訊保護 (MIP) SDK 設定和配置中的步驟。 本「保護配置檔和引擎設定」快速入門指南依賴於正確的 SDK 安裝和配置。
- 選擇:
建立 Visual Studio 方案和專案
首先,我們會建立並設定初始的 Visual Studio 方案和專案,其他的快速入門指南將以此為基礎進行建置。
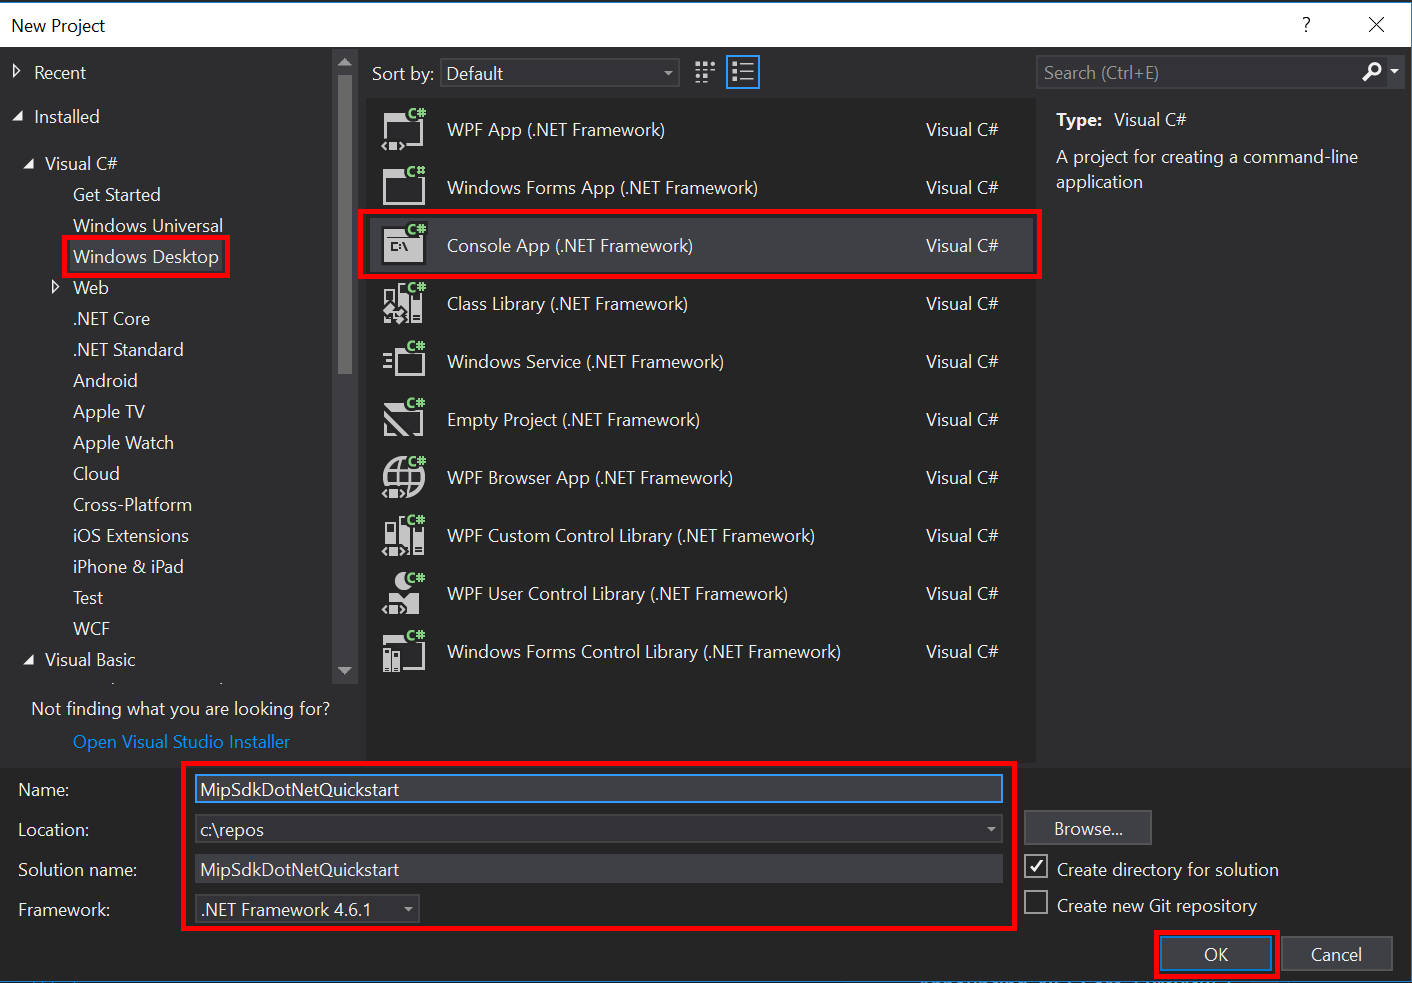
開啟 Visual Studio 2019 或更新版本,選取 [ 檔案 ] 功能表、[ 新增]、[ 專案]。 在 [ 新增專案] 對話框中:
在左窗格中的 [已安裝] 底下,選取 [Visual C#],選取 [Windows 桌面]。
在中央窗格中,選取 [控制台應用程式] (.NET Framework)
在底部窗格中,據以更新專案 [名稱]、[ 位置] 和包含 的方案名稱 。
完成後,按下右下角的 [ 確定] 按鈕。
將 MIP 檔案 SDK 的 NuGet 套件新增至您的專案:
- 在 [方案總管] 中,以滑鼠右鍵按兩下項目節點(直接在頂端/方案節點底下),然後選取 [ 管理 NuGet 套件...] :
- 當 NuGet 套件管理員 索引標籤在編輯器群組的索引標籤區域中開啟時:
- 選擇[瀏覽]。
- 在搜尋方塊中輸入 「Microsoft.InformationProtection」。。
- 選取 「Microsoft.InformationProtection.File」 套件。
- 按兩下 [安裝],然後在 [預覽變更 確認] 對話框顯示時按兩下 [確定]。
重複上述步驟以新增 MIP 保護 SDK 套件,但改為將 “Microsoft.IdentityModel.Clients.ActiveDirectory” 新增至應用程式。

實作身份驗證代理和同意代理
如果尚未實作,請遵循 File SDK 應用程式初始化 中所列的步驟,以實作驗證和同意委派。
初始化 MIP SDK 受管理的包裝器
從 [方案總管] 中,開啟專案中包含 方法實作
Main()的 .cs 檔案。 它預設為與包含它的專案相同的名稱,此專案名稱是在您建立專案時指定的。移除生成的實作
main()。Managed 包裝函式包含靜態類別,
Microsoft.InformationProtection.MIP用於初始化、建立MipContext、載入配置檔,以及釋放資源。 若要初始化檔案 SDK 作業的包裝函式,請呼叫MIP.Initialize(),傳入MipComponent.Protection以載入保護作業所需的連結庫。在
Main()Program.cs 中新增下列內容,將 <application-id> 替換為先前建立之 Microsoft Entra Application Registration 的 ID。
using System;
using System.Threading.Tasks;
using Microsoft.InformationProtection;
using Microsoft.InformationProtection.Exceptions;
using Microsoft.InformationProtection.Protection;

namespace mip_sdk_dotnet_quickstart
{
    class Program
    {
        private const string clientId = "<application-id>";
        private const string appName = "<friendly-name>";

        static void Main(string[] args)
        {
            //Initialize Wrapper for Protection SDK operations
            MIP.Initialize(MipComponent.Protection);
        }
    }
}
構建保護輪廓和引擎
如前所述,使用 MIP API 的 SDK 用戶端需要設定檔和引擎物件。 完成本快速入門的程式代碼撰寫部分,方法是新增程式代碼以載入原生 DLL,然後具現化配置檔和引擎物件。
using System;
using System.Threading.Tasks;
using Microsoft.InformationProtection;
using Microsoft.InformationProtection.Exceptions;
using Microsoft.InformationProtection.Protection;

namespace mip_sdk_dotnet_quickstart
{
     class Program
     {
          private const string clientId = "<application-id>";
          private const string appName = "<friendly-name>";

          static void Main(string[] args)
          {
               // Initialize Wrapper for Protection SDK operations.
               MIP.Initialize(MipComponent.Protection);

               // Create ApplicationInfo, setting the clientID from Azure AD App Registration as the ApplicationId.
               ApplicationInfo appInfo = new ApplicationInfo()
               {
                    ApplicationId = clientId,
                    ApplicationName = appName,
                    ApplicationVersion = "1.0.0"
               };

               // Instantiate the AuthDelegateImpl object, passing in AppInfo.
               AuthDelegateImplementation authDelegate = new AuthDelegateImplementation(appInfo);

               // Create MipConfiguration Object
               MipConfiguration mipConfiguration = new MipConfiguration(appInfo, "mip_data", LogLevel.Trace, false);

               // Create MipContext using Configuration
               mipContext = MIP.CreateMipContext(mipConfiguration);

               // Initialize and instantiate the ProtectionProfile.
               // Create the ProtectionProfileSettings object.
               // Initialize protection profile settings to create/use local state.
               var profileSettings = new ProtectionProfileSettings(mipContext,
                                        CacheStorageType.OnDiskEncrypted,
                                        new ConsentDelegateImplementation());

               // Load the Profile async and wait for the result.
               var protectionProfile = Task.Run(async () => await MIP.LoadProtectionProfileAsync(profileSettings)).Result;

               // Create a ProtectionEngineSettings object, then use that to add an engine to the profile.
               var engineSettings = new ProtectionEngineSettings("user1@tenant.com", authDelegate, "", "en-US");
               engineSettings.Identity = new Identity("user1@tenant.com");
               var protectionEngine = Task.Run(async () => await protectionProfile.AddEngineAsync(engineSettings)).Result;

               // Application Shutdown
               // handler = null; // This will be used in later quick starts.
               protectionEngine = null;
               protectionProfile = null;
               mipContext = null;
          }
     }
}
請使用下列值替換您在原始碼中貼上的佔位元值:
佔位符 價值 範例 <應用程式識別碼> 指派給「MIP SDK 設定和設定」中註冊之應用程式的Microsoft Entra 應用程式識別碼(2 個實例)。 0edbblll-8773-44de-b87c-b8c6276d41eb <友好的名稱> 為您的應用程式設定的使用者友好名稱。 應用程式初始化 現在請執行應用程式的最終組建,並解決任何錯誤。 您的程式碼應該能建置成功。
後續步驟
現在您的初始化程式代碼已完成,您已準備好進行下一個快速入門,開始體驗 MIP 保護 SDK。