Important
裝置元數據已被取代,將在未來的 Windows 版本中移除。 如需這項功能取代的相關信息,請參閱 驅動程式套件容器元數據。
在 Windows 8.1 中,UWP 裝置應用程式可讓印表機製造商自定義顯示進階列印設定的飛出視窗。 本主題介紹進階列印設定飛出視窗,並示範 列印設定和列印通知 範例的 C# 版本如何以自定義飛出視窗取代預設飛出視窗。 若要深入瞭解一般 UWP 裝置應用程式,請參閱 認識 UWP 裝置應用程式。
列印設定和列印通知範例的 C# 版本會使用 Preferences.xaml 頁面來示範進階列印設定之自定義飛出視窗的 UI。 列印協助程式類別可用來建立裝置內容(IPrinterExtensionContext),並執行裝置查詢。 The PrinterHelperClass.cs file is in the DeviceAppForPrintersLibrary project and uses APIs defined in the PrinterExtensionLibrary project. 印表機延伸模組連結庫提供方便的方式來存取 v4 印表驅動程式的印表機延伸模組介面。 如需詳細資訊,請參閱 印表機擴充功能庫概觀。
Note
本主題中顯示的程式代碼範例是以 列印設定和列印通知 範例的 C# 版本為基礎。 此範例也適用於 JavaScript 和 C++。 請注意,由於C++可以直接存取 COM,因此範例C++版本不包含程式代碼庫專案。 下載範例以查看最新版本的程序代碼。
進階列印設定
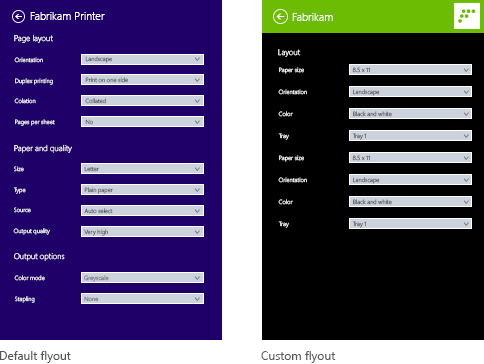
進階列印設定體驗是當使用者想要選取 [列印] 視窗中未提供的列印設定時,印表機所提供的功能。 It is accessible through the More settings link in the Print window. 這不是全屏幕體驗,而是顯示在飛出視窗內,這是顯示輕量型的內容型使用者介面的控件,當使用者按兩下或點選外部時,就會關閉該介面。
這項體驗可用來醒目提示印表機的區分功能,例如能夠將浮水印套用至文件頁面、提供安全的列印選項,或影像增強選項。
未安裝印表機的 UWP 裝置應用程式時,Windows 會提供預設的印表設定體驗。 如果 Windows 偵測到您的印表機已安裝 UWP 裝置應用程式,且應用程式已加入加入 windows.printTaskSettings 擴充功能,則您的應用程式會取代 Windows 所提供的預設體驗。
若要針對進階列印設定叫用飛出視窗:
開啟支援列印的 UWP 應用程式
在畫面右側撥動來存取魅力(或使用 Windows 標誌鍵 + C)
Tap the Devices charm
Tap Print
點選印表機
The Print window opens
Click the More settings link on the Print window
進階列印設定飛出視窗隨即開啟
The default flyout appears when no UWP device app for the printer is installed
A custom flyout appears when a UWP device app for the printer is installed
Prerequisites
開始之前:
請確定您的印表機是使用 v4 印表驅動程式安裝。 如需詳細資訊,請參閱 開發 v4 列印驅動程式。
設定好您的開發電腦。 See Getting started for info about downloading the tools and creating a developer account.
將您的應用程式與市集產生關聯。 如需相關信息,請參閱 建立 UWP 裝置應用程式。
為您的印表機建立裝置元數據,使其與您的應用程式產生關聯。 如需詳細資訊,請參閱 建立裝置元數據。
建置應用程式主頁面的UI。 所有UWP裝置應用程式都可以從 [開始] 啟動,其中會顯示全螢幕。 利用 \[開始\] 體驗,以符合您裝置特定品牌和功能的方式強調您的產品或服務。 它可以使用的UI控制件類型沒有任何特殊限制。 若要開始設計全螢幕體驗,請參閱 Microsoft Store 設計原則。
If you're writing your app with C# or JavaScript, add the PrinterExtensionLibrary and DeviceAppForPrintersLibrary projects to your UWP device app solution. 您可以在 [列印設定] 和 [列印通知 ] 範例中找到這些專案。
Note
因為C++可以直接存取 COM,C++應用程式不需要個別的連結庫來處理以 COM 為基礎的印表機裝置內容。
步驟 1:註冊擴充功能
為了讓 Windows 能夠辨識應用程式可以提供進階列印設定的自定義飛出視窗,它必須註冊列印工作設定延伸模組。 此擴充功能宣告在 Extension 元素中,並將 Category 屬性設置為 windows.printTaskSettings的值。 在 C# 和 C++ 範例中,Executable 屬性會設定為 $targetnametoken$.exe,而 EntryPoint 屬性會設定為 DeviceAppForPrinters.App。
You can add the print task settings extension on the Declarations tab of the Manifest Designer in Microsoft Visual Studio. 您也可以使用 XML (Text) 編輯器手動編輯應用程式套件指令清單 XML。 Right-click the Package.appxmanifest file in Solution Explorer for editing options.
This example shows the print task settings extension in the Extension element, as it appears in the app package manifest file, Package.appxmanifest.
<?xml version="1.0" encoding="utf-8"?>
<Package xmlns="http://schemas.microsoft.com/appx/2010/manifest">
  <Identity Name="Microsoft.SDKSamples.DeviceAppForPrinters.CS" Publisher="CN=Microsoft Corporation, O=Microsoft Corporation, L=Redmond, S=Washington, C=US" Version="1.0.0.0" />
  <Properties>
    <DisplayName>Device App For Printers C# sample</DisplayName>
    <PublisherDisplayName>Microsoft Corporation</PublisherDisplayName>
    <Logo>Assets\storeLogo-sdk.png</Logo>
  </Properties>
  <Prerequisites>
    <OSMinVersion>6.3.0</OSMinVersion>
    <OSMaxVersionTested>6.3.0</OSMaxVersionTested>
  </Prerequisites>
  <Resources>
    <Resource Language="x-generate" />
  </Resources>
  <Applications>
    <Application Id="DeviceAppForPrinters" Executable="$targetnametoken$.exe" EntryPoint="DeviceAppForPrinters.App">
      <VisualElements DisplayName="Device App For Printers C# sample" Logo="Assets\squareTile-sdk.png" SmallLogo="Assets\smallTile-sdk.png" Description="DeviceAppForPrinters C# sample" ForegroundText="light" BackgroundColor="#00b2f0" ToastCapable="true">
<DefaultTile ShowName="allLogos" ShortName="App4PrinterCS" WideLogo="Assets\tile-sdk.png" />
<SplashScreen Image="Assets\splash-sdk.png" BackgroundColor="#00b2f0" />
      </VisualElements>
      <Extensions>
<Extension Category="windows.backgroundTasks" EntryPoint="BackgroundTask.PrintBackgroundTask">
  <BackgroundTasks>
    <Task Type="systemEvent" />
  </BackgroundTasks>
</Extension>
<Extension Category="windows.printTaskSettings" Executable="$targetnametoken$.exe" EntryPoint="DeviceAppForPrinters.App" />
      </Extensions>
    </Application>
  </Applications>
</Package>
步驟 2:建置 UI
在建置您的應用程式之前,您應該與設計師和行銷小組合作,以設計用戶體驗。 用戶體驗應該投影貴公司的品牌層面,並協助您建立與用戶的連線。
Design guidelines
在設計自定義快顯視窗之前,請務必先檢閱 UWP 應用程式快顯視窗指導方針。 指導方針可協助確保您的彈出視窗提供與其他 UWP 應用程式一致的直覺式體驗。
針對您應用程式的主頁面,請記住,Windows 8.1 可以在單一監視器上以各種大小顯示多個應用程式。 請參閱下列指導方針,以進一步瞭解您的應用程式如何在螢幕大小、視窗大小和方向之間恰當重排。
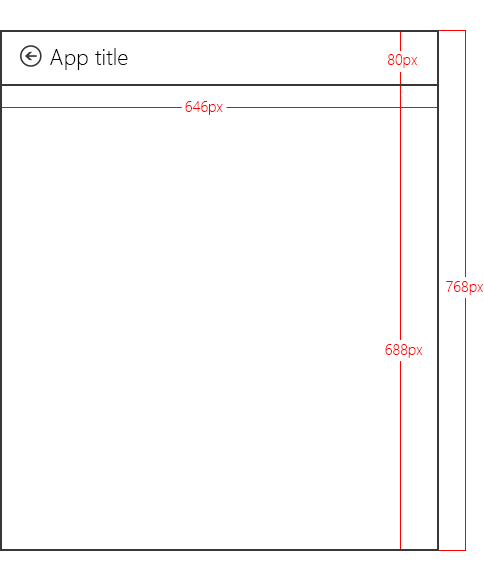
Flyout dimensions
顯示進階列印設定的飛出視窗寬 646 像素,且高度至少為 768 像素(實際高度取決於使用者的螢幕解析度)。 Windows 會提供飛出視窗標題區域中的 [上一步] 按鈕。 「應用程式標題」文字是來自應用程式指令清單的應用程式標題。 標題區域高 80 像素,為自定義飛出視窗的可檢視區域留下 688 像素。
Note
如果您的自定義飛出視窗高度超過 688 像素,則使用者可以滑動或卷動,以檢視位於可檢視區域上方或下方的飛出視窗部分。
定義應用程式標題色彩和圖示
標題、背景色彩、文字色彩和自定義飛出視窗上的小型標誌取自 VisualElements 應用程式套件指令清單檔案中的 元素。
This example shows the title and icon, as defined in the VisualElements element, in the app package manifest file (Package.appxmanifest).
      <VisualElements DisplayName="Device App For Printers C# sample" Logo="Assets\squareTile-sdk.png" SmallLogo="Assets\smallTile-sdk.png" Description="DeviceAppForPrinters C# sample" ForegroundText="light" BackgroundColor="#00b2f0" ToastCapable="true">
        <DefaultTile ShowName="allLogos" ShortName="App4PrinterCS" WideLogo="Assets\tile-sdk.png" />
        <SplashScreen Image="Assets\splash-sdk.png" BackgroundColor="#00b2f0" />
      </VisualElements>
Best practices
保持相同的外觀和風格。 將您的自定義飛出視窗與 [開始] 體驗的設計對齊(您應用程式的 [主] 頁面),包括字型、色彩和控件等元素。 無論從何處調用應用程式,應用程式應該讓人感到熟悉。
讓互動保持簡單。 避免耗時或複雜的互動。 在大部分情況下,設定印表機、檢視狀態、訂購筆跡和疑難解答等動作最好是在 [開始] 體驗內完成。
請將導航保持在最低限度。 避免讓使用者在自定義飛出視窗中的多個頁面之間來回巡覽。 請改用垂直捲動或內嵌控件,例如漸進式洩漏控件、下拉式清單和內嵌錯誤訊息。
請勿使用輕觸即關的飛出視窗。 列印體驗已經使用自動關閉的彈出視窗。 在您的自定義飛出視窗中加入另一個淺色關閉元素可能會混淆您的使用者。
停用引導用戶遠離列印體驗的連結。 當使用者列印內容時,您應該採取步驟,以確保它們會保留在列印內容中。 例如,如果您的應用程式具有導致應用程式其他區域的連結(例如首頁或購買筆跡的頁面),您應該停用它們,讓使用者不會意外離開進階列印設定體驗。
步驟 3:處理啟用
如果您的應用程式已宣告列印工作設定延伸模組,它必須實施一個方法來處理應用程式啟用事件。 應用程式啟用是當應用程式啟動時,您的應用程式可以選擇要啟動哪個頁面。 對於已宣告列印工作設定延伸模組的應用程式,Windows 會在 Activated 事件自變數中傳遞列印工作延伸模組內容:Windows.ApplicationModel.Activation.IActivatedEventArgs。
A UWP device app can determine that the activation is intended for advanced print settings (that someone just tapped More options on the print settings dialog) when the event argument's kind property is equal to Windows.ApplicationModel.Activation.ActivationKind.printTaskSettings.
Note
在某些情況下,如果用戶在啟動后立即關閉應用程式,可能會在啟用處理程式內擲回例外狀況。 若要避免這種情況,請確定您的啟用處理程式會有效率地完成,而且不會執行需要大量資源的處理。
This example shows the activation event handler in the OnActivated method, as it appears in the Constants.cs file. 事件自變數接著會轉換成 Windows.ApplicationModel.Activation.PrintTaskSettingsActivatedEventArgs。 Although the sample includes this code in the Constants.cs file, it's actually part of the App class that is also defined in the App.xaml.cs file.
partial class App : Application
{
    protected override void OnActivated(IActivatedEventArgs args)
    {
        if (args.Kind == ActivationKind.PrintTaskSettings)
        {
            Frame rootFrame = new Frame();
            if (null == Window.Current.Content)
            {
                rootFrame.Navigate(typeof(MainPage));
                Window.Current.Content = rootFrame;
            }
            Window.Current.Activate();

            MainPage mainPage = (MainPage)rootFrame.Content;

            // Load advanced printer preferences scenario
            mainPage.LoadAdvancedPrintSettingsContext((PrintTaskSettingsActivatedEventArgs)args);
        }
    }
}
步驟 4:顯示設定
當呼叫LoadAdvancedPrintSettingsContext方法時,列印工作組態的內容會被指派給 MainPage 類別的變數。 這可讓自定義飛出視窗在啟動時存取列印設定。
傳遞至 LoadAdvancedPrintSettingsContext 方法的事件自變數會公開用於存取和控制印表機的屬性:
- The args.configuration property provides an object of type Windows.Devices.Printers.Extensions.PrintTaskConfiguration. 此物件可讓您存取列印工作延伸模組內容,也可讓您新增事件處理程式來更新列印票證。
- The args.configuration.printerExtensionContext property provides an object of type Windows.Devices.Printers.Extensions.PrinterExtensionContext. 此物件是 Print Schema、PrintTicket 以及列印佇列資訊的 PrinterExtensionLibrary 介面指標。 如果未公開任何介面,則為 Null。 如需詳細資訊,請參閱 印表機擴充功能庫概觀。
This example shows the LoadAdvancedPrintSettingsContext method, as it appears in the Constants.cs file.
public PrintTaskConfiguration Config;
public Object Context;

public void LoadAdvancedPrintSettingsContext(PrintTaskSettingsActivatedEventArgs args)
{
    Config = args.Configuration;
    Context = Config.PrinterExtensionContext;
    LoadScenario(typeof(DeviceAppForPrinters.Preferences));
}
On the custom flyout page, Preferences.xaml.cs, a class named rootPage acts as a pointer to the MainPage class so that the print task extension context and the printer device context can be accessed from the flyout.
This example shows the pointer in a portion of Preferences class, from the Preferences.xaml.cs file. 下載 列印設定和列印通知 範例,以查看完整的程序代碼。
public sealed partial class Preferences : SDKTemplate.Common.LayoutAwarePage
{
    // A pointer back to the main page.
    MainPage rootPage = MainPage.Current;

    // To listen for save requests.
    PrintTaskConfiguration configuration;

    // To create the printer device context.
    Object printerExtensionContext;
    PrintHelperClass printHelper;

    // The features in this sample were chosen because they're available on a wide range of printer drivers.
    private string[] features = { "PageOrientation", "PageOutputColor", "PageMediaSize", "PageMediaType" };
    private string[] selections = { null, null, null, null };

    // . . .
    // . . .
    // . . .
When the page constructor for Preferences.xaml.cs is called, objects are created for the print task extension context (a PrintTaskConfiguration object named configuration) and the printer device context (a PrintHelperClass object named printHelper).
建立這些對象之後,將在 DisplaySettings 方法中使用印表機裝置內容來載入 TextBlocks 和 ComboBoxes。 請注意,與 JavaScript 不同的是,選取範圍中的變更不會在與其餘應用程式相同的線程上引發。 您必須維護使用者選擇的本機緩存,以供稍後使用。
This example shows the custom flyout page constructor, DisplaySettings, and other helper methods in the Preferences.xaml.cs file.
public Preferences()
{
    this.InitializeComponent();

    configuration = rootPage.Config;
    printerExtensionContext = rootPage.Context;
    printHelper = new PrintHelperClass(printerExtensionContext);

    // Disable scenario navigation by hiding the scenario list UI elements
    ((UIElement)rootPage.FindName("Scenarios")).Visibility = Windows.UI.Xaml.Visibility.Collapsed;
    ((UIElement)rootPage.FindName("ScenarioListLabel")).Visibility = Windows.UI.Xaml.Visibility.Collapsed;
    ((UIElement)rootPage.FindName("DescriptionText")).Visibility = Windows.UI.Xaml.Visibility.Collapsed;

    DisplaySettings();
}


private void DisplaySettings(bool constraints=false)
{
    PrintOptions.Visibility = Windows.UI.Xaml.Visibility.Visible;
    WaitPanel.Visibility = Windows.UI.Xaml.Visibility.Collapsed;

    // Fill in the drop-down select controls for some common printing features.
    TextBlock[] featureLabels = { PageOrientationLabel, PageOutputColorLabel, PageMediaSizeLabel, PageMediaTypeLabel };
    ComboBox[] featureBoxes = { PageOrientationBox, PageOutputColorBox, PageMediaSizeBox, PageMediaTypeBox };

    for (int i = 0; i < features.Length; i++)
    {
        // Only display a feature if it exists
        featureLabels[i].Visibility = Windows.UI.Xaml.Visibility.Collapsed;
        featureBoxes[i].Visibility = Windows.UI.Xaml.Visibility.Collapsed;

        string feature = features[i];

        // Check whether the currently selected printer's capabilities include this feature.
        if (!printHelper.FeatureExists(feature))
        {
            continue;
        }

        // Fill in the labels so that they display the display name of each feature.
        featureLabels[i].Text = printHelper.GetFeatureDisplayName(feature);
        string[] index = printHelper.GetOptionInfo(feature, "Index");
        string[] displayName = printHelper.GetOptionInfo(feature, "DisplayName");
        string selectedOption = printHelper.GetSelectedOptionIndex(feature);

        // Unless specified, do not get constraints
        bool[] constrainedList = constraints ? printHelper.GetOptionConstraints(feature) : new bool[index.Length];

        // Populate the combo box with the options for the current feature.
        PopulateBox(featureBoxes[i], index, displayName, selectedOption, constrainedList);
        selections[i] = selectedOption;

        // Every time the selection for a feature changes, we update our local cached set of selections.
        featureBoxes[i].SelectionChanged += OnFeatureOptionsChanged;

        // Show existing features
        featureLabels[i].Visibility = Windows.UI.Xaml.Visibility.Visible;
        featureBoxes[i].Visibility = Windows.UI.Xaml.Visibility.Visible;
    }
}

void PopulateBox(ComboBox box, string[] index, string[] displayName, string selectedOption, bool[] constrainedList)
{
    // Clear the combobox of any options from previous UI refresh before repopulating it.
    box.SelectionChanged -= OnFeatureOptionsChanged;
    box.Items.Clear();
    // There should be only one displayName for each possible option.
    if (index.Length == displayName.Length)
    {
        for (int i = 0; i < index.Length; i++)
        {
            // Create a new DisplayItem so the user will see the friendly displayName instead of the index.
            ComboBoxItem newItem = new ComboBoxItem();
            newItem.Content = displayName[i];
            newItem.DataContext = index[i];
            newItem.Foreground = constrainedList[i] ? new SolidColorBrush(Colors.Red) : new SolidColorBrush(Colors.Black);
            box.Items.Add(newItem);

            // Display current selected option as selected in the combo box.
            if (selectedOption == index[i])
            {
                box.SelectedIndex = i;
                box.Foreground = newItem.Foreground;
            }
        }
    }
}

private void OnFeatureOptionsChanged(object sender, SelectionChangedEventArgs args)
{
    ComboBox comboBox = sender as ComboBox;

    for (int i = 0; i < features.Length; i++)
    {
        if (features[i] + "Box" == comboBox.Name)
        {
            selections[i] = (comboBox.SelectedItem as ComboBoxItem).DataContext as string;
        }
    }
}
步驟 5:儲存設定
When the user has finished setting advanced print settings, the Microsoft Store device app needs to save the changes before the user goes back to the Print window. To do that, the app needs to listen for when the user taps the Back button (from the custom flyout page). 發生這種情況時, SaveRequested 會觸發列印工作延伸內容 ( configuration 物件) 的事件。
This example shows the event listener for SaveRequested, being added in the OnNavigatedTo event handler of the custom flyout, in the Preferences.xaml.cs file. When the SaveRequested event is triggered, the OnSaveRequested method will be invoked (that method is also in the Preferences.xaml.cs file).
protected override void OnNavigatedTo(NavigationEventArgs e)
{
    if (null == configuration)
    {
        rootPage.NotifyUser("Configuration arguments cannot be null", NotifyType.ErrorMessage);
        return;
    }

    // Add an event listener for saverequested (the back button of the flyout is pressed).
    configuration.SaveRequested += OnSaveRequested;
}
在方法中 OnSaveRequested ,應用程式會先使用 printHelper 物件,為印表機延伸模組內容上的每項功能設定目前選取的選項。 然後,它會呼叫作為 Save 方法參數傳入的 request 物件上的 OnSaveRequested 方法。 方法 Save 來自 Windows.Devices.Printers.Extensions.PrintTaskConfigurationSaveRequest 類別,使用印表機延伸模組內容來驗證列印票證並儲存列印工作組態。
Important
如果列印票證以任何方式無效,此方法 Save 會擲回應用程式必須處理的例外狀況。 如果應用程式未處理例外狀況,就會停止流程,強制使用者關閉飛出視窗並重新啟動列印流程。
This example shows the OnSaveRequested method in the Preferences.xaml.cs file.
SaveRequested由於事件未在 UI 線程上引發,因此它必須使用 Windows.UI.Core.CoreDispatcher 將訊息張貼至 UI 線程,以在驗證和儲存票證時顯示適當的訊息。
async private void OnSaveRequested(object sender, PrintTaskConfigurationSaveRequestedEventArgs args)
{
    if (null == printHelper || null == printerExtensionContext || null == args)
    {
        await Dispatcher.RunAsync(Windows.UI.Core.CoreDispatcherPriority.Normal, () =>
        {
            rootPage.NotifyUser("onSaveRequested: args, printHelper, and context cannot be null", NotifyType.ErrorMessage);
        });
        return;
    }

    // Get the request object, which has the save method that allows saving updated print settings.
    PrintTaskConfigurationSaveRequest request = args.Request;

    if (null == request)
    {
        await Dispatcher.RunAsync(Windows.UI.Core.CoreDispatcherPriority.Normal, () =>
        {
            rootPage.NotifyUser("onSaveRequested: request cannot be null", NotifyType.ErrorMessage);
        });
        return;
    }

    PrintTaskConfigurationSaveRequestedDeferral deferral = request.GetDeferral();

    // Two separate messages are dispatched to:
    // 1) put up a popup panel,
    // 2) set the each options to the print ticket and attempt to save it,
    // 3) tear down the popup panel if the print ticket could not be saved.
    await Dispatcher.RunAsync(Windows.UI.Core.CoreDispatcherPriority.Normal, () =>
    {
        PrintOptions.Visibility = Windows.UI.Xaml.Visibility.Collapsed;
        WaitPanel.Visibility = Windows.UI.Xaml.Visibility.Visible;
    });

    // Go through all the feature select elements, look up the selected
    // option name, and update the context
    // for each feature
    for (var i = 0; i < features.Length; i++)
    {
        // Set the feature's selected option in the context's print ticket.
        // The printerExtensionContext object is updated with each iteration of this loop
        printHelper.SetFeatureOption(features[i], selections[i]);
    }

    bool ticketSaved;
    try
    {
        // This save request will throw an exception if ticket validation fails.
        // When the exception is thrown, the app flyout will remain.
        // If you want the flyout to remain regardless of outcome, you can call
        // request.Cancel(). This should be used sparingly, however, as it could
        // disrupt the entire the print flow and will force the user to
        // light dismiss to restart the entire experience.
        request.Save(printerExtensionContext);

        if (configuration != null)
        {
            configuration.SaveRequested -= OnSaveRequested;
        }
        ticketSaved = true;
    }
    catch (Exception exp)
    {
        // Check if the HResult from the exception is from an invalid ticket, otherwise rethrow the exception
        if (exp.HResult.Equals(unchecked((int)0x8007000D))) // E_INVALID_DATA
        {
            ticketSaved = false;
        }
        else
        {
            throw;
        }
    }

    // If ticket isn't saved, refresh UI and notify user
    if (!ticketSaved)
    {
        await Dispatcher.RunAsync(Windows.UI.Core.CoreDispatcherPriority.Normal, () =>
        {
            rootPage.NotifyUser("Failed to save the print ticket", NotifyType.ErrorMessage);
            DisplaySettings(true);
        });
    }
    deferral.Complete();
}
儲存需要使用者輸入的選項
列印設定和列印通知範例示範如何設定已定義的功能,其中涵蓋大部分的列印選項。 不過,某些選項需要自定義UI才能取得使用者指定的值。 例如,如果應用程式使用進階列印設定來指定自定義頁面大小,則會採取下列步驟來儲存使用者指定的值:
在應用程式啟用期間擷取列印票證。 在 步驟 3:處理啟用中,會說明應用程式如何啟用列印設定。
檢查是否已指定頁面大小選項。 在 C# 或 JS 應用程式中,列印協助程式類別可以檢查此選項。 在C++應用程式中,呼叫 IPrintSchemaOption 上的 QueryInterface 以擷取 IPrintSchemaPageMediaSizeOption。
這個範例顯示列印協助程序類別中檢查是否指定頁面大小選項的方法。
public bool ShouldShowCustomUI(string index)
{
    if (null != index)
    {
        string feature = "PageMediaSize";
        int i = int.Parse(index);
        IPrintSchemaOption selectedOption = GetCachedFeatureOptions(feature)[i];
        if (selectedOption.Name.Equals("CustomMediaSize", StringComparison.CurrentCulture)
            || selectedOption.Name.Equals("PSCustomMediaSize", StringComparison.CurrentCulture))
        {
            return true;
        }
    }
    return false;
}
在自定義飛出視窗中,顯示要求使用者輸入頁面高度和寬度的自定義UI,並從IPrintSchemaPageMediaSizeOption 擷取使用者指定的高度和寬度。
此範例顯示自定義飛出視窗的方法,要求使用者輸入頁面高度和寬度。
private void ShowCustomPageMediaSizeUI(string index, bool keepValue) { //Hide custom media size UI unless needed if (IsCustomSizeSelected(index)) { if (keepValue && (!customWidth.Equals("")) && (!customHeight.Equals(""))) { CustomWidthBox.Text = customWidth; CustomHeightBox.Text = customHeight; } else { // Use a helper function from the WinRT helper component CustomWidthBox.Text = printHelper.GetCustomWidth(index); CustomHeightBox.Text = printHelper.GetCustomHeight(index); } CustomUIPanel.Visibility = Windows.UI.Xaml.Visibility.Visible; CustomWidthBox.KeyDown += OnCustomValueEntered; CustomHeightBox.KeyDown += OnCustomValueEntered; } else { CustomUIPanel.Visibility = Windows.UI.Xaml.Visibility.Collapsed; CustomWidthBox.KeyDown -= OnCustomValueEntered; CustomHeightBox.KeyDown -= OnCustomValueEntered; } }IPrintSchemaPageMediaSizeOption使用使用者指定的值更新 物件,並驗證高度和寬度是否符合使用者指定的值。此範例是一個用於在印表機協助類別中更新
IPrintSchemaPageMediaSizeOption物件的輔助方法。OnSaveRequested如果自定義飛出視窗中的處理程序判斷已要求自定義頁面大小選項,則會呼叫此函式。public void SetCustomMediaSizeDimensions(string width, string height) { if ((null == width) && (null == height) && (null == Capabilities)) { return; } try { CheckSizeValidity(width, height); } catch (FormatException e) { throw new ArgumentException(e.Message); } catch (OverflowException e) { throw new ArgumentException(e.Message); } // The context is retrieved during app activation. IPrintSchemaTicket ticket = context.Ticket; // // Input XML as Stream // XElement ticketRootXElement = null; using (Stream ticketReadStream = ticket.GetReadStream()) { ticketRootXElement = XElement.Load(ticketReadStream); } XNamespace psfNs = PrintSchemaConstants.FrameworkNamespaceUri; XNamespace pskNs = PrintSchemaConstants.KeywordsNamespaceUri; string pskPrefix = ticketRootXElement.GetPrefixOfNamespace(pskNs); // Modify the MediaSizeHeight and MediaSizeWidth IEnumerable<XElement> parameterInitCollection = from c in ticketRootXElement.Elements(psfNs + "ParameterInit") select c; foreach (XElement parameterInit in parameterInitCollection) { if (0 == String.Compare((string)parameterInit.Attribute("name"), pskPrefix + ":PageMediaSizePSWidth")) { IEnumerable<XElement> valueCollection = from c in parameterInit.Elements(psfNs + "Value") select c; valueCollection.ElementAt(0).Value = width; } else if (0 == String.Compare((string)parameterInit.Attribute("name"), pskPrefix + ":PageMediaSizePSHeight")) { IEnumerable<XElement> valueCollection = from c in parameterInit.Elements(psfNs + "Value") select c; valueCollection.ElementAt(0).Value = height; } } // // Write XLinq changes back to DOM // using (Stream ticketWriteStream = ticket.GetWriteStream()) { ticketRootXElement.Save(ticketWriteStream); } }
Testing
您必須先使用裝置元數據連結到印表機,才能測試 UWP 裝置應用程式。
您需要印表機的裝置元數據套件複本,才能將裝置應用程式資訊新增至該套件。 如果您沒有裝置元資料,您可以使用 裝置元資料撰寫精靈 來建置它,如 建立 UWP 裝置應用程式的裝置元資料主題所述,。
Note
若要使用 裝置元數據撰寫精靈,您必須先安裝 Microsoft Visual Studio Professional、Microsoft Visual Studio Ultimate 或 獨立 SDK for Windows 8.1,才能完成本主題中的步驟。 安裝 Microsoft Visual Studio Express for Windows 會安裝不包含精靈的 SDK 版本。
下列步驟會建置您的應用程式並安裝裝置元數據。
啟用測試簽署。
按兩下 DeviceMetadataWizard.exe,從 %ProgramFiles[x86]%\Windows Kits\8.1\bin\x86 啟動 裝置元數據撰寫精靈
From the Tools menu, select Enable Test Signing.
重新啟動電腦
開啟方案 (.sln) 檔案來建置方案。 按 F7,或在載入範例後,從頂端功能表中選擇 建置->建置方案。
中斷連線並卸載印表機。 需要此步驟,Windows 會在下次偵測到裝置時讀取更新的裝置元數據。
編輯並儲存裝置元數據。 若要將裝置應用程式連結至您的裝置,您必須將裝置應用程式與裝置產生關聯
Note
如果您尚未建立裝置元資料,請參閱 建立 UWP 裝置應用程式的裝置元資料。
如果 裝置元數據撰寫精靈 尚未開啟,請按兩下 DeviceMetadataWizard.exe,從 %ProgramFiles(x86)%\Windows Kits\8.1\bin\x86 啟動。
點選 編輯裝置元資料。 這可讓您編輯現有的裝置元數據套件。
In the Open dialog box, locate the device metadata package associated with your UWP device app. (It has a devicemetadata-ms file extension.)
在 [指定 UWP 裝置應用程式資訊] 頁面上,於 [UWP 裝置應用程式] 方塊中輸入 Microsoft 市集應用程式資訊。 按下 [匯入 UWP 應用程式指令清單檔],自動輸入 套件名稱、發行者名稱,UWP 應用程式識別碼。
If your app is registering for printer notifications, fill out the Notification handlers box. In Event ID, enter the name of the print event handler. In Event Asset, enter the name of the file where that code resides.
When you're done, click Next until you get to the Finish page.
在 [檢閱裝置元數據套件] 頁面上,確定所有設定都正確無誤,然後選取 [將裝置元數據套件複製到本機計算機上的元數據存放區 複選框。 Then click Save.
重新連線印表機,讓 Windows 在裝置連線時讀取更新的裝置元數據。
Troubleshooting
問題:進階列印設定會顯示預設飛出視窗,而不是自定義飛出視窗
如果進階列印設定飛出視窗顯示預設飛出視窗,而不是您的應用程式實作的自訂飛出視窗...
Possible cause: Test signing is not turned on. 如需開啟偵錯的相關資訊,請參閱本主題中的偵錯部分。
Possible cause: The app is not querying for the right Package Family Name. 檢查程式代碼中的套件系列名稱。 Open up package.appxmanifest in Visual Studio and make sure that the package family name you are querying for matches the one in the Packaging tab, in the Package Family Name field.
Possible cause: The device metadata is not associated with the Package Family Name. 使用 [裝置元數據撰寫精靈 ] 開啟裝置元數據,並檢查套件系列名稱。 Start the wizard from %ProgramFiles(x86)%\Windows Kits\8.1\bin\x86, by double-clicking DeviceMetadataWizard.exe.
問題:應用程式會在彈出式視窗中啟動,然後馬上關閉。
如果進階列印設定的自訂快顯視窗在開啟後立即消失...
- Possible cause: In Windows 8, there is a known issue that within a flyout, UWP apps will be dismissed under the debugger. 一旦您知道啟用正常運作,請關閉偵錯。 如果您需要偵錯儲存列印票證,請在啟用之後附加偵錯工具。