注意事項
Mixed Reality學院的教學是以第一代) 和 Mixed Reality Immersive Headset 為核心設計 (HoloLens。 因此,我們認為保留這些教學對仍在尋找開發指引的開發者非常重要。 這些教學並未更新 HoloLens 2 所使用的最新工具組或互動方式。 它們會被維護以持續支援的裝置。 未來將發布一系列新教學,示範如何為 HoloLens 2 開發。 此通知將於教學發布後更新連結。
在本課程中,您將學習如何在混合實境應用程式中使用 Microsoft Graph 使用安全認證登入您的 Microsoft 帳號。 接著你可以在應用程式介面中檢索並顯示你的排定會議。

Microsoft Graph 是一組設計用來存取許多 Microsoft 服務的 API。 Microsoft 將 Microsoft Graph 描述為一個由關聯連結的資源矩陣,意即它允許應用程式存取各種連接的使用者資料。 欲了解更多資訊,請造訪 Microsoft Graph 頁面。
開發過程包括開發一款應用程式,使用者需凝視並點擊球體,球體會提示使用者安全登入 Microsoft 帳號。 登入帳號後,使用者可以看到當天排定的會議清單。
完成本課程後,你可以擁有一個混合實境 HoloLens 應用程式,它能執行以下功能:
- 使用點擊手勢點擊物件,會提示使用者登入Microsoft帳號 (離開應用程式登入,然後) 再回到應用程式。
- 查看當天安排的會議清單。
在你的申請中,如何將結果與設計整合,取決於你自己。 本課程旨在教你如何將 Azure 服務整合到你的 Unity 專案中。 你的工作是運用從這門課程獲得的知識,來提升你的混合實境應用。
裝置支援
| 河道 | 全息鏡頭 | 沉浸式頭戴裝置 |
|---|---|---|
| MR 與 Azure 311:Microsoft Graph | ✔️ |
先決條件
注意事項
這個教學是為有基本 Unity 和 C# 經驗的開發者設計的。 本文件中的先決條件與書面指示,皆為截至2018年7月 () 時測試與驗證的內容。 你可以自由使用安裝 工具 文章中列出的最新軟體,但不應假設本課程的資訊與你在新軟體中找到的完全相同,而非以下列出的內容。
我們建議本課程使用以下硬體與軟體:
- 一台開發型個人電腦
- Windows 10 Fall Creators Update (或更高版本) 啟用開發者模式
- 最新的 Windows 10 SDK
- Unity 2017.4
- Visual Studio 2017
- 啟用開發者模式的 Microsoft HoloLens
- Internet access for Azure setup and Microsoft Graph data retrieval
- 有效的 Microsoft帳號 (個人或工作/學校)
- 今天安排了幾場會議,使用同一個 Microsoft 帳號
開始之前
- 為避免在建置此專案時遇到問題,建議你將本教學提到的專案建立在根目錄或近根資料夾中, (長的資料夾路徑在建置時) 會造成問題。
- 設置並測試你的全息鏡頭。 如果你需要協助設定 HoloLens,請務必造訪 HoloLens 設定文章。
- 在開始開發新的 HoloLens 應用程式時,建議先進行校準與感測器調整, (有時針對每位使用者) 執行這些任務會有幫助。
如需校正相關協助,請點此 連結至HoloLens校正文章。
如需感測器調校的幫助,請點此 連結至《HoloLens 感測器調校》文章。
第一章 - 在申請註冊入口網站建立您的應用程式
首先,您需要在 申請註冊入口網站建立並註冊您的申請。
在本章中,你也會找到服務金鑰,讓你可以呼叫 Microsoft Graph 存取你的帳戶內容。
請前往 Microsoft 應用程式註冊入口網站 ,並以您的 Microsoft 帳號登入。 登入後,您將被導向申請 註冊入口網站。
在 「我的應用程式 」區塊,點擊 「新增應用程式」按鈕。
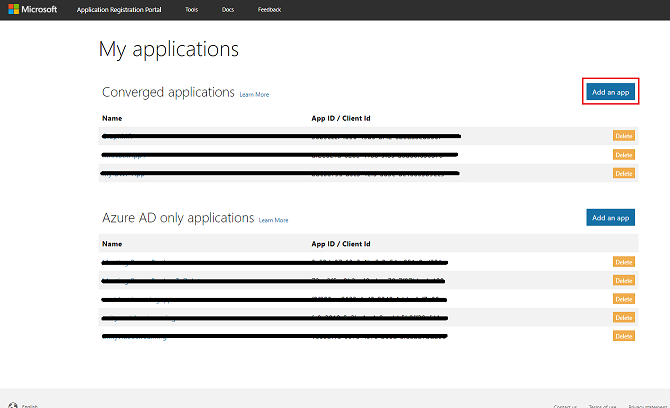
重要事項
應用程式註冊入口網站的外觀可能會有所不同,取決於你之前是否使用過 Microsoft Graph。 以下截圖展示了這些不同版本。
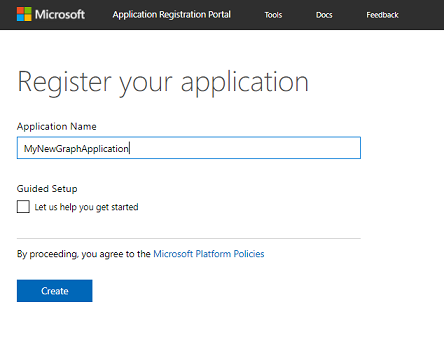
為你的應用程式新增名稱,然後點擊 建立。
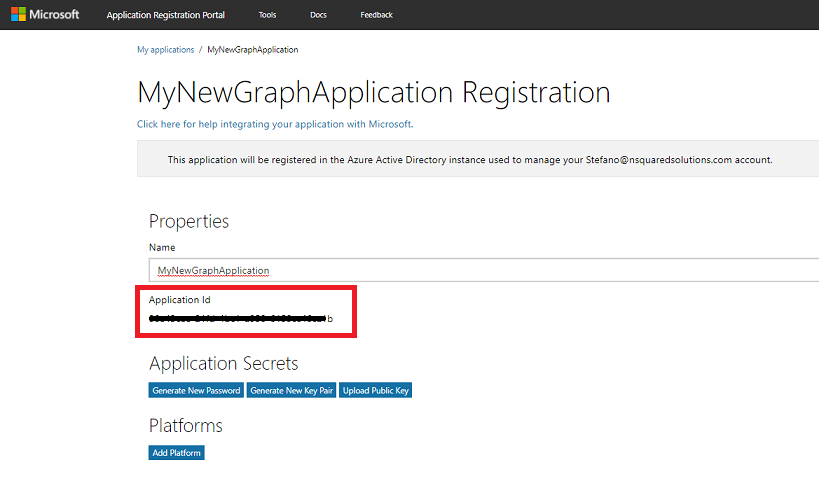
應用程式建立完成後,你會被導向應用程式主頁。 複製 申請編號 ,並確保在安全的地方註明這個數值。 你必須盡快在程式碼中使用它。
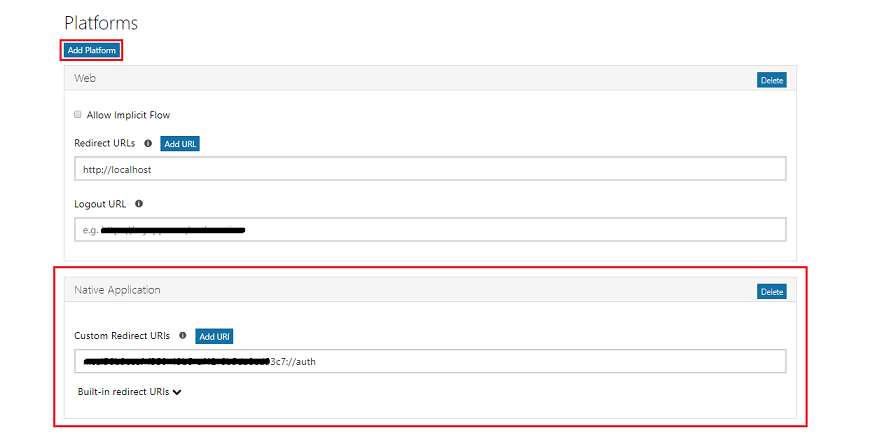
在 平台 區塊,請確保顯示為 原生應用程式 。 如果沒有,請點選新增平台並選擇原生應用程式。
在同一頁面往下滑,在名為 Microsoft Graph Permissions 的區塊中,你需要為應用程式新增更多權限。 點擊「 新增 」→「 委派權限」旁邊。
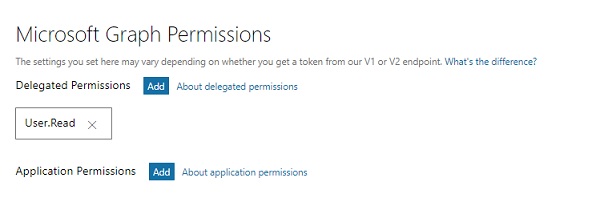
既然你希望應用程式能存取使用者的行事曆,請勾選名為 「Calendars.Read 」的方框並點擊 確定。

往下滑到最底並點擊 儲存 按鈕。
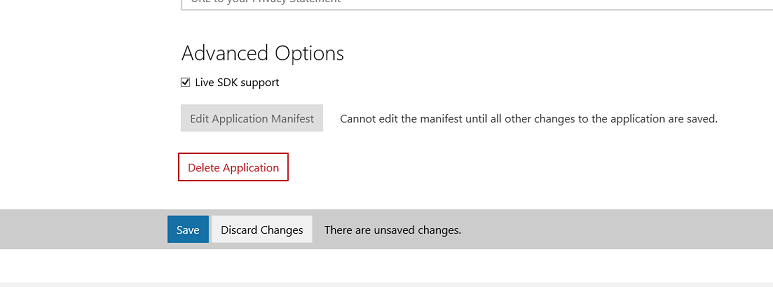
你的存檔已確認,你可以從 申請註冊入口登出。
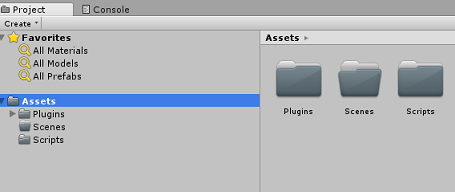
第二章 - 建立 Unity 專案
以下是混合實境開發的典型架構,因此是其他專案的良好範本。
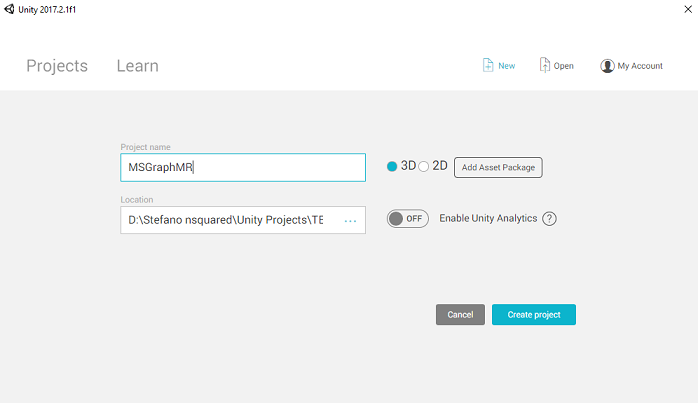
打開 Unity 並點 選新檔。

你需要提供 Unity 專案名稱。 插入 MSGraphMR。 確保專案範本設定為 3D。 請將 位置 設定在適合你的位置, (記得,靠近根目錄會比較) 。 然後,點擊 「建立專案」。
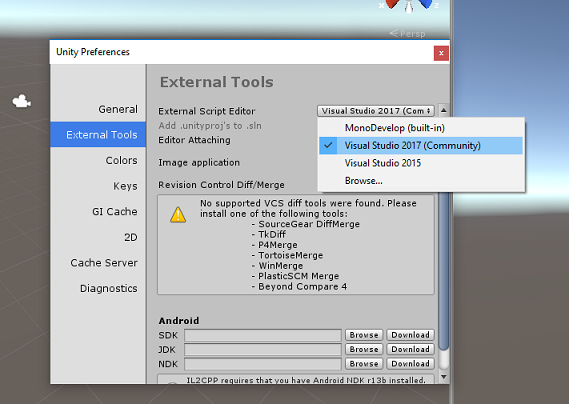
打開 Unity 時,值得檢查預設的 腳本編輯器 是否設定為 Visual Studio。 進入 編輯>偏好設定 ,然後從新視窗中切換到 外部工具。 將 外部腳本編輯器 改為 Visual Studio 2017。 關閉 偏好設定 視窗。
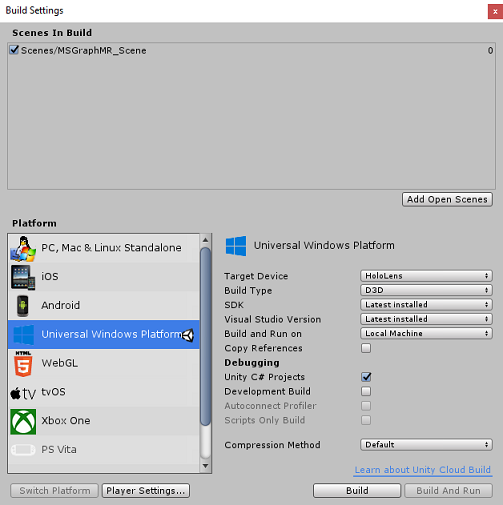
到檔案>建置設定,選擇通用 Windows 平台,然後點選切換平台按鈕套用你的選擇。

在 檔案>建置設定中,請確保:
目標裝置 設定為 HoloLens
建構類型 設定為 D3D
SDK 設定為 最新安裝
Visual Studio 版本 設定為 最新安裝
建置與執行 設定為 本地機器
儲存場景並加入建構。
選擇 新增開啟場景。 存檔視窗會出現。

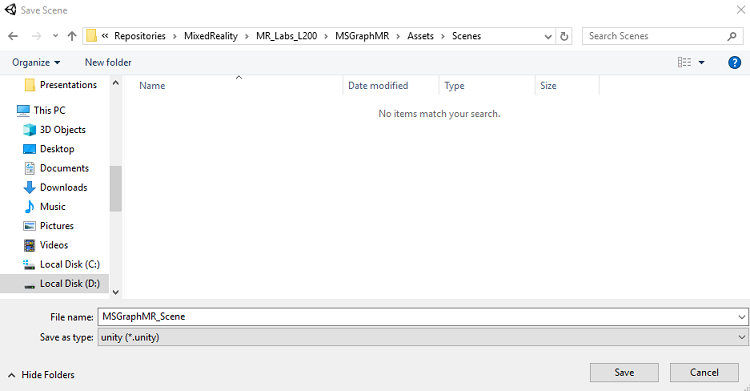
為這個場景以及未來的任何場景建立一個新資料夾。 選擇 「新增資料夾 」按鈕,建立新資料夾,命名 為 Scenes。
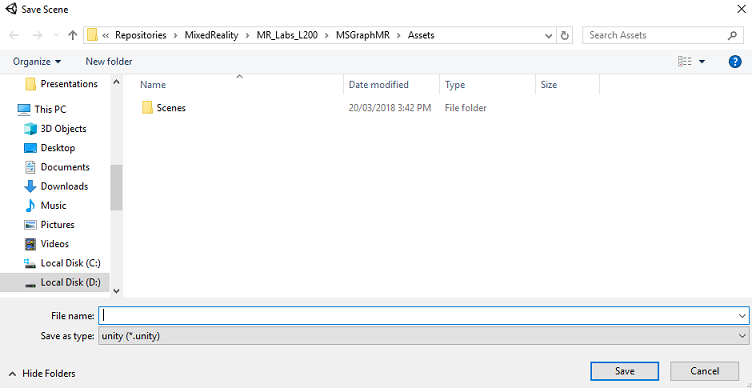
打開你新建立 的 Scenes 資料夾,然後在 檔案名稱:文字欄位輸入 MR_ComputerVisionScene,然後點 選儲存。
重要事項
請注意,你必須將 Unity 場景儲存在 Assets 資料夾中,因為它們必須與 Unity 專案相關聯。 建立 scenes 資料夾 (及其他類似資料夾) 是結構化 Unity 專案的典型方式。
剩下的設定,在 建構設定裡,暫時應該保持預設。
在 建築設定 視窗中,點擊 玩家設定 按鈕,會開啟檢查 器 所在位置的相關面板。
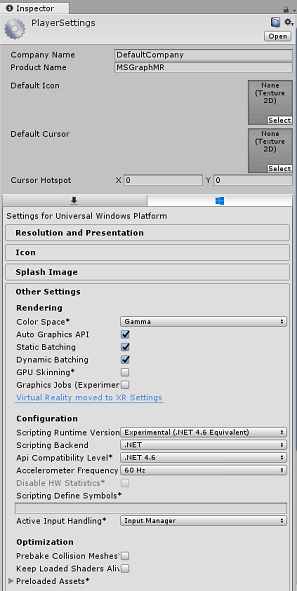
在這個面板中,需要驗證幾個設定:
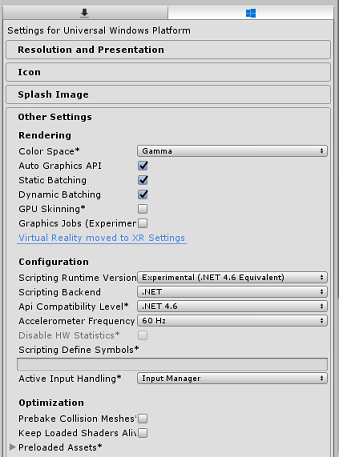
在 其他設定 標籤中:
腳本執行時版本應該是實驗性 (.NET 4.6 等效) ,這會觸發重新啟動編輯器的需求。
腳本後端應該是 .NET
API 相容等級 應該是 .NET 4.6
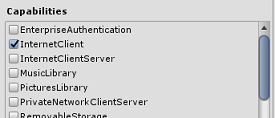
在 發佈設定 標籤中 ,功能欄下勾選:
網際網路用戶端
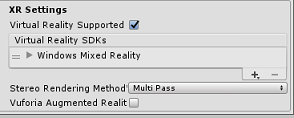
在面板下方,XR 設定 (「發布設定) 」下方,勾選支援虛擬實境,確保 Windows Mixed Reality SDK 已加入。
回到 建置設定, Unity C# 專案 不再是灰色;勾選旁邊的勾選框。
關閉 建構設定 視窗。
將你的場景和專案儲存在檔案存檔場景/檔案>儲存專案 (>) 。
第三章 - 在 Unity 中匯入函式庫
重要事項
如果你想跳過課程中的 Unity 設定部分,直接寫程式碼,可以下載 Azure-MR-311.unitypackage,匯入你的專案中作為自訂套件,然後從第 5 章繼續。
要在 Unity 中使用 Microsoft Graph ,你需要使用 Microsoft.Identity.Client DLL。 可以使用 Microsoft Graph SDK 的 SDK,但建置 Unity 專案後需要新增 NuGet 套件, (也就是說建置) 後編輯專案。 被認為直接將所需 DLL 匯入 Unity 會更簡單。
注意事項
Unity 目前有一個已知的問題,匯入後需要重新設定外掛。 本節 (第 4 至 7 步驟) 在錯誤解決後將不再需要。
若要將 Microsoft Graph 匯入您自己的專案,請 下載 MSGraph_LabPlugins.zip 檔案。 此套件由測試過的函式庫版本所建立。
如果你想了解更多如何在 Unity 專案中新增自訂 DLL,請 點此連結。
匯入套件:
透過「資產>匯入套件」>自訂套件選單選項,將 Unity 套件加入 Unity。 選擇你下載的套件。
在跳出的 Unity 套件匯入 框中,確保所有在 (下且包含) 插件 的項目都被選中。

點擊 匯入 按鈕將項目加入您的專案。
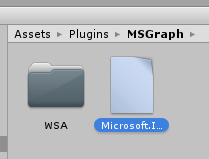
到專案面板的 MSGraph 資料夾裡的插件,選擇名為 Microsoft.Identity.Client 的插件。
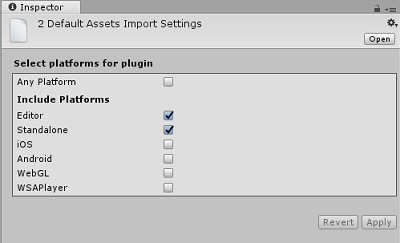
選擇外 掛 後,確保「 任意平台 」未勾選,然後確認 WSAPlayer 也未勾選,然後點選 「套用」。 這只是為了確認檔案設定正確。
注意事項
標記這些插件會設定成只能在 Unity 編輯器中使用。 WSA 資料夾中還有另一組 DLL,這些 DLL 會在專案從 Unity 匯出為通用 Windows 應用程式後使用。
接著,你需要在 MSGraph 資料夾裡開啟 WSA 資料夾。 你看到的是你設定的同一個檔案的副本。 選擇檔案,然後在檢查器中:
確保 Any Platform未被勾選, 且只有WSAPlayer 被 勾選。
確保 SDK 設為 UWP,腳 本後端 設為 Dot Net
確保「 不處理 」已 勾選。
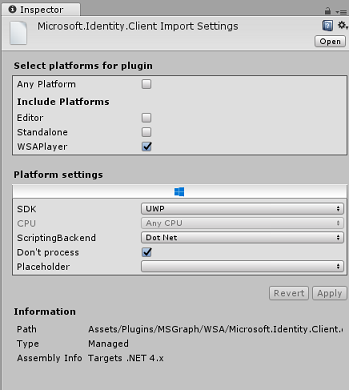
按一下 [套用]。
第四章 - 攝影機設置
在本章中,你會設置場景的主攝影機:
在 層級面板中,選擇 主攝影機。
一旦選擇,你就能在檢查員面板中看到主攝影機的所有組件。
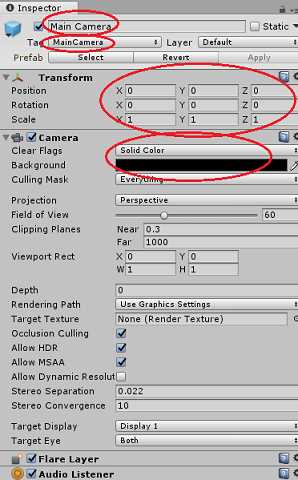
攝影機 物件 必須命名 為主攝影機 (注意拼法!) 。
主攝影機 標籤 必須設為 主攝影機 (注意拼字!) 。
確保 轉換位置 設定為 0, 0, 0。
將 透明旗 幟設定為 純色。
將相機元件的 背景色 設為 黑色,alpha 0 (十六進位代碼:#00000000) 。
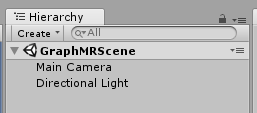
階層 面板 中的最終物件結構應與下圖所示相同:
第五章 - 建立會議 UI 類別
你需要建立的第一個腳本是 MeetingsUI,負責在應用程式的介面中架設並填充歡迎訊息、指示和會議細節) (。
要建立這個類別:
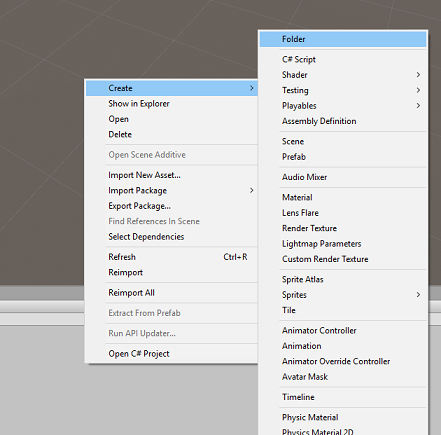
在專案面板中右鍵點擊 Assets 資料夾,然後選擇建立>資料夾。 把資料夾命名 為 Scripts。
打開 Scripts 資料夾,然後在該資料夾內右鍵點擊 「Create>C# Script」。 把腳本命名 為 MeetingsUI。

雙擊新的 MeetingsUI 腳本,可以用 Visual Studio 開啟它。
插入以下命名空間:
using System;
using UnityEngine;
在類別中,插入以下變數:
    /// <summary>
    /// Allows this class to behave like a singleton
    /// </summary>
    public static MeetingsUI Instance;

    /// <summary>
    /// The 3D text of the scene
    /// </summary>
    private TextMesh _meetingDisplayTextMesh;
接著替換 Start () 方法,並加入 Awake () 方法。 當類別初始化時,這些會被呼叫:
    /// <summary>
    /// Called on initialization
    /// </summary>
    void Awake()
    {
        Instance = this;
    }

    /// <summary>
    /// Called on initialization, after Awake
    /// </summary>
    void Start ()
    {
        // Creating the text mesh within the scene
        _meetingDisplayTextMesh = CreateMeetingsDisplay();
    }
新增負責建立 會議介面 的方法,並在需要時填入目前的會議:
/// <summary> /// Set the welcome message for the user /// </summary> internal void WelcomeUser(string userName) { if(!string.IsNullOrEmpty(userName)) { _meetingDisplayTextMesh.text = $"Welcome {userName}"; } else { _meetingDisplayTextMesh.text = "Welcome"; } } /// <summary> /// Set up the parameters for the UI text /// </summary> /// <returns>Returns the 3D text in the scene</returns> private TextMesh CreateMeetingsDisplay() { GameObject display = new GameObject(); display.transform.localScale = new Vector3(0.03f, 0.03f, 0.03f); display.transform.position = new Vector3(-3.5f, 2f, 9f); TextMesh textMesh = display.AddComponent<TextMesh>(); textMesh.anchor = TextAnchor.MiddleLeft; textMesh.alignment = TextAlignment.Left; textMesh.fontSize = 80; textMesh.text = "Welcome! \nPlease gaze at the button" + "\nand use the Tap Gesture to display your meetings"; return textMesh; } /// <summary> /// Adds a new Meeting in the UI by chaining the existing UI text /// </summary> internal void AddMeeting(string subject, DateTime dateTime, string location) { string newText = $"\n{_meetingDisplayTextMesh.text}\n\n Meeting,\nSubject: {subject},\nToday at {dateTime},\nLocation: {location}"; _meetingDisplayTextMesh.text = newText; }刪除更新 () 方法,並在返回 Unity 前將變更存入 Visual Studio。
第六章 - 建立圖類
下一個要建立的腳本是 圖 譜腳本。 此腳本負責撥打電話以驗證使用者身份,並從使用者行事曆中取得當天的預定會議。
要建立這個類別:
雙擊腳 本 資料夾,即可開啟。
在 Scripts 資料夾內右鍵點擊「 建立>C# 腳本」。 把腳本命名 為 Graph。
雙擊腳本即可用 Visual Studio 開啟。
插入以下命名空間:
using System.Collections.Generic;
using UnityEngine;
using Microsoft.Identity.Client;
using System;
using System.Threading.Tasks;

#if !UNITY_EDITOR && UNITY_WSA
using System.Net.Http;
using System.Net.Http.Headers;
using Windows.Storage;
#endif
重要事項
你會注意到這個腳本中的部分程式碼是包裹在 預編譯指令(Precompile Directives)上的,這是為了避免在建置 Visual Studio 解決方案時出現函式庫的問題。
刪除 開始 () 並 更新 () 方法,因為它們沒有被使用。
在 Graph 類別之外,插入以下物件,這些物件是反序列化代表每日排程會議的 JSON 物件所必需的:
/// <summary>
/// The object hosting the scheduled meetings
/// </summary>
[Serializable]
public class Rootobject
{
    public List<Value> value;
}

[Serializable]
public class Value
{
    public string subject { get; set; }
    public StartTime start { get; set; }
    public Location location { get; set; }
}

[Serializable]
public class StartTime
{
    public string dateTime;

    private DateTime? _startDateTime;
    public DateTime StartDateTime
    {
        get
        {
            if (_startDateTime != null)
                return _startDateTime.Value;
            DateTime dt;
            DateTime.TryParse(dateTime, out dt);
            _startDateTime = dt;
            return _startDateTime.Value;
        }
    }
}

[Serializable]
public class Location
{
    public string displayName { get; set; }
}
在 圖 類別中,加入以下變數:
    /// <summary>
    /// Insert your Application Id here
    /// </summary>
    private string _appId = "-- Insert your Application Id here --";

    /// <summary>
    /// Application scopes, determine Microsoft Graph accessibility level to user account
    /// </summary>
    private IEnumerable<string> _scopes = new List<string>() { "User.Read", "Calendars.Read" };

    /// <summary>
    /// Microsoft Graph API, user reference
    /// </summary>
    private PublicClientApplication _client;

    /// <summary>
    /// Microsoft Graph API, authentication
    /// </summary>
    private AuthenticationResult _authResult;
注意事項
將 appID 值改成你在第 1 章第 4 步中提到的 App ID。 此數值應與申請 註冊入口 網站中顯示的值相同。
在 Graph 類別中,新增 SignInAsync () 和 AquireTokenAsync () ,提示使用者插入登入憑證。
    /// <summary>
    /// Begin the Sign In process using Microsoft Graph Library
    /// </summary>
    internal async void SignInAsync()
    {
#if !UNITY_EDITOR && UNITY_WSA
        // Set up Grap user settings, determine if needs auth
        ApplicationDataContainer localSettings = ApplicationData.Current.LocalSettings;
        string userId = localSettings.Values["UserId"] as string;
        _client = new PublicClientApplication(_appId);

        // Attempt authentication
        _authResult = await AcquireTokenAsync(_client, _scopes, userId);

        // If authentication is successful, retrieve the meetings
        if (!string.IsNullOrEmpty(_authResult.AccessToken))
        {
            // Once Auth as been completed, find the meetings for the day
            await ListMeetingsAsync(_authResult.AccessToken);
        }
#endif
    }

    /// <summary>
    /// Attempt to retrieve the Access Token by either retrieving
    /// previously stored credentials or by prompting user to Login
    /// </summary>
    private async Task<AuthenticationResult> AcquireTokenAsync(
        IPublicClientApplication app, IEnumerable<string> scopes, string userId)
    {
        IUser user = !string.IsNullOrEmpty(userId) ? app.GetUser(userId) : null;
        string userName = user != null ? user.Name : "null";

        // Once the User name is found, display it as a welcome message
        MeetingsUI.Instance.WelcomeUser(userName);

        // Attempt to Log In the user with a pre-stored token. Only happens
        // in case the user Logged In with this app on this device previously
        try
        {
            _authResult = await app.AcquireTokenSilentAsync(scopes, user);
        }
        catch (MsalUiRequiredException)
        {
            // Pre-stored token not found, prompt the user to log-in
            try
            {
                _authResult = await app.AcquireTokenAsync(scopes);
            }
            catch (MsalException msalex)
            {
                Debug.Log($"Error Acquiring Token: {msalex.Message}");
                return _authResult;
            }
        }

        MeetingsUI.Instance.WelcomeUser(_authResult.User.Name);

#if !UNITY_EDITOR && UNITY_WSA
        ApplicationData.Current.LocalSettings.Values["UserId"] =
        _authResult.User.Identifier;
#endif
        return _authResult;
    }
加入以下兩種方法:
BuildTodayCalendarEndpoint () ,該 URI 會指定預定會議被檢索的日期與時間範圍。
ListMeetingsAsync () ,該系統會從 Microsoft Graph 請求排定的會議。
    /// <summary>
    /// Build the endpoint to retrieve the meetings for the current day.
    /// </summary>
    /// <returns>Returns the Calendar Endpoint</returns>
    public string BuildTodayCalendarEndpoint()
    {
        DateTime startOfTheDay = DateTime.Today.AddDays(0);
        DateTime endOfTheDay = DateTime.Today.AddDays(1);
        DateTime startOfTheDayUTC = startOfTheDay.ToUniversalTime();
        DateTime endOfTheDayUTC = endOfTheDay.ToUniversalTime();

        string todayDate = startOfTheDayUTC.ToString("o");
        string tomorrowDate = endOfTheDayUTC.ToString("o");
        string todayCalendarEndpoint = string.Format(
            "https://graph.microsoft.com/v1.0/me/calendarview?startdatetime={0}&enddatetime={1}",
            todayDate,
            tomorrowDate);

        return todayCalendarEndpoint;
    }

    /// <summary>
    /// Request all the scheduled meetings for the current day.
    /// </summary>
    private async Task ListMeetingsAsync(string accessToken)
    {
#if !UNITY_EDITOR && UNITY_WSA
        var http = new HttpClient();

        http.DefaultRequestHeaders.Authorization =
        new AuthenticationHeaderValue("Bearer", accessToken);
        var response = await http.GetAsync(BuildTodayCalendarEndpoint());

        var jsonResponse = await response.Content.ReadAsStringAsync();

        Rootobject rootObject = new Rootobject();
        try
        {
            // Parse the JSON response.
            rootObject = JsonUtility.FromJson<Rootobject>(jsonResponse);

            // Sort the meeting list by starting time.
            rootObject.value.Sort((x, y) => DateTime.Compare(x.start.StartDateTime, y.start.StartDateTime));

            // Populate the UI with the meetings.
            for (int i = 0; i < rootObject.value.Count; i++)
            {
                MeetingsUI.Instance.AddMeeting(rootObject.value[i].subject,
                                            rootObject.value[i].start.StartDateTime.ToLocalTime(),
                                            rootObject.value[i].location.displayName);
            }
        }
        catch (Exception ex)
        {
            Debug.Log($"Error = {ex.Message}");
            return;
        }
#endif
    }
你現在已經完成 了圖 譜腳本。 在回到 Unity 之前,先把你的變更存到 Visual Studio。
第七章 - 建立 GazeInput 腳本
你現在建立 GazeInput。 這個類別會處理並追蹤使用者的視線,利用來自主鏡頭的射線投射向前方。
要製作腳本:
雙擊腳 本 資料夾,即可開啟。
在 Scripts 資料夾內右鍵點擊「 建立>C# 腳本」。 腳本命名為 GazeInput。
雙擊腳本即可用 Visual Studio 開啟。
將命名空間的程式碼改成與下方相同,並在 GazeInput 類別上方加上「[System.Serializable]」標籤,以便進行序列化:
using UnityEngine;

/// <summary>
/// Class responsible for the User's Gaze interactions
/// </summary>
[System.Serializable]
public class GazeInput : MonoBehaviour
{
在 GazeInput 類別中,加入以下變數:
    [Tooltip("Used to compare whether an object is to be interacted with.")]
    internal string InteractibleTag = "SignInButton";

    /// <summary>
    /// Length of the gaze
    /// </summary>
    internal float GazeMaxDistance = 300;

    /// <summary>
    /// Object currently gazed
    /// </summary>
    internal GameObject FocusedObject { get; private set; }

    internal GameObject oldFocusedObject { get; private set; }

    internal RaycastHit HitInfo { get; private set; }

    /// <summary>
    /// Cursor object visible in the scene
    /// </summary>
    internal GameObject Cursor { get; private set; }

    internal bool Hit { get; private set; }

    internal Vector3 Position { get; private set; }

    internal Vector3 Normal { get; private set; }

    private Vector3 _gazeOrigin;

    private Vector3 _gazeDirection;
新增 CreateCursor () 方法,在場景中建立 HoloLens 游標,並從 Start () 方法呼叫該方法:
    /// <summary>
    /// Start method used upon initialisation.
    /// </summary>
    internal virtual void Start()
    {
        FocusedObject = null;
        Cursor = CreateCursor();
    }

    /// <summary>
    /// Method to create a cursor object.
    /// </summary>
    internal GameObject CreateCursor()
    {
        GameObject newCursor = GameObject.CreatePrimitive(PrimitiveType.Sphere);
        newCursor.SetActive(false);
        // Remove the collider, so it doesn't block raycast.
        Destroy(newCursor.GetComponent<SphereCollider>());
        newCursor.transform.localScale = new Vector3(0.05f, 0.05f, 0.05f);
        Material mat = new Material(Shader.Find("Diffuse"));
        newCursor.GetComponent<MeshRenderer>().material = mat;
        mat.color = Color.HSVToRGB(0.0223f, 0.7922f, 1.000f);
        newCursor.SetActive(true);

        return newCursor;
    }
以下方法可啟用凝視射線投射並追蹤聚焦物體。
/// <summary>
/// Called every frame
/// </summary>
internal virtual void Update()
{
    _gazeOrigin = Camera.main.transform.position;

    _gazeDirection = Camera.main.transform.forward;

    UpdateRaycast();
}
/// <summary>
/// Reset the old focused object, stop the gaze timer, and send data if it
/// is greater than one.
/// </summary>
private void ResetFocusedObject()
{
    // Ensure the old focused object is not null.
    if (oldFocusedObject != null)
    {
        if (oldFocusedObject.CompareTag(InteractibleTag))
        {
            // Provide the 'Gaze Exited' event.
            oldFocusedObject.SendMessage("OnGazeExited", SendMessageOptions.DontRequireReceiver);
        }
    }
}
private void UpdateRaycast() { // Set the old focused gameobject. oldFocusedObject = FocusedObject; RaycastHit hitInfo; // Initialise Raycasting. Hit = Physics.Raycast(_gazeOrigin, _gazeDirection, out hitInfo, GazeMaxDistance); HitInfo = hitInfo; // Check whether raycast has hit. if (Hit == true) { Position = hitInfo.point; Normal = hitInfo.normal; // Check whether the hit has a collider. if (hitInfo.collider != null) { // Set the focused object with what the user just looked at. FocusedObject = hitInfo.collider.gameObject; } else { // Object looked on is not valid, set focused gameobject to null. FocusedObject = null; } } else { // No object looked upon, set focused gameobject to null. FocusedObject = null; // Provide default position for cursor. Position = _gazeOrigin + (_gazeDirection * GazeMaxDistance); // Provide a default normal. Normal = _gazeDirection; } // Lerp the cursor to the given position, which helps to stabilize the gaze. Cursor.transform.position = Vector3.Lerp(Cursor.transform.position, Position, 0.6f); // Check whether the previous focused object is this same. If so, reset the focused object. if (FocusedObject != oldFocusedObject) { ResetFocusedObject(); if (FocusedObject != null) { if (FocusedObject.CompareTag(InteractibleTag)) { // Provide the 'Gaze Entered' event. FocusedObject.SendMessage("OnGazeEntered", SendMessageOptions.DontRequireReceiver); } } } }在回到 Unity 之前,先把你的變更存到 Visual Studio。
第八章 - 創建互動課程
你現在需要建立 Interactions 腳本,它負責:
處理點擊互動與攝影機凝視,讓使用者能與場景中的登入「按鈕」互動。
在場景中建立登入的「按鈕」物件,讓使用者可以互動。
要製作腳本:
雙擊腳 本 資料夾,即可開啟。
在 Scripts 資料夾內右鍵點擊「 建立>C# 腳本」。 劇本名稱 為「互動」。
雙擊腳本即可用 Visual Studio 開啟。
插入以下命名空間:
using UnityEngine;
using UnityEngine.XR.WSA.Input;
將 互動 類別的繼承從從 MonoBehaviour 改為 GazeInput。
公共類別互動:單一行為public class Interactions : GazeInput在 Interaction 類別中,插入以下變數:
    /// <summary>
    /// Allows input recognition with the HoloLens
    /// </summary>
    private GestureRecognizer _gestureRecognizer;
取代 Start 方法;請注意,這是一個覆寫方法,稱為「基礎」凝視類別方法。 當類別初始化時會呼叫開始 () ,註冊輸入辨識並在場景中建立登入按鈕:
    /// <summary>
    /// Called on initialization, after Awake
    /// </summary>
    internal override void Start()
    {
        base.Start();

        // Register the application to recognize HoloLens user inputs
        _gestureRecognizer = new GestureRecognizer();
        _gestureRecognizer.SetRecognizableGestures(GestureSettings.Tap);
        _gestureRecognizer.Tapped += GestureRecognizer_Tapped;
        _gestureRecognizer.StartCapturingGestures();

        // Add the Graph script to this object
        gameObject.AddComponent<MeetingsUI>();
        CreateSignInButton();
    }
新增 CreateSignInButton () 方法,該方法會在場景中實例化登入 按鈕 並設定其屬性:
    /// <summary>
    /// Create the sign in button object in the scene
    /// and sets its properties
    /// </summary>
    void CreateSignInButton()
    {
        GameObject signInButton = GameObject.CreatePrimitive(PrimitiveType.Sphere);

        Material mat = new Material(Shader.Find("Diffuse"));
        signInButton.GetComponent<Renderer>().material = mat;
        mat.color = Color.blue;

        signInButton.transform.position = new Vector3(3.5f, 2f, 9f);
        signInButton.tag = "SignInButton";
        signInButton.AddComponent<Graph>();
    }
新增 GestureRecognizer_Tapped () 方法,也就是回應 Tap 使用者事件。
/// <summary> /// Detects the User Tap Input /// </summary> private void GestureRecognizer_Tapped(TappedEventArgs obj) { if(base.FocusedObject != null) { Debug.Log($"TAP on {base.FocusedObject.name}"); base.FocusedObject.SendMessage("SignInAsync", SendMessageOptions.RequireReceiver); } }刪除Update () 方法,然後在 Visual Studio 儲存你的更改 ,再回到 Unity。
第九章 - 設定劇本參考
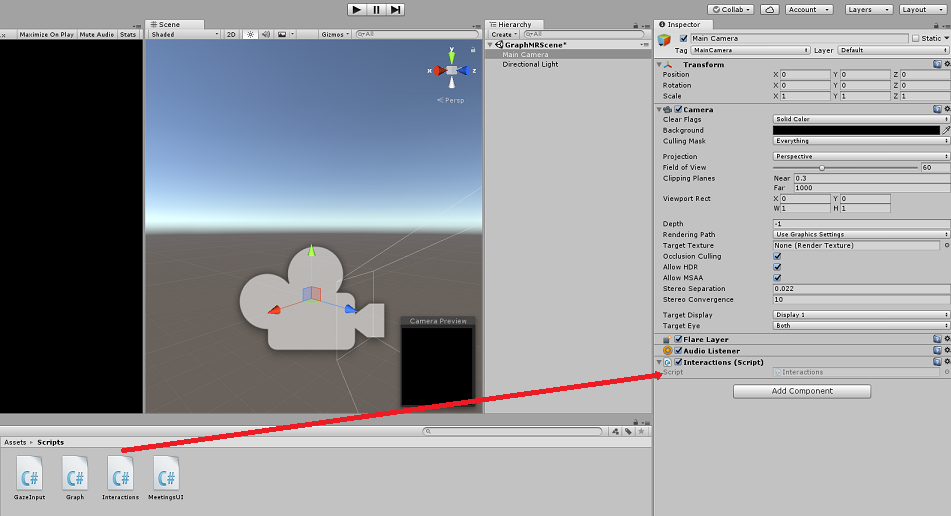
在這個章節中,你需要將 互動 腳本放在 主鏡頭上。 這個腳本接著會把其他腳本放到需要的位置。
從專案面板的 Scripts 資料夾,將腳本 Interactions 拖曳到主攝影機物件,如下圖所示。
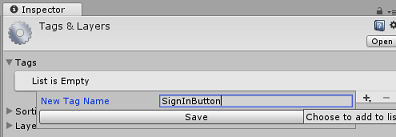
第十章 - 設定標籤
處理凝視的程式碼利用 Tag SignInButton 來識別使用者在登入 Microsoft Graph 時互動的物件。
要建立標籤:
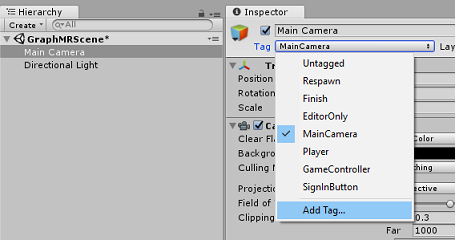
在 Unity 編輯器中,點擊階層面板中的主鏡頭。
在 檢查面板 中點選 MainCamera標籤 可開啟下拉選單。 點擊 新增標籤...
點擊按鈕 + 。
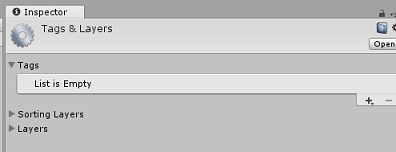
把標籤名稱寫成 SignInButton ,然後點 選儲存。
第十一章 - 將 Unity 專案建置到 UWP
這個專案 Unity 部分所需的一切現已完成,現在是時候從 Unity 上建構它。
請前往建置設定 (檔案>建置設定) 。
如果還沒,記得點選 Unity C# 專案。
點擊 「建造」。 Unity 會啟動一個檔案總管視窗,你需要在那裡建立並選擇一個資料夾來建置應用程式。 現在就建立那個資料夾,並命名為 App。 然後選擇 App 資料夾,點選「 選擇資料夾」。
Unity 開始將你的專案建置到 App 資料夾。
Unity 完成建置 (可能需要一些時間) ,它會在建置地點開啟一個檔案總管視窗 (查看工作列,因為這個視窗不一定總是出現在視窗上方,但會通知你新增了一個新視窗) 。
第十二章 - 部署到全息鏡頭
在 HoloLens 上部署:
你需要 HoloLens (的 IP 位址,才能進行遠端部署) ,並確保你的 HoloLens 處於 開發者模式。 若要執行這項作業:
戴著全息鏡片時, 打開設定。
前往 網路 & 網路>Wi-Fi>進階選項
請注意 IPv4 位址。
接著,回到設定,然後 & 開發者更新安全>
開啟 開發者模式。
) App 資料夾 (新的 Unity 建置,並用 Visual Studio 開啟解決方案檔案。
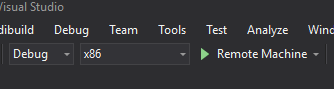
在解決方案設定中選擇除錯。
在 解決方案平台中,選擇 x86,遠端機器。 系統會提示你將遠端裝置的 IP 位址 (HoloLens 輸入,這裡是你) 注意到的。
到 建置 選單,點選 部署解決方案 ,將應用程式側載到你的 HoloLens。
你的應用程式現在應該會出現在 HoloLens 已安裝的應用程式清單中,準備啟動!
您的 Microsoft Graph HoloLens 應用程式
恭喜你,你打造了一款結合 Microsoft Graph 的混合實境應用程式,能讀取並顯示使用者行事曆資料。
額外練習
練習一
使用 Microsoft Graph 來顯示使用者的其他資訊
- 使用者電子郵件/電話號碼/大頭貼
練習一
實作語音控制來導航 Microsoft Graph 介面。