Note
Access to this page requires authorization. You can try signing in or changing directories.
Access to this page requires authorization. You can try changing directories.
The Retail Interest Group by Dynamics 365 Commerce has moved from Yammer to Viva Engage. If you don't have access to the new Viva Engage community, fill out this form (https://aka.ms/JoinD365commerceVivaEngageCommunity) to be added and stay engaged in the latest discussions.
Important
Some or all of the functionality noted in this article is available as part of a preview release. The content and the functionality are subject to change. For more information about preview releases, see One version service updates FAQ.
This article explains how to set up and enable the pay by link payment method to capture payments using the Microsoft Dynamics 365 Payment Connector for Adyen.
Pay by link functionality enables merchants to offer modern payment methods that give customers the flexibility to choose their preferred payment method. Pay by link eliminates the need for a payment terminal. Therefore, store associates can be mobile and accept various types of payments. In addition, pay by link enables customers to pay from their current location. In this way, it can help reduce checkout lines and therefore expedite the checkout process.
Note
Starting with Commerce version 10.0.46, pay by link functionality is also available for orders created from point of sale (POS) and call center.
Prerequisites
Enable OAuth authentication
Payment notifications for the pay by link payment method use Open Authorization (OAuth)–based authentication. Starting with Commerce version 10.0.46, OAuth-related fields are available by default. For earlier Commerce versions, you must contact Microsoft Support and ask to have the flight enabled in your Commerce environments.
Link your Commerce environment to a Dataverse environment
The payment notification service uses Dataverse. Therefore, to receive payment notifications, you must link your Commerce environment to a corresponding Dataverse environment. Learn more in Connect finance and operations apps with a new Microsoft Dataverse instance and Connect finance and operations apps with an existing Microsoft Dataverse instance.
Minimum required versions
Pay by link for cash and carry transactions is available starting with the Commerce 10.0.44 release. The following minimum versions of the various components are required:
- Store Commerce app/Cloud POS: Version 9.54.25148.1, or any version starting with Commerce version 10.0.45.
- Commerce Scale Unit (CSU): Version 9.54.25295.4 for Commerce version 10.0.44, and version 9.55.25295.1 starting with Commerce version 10.0.45.
- Commerce headquarters: 10.0.44 and any version for 10.0.45
Note
Pay by link functionality for customer orders in POS and call center is available starting with the Commerce 10.0.46 release. However, these capabilities are in private preview.
Required role to complete the setup
Some of the steps require a Commerce headquarters user who is either an administrator or has the Commerce Payment Administrator role assigned to them in Microsoft Power platform.
Setup
Enable the features required for pay by link
To enable payment notifications for pay by link, you must enable the following features in the Feature management workspace:
- Enhanced wallet support and payment improvements. Learn more in Wallet payment support.
- The unified payments experience in POS. Learn more in Check out faster with optimized payment flows.
- The Enable Payments Notification feature.
- The Enable Pay By Link Payment feature.
Create a webhook to receive payment notifications from Adyen
The following information is required to create a webhook in the Adyen portal:
- The URL of the payment notification service
- OAuth credentials for authentication against the payment notification service
The payment notification service URL is where Adyen sends the notifications. You can get this URL from Commerce headquarters. Go to Commerce shared parameters > Payment notifications, and copy the value of the Payment notifications end point URL field. If the field is blank, the Commerce environment isn't linked to a Dataverse environment. In this case, contact your Commerce administrator or Microsoft Support for help.
To create the OAuth credentials, you must register a new application in the Azure portal. Payment notifications from Adyen then use the new application's credentials to communicate securely with the payment notification service.
Register a new application in the Azure portal
To register a new application in the Azure portal, follow these steps.
Sign in to the Azure portal by using a work or school account.
If your account gives you access to more than one tenant, select your account in the upper-right corner. Then set your portal session to the Microsoft Entra tenant that you want.
In the left pane, select the Microsoft Entra ID service, and then select App registrations > New registration.
On the Register an application page, enter your application's registration information:
- Name: Enter a meaningful application name. This name is shown to users of the app.
- Supported account types: Any of the available options should work.
- Redirect URI: This field isn't needed.
Select Register.
After the new application is registered, on the Overview page, copy the values of the following properties:
- Application (client) ID
- Directory (tenant) ID
Next, you must create a client secret for the application. Go to the Certificates & secrets section, and then select New client secret. Provide a description and an expiration period for the secret. Ensure that you create a business process for rotating the secret, because payment notifications fail after the secret expires. Copy the secret value, and save it somewhere for later use.
To create a new webhook, follow these steps.
Go to the Adyen portal, and then go to the Developers section.
Create a standard webhook.
In the Server configuration section, in the URL field, paste the Payment notifications endpoint URL value that you copied earlier.
Keep the default values for the Method field (JSON) and the Encryption protocol fields (TLS v1.3).
In the Security section, select OAuth, and enter values for the following properties:
- Client ID: Enter the Application (client) ID value that you copied earlier.
- Client secret: Enter the Secret value value that you copied earlier.
- URL: Enter
https://login.microsoftonline.com/{tenantid}/oauth2/v2.0/token. Replace {tenantID} with the Directory (tenant) ID value that you copied earlier. - Scope: Enter a013b12b-2624-40b4-b15b-b7751d733a22/.default.

Generate a new Hash-based Message Authentication Code (HMAC) key, and copy it. You aren't able to view this key again, so keep it somewhere safe.
In the Events section, select Authorization.
Under Additional settings, in the Card section, select the Include card bin and Include Subvariant options.
Leave the remaining fields set to their default values, and save the configuration.
Note
Don't test the configuration yet, because the setup isn't completed. The configuration is validated after the next step.
Important
- If you save the configuration on the Adyen portal and it generates a Domain could not be resolved error message, it's due to a known issue with the placement of the period (.) separator in the subdomain segment of the payment notification endpoint URL. The period (.) separating the subdomain segments is currently placed one character too far to the right. This issue is resolved in Commerce version 10.0.45.
- To resolve the issue for Commerce versions before 10.0.45, move the period separator one character to the left so that the second segment contains two characters instead of one. This adjustment ensures that the URL resolves correctly and can be used to create a webhook.
- For example, if the incorrect URL format is
<30 or 31 characters>.<1 character>.organization.api.powerplatform.com/dynamics/api/payment/notifications/1, the correct URL format should be:<29 or 30 characters>.<2 characters>.organization.api.powerplatform.com/dynamics/api/payment/notifications/1. Put differently, if the incorrect URL ishttps://xxxxxxxxxxxxxxxxxxxxxxxxxxxabc5.0.organization.api.powerplatform.com/dynamics/api/payment/notifications/1, it should be modified to behttps://xxxxxxxxxxxxxxxxxxxxxxxxxxxabc.50.organization.api.powerplatform.com/dynamics/api/payment/notifications/1. - If you need assistance identifying or correcting the payment notification endpoint URL in your configuration, contact Microsoft support.
Update Commerce headquarters with the HMAC and application client ID details to authenticate the payment notifications sent by Adyen
To update the details to authenticate the payment notifications that Adyen sends, follow these steps.
In headquarters, go to Commerce shared parameters.
In the Payment notification section, enter values for the following properties:
- Data verification HMAC key: Enter the HMAC key that you copied earlier.
- Payment notifications client ID: Enter the Application (client) ID value that you copied earlier.
Save the configuration.
Note
Only Commerce headquarters users who have either the Administrator or Commerce Payment Administrator role in Microsoft Power Platform can save the configuration.
Test the connection to the payment notification service
To test the connection, follow these steps.
- Go to the Adyen portal.
- Edit the webhook that you created earlier, and then select Test configuration. If the connection fails, review all the values that you entered when you created the webhook to validate that they're correct. If you make any changes (for example, if you change the keys), wait 20 minutes before you test the connection again. In this way, you ensure that caching doesn't affect the test. If the issue persists, contact Microsoft Support.
Set up the pay by link payment method for the store
You can create the pay by link payment method either as a dedicated button, or as a new payment method that appears in the list of payment methods. You can also add it to the existing payment method that was created for credit/debit cards. In this way, when a cashier selects the existing payment method, the POS shows pay by link as one of the input types for payment capture.
In both cases, the pay by link option is shown only if the administrator selects Pay By Link as a payment input type for a payment method. In headquarters, open the Payment methods page, and select a payment method. Then, on the Action Pane, select Payment Input Type. To create a dedicated payment method for pay by link, select only Pay By Link on the Payment Input Type page. To add pay by link as one of the input type options for capturing payments, select Pay By Link together with Payment on terminal and Manual entry (optional).
Note
The Payment Input Type button is available only for payment methods where the Function field is set to Card or Wallet, and the Operation name field is set to Pay card.

If Manual entry is added as a payment input type, when a cashier selects the payment method in POS, the customer is prompted to manually enter their credit card number on the payment terminal. In addition, when the manual entry option is enabled, the Allow manual card numbers property (Electronic payment setup > Allow manual card numbers) is set to True and disabled. If the manual entry option is removed, the Allow manual card numbers property remains disabled, but it can be edited by the user.
To support payment options such as Quick Response (QR) code–based wallets, setup of bin ranges isn't sufficient. New card types must be created and mapped to corresponding payment variants. These card types must be added to the payment method where pay by link is enabled. Learn more in Wallet payment support.
Note
If you create a new payment method for pay by link, you don't have to add electronic payment types that were previously added to other payment methods that are available for the store. For example, if the Visa, Mastercard, American Express payment types were previously added to the Cards payment method, you don't have to add them to the pay by link payment method. The system looks through all the payment methods that are associated with the store to find a matching electronic payment type that's used for payments.
Pay by link doesn't require that Hardware station is enabled for Cloud POS or the Store Commerce app. If you want to use pay by link with a register that isn't paired with a hardware station, you must configure the register to use Commerce Scale Unit for "card not present" processing. (Commerce Scale Unit is also known as Retail Server.) In headquarters, open the register page, and then, in the General section, set the Card not present processing field to Use retail server.
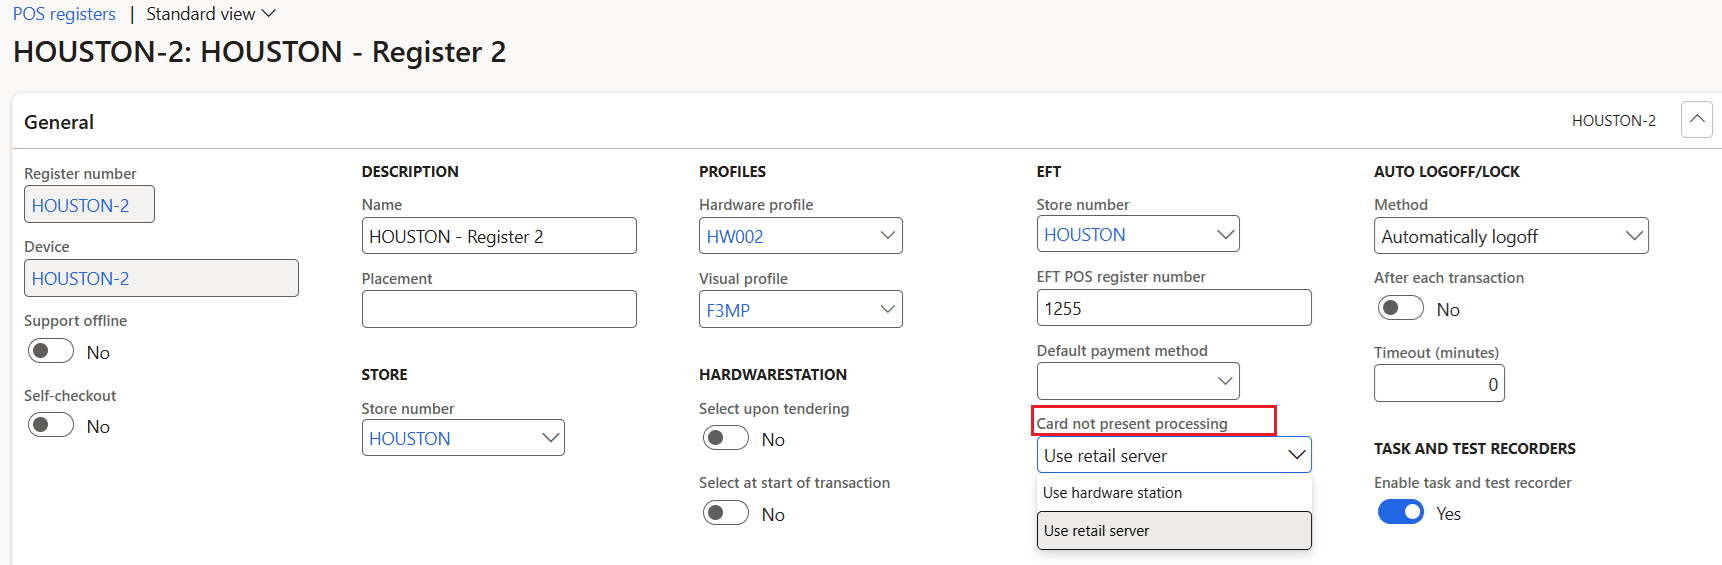
Important
If you don't intend to pair a hardware station with POS, contact Microsoft Support, and ask to have the Payments.PayByLinkVisibleWhenHWSOrTerminalInactive flight enabled in your environment. This flight is automatically enabled as of Commerce version 10.0.45.
Define the behavior for the payment link
You can control some payment link experiences by configuring key-value pairs in the Custom Settings property in the Adyen connector that's used for the register or store (in the case of call center orders). You can control the following experiences:
- Payment expiration duration
- To control this value for cash and carry transactions, add a value for the PaymentLinkDuration key.
- To control this value for customer orders, add a value for the PaymentLinkDuration_Orders key.
- Inclusion of the Adyen store information in the payment link - To control this experience, add a value for the Store key.
- Requirement for shoppers to enter their information before payment - To control this experience, add a value for the RequiredShopperFields key.
You can skip any of the preceding key-value pairs in Custom Settings. If you don't add a value for the PaymentLinkDuration key, Adyen's default duration of 24 hours is used. If you don't add a value for the Store key, only payment methods that don't depend on the Adyen store are shown. If you don't add a value for the RequiredShopperFields key, the related fields aren't shown to customers before they use the payment link.
For example, you add the value {"PaymentLinkDuration":"02:00", "Store":"Test_Store", "RequiredShopperFields":"email,name,phone,billingAddress,deliveryAddress"} for the Custom Settings property. In this case, the Adyen payment connector sets the payment link expiration to two hours, the payment link is associated with the Test_Store store, and customers must enter their name, email address, phone number, delivery address, and billing address before they make the payment.
[!NOTE} To define the payment link duration to be more than one day, see System.TimeSpan.Parse method for instructions on how to specify the value for the PaymentLinkDuration property.
For test environments, you must set the Gateway environment property of the Adyen connector in the hardware profile to Test. For production environments, set the value of the Gateway environment property to Live (or a region-specific value), and set the Optional Domain property to the prefix value specified in the Adyen customer portal.
To set up the Adyen connector in the hardware profile, follow these steps.
- Sign in to the live environment of the Adyen customer portal.
- In the left pane, under Developers, select API URLs.
- For Select a data center, select the appropriate data center, based on your region.
- Copy the prefix value, and paste it into the Optional Domain property field of the Adyen connector.
- Run the 9999 distribution schedule job.
Payment experience when using pay by link for cash and carry transactions
When the pay by link payment method is selected, the POS displays a dialog. This dialog shows basic customer information, such as the name, email address, and primary delivery address. The values are automatically taken from the customer who is added to the transaction. However, the cashier can change the values before they create the payment link. If no customer is added to the transaction, the name and email fields are blank, and the store's address is used as the default delivery address.
Although none of this information is required to generate the payment link, the information is recorded against the customer details for the payment link. Some payment methods might require some of this payment information, so those payment methods don't work if the information is missing.
After the payment link is created, the system shows the payment link and a corresponding QR code. The cashier can copy the payment link and send it to the customer via any communication method that's available on their device. Alternatively, the customer can scan the QR code from their phone.
The payment link is an Adyen-hosted webpage that can be branded to meet your needs. To learn more about the branding options, contact Adyen.
Some payment methods, such as "buy now, pay later," require that a billing address is provided for the customer. By default, the payment link created excludes billing address information. If the RequiredShopperFields:billingAddress key-value pair is added in the Custom Settings property of the hardware profile, when the payment link is opened, the customer must enter their billing address to view the payment options.
While the customer is making the payment, the system automatically checks the payment status every five seconds. The cashier can also manually check the payment status by selecting Check status.
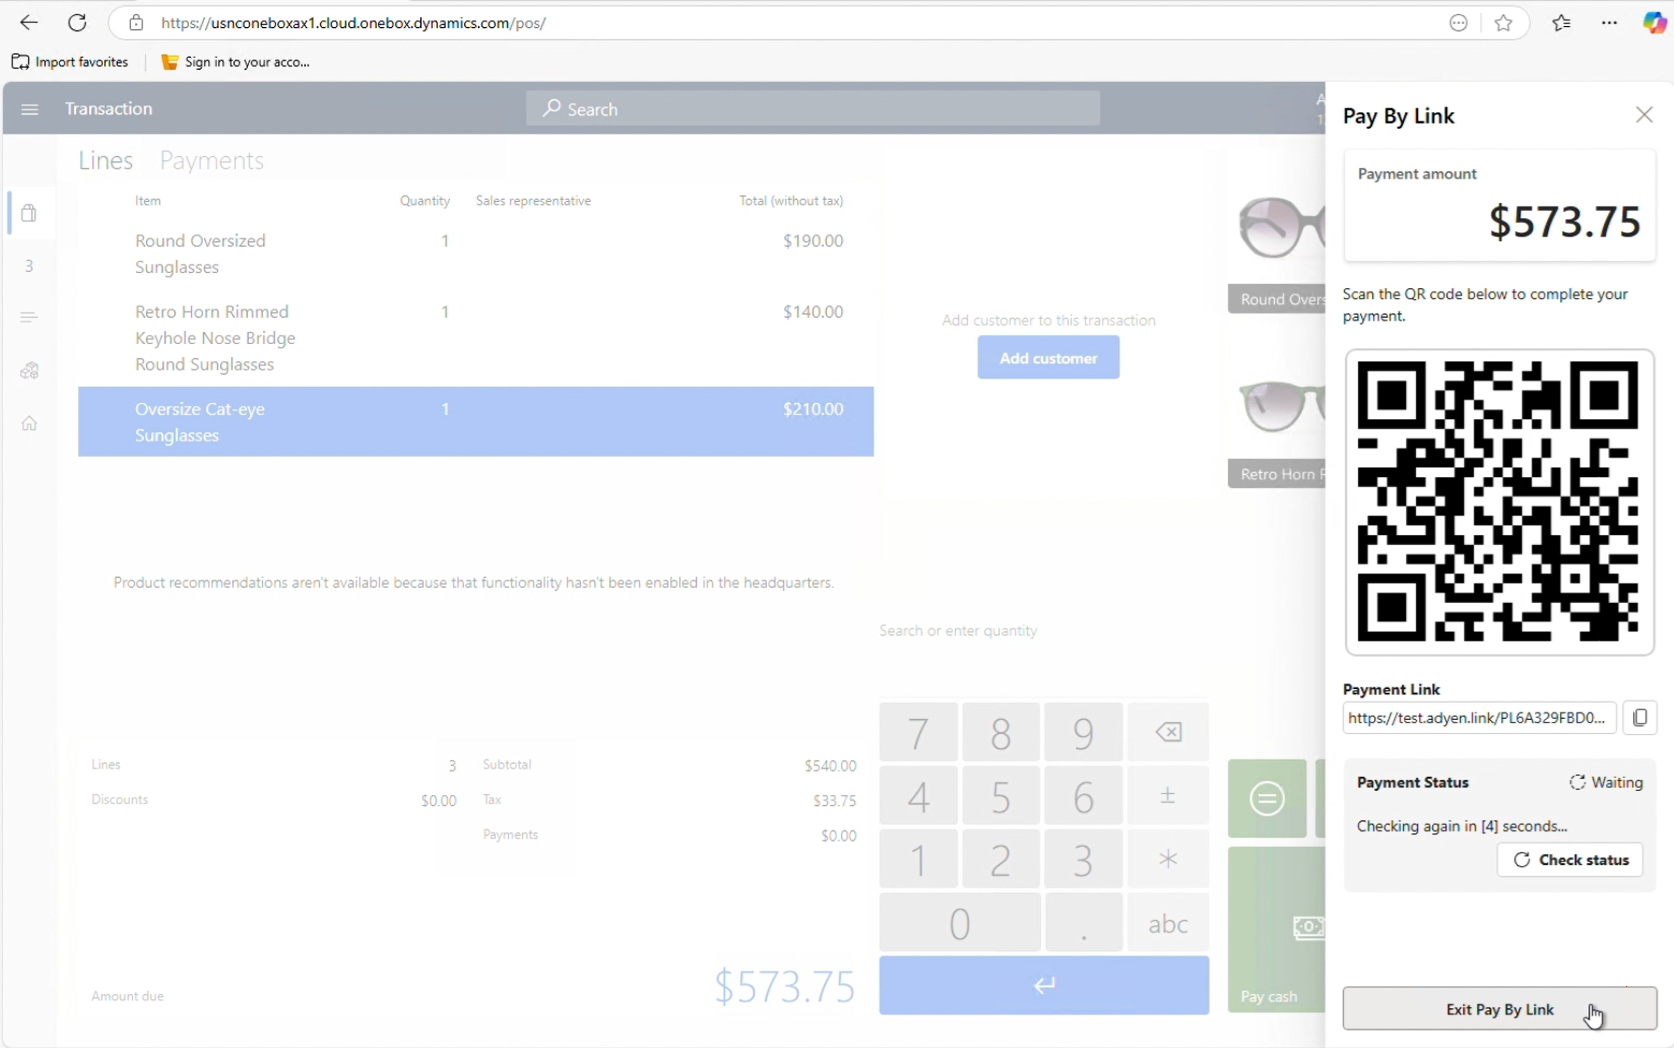
Sometimes, the cashier might have to cancel the payment link. For example, cancellation might be required because the customer wants to add or remove items. In this case, the cashier can select Exit Pay By Link and then Cancel payment link. After the payment link is canceled, it expires and can't be used to accept payments.
If the customer needs more time, and the cashier wants to help other customers in the meantime, the cashier can select Cancel payment link and then Suspend payment link. If the cashier has the required permissions, this action suspends the transaction. The cashier can then help the next customer in line. This action can also be helpful for "line busting" scenarios, where a store associate scans customer items, generates a payment link, and then suspends the transaction. The customer can then make the payment at any time before they reach the counter. When they reach the counter, the cashier can resume the suspended transaction and check for the payment. If the payment was received, a payment line is added when the transaction is resumed. If the payment wasn't received, the cashier can check the payment status by viewing the incomplete payment line in the Payments section of the transaction.
Suspended transactions
The suspended transaction screen now includes a Has payment link column. A value of Yes in this column indicates that a transaction that has an active payment link was suspended. The cashier can select suspended transactions and try to void them. The system first automatically expires any unused payment links for those transactions. However, used payment links remain unchanged. We recommend that the cashier checks the payment status of suspended transactions before they void the transactions.
When the shift is being closed, if the Void when closing shift configuration is enabled in the functionality profile for the store, the system follows the previously described logic. It tries to expire unused payment links before the suspended transactions are voided.
In Commerce version 10.0.44, the pay by link payment method supports scenarios where the payment must be captured, and the customer is in the store and wants to make a payment. Pay by link can also be used to capture customer order deposits, payment for invoices, and customer account deposits in POS. In future releases, the capability to create orders that have pending payments allow for other scenarios. For example, a store associate can create a customer order that has the customer's shipping details and generate a payment link for the customer. The customer can then make the payment whenever they're ready. If the payment isn't received within the predefined duration, the order is canceled.
Payment link for customer orders in POS
Customers visiting a physical store often like the products on display, but need more time to evaluate before making a purchase. When customers are ready to purchase products, they often choose to order them online because they'd rather avoid another trip to the physical store. This not only results in the loss of sale for the physical store, but also a lost commission for the store associate who helped the customer evaluate the product. To mitigate such losses, stores can use the Adyen connector's pay by link functionality to create the order and email the corresponding payment link to the customer. If the customer makes a payment within a predefined duration, then the order can be released for processing, otherwise the system cancels the order. This flow ensures that the sale is credited to the store and the store associate who helped the customer with the sale.
Note
This feature is available as a private preview starting with Commerce version 10.0.46.
Set up pay by link functionality for orders in POS
In addition to the generic pay by link setup described earlier in this article, the following additional steps are required to enable the pay later via payment link functionality.
To enable the pay later via payment link functionality, follow these steps.
In Commerce headquarters, enable the Enable asynchronous payments for sales orders feature in the Feature management workspace. However, since this feature is a private preview feature, you must first contact Microsoft support to include this feature in your environment.
To ensure that all the new tables are initialized, run the Initialize commerce scheduler job while keeping the Delete existing configuration and Update subjobs only configurations set to No.
Define the hold code to be applied to orders to be paid later via a payment link. To do so, go to the Account receivable parameters > General > Sales setup FastTab, and for the Hold code for payment confirmation configuration, select a hold code.
Define the duration in minutes that is allowed for the customer to make a payment for the order. If the customer doesn't make a payment during this duration, then the system cancels the order. To define the payment duration, go to the Account receivable parameters > General > Sales setup FastTab and select a value for the Order hold timeout for pending payments (minutes) configuration.
By default, only managers can create orders with deferred payments. To grant this permission to a worker, you must enable the Allow conclude transaction with deferred payments POS permission for the worker, and then associate this permission to a new operation named Conclude and pay later.
Schedule the Process asynchronous payments for sales orders batch job to run at the desired interval (for example, every 15 minutes) to check for customer payments.
To automatically send the payment link to the customer, follow the instructions in Set up an email notification profile to enable the standard email capability in Commerce headquarters.
For the email notification profile associated with the store, add a new Payment link created email notification type and define the email format for this event. You can add the following properties to the email format to send the payment link related details:
- paymentlinkurl: The payment link URL
- paymentlinkamountdue: The amount associated with the payment link.
- paymentlinkid: The payment link ID.
- referenceid: The merchant reference ID.
- paymentlinkqrcode: The QR code for the payment link URL. This field is only supported for the payment link created and canceled via call center, not for POS.
Note
There's an additional Payment link canceled email notification type that can send an email when the payment link is canceled. However, as of Commerce version as of 10.0.46, the Payment link canceled notification type is only supported for the call center orders and not for POS.
Run the 9999 distribution schedule job to ensure that the setup data is synchronized with the channel database.
End-to-end user experience for customer orders in POS
The following example describes a typical end-to-end user experience for customer orders in POS.
A sales associate helps a customer choose a chair in the physical store, but the customer needs more time to decide.
The sales associate suggests that they can reserve the chair, and if the customer decides to buy it later and makes a payment within 24 hours, they can ship it to the customer's home. The customer agrees.
The sales associate creates a customer record, adds the item to the cart, adds the shipping address, and generates a payment link. If an email notification profile is configured in headquarters, then an email is sent to the customer with the payment link details. The email address used is the address provided during payment link creation.
Note
Order-related emails such as order creation and order fulfillment go to the email address associated with the order, which could be different from the email address provided during payment link creation.
On the Pay by Link dialog, the sales associate selects Exit Pay By Link, and then selects Conclude and pay later to complete the transaction. These actions put the order on hold and inventory is reserved against the order.
Later that day, the customer decides to buy the chair and opens the payment link from the email that was sent earlier. The customer selects a payment option from the list displayed on the payment page and completes the payment.
After a few minutes, the Process asynchronous payments for sales orders batch job runs, which processes the payment, links it with the order, and removes the order from hold.
If the customer doesn't pay the order within the specified duration window, the Process asynchronous payments for sales orders batch job cancels the order.
Manually check the payment status for an order
Call center users can manually check the payment status of an order.
To manually check the payment status of an order, follow these steps.
- In headquarters, go to the All sales orders form and open the sales order waiting for payment.
- On the Sales order tab, under the Payments submenu, select Asynchronous payments. This action opens a form with the payment links associated with the order. If the payment link status is shown as Active, the payments against this link are either not yet processed or the customer hasn't yet paid.
- To check the latest status, select Check status to reload the current payment link status. This form also has a Cancel button to cancel the payment link. The payment link can only be canceled if the customer hasn't yet used the link for payment.
Payment link for call center orders
Sending a payment link to customers via email for phone orders provides customers with a wide range of payment options, providing convenience and flexibility. This process builds customer trust because it avoids the need to ask for the customer's phone number while on the call.
Note
This feature is available as a private preview in the Commerce version 10.0.46 release.
Set up for pay by link for orders in call center
To set up for pay by link for orders in call center, complete the setup steps described in Payment-link-for-customer-orders-in-POS. After you complete the setup steps, the following changes should appear.
- The Enable asynchronous payments for sales orders feature is enabled.
- The Hold code for payment confirmation and Order hold timeout for pending payments (minutes) account receivable parameter configurations are updated.
- The Process asynchronous payments for sales orders batch job is configured to check for payment status by running at the desired duration interval.
- Automated emails are configured, if needed.
To finish setting up pay by link for orders in call center, follow these steps.
- Go to the call center channel and open the payment methods associated with the channel.
- Select the payment method defined to accept cards. The payment method's Function property should be set to Card, and it should be mapped to the Pay card operation.
- A Payment input type button must be enabled for the payment method. To enable the button, open the Payment input type form and select from the two available options, Manual entry and Pay By Link. Manual entry enables manual card entry, while the Pay By Link option enables the creation of a payment link. This scenario is similar to how the payment input type is defined for the physical stores as described in Set up the pay by link payment method for the store.
With this configuration, when the call center user opens the payment experience, all the card types (for example, Visa and Mastercard) show two options: Manual entry and Pay By Link. Call center users can then select a card type and create a payment link. However, the customer can select any available payment method shown on the payment link. To avoid any confusion for call center users, you can optionally create a new Card type (for example, Payment link) and add it as an Electronic payment method to the existing payment method for the call center channel. With this setup, when call center users open the payment experience, on the Payments dropdown menu they see Payment link as one of the card options. Call center users can select this card type, and then select the Pay by Link option to create the payment link. When the customer accesses the payment link, they can select any available payment method, and a corresponding payment line is added to the order with the appropriate payment method used (for example, Visa or Mastercard).
To enable the functionality to allow customers to pay the money later via a payment link, in headquarters go to the Call center parameters form. On the Payments tab, enable the Allow pay later configuration. This optional step is only required if you want to support the pay later functionality. Without this functionality enabled, customers must make a payment via a payment link while on the call with a call center user.
End-to-end user experience for call center orders
The following example describes a typical end-to-end user experience for a call center order.
- A call center user helps create an order for a customer over the phone.
- When the order is ready for payment, the call center user selects Complete on the sales order. A sales order summary with a Payment section opens.
- The call center user selects any of the existing card types from the list of supported payment methods, or selects the Payment link card type and then selects the Payment input type as Pay By Link. A form is displayed used for creating the payment link that has the customer information prepopulated.
- After the call center user updates the customer information as needed, the call center user selects Create link to create the payment link. If an email notification profile is configured in headquarters, the system sends an email to the customer with the payment link details.
- If the customer changes their mind or requests more time for making a payment, the call center user can either cancel the payment link from the payment link dialog, or they can use the Pay later option if the functionality is enabled in the call center parameters. If the Pay later option is used, the order is placed on a hold and the customer can make a payment within the predefined duration window to process the order. Otherwise, the system cancels the order.
- The customer opens the payment link from their phone or computer to complete the payment.
- The call center user's screen is automatically refreshed every five seconds to check if the payment is tendered. Once the payment is received, a corresponding payment line is added to the order as Authorized.
- The call center user submits the order and completes the sale.
Manually check the payment status for a call center order
Call center users can manually check the payment status of a call center order.
To manually check the payment status of a call center order, follow these steps.
- In headquarters, go to the All sales orders form and open the sales order waiting for payment.
- On the Sales order tab, under the Payments submenu, select Asynchronous payments. This action opens a form with the payment links associated with the order. If the payment link status is shown as Active, the payments against this link are either not yet processed or the customer hasn't yet paid.
- To check the latest status, select Check status to reload the current payment link status. This form also has a Cancel button to cancel the payment link. The payment link can only be canceled if the customer hasn't yet used the link for payment.
Known limitations of the pay by link payment method
The pay by link payment method has the following known limitations:
- The pay by link payment method doesn't support unreferenced returns. Therefore, a payment link can't be generated for negative amounts. However, the original payment is automatically refunded if there are referenced returns.
- The pay by link payment method only supports payment capture. The links can't be used to authorize the remaining balance on customer orders.
- For Commerce version 10.0.44, the pay by link payment method doesn't support partial payments using the payment link. In addition, customers can't use a gift card to pay part of the amount and then use a different payment method to pay the balance. Instead, the cashier can create a payment link for the partial amount and send it to the customer. After the payment is received, the cashier can create a second link for the balance. This limitation is mitigated in Commerce version 10.0.45.
- No payment link can be created while the POS is in offline mode. If a payment link is created while the POS is online, but the POS then goes offline, the system can't check the payment status. The cashier can't cancel the payment link, but they can proceed without canceling it.
- For Commerce version 10.0.44, the pay by link payment method doesn't support some payment methods (for example, Klarna) that require that a country/region code is provided while creating the payment link. This limitation is mitigated in Commerce version 10.0.45.
Purge old payment authorization notifications
To ensure that old authorization notifications are deleted to save the storage and keep the notifications form manageable, old notifications can either be deleted manually from the Payment authorization notifications form, or deleted automatically by running the Purge payment authorization notifications data batch job. The batch job allows you to specify the number of days that pass before notifications are deleted.