Note
Access to this page requires authorization. You can try signing in or changing directories.
Access to this page requires authorization. You can try changing directories.
Organizations often have applications that aren’t yet integrated with Microsoft Entra but still need to be governed. Using custom data provided resources, you can include these disconnected applications in Microsoft Entra ID access reviews by uploading their access data directly into a catalog.
This capability enables you to run user Access Reviews (UARs) across both Microsoft Entra-connected, and custom, resources within the same catalog. Reviewers can easily review and certify users’ access in the My Access portal, helping ensure consistent governance, improved visibility, and compliance across all resources whether or not they’re connected to Microsoft Entra.
License requirements
This feature requires Microsoft Entra ID Governance or Microsoft Entra Suite subscriptions, for your organization's users. For more information, see the articles of each capability for more details. To find the right license for your requirements, see Microsoft Entra ID Governance licensing fundamentals.
Create a catalog
If you do not yet have a catalog, then create a new catalog. If you have a catalog already, then continue at the next section.
Sign in to the Microsoft Entra admin center as at least an Identity Governance Administrator or catalog creator.
Tip
Users who were assigned to the User Administrator role will no longer be able to create catalogs or manage access packages in a catalog they don't own. If users in your organization were assigned to the User Administrator role to configure catalogs, access packages, or policies in entitlement management, you should instead assign these users the Identity Governance Administrator role.
Browse to ID Governance > Catalogs.
Select New catalog.
Enter a unique name for the catalog and provide a description.
Users see this information in an access package's details.
Select Create to create the catalog.
For more information on creating a catalog and adding resources, see Create and manage a catalog of resources.
Add a custom data provided resource to a catalog
With a catalog created, you can add custom data provided resources to it by doing the following steps:
Sign in to the Microsoft Entra admin center as at least an Identity Governance Administrator.
Browse to ID Governance > Catalogs.
On the Catalogs page, open the catalog you created in the previous section.
On the left menu, select Resources.
Select Add resources.
Select the resource type: custom data provided resource.
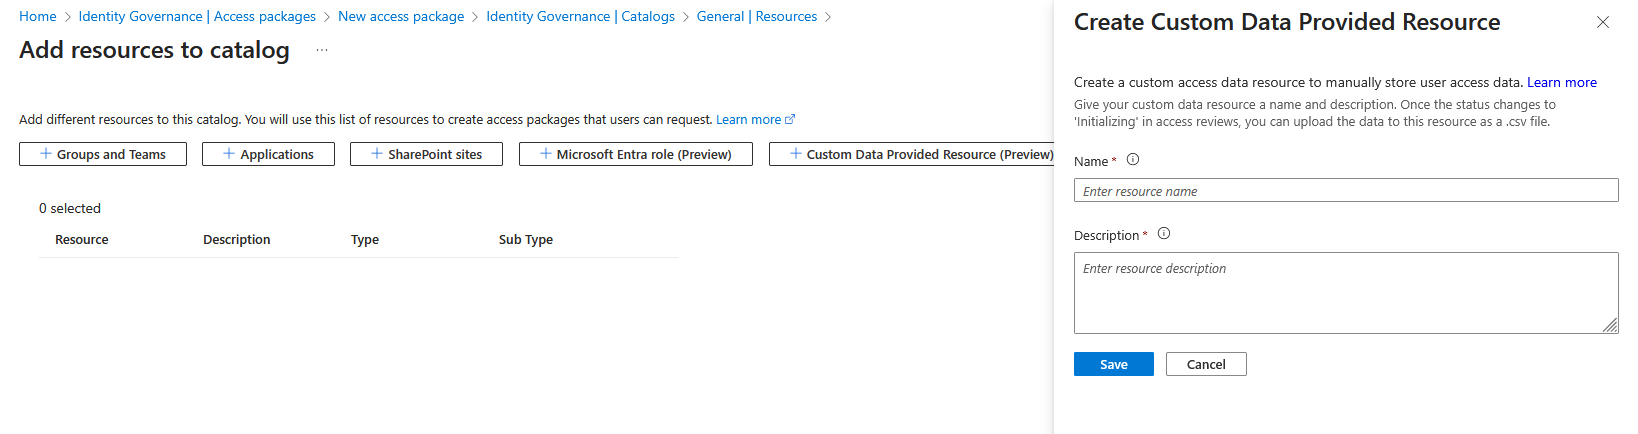
On the resource page, enter:
- Resource name – A name for the resource.
- Description – A description for the resource.
Select Save.
Create a User Access Review
Important
Custom data resource reviews currently support single-stage reviews where managers are the only available reviewers.
Sign in to the Microsoft Entra admin center as at least an Identity Governance Administrator.
Browse to ID Governance > Access Reviews > new access review.
On the Access reviews template screen, select Review users access across multiple resource types within a catalog, and select catalog review template.

Enter in basic information about the workflow and select Next.
On the resources tab, select the catalog where you added the resources on and select Next.
On the Reviewers and schedule tab, select reviewers you want to conduct access reviews. Currently only single stage reviews where the managers of the users who the access reviews are for can be set as reviewers.
Select Create.
You can also create an access review programmatically using Microsoft Graph. For more information, see Create a single stage access review on a catalog.
Get Access Review Object and Instance ID
After creating the catalog access review, but before uploading your custom data, you must get both the Access Review object ID, and the Access Review instance object ID. To get this information, you'd do the following:
Browse to ID Governance > Access Reviews.
Select the catalog access review you created.
On the Access Review overview screen, copy the Object ID.

Select the current instance of the access review on the access review overview screen.
On the access review instance screen, save the instance Object ID.

Upload custom data
After copying both the Access review object, and access review instance object, IDs note that the status of the access review shows as Initializing.

Return to the catalog you created, and select Resources.
On the resource screen for the catalog, select the custom data access resource you created, and select Upload custom access data.

On the Upload access data for custom resource screen under Basics, enter in both the access review object ID, and the Access review instance object ID found in the section Get Access Review Object and Instance ID.

Under Upload files select up to 10 CSVs to include in the access data and select Save.

Note
To confirm all CSVs were uploaded successfully, view the audit logs.
You have up to two hours from the time the review enters the Initializing state to complete the upload.
You can also upload custom data via Graph, by creating an upload session and then uploading a CSV file. For more information, see customDataProvidedResourceUploadSession.
Active review state
At the Active stage:
- Reviewers receive an email notification.
- They can sign in to the My Access portal to view and complete their review decisions.
Applying stage
In the Applying stage, you can get a list of denied users by making the list decisions API call:
GET https://graph.microsoft.com/beta/identityGovernance/accessReviews/definitions/{access review object ID}/instances/{access review instance object ID}/decisions?$filter=(decision eq 'Deny' and resourceId eq '<custom data provided resource ID>')
For each decision item:
Remove access from your own system and then patch each decision item to indicate success or failure for removal by making the update accessReviewInstanceDecisionItem API call:
PATCH https://graph.microsoft.com/beta/identityGovernance/accessReviews/definitions/{access review object ID}/instances/{access review instance object ID}/decisions/{decision ID}
Content-Type: application/json

{
 "applyResult": "AppliedSuccessfully",
 "applyDescription": "ServiceNow ticket created"
}
The review transition to the Applied state once all the custom data provided decisions have been applied. For example, if you have five decisions that must be made from the data, you must apply using PATCH each of five decision items before the review transitions to Applied.
Review status
As reviewers take actions, the review progresses through several states:
| Review Status | Description |
|---|---|
| Initializing | Review instance created; waiting for custom data upload. |
| Active | Reviewers can take decisions in the My Access portal. |
| Applying | Review decisions are being remediated. |
| Applied | All decisions are marked as applied. |
Timeframes summary
| Action | When | Time limit |
|---|---|---|
| Upload custom data | During Initializing | Within two hours. |
| Review decisions | During Active | Until the review end date. |
| Apply decisions | During Applying | 30 days and review remain in applying status until all decisions are marked as applied. |