Note
Access to this page requires authorization. You can try signing in or changing directories.
Access to this page requires authorization. You can try changing directories.
This article shows you how to add a lakehouse as a destination to an eventstream in Microsoft Fabric event streams. For optimized streaming performance and real-time querying, consider streaming data to an Eventhouse with add Eventhouse destination to an eventstream and then enable Eventhouse OneLake Availability.
Note
Enhanced capabilities are enabled by default when you create eventstreams. If you have eventstreams that you created via standard capabilities, those eventstreams will continue to work. You can still edit and use them as usual. We recommend that you create a new eventstream to replace standard eventstreams so that you can take advantage of additional capabilities and benefits of enhanced eventstreams.
Important
There's schema enforcement for writing data into a lakehouse destination table. All new writes to the table must be compatible with the target table's schema at write time, ensuring data quality.
When output is written to a new delta table, the table schema is created based on the first record. All records of the output data are projected onto the schema of the existing table.
If the incoming data has columns that aren't in the existing table schema, the extra columns aren't included in the data written to the table. Likewise, if the incoming data is missing columns that are in the existing table schema, the missing columns write to the table with the values set to null.
If the schema of a Delta table and an incoming record have no intersection, it results in a schema conversion failure. However, this isn't the only scenario that can cause such a failure.
If the schema of incoming data changes (i.e., the new data record's schema does not align with the first record), certain columns or entire records may be lost when writing to the lakehouse. Therefore, using a lakehouse to receive such streaming data, such as database CDC data, isn't recommended.
Prerequisites
- Access to a workspace in the Fabric capacity license mode (or) the Trial license mode with Contributor or higher permissions.
- Access to the workspace where your lakehouse is located with Contributor or higher permissions.
Add a lakehouse as a destination
To add a lakehouse destination to a default or derived eventstream, follow these steps.
In Edit mode for your eventstream, select Add destination on the ribbon and select Lakehouse from the dropdown list.

Connect the lakehouse node to your stream node or operator.
On the Lakehouse configuration screen, complete the following information:
- Enter a Destination name.
- Select the Workspace that contains your lakehouse.
- Select an existing Lakehouse from the workspace you specified.
- Select an existing Delta table, or create a new one to receive data.
- Select the Input data format that is sent to your lakehouse. The supported data formats are JSON, Avro, and CSV.

Select Advanced.
Two ingestion modes are available for a lakehouse destination. Based on your scenario, configure these modes to optimize how Fabric event streams writes to the lakehouse.
Minimum rows is the minimum number of rows that the lakehouse ingests in a single file. The minimum is 1 row, and the maximum is 2 million rows per file. The smaller the minimum number of rows, the more files the lakehouse creates during ingestion.
Maximum duration is the maximum duration that the lakehouse takes to ingest a single file. The minimum is 1 minute and maximum is 2 hours. The longer the duration, the more rows are ingested in a file.

Select Save.
To implement the newly added lakehouse destination, select Publish.


Once you complete these steps, the lakehouse destination is available for visualization in Live view. In the Details pane, you can select the Optimize table in notebook shortcut to launch an Apache Spark job within a Notebook, which consolidates the small streaming files within the target lakehouse table.

Note
When configuring an Eventstream, the source, transformation logic, and destination are typically added together. By default, when publishing the Eventstream, the backend services for both data ingestion and data routing start with Now respectively. However, data ingestion may begin faster than data routing, causing some data to be ingested into Eventstream before routing is fully initialized. As a result, this data may not be routed to the destination.
To mitigate this, follow these steps:
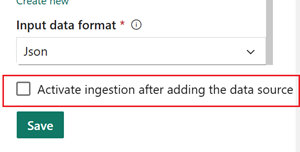
When configuring an Eventhouse (Event processing before ingestion) or Lakehouse destination, uncheck Activate ingestion after adding the data source.
Manually activate ingestion after the Eventstream is published.
Use the Custom time option to select an earlier timestamp, ensuring initial data is properly processed and routed.

 For more information, see Pause and resume data streams
Related content
To learn how to add other destinations to an eventstream, see the following articles: