Note
Access to this page requires authorization. You can try signing in or changing directories.
Access to this page requires authorization. You can try changing directories.
When outbound access protection is enabled for a workspace, all outbound connections are blocked by default. You can then permit access to external data sources or other workspaces by configuring managed private endpoints:
- For connections to external data sources, use managed private endpoints.
- For connections to other workspaces, use managed private endpoints together with the Private Link service.
This article explains how to create managed private endpoints for both of these scenarios.
Note
Before creating managed private endpoints, make sure you have completed the steps to enable outbound access protection for your workspace.
Allow outbound access to an external source
To enable outbound access to external data sources that support managed private endpoints, create a managed private endpoint in your workspace with outbound access protection enabled. The diagram below illustrates Workspace 1, which has outbound access protection turned on, connecting securely to an external data source through a managed private endpoint.

To enable this scenario, follow these steps:
Make sure outbound access protection is enabled for the workspace.
Sign in to Fabric as a workspace admin and create a managed private endpoint by going to Workspace settings > Network Security > Managed Private Endpoints > Create. For detailed steps, see Create a managed private endpoint.
After the managed private endpoint is created and approved on the external data source, artifacts in the outbound access protected workspace can connect to the data source.
Allow outbound access to another workspace in the tenant
To connect to another workspace in the tenant, use managed private endpoints and the Private Link service to enable secure outbound connections. As described in this section, create a Private Link service for the target workspace (Workspace 2 in the diagram) by deploying an ARM template, and then create a managed private endpoint in the outbound access protected workspace (Workspace 1) to connect to the target workspace.

Create the Private Link service for the target workspace
Sign in to the Azure portal.
From the Azure portal search bar, search for deploy a custom template and then select it from the available options.
On the Custom deployment page, select Build your own template in the editor.
In the editor, create a Fabric resource using the following ARM template, where:
<resource-name>is the name you choose for the Fabric resource.<tenant-object-id>is your Microsoft Entra tenant ID. See How to find your Microsoft Entra tenant ID.<workspace-id>is the workspace ID for the target workspace. Find it in the workspace URL aftergroup.
{
  "$schema": "http://schema.management.azure.com/schemas/2015-01-01/deploymentTemplate.json#",
  "contentVersion": "1.0.0.0",
  "parameters": {},
  "resources": [
    {
      "type": "Microsoft.Fabric/privateLinkServicesForFabric",
      "apiVersion": "2024-06-01",
      "name": "<resource-name>",
      "location": "global",
      "properties": {
        "tenantId": "<tenant-id>",
        "workspaceId": "<workspace-id>"
      }
    }
  ]
}
Note
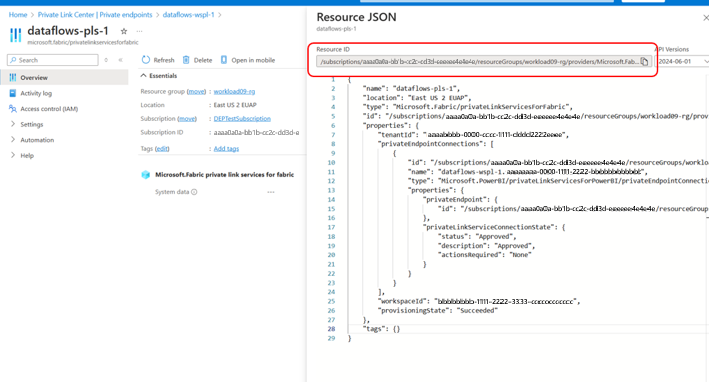
After deployment, you can find the Private Link service details in the output JSON file. Copy the resource ID of the Private Link service for use in the next step. You can also find the Private Link service resource in the resource group, but you need to select Show hidden resources.
Create a managed private endpoint in the protected workspace
Create a managed private endpoint in the outbound access protected workspace (Workspace 1) to allow access to the target workspace (Workspace 2).
In the Fabric portal, open the workspace that has outbound access protection enabled.
Select Workspace settings > Outbound networking.
On the Network Security page, under Managed Private Endpoints, select Create.
Enter a name for the managed private endpoint.
Under Resource identifier, paste the resource ID of the Private Link service created in the previous section. You can also find the resource ID in the Azure portal by opening the Private Link service in Resource Manager and selecting JSON View to open the resource JSON.
Under Target sub-resource, select Workspace. Then select Create.


Important
The activation status displays Provisioning and the approval status is blank, meaning the managed private endpoint request is pending approval. A tenant admin must approve the request as described in the next section.
Approve the managed private endpoint connection
A tenant admin must approve the pending managed private endpoint request by completing the following steps.
Sign in to the Azure portal.
Search for and select Private Link Services.
Select Pending connections.
Select the connection with the name specified in the template, and then select Approve.

After about 15 minutes, check the status of the managed private endpoint: In the Fabric portal, open the outbound access protected workspace and go to Workspace settings > Outbound networking. On the Network Security page, verify the activation status is Succeeded and the approval status is Approved.


The cross-workspace managed private endpoint is now set up between the outbound access protected workspace and the target workspace. Workspace admins and contributors can now connect to artifacts in the target workspace from the outbound access protected workspace.