Note
Access to this page requires authorization. You can try signing in or changing directories.
Access to this page requires authorization. You can try changing directories.
[This article is prerelease documentation and is subject to change.]
The new experience in Power Apps combines plans, data models, and apps in a single design surface. This integrated approach minimizes distractions and keeps you focused on building solutions efficiently.
Key capabilities
- Design everything together: Build apps, plans, and data models together in a single, cohesive process.
- Build faster with AI: Quickly move from ideas to working prototypes using conversational chat.
- Instant app creation: Generate modern web apps directly from your requirements and data with one click.
Important
- This is a preview feature.
- Preview features aren't meant for production use and might have restricted functionality. These features are subject to supplemental terms of use, and are available before an official release so that customers can get early access and provide feedback.
Create an app
Sign in to https://vibe.preview.powerapps.com.
Enter your prompt in the text box, then select Enter.

Agents start working and assets load. You see the plan, data model, and app preview generate.

After the plan, data, and app generate, select Save in the upper-right corner. The first save stores the app, tables, and plan together in your selected solution, while your data remains in in-memory draft tables. This approach lets you iterate on the data model and app quickly without committing to a data source. When you publish the app, you select the data source.


Review and refine your generated app and data model
The new workspace uses a single, unified chat that keeps context as you switch between Plan, Data, and App. It speeds up development by letting you preview the app visually, inspect the code, and make inline changes all without leaving the workspace.

Each focus area displays its specific tools above the work surface. For instance, when you select the App focus area, you see these options:
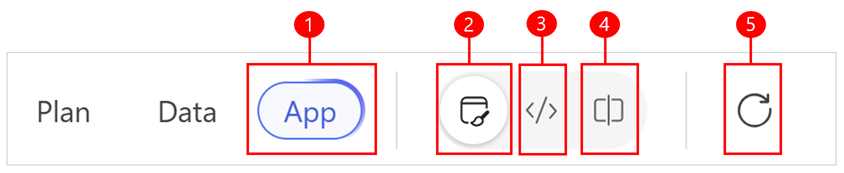
Legend:
- App: When selected, this focus area displays menu options specific to the app.
- Preview: View a live preview of the app.
- Code: Access and review the app’s code.
- Split: See both the code and the app preview side by side.
- Download source: Download the source files of the app.
- Play: Play and test the app.
- Toggle inline edits: Select any area in the app and edit its text directly.
- Refresh preview: Reload the app preview to see the latest changes.
Edit the generated app
When generation finishes, the visual preview appears in focus on the work surface.
You can interact with the app directly, using the navigation items and buttons to see how they function and respond.
To inspect the code, switch to Code view or Split view. Expand the src folder to see subfolders and files, then select any file to view the generated code.
When you modify the app, plan, or data, the agent analyzes your changes to see if updates are needed elsewhere in the solution. If so, the agent automatically applies updates and summarizes them in the chat.
Edit the app by using chat
Use the chat input on the work surface to ask questions or request changes to the generated app. For example: “What does this button do?” or “Change theme to blue.”
- If you ask a question, the agent provides an explanatory response.
- If you request a change, the agent evaluates the request, outlines an implementation plan, and then applies it.
- If the agent can't implement the change directly, you receive step-by-step guidance or instructions for retrying the request.
Edit the app by using inline actions
Use inline actions to edit the style of your app.
Select the option to toggle inline edits.
Select the item you want to edit. The element is outlined and labeled with the corresponding code object so you know exactly what you’re editing. Depending on the element type, a properties pane or inline controls appear for typography, styling, or layout. Adjust values like font, color, or spacing directly in the pane. If multiple elements share the same style, a single change can apply across the group. For example, changing a button color inside a card updates all buttons in that card group.
Inline edits update the associated code directly without an AI agent involved.
When you select an element, open inline chat and request a change like Make this button primary blue. The selected element’s context is passed automatically, so you don’t have to describe it in the prompt. This feature is equivalent to typing the same request in the main chat but faster.
When you're done, review the result in the visual preview. If needed, switch to Code view or Split view to inspect the generated files.
Keyboard shortcuts for inline actions
You can use quick keys to open and close inline edit actions while editing your app.
- Hold and release Alt to toggle the inline edit gesture.
- Press Esc to dismiss the inline edit gesture.
Edit the generated plan
Select the Plan focus area to access these options:

Legend:
- Plan: Edit the plan directly in this view.
- User roles: View the generated user roles and requirements.
- Data model: See the proposed tables for the data model.
- Technology: Review the recommended technologies for your solution.
Edit the plan using chat
Open the chat and enter your questions or request changes, such as:
- Update the manager role
- Add a requirement for offline access
- Remove the Power BI report
The agent analyzes your request and applies updates to the plan. You can also make targeted edits directly inline.
Edit user requirements
Select the area you want to change and select the Edit button or Chat with Copilot button to add new roles and requirements. Use inline chat while an area is selected to provide context for the agent. This approach saves you from describing the specific element.

Edit the data model
In the Data model area, select the Chat with Copilot button and enter your changes.
Or, select the ellipsis for the specific table you want to edit. You can select to view the data workspace, save the proposed tables, or chat with the agents to pass in specific context about the edit you're requesting.

Edit technology
In the Technology area, select the Chat with Copilot button and enter your changes. You can also add new technologies or chat with the agent with specific context for the change you're requesting.
Select the Create button to open Power Automate and create a new workflow.

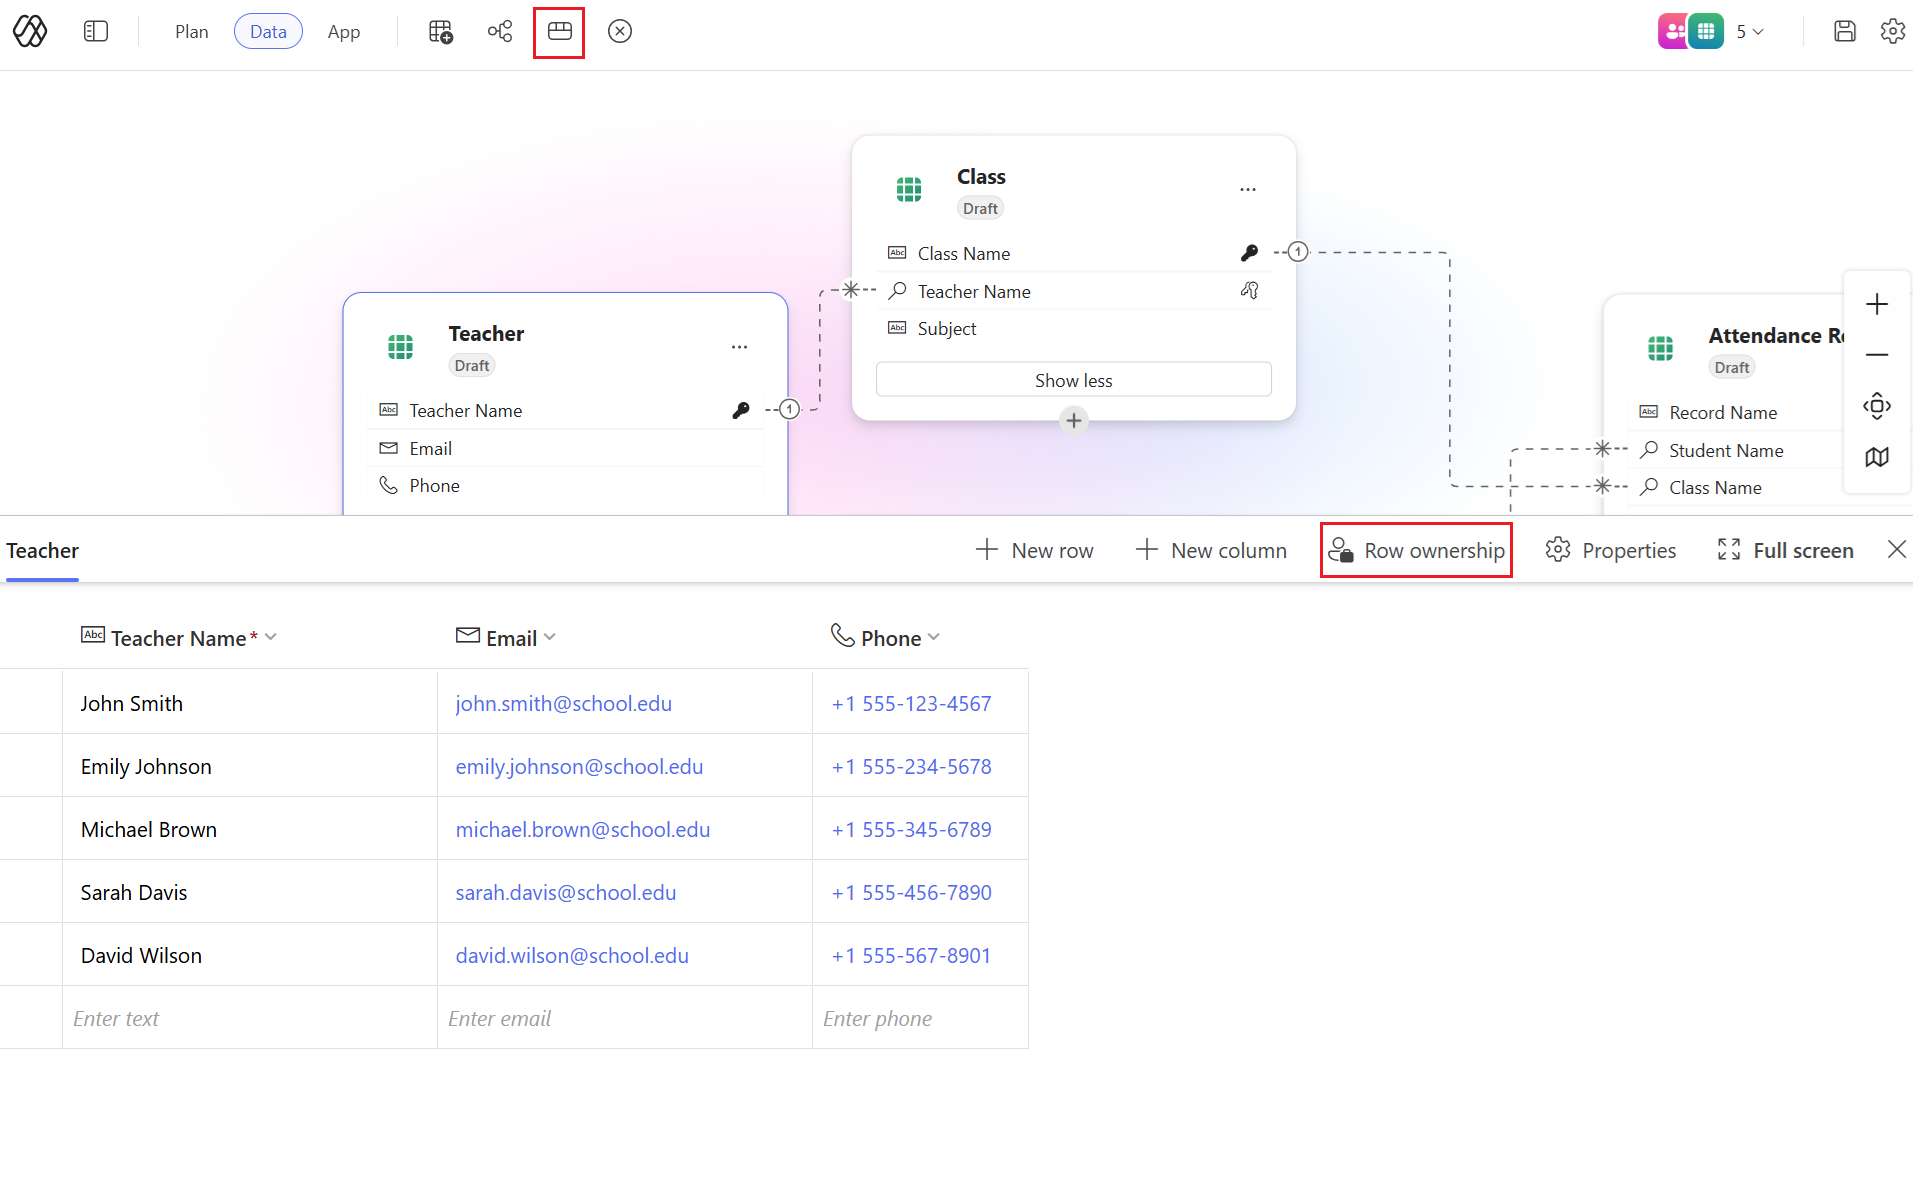
Edit the generated data model
Select Data and review and refine your data. The data view displays all proposed tables, their relationships, and sample data. It helps you understand the schema and how the generated app uses the data. The tables are currently in-memory only and aren't published to any data source. You can modify them until they meet your business needs. For more information, see Create and edit tables using Power Apps.

Legend
- Data: Edit the data model directly in this view.
- Add table: Add a draft or existing table.
- Create relationships: Creates a table relationship between two tables.
- Data view: View the data workspace experience where you create tables, configure table relationships, and can view a diagram of your data.
- Remove: Deletes the table and all associated table rows.
Edit data using chat
Use the chat to ask questions or request changes to the proposed fields, tables, and relationships.
You can also ask for additional sample data to enrich your dataset for the app. The agent analyzes your requests and makes the necessary updates.
Some actions might not be supported through agent chat. For more information, see the limitations section in the article.
Edit data with inline actions
Add new or existing tables, or make targeted changes to relationships, tables, and sample data directly within the data workspace.
To edit, select the relationship line or the ellipsis (…) next to the table you want to modify.
Select Remove to remove relationships or tables from the data model, or make specific edits as needed.

Add a data table
Select Add table in the command bar to include a new or existing table in your data model.
Choose Draft table to create a new in-memory table from scratch, or select Existing Dataverse table to add data you already have.

Add and edit relationship
Select Add relationship in the command bar to add a new relationship between two tables.
To edit a relationship, select the relationship line between two tables and select Edit from the dropdown menu. Here you can change the relationship type or add a lookup column. You can also perform advanced edits like changing the logical names used in the relationship.
Some relationship configurations currently aren't supported. For more information, see Known limitations.
Remove a data table
Select the table you want to remove.
Select Remove in the command bar.
- If you remove a draft table, you delete it along with all its rows.
- If you remove an existing Dataverse table, the table and its data remain in the original source; you only remove the reference from your solution.
View and edit data in a table
- Select View data from the command bar.

- In this view, you can add, remove, or modify columns and rows as needed.
Row ownership
Follow one of these steps to change the ownership type to User, Team, or Organization:
Select View options and then select Row ownership.

Select View data on the command bar, select a row, and then select Row ownership.
Edit the data table properties
- Select the table you want to edit and then select View data in the command bar.
- Select Properties to update the table’s display name, plural name, description, and other details.

Application lifecycle management (ALM) capabilities
The following ALM features are supported:
Save: AutoSave isn't currently available. To save your progress, select Save in the command bar at any time. This action saves all edits to every solution object in your preferred solution.
Publish data: To publish draft tables, select Publish draft tables from the data card’s context menu when you’re ready to make a table available for production. You can choose Dataverse as the target data source. Once published, any apps using these draft tables automatically update to use the published versions.
Publishing app: When you’re ready to release your app for production, select Publish in the app’s command bar. If your app uses any draft tables, you're prompted to publish those tables as well.
Share the app: To share your app with others, select Share and add the accounts of users you want to grant access to run the app.
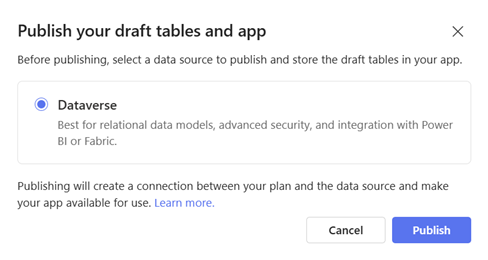
Choose a data source and publish
When you’re ready to publish, on the top right select Publish.
Select a data source to publish and store the draft tables in your app and then select Publish.
Known limitations
The new Power Apps experience has the following limitations:
- You can't access or edit apps created in the new authoring experience outside of the new authoring experience.
- If you export an app and edit it outside the new authoring experience (for example, in VS Code), redeploying via PAC CLI creates a new app, and it disconnects from the original plan.
- Currently, you can only have one app per plan; multiple apps within a single plan are temporarily not enabled.
- You can't open pre-existing plans in the new experience.
- Canvas and model-driven apps aren't supported; you can't recommend, open, or edit these app types in the new authoring experience.
- Existing tables aren't automatically recommended during data model proposal; you can manually add existing tables to your plan.
- Editing existing Dataverse tables via chat isn't currently supported; you can make changes to these tables through the data editor manually.
- Direct code edits in Code view or Split view aren't supported; you can't modify code directly in these views.
- You can't directly create proposed technologies (apart from code apps) from the plan; you must add additional technologies manually.
Share your feedback
Feedback on generated content: Use the thumbs up or thumbs down icons in the chat pane to rate the generated content. For more details, select Tell us why to provide specific feedback.
Feedback on the overall experience: Select Give feedback in the command bar to share your thoughts about the overall experience. Choose a feedback category and enter your comments in the provided field.
