Remarque
L’accès à cette page nécessite une autorisation. Vous pouvez essayer de vous connecter ou de modifier des répertoires.
L’accès à cette page nécessite une autorisation. Vous pouvez essayer de modifier des répertoires.
Importante
Certaines informations contenues dans cet article concernent le produit en préversion, qui peut être considérablement modifié avant sa publication commerciale. Microsoft n’offre aucune garantie, explicite ou implicite, concernant les informations fournies ici.
La collection d’outils de création d’agent dans le serveur MICROSOFT Sentinel Model Context Protocol (MCP) permet aux développeurs d’utiliser le langage naturel pour créer des agents Security Copilot au sein d’un IDE compatible MCP de leur choix.
Dans ce guide de prise en main, vous allez apprendre à :
Configurer et s’authentifier auprès du serveur MCP
Activer le mode agent GitHub Copilot
Gérer le contexte des outils MCP
Configuration requise
Pour utiliser Microsoft Sentinel MCP Server et accéder aux outils, vous devez être intégré à lac de données Microsoft Sentinel. Pour plus d’informations, consultez Intégration à lac de données Microsoft Sentinel et Microsoft Sentinel Graph (préversion).
Éditeurs de code pris en charge
La prise en charge de Microsoft Sentinel pour les outils MCP de création d’agent Security Copilot est disponible pour les éditeurs de code basés sur l’IA suivants :
Configurer et s’authentifier auprès du serveur MCP
Les étapes d’installation du serveur MCP sont les suivantes :
Lancez Visual Studio Code (VS Code).
Ajoutez la connexion de serveur MCP dans VS Code. Tapez Appuyez
Ctrl + Shift + Ppour ouvrir la palette de commandes. Tapez le symbole>, suivi du texteMCP: Add server.
Sélectionnez
HTTP (HTTP or Server-Sent Events).
Tapez l’URL du serveur suivante, puis sélectionnez Entrée. Cette URL respecte la casse.
https://sentinel.microsoft.com/mcp/security-copilot-agent-creationEntrez un ID de serveur convivial.

Vous êtes invité à approuver le serveur.

Sélectionnez Autoriser lorsque vous êtes invité à authentifier la définition du serveur.

Choisissez s’il faut rendre le serveur disponible dans tous les espaces de travail VS Code ou dans le seul espace de travail actuel.

Une fois authentifié, le serveur doit commencer à exécuter et vous devez voir un fichier nommé
mcp.jsonqui vérifie les configurations du serveur MCP dans l’espace de travail VS Code.


Activer le mode agent GitHub Copilot
Ouvrez le menu >Affichage de conversation > de VS Code Conversation ou appuyez sur
CRTL + ALT + I.Définissez la conversation sur mode Agent.
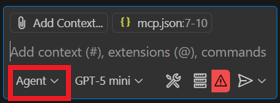
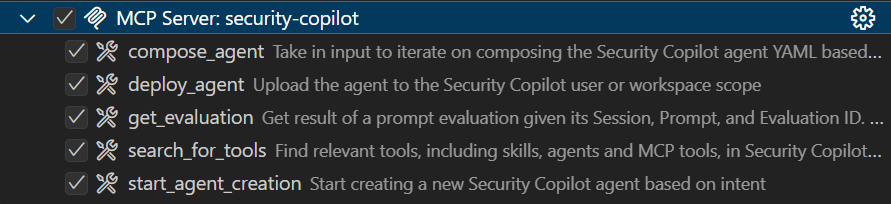
Sélectionnez l’icône outils dans la barre d’invite.

Vous pouvez voir la liste des outils utilisés par GitHub Copilot. Développez la ligne du serveur MCP que vous venez d’ajouter pour afficher les cinq outils de génération d’agent :


Gérer le contexte des outils MCP
En fournissant le contexte approprié, vous pouvez obtenir de l’aide de l’IA dans VS Code pour fournir des réponses pertinentes et précises. Cette section couvre deux options pour gérer le contexte et s’assurer que l’IA assistant utilise les outils MCP comme prévu et avec une plus grande cohérence.
Vous pouvez choisir parmi l’une des options suivantes pour gérer le contexte :
Instructions personnalisées
Les instructions personnalisées vous permettent de définir des instructions ou des règles courantes dans un fichier Markdown pour décrire la façon dont les tâches doivent être effectuées. Au lieu d’inclure manuellement le contexte dans chaque invite de conversation, spécifiez des instructions personnalisées dans un fichier Markdown pour garantir des réponses IA cohérentes qui s’alignent sur les exigences de votre projet.
Vous pouvez configurer des instructions personnalisées pour qu’elles s’appliquent automatiquement à toutes les demandes de conversation ou à des fichiers spécifiques uniquement.
Utiliser un fichier d’instructions personnalisées
Définissez vos instructions personnalisées dans un seul .github/copilot-instructions.md fichier Markdown à la racine de votre espace de travail. VS Code applique automatiquement les instructions de ce fichier à toutes les demandes de conversation au sein de cet espace de travail.
Les étapes d’utilisation d’un .github/copilot-instructions.md fichier :
Activez le
github.copilot.chat.codeGeneration.useInstructionFilesparamètre .Créez un
.github/copilot-instructions.mdfichier à la racine de votre espace de travail. Si nécessaire, créez d’abord un.githubrépertoire.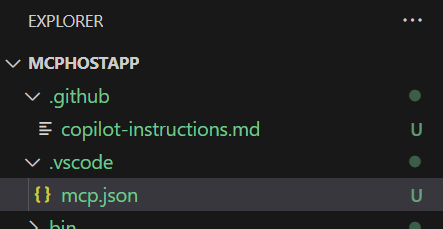
Décrivez vos instructions en utilisant le langage naturel et au format Markdown.
Pour commencer, copiez le contenu du fichier
scp-mcp-context.mdde contexte dans lecopilot-instructions.mdfichier. Consultez Contexte MCP.

Ajouter un fichier de contexte
Pour vous assurer que l’ia assistant peut utiliser les outils MCP comme prévu et avec une plus grande cohérence, ajoutez ce fichier de contexte à votre IDE. Vérifiez que le assistant IA fait référence à ce fichier lorsque vous l’y invitez.
Ajoutez le contexte
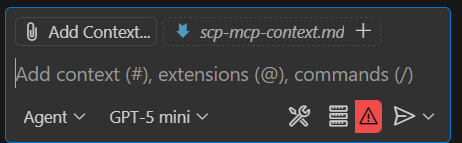
scp-mcp-context.mdà VS Code ou collez-le directement dans votre espace de travail. Utilisez le fichier de contexte, consultez Contexte MCP. Votre espace de travail ressemble à ceci :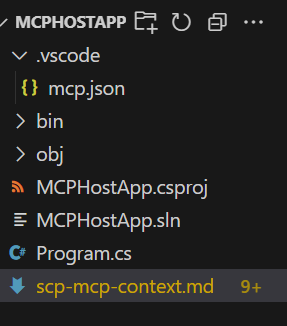
Sélectionnez Ajouter un contexte dans la barre d’invite, puis sélectionnez le fichier de contexte.


Fichier de contexte pour les outils MCP
Copiez le scp-mcp-context.md à utiliser avec le guide de démarrage rapide.
# MCP Tools Available for Agent Building
    1. **start_agent_creation**
        - **Purpose**: Creates a new Security Copilot session and starts the agent building process.
        - The userQuery input will be the user's problem statement (what they want the agent to do).
        - The output of the tool should be returned IN FULL WITHOUT EDITS.
        - The tool will return an initial agent YAML definition.
    2. **compose_agent**
        - **Purpose**: Continues the session and agent building process created by *start_agent_creation*. Outputs agent definition YAML or can ask clarifying questions to the user.
        - The sessionId input is obtained from the output of *start_agent_creation*
        - The existingDefinition input is optional. If an agent definition YAML has not been created yet, this should be blank (can be an empty string).
    3. **search_for_tools**
        - **Purpose: Discover relevant skills (tools) based on the user's query
        - This will create a new Security Copilot session, but it should not be included in the start_agent/continue_agent flow.
          - A user might want to know about Security Copilot skills they have access to without wanting to create an agent
          - The session ID created should NOT be reused in any capacity
    4. **get_evaluation**
        - **Purpose: Get the results of the evaluations triggered by each of the above tools. You MUST repeatedly activate this tool until the property of the result "state" is equal to "Completed" in order to get the fully processed result. The "state" may equal "Created" or "Running" but again, you must repeat the process until the state is "Completed". There is NO MAXIMUM amount of times you might call this tool in a row.
    5. **deploy_agent**
        - **Purpose: Deploy an agent to Security Copilot.
        - The user must provide the scope as either "User" or "Workspace".
        - Unless they already have an AGENT definition yaml provided, *start_agent_creation* must be run before to generate an agentDefinition
        - "agentSkillsetName" should be COPIED EXACTLY from the value of "Descriptor: Name:" in the agent definition YAML, including any special characters like ".". This will NOT work if the two do not match EXACTLY.
        - DO NOT use *get_evaluation* after this tool.

# Agent Building Execution Flow

## Step 1: Problem Statement Check
- If the user did **not** provide a problem statement, prompt them to do so.
- If the user **did** provide a problem statement, proceed to Step 2.

## Step 2: Start Agent Creation
- Use the `start_agent_creation` tool with `userQuery = <problem statement>`.
  - **DO NOT** include any quotation marks in the userQuery
- Then, use `get_evaluation` to retrieve the initial response.
  - **DO** repeatedly call `get_evaluation` until the `"state"` property of the result equals `"Completed"`.
  - **DO NOT** require the user to ask again to get the results.
  - **DO NOT** edit or reword the response content.

## Step 2.5: Output Handling
- **DO NOT** reformat, summarize, or describe the YAML output.
- **DO** return the YAML output **verbatim**.
- **DO** return the output in **AGENT FORMAT**.

## Step 3: Agent Refinement
- Ask the user if they would like to edit the agent or if they would like to deploy the agent. If they want to deploy, skip to **Step 4**.
- If the user wants to edit the agent definition:
  - If they respond with edits directly, use `compose_agent` with:
    - `sessionId` from `start_agent_creation`
    - `existingDefinition = <previous AGENT YAML>`
      - `\n` MUST be rewritten as `\\n`
    - `userQuery = <user’s new input>`
      - **DO NOT** include any quotation marks in the userQuery
  - If they attach a manually edited YAML file to the context, use the file content as `existingDefinition`.
    - **DO NOT** edit the file directly, you MUST use `compose_agent`
    - `\n` MUST be rewritten as `\\n`

## Step 4: Agent Deployment
- If the user asks to deploy the agent, use `deploy_agent`.
  - You **must confirm the scope**: either `"User"` or `"Workspace"`.
    - If not provided, ask the user to specify.
  - `agentSkillsetName` must **exactly match** the value of `Descriptor: Name:` in the YAML.
    - This includes any special characters.
  - Leave existing instances of `\n` inside `agentDefinition` as-is
- **DO NOT** run `get_evaluation` after deployment.
- **DO** include all of these things in the tool response to the user:
    1. Confirm successful deployment to the user
    2. Direct the user to the Security Copilot portal to test and view the agent with this link: https://securitycopilot.microsoft.com/agents
    3. Direct the user to read more on how to test their agent in Security Copilot with this link: https://learn.microsoft.com/en-us/copilot/security/developer/mcp-quickstart#test-agent

## Step 5: Further Agent Refinement and Redeployment
- After deployment, the user may still want to **edit the agent definition**.
  - If so, you must support calling `compose_agent` again.
  - Follow the same process as described in **Step 3**:
    - If the user asks for edits directly, use the previous AGENT YAML as `existingDefinition`.
    - If the user uploads a manually edited YAML file, use the file content as `existingDefinition`.
- The user may also want to **redeploy the agent** after making refinements.
  - You must run `deploy_agent` again using the updated YAML.
  - Ensure the `agentSkillsetName` matches **exactly** the value of `Descriptor: Name:` in the latest YAML, including any special characters.
  - Leave existing instances of `\n` inside `agentDefinition` as-is
  - Confirm the deployment scope: either `"User"` or `"Workspace"`.
    - If the scope is not provided, prompt the user to specify.
  - Do **not** run `get_evaluation` after deployment.
  - Confirm successful redeployment to the user.
- Alternatively, the user may want to **create a new agent**.
  - Restart the procedure from **Step 1**.
  - When using `start_agent_creation`, a new session ID will be created.
  - **DO** keep track of which session IDs correspond to which problem statements or agents so the user can return to previous sessions if needed.

## Additional Rules
- Only call `compose_agent` **after** the user has provided a response. Do not proceed automatically.
- Agent creation must remain **user-driven**. Do not initiate steps without explicit user input.
- Wait for the user to respond before continuing to the next step.
- Tool responses must be returned **directly to the user** in full.
  - Do **not** alter, reformat, summarize, or reword the content of any tool response.
  - This applies specifically to the `"result": "content"` field in the JSON returned by tool executions.
  - LEAVE OUT any "Grounding Notes"

## Error Handling
- If any tool call fails:
  - Inform the user of the failure.
  - If it is a client error, make an attempt to retry the tools, rewriting inputs based on the error message.
    - Example: If the error indicates invalid JSON characters, escape or remove those characters from the input and retry. Always attempt escaping first.