Important
デバイス メタデータは非推奨となり、Windows の今後のリリースで削除される予定です。 この機能の置き換えについては、「 ドライバー パッケージ コンテナー メタデータ」を参照してください。
Windows 8.1 では、UWP デバイス アプリを使用すると、デバイスの製造元は、一部のカメラ アプリでより多くのカメラ オプションを表示するポップアップをカスタマイズできます。 This topic introduces the More options flyout that's displayed by the CameraCaptureUI API, and shows how the C# version of the UWP device app for camera sample replaces the default flyout with a custom flyout. UWP デバイス アプリ全般の詳細については、「UWP デバイス アプリを使用する」を参照してください。
Note
In Windows 8.1, the built-in camera app does not display a More options button and therefore can't display a UWP device app to show more camera options. However, the CameraCaptureUI class, that's available to all UWP apps, does have a More options button and can display UWP device apps from it.
カメラ用 UWP デバイス アプリの C# バージョンのサンプルでは、DeviceAppPage.xaml ページを使用して、その他のカメラ オプションのカスタム ポップアップの UI を示します。 また、このサンプルでは、カメラ ドライバー MFT (メディア ファンデーション変換) を使用してカメラ効果を適用します。 詳細については、「 カメラ ドライバー MFT の作成」を参照してください。
Note
このトピックで示すコード例は、 カメラ 用 UWP デバイス アプリ の C# バージョンのサンプルに基づいています。 このサンプルは、JavaScript と C++ でも使用できます。 サンプルをダウンロードして、最新バージョンのコードを確認します。
カメラのその他のオプション
The more camera options experience is the functionality that a UWP device app provides when another app, a UWP app, captures or previews video from the camera by using the CameraCaptureUI API. It is accessible through the More options link in the Camera options window. これは全画面表示ではありませんが、ポップアップ内に表示されます。これは、ユーザーがクリックまたはタップしたときに閉じる軽量のコンテキスト ユーザー インターフェイスを表示するためのコントロールです。
このエクスペリエンスを使用すると、カスタム ビデオ効果を適用する機能など、カメラの差別化された機能を強調表示できます。
カメラ用に UWP デバイス アプリがインストールされていない場合、Windows では既定のより多くのカメラ オプション エクスペリエンスが提供されます。 カメラ用に UWP デバイス アプリがインストールされていること、アプリが windows.cameraSettings 拡張機能にオプトインされたことが Windows によって検出された場合、アプリは Windows によって提供される既定のエクスペリエンスに置き換えられます。
その他のカメラ オプションのポップアップを呼び出すには:
Open a UWP app that uses the CameraCaptureUI API (the CameraCaptureUI sample, for example)
Tap the Options button in the UI
This opens a Camera options flyout that shows basic options for setting resolution and video stabilization
On the Camera options flyout, tap More options
The More options flyout opens
The default flyout appears when no UWP device app for the camera is installed
A custom flyout appears when a UWP device app for the camera is installed

この画像は、カスタム ポップアップの例の横にある他のカメラ オプションの既定のポップアップを示しています。
Prerequisites
開始する前に、以下の操作を行います。
開発用 PC をセットアップします。 See Getting started for info about downloading the tools and creating a developer account.
アプリをストアに関連付けます。 詳細については、「 UWP デバイス アプリの作成 」を参照してください。
プリンターをアプリに関連付けるプリンターのデバイス メタデータを作成します。 詳細については、「 デバイス メタデータの作成 」を参照してください。
アプリのメイン ページの UI をビルドします。 すべての UWP デバイス アプリはスタート画面から起動でき、全画面表示で表示されます。 スタート エクスペリエンスを使用して、デバイスの特定のブランドと機能に一致する方法で製品またはサービスを強調表示します。 使用できる UI コントロールの種類に特別な制限はありません。 全画面表示エクスペリエンスの設計を開始するには、 Microsoft Store の設計原則を参照してください。
手順 1: 拡張機能を登録する
アプリが他のカメラ オプションのカスタム ポップアップを提供できることを Windows が認識するには、カメラ設定拡張機能を登録する必要があります。 この拡張機能は、 Extension 要素で宣言され、 Category 属性は windows.cameraSettings の値に設定されます。 C# と C++ のサンプルでは、 Executable 属性は DeviceAppForWebcam.exe に設定され、 EntryPoint 属性は DeviceAppForWebcam.App に設定されます。
You can add the camera settings extension on the Declarations tab of the Manifest Designer in Microsoft Visual Studio. XML (テキスト) エディターを使用して、アプリ パッケージ マニフェスト XML を手動で編集することもできます。 Right-click the Package.appxmanifest file in Solution Explorer for editing options.
This example shows the camera settings extension in the Extension element, as it appears in the app package manifest file, Package.appxmanifest.
<?xml version="1.0" encoding="utf-8"?>
<Package xmlns="http://schemas.microsoft.com/appx/2010/manifest">
  <Identity Name="Microsoft.SDKSamples.DeviceAppForWebcam.CPP" Publisher="CN=Microsoft Corporation, O=Microsoft Corporation, L=Redmond, S=Washington, C=US" Version="1.0.0.0" />
  <Properties>
    <DisplayName>DeviceAppForWebcam CPP sample</DisplayName>
    <PublisherDisplayName>Microsoft Corporation</PublisherDisplayName>
    <Logo>Assets\storeLogo-sdk.png</Logo>
  </Properties>
  <Prerequisites>
    <OSMinVersion>6.3.0</OSMinVersion>
    <OSMaxVersionTested>6.3.0</OSMaxVersionTested>
  </Prerequisites>
  <Resources>
    <Resource Language="x-generate" />
  </Resources>
  <Applications>
    <Application Id="DeviceAppForWebcam.App" Executable="$targetnametoken$.exe" EntryPoint="DeviceAppForWebcam.App">
      <VisualElements DisplayName="DeviceAppForWebcam CPP sample" Logo="Assets\squareTile-sdk.png" SmallLogo="Assets\smallTile-sdk.png" Description="DeviceAppForWebcam CPP sample" ForegroundText="light" BackgroundColor="#00b2f0">
        <DefaultTile ShortName="DeviceApp CPP" ShowName="allLogos" />
        <SplashScreen Image="Assets\splash-sdk.png" BackgroundColor="#00b2f0" />
      </VisualElements>
      <Extensions>
        <Extension Category="windows.cameraSettings" Executable="DeviceAppForWebcam.exe" EntryPoint="DeviceAppForWebcam.App" />
      </Extensions>
    </Application>
  </Applications>
</Package>
手順 2: UI をビルドする
アプリをビルドする前に、デザイナーやマーケティング チームと協力してユーザー エクスペリエンスを設計する必要があります。 ユーザー エクスペリエンスは、会社のブランド化の側面を投影し、ユーザーとの接続を構築するのに役立ちます。
Design guidelines
カスタム ポップアップを設計する前に 、UWP アプリのポップアップ ガイドライン を確認することが重要です。 このガイドラインは、ポップアップが他の UWP アプリと一貫性のある直感的なエクスペリエンスを提供するのに役立ちます。
アプリのメイン ページでは、Windows 8.1 で複数のアプリをさまざまなサイズで 1 つのモニターに表示できることに注意してください。 画面サイズ、ウィンドウ サイズ、向きの間でアプリを適切にリフローする方法の詳細については、次のガイドラインを参照してください。
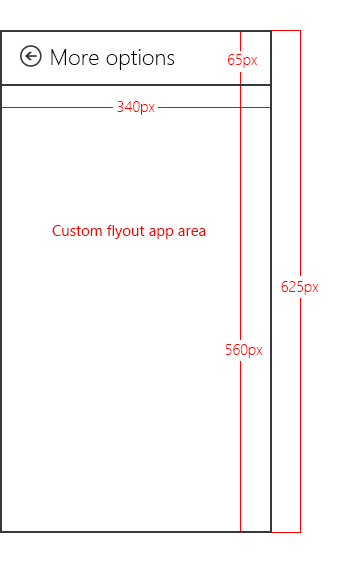
Flyout dimensions
より多くのカメラ オプションを表示するポップアップは、高さ 625 ピクセル、幅 340 ピクセルです。 The area containing the More options text at the top is provided by Windows and is approximately 65 pixels high, leaving 560 pixels for the viewable area of the custom flyout. カスタム ポップアップの幅が 340 ピクセルを超えないようにする必要があります。
Note
カスタム ポップアップの高さが 560 ピクセルを超える場合、ユーザーはスライドまたはスクロールして、表示可能領域の上または下にあるポップアップの一部を表示できます。
Suggested effects
Color effects. たとえば、グレースケール、セピア トーン、画像全体の日射化などです。
Face-tracking effects. 写真内で顔が識別され、その上に帽子や眼鏡などのオーバーレイが追加されます。
Scene modes. これらは、さまざまな照明条件の事前設定された露出とフォーカス モードです。
Suggested settings
UWP デバイス アプリのカスタム ポップアップでは、製造元が提供する色補正スキームなど、ハードウェアで実装された設定を有効にするスイッチを提供できます。
UWP デバイス アプリによって公開されるその他の設定を補完する基本プロパティを実装します。 たとえば、多くのデバイスでは、明るさ、コントラスト、ちらつき、フォーカス、露出を調整するためのコントロールが公開される場合がありますが、明るさとコントラストを自動的に調整するために TrueColor を実装するデバイスでは、これらの設定を指定する必要がない場合があります。
Restrictions
アプリがストリーミングまたはキャプチャされていない場合は、メイン アプリから (
CameraOptionsUI.Showメソッドを呼び出して) UWP デバイス アプリのカスタム ポップアップを開かないでください。プレビューを提供したり、UWP デバイス アプリのカスタム ポップアップ内からビデオ ストリームの所有権を取得したりしないでください。 カスタム ポップアップは、ビデオをキャプチャする別のアプリのコンパニオンとして機能することを目的としています。 キャプチャ アプリにはビデオ ストリームの所有権があります。 低レベルの API を使用してビデオ ストリームにアクセスしないでください。 これにより、予期しない動作が発生し、キャプチャ アプリがストリームへのアクセスを失う可能性があります。
カスタム ポップアップの解像度を調整しないでください。
ポップアップ、通知、またはダイアログを、カスタム ポップアップ用の領域外に表示しないでください。 これらの種類のダイアログは許可されません。
カスタム ポップアップ内でオーディオまたはビデオのキャプチャを開始しないでください。 カスタム ポップアップは、キャプチャ自体を開始するのではなく、ビデオをキャプチャしている別のアプリを拡張するためのものです。 さらに、オーディオまたはビデオをキャプチャするとシステム ダイアログがトリガーされる場合があり、ポップアップ ダイアログはカスタム ポップアップ内では許可されません。
手順 3: アクティベーションを処理する
アプリがカメラ設定拡張機能を宣言している場合は、アプリのアクティブ化イベントを処理するために OnActivated メソッドを実装する必要があります。 This event is triggered when a UWP app, using the CameraCaptureUI class, calls the CameraOptionsUI.Show method. アプリのアクティブ化は、アプリの起動時に起動するページをアプリが選択できる場合です。 カメラ設定拡張機能を宣言したアプリの場合、Windows は、アクティブ化されたイベント引数 Windows.ApplicationModel.Activation.IActivatedEventArgs でビデオ デバイスを渡します。
A UWP device app can determine that the activation is intended for camera settings (that someone just tapped More options on the Camera options dialog) when the event argument's kind property is equal to Windows.ApplicationModel.Activation.ActivationKind.CameraSettings.
This example shows the activation event handler in the OnActivated method, as it appears in the App.xaml.cs file. The event arguments are then cast as Windows.ApplicationModel.Activation.CameraSettingsActivatedEventArgs and sent to the Initialize method of the custom flyout (DeviceAppPage.xaml.cs).
protected override void OnActivated(IActivatedEventArgs args)
{
    if (args.Kind == ActivationKind.CameraSettings)
    {
        base.OnActivated(args);
        DeviceAppPage page = new DeviceAppPage();
        Window.Current.Content = page;
        page.Initialize((CameraSettingsActivatedEventArgs)args);

        Window.Current.Activate();
    }
}
手順 4: 設定と効果を制御する
When the Initialize method of the custom flyout (DeviceAppPage.xaml.cs) is called, the video device is passed to the flyout through the event arguments. これらの引数は、カメラを制御するためのプロパティを公開します。
The args.VideoDeviceController property provides an object of type Windows.Media.Devices.VideoDeviceController. このオブジェクトは、標準設定を調整するためのメソッドを提供します。
The args.VideoDeviceExtension property is a pointer to the camera driver MFT. ドライバー MFT インターフェイスが公開されていない場合、このプロパティは null になります。 カメラ ドライバーの MFT の詳細については、「 カメラ ドライバー MFT の作成」を参照してください。
This example shows a portion of the Initialize method, as it appears in the DeviceAppPage.xaml.cs file. ここでは、ビデオ デバイス コントローラー (videoDevController オブジェクト) とカメラ ドライバー MFT (lcWrapper オブジェクト) が作成され、ポップアップに現在のカメラ設定が設定されます。
public void Initialize(CameraSettingsActivatedEventArgs args)
{
    videoDevController = (VideoDeviceController)args.VideoDeviceController;

    if (args.VideoDeviceExtension != null)
    {
        lcWrapper = new WinRTComponent();
        lcWrapper.Initialize(args.VideoDeviceExtension);
    }

    bool bAuto = false;
    double value = 0.0;

    if (videoDevController.Brightness.Capabilities.Step != 0)
    {
        slBrt.Minimum = videoDevController.Brightness.Capabilities.Min;
        slBrt.Maximum = videoDevController.Brightness.Capabilities.Max;
        slBrt.StepFrequency = videoDevController.Brightness.Capabilities.Step;
        videoDevController.Brightness.TryGetValue(out value);
        slBrt.Value = value;
    }
    else
    {
        slBrt.IsEnabled = false;
    }
    if (videoDevController.Brightness.Capabilities.AutoModeSupported)
    {
        videoDevController.Brightness.TryGetAuto(out bAuto);
        tsBrtAuto.IsOn = bAuto;
    }
    else
    {
        tsBrtAuto.IsOn = false;
        tsBrtAuto.IsEnabled = false;
    }

    if (videoDevController.Contrast.Capabilities.Step != 0)
    {
        slCrt.Minimum = videoDevController.Contrast.Capabilities.Min;
        slCrt.Maximum = videoDevController.Contrast.Capabilities.Max;
        slCrt.StepFrequency = videoDevController.Contrast.Capabilities.Step;
        videoDevController.Contrast.TryGetValue(out value);
        slCrt.Value = value;
    }
    else
    {
        slCrt.IsEnabled = false;
    }
    // . . .
    // . . .
    // . . .
The camera driver MFT is demonstrated in the Driver MFT sample. カメラ ドライバーの MFT の詳細については、「 カメラ ドライバー MFT の作成」を参照してください。
手順 5: 変更を適用する
ポップアップ上のコントロールに変更が加えられた場合、対応するコントロールの Changed イベントを使用して、ビデオ デバイス コントローラー (videoDevController オブジェクト) とカメラ ドライバー MFT (lcWrapper オブジェクト) に変更を適用します。
This example shows the Changed methods that apply changes to the video device controller and the camera driver MFT, as they appear in the DeviceAppPage.xaml.cs file.
protected void OnBrtAutoToggleChanged(object sender, RoutedEventArgs e)
{
    videoDevController.Brightness.TrySetAuto(tsBrtAuto.IsOn);
    slBrt.IsEnabled = !tsBrtAuto.IsOn;
}

protected void OnBrtSliderValueChanged(object sender, RoutedEventArgs e)
{
    videoDevController.Brightness.TrySetValue(slBrt.Value);
}

protected void OnCrtAutoToggleChanged(object sender, RoutedEventArgs e)
{
    videoDevController.Contrast.TrySetAuto(tsCrtAuto.IsOn);
    slCrt.IsEnabled = !tsCrtAuto.IsOn;
}

protected void OnCrtSliderValueChanged(object sender, RoutedEventArgs e)
{
    videoDevController.Contrast.TrySetValue(slCrt.Value);
}

protected void OnFocusAutoToggleChanged(object sender, RoutedEventArgs e)
{
    videoDevController.Focus.TrySetAuto(tsFocusAuto.IsOn);
    slFocus.IsEnabled = !tsFocusAuto.IsOn;
}

protected void OnFocusSliderValueChanged(object sender, RoutedEventArgs e)
{
    videoDevController.Focus.TrySetValue(slFocus.Value);
}

protected void OnExpAutoToggleChanged(object sender, RoutedEventArgs e)
{
    videoDevController.Exposure.TrySetAuto(tsExpAuto.IsOn);
    slExp.IsEnabled = !tsExpAuto.IsOn;
}

protected void OnExpSliderValueChanged(object sender, RoutedEventArgs e)
{
    videoDevController.Exposure.TrySetValue(slExp.Value);
}

protected void OnEffectEnabledToggleChanged(object sender, RoutedEventArgs e)
{
    if (tsEffectEnabled.IsOn)
    {
        lcWrapper.Enable();
    }
    else
    {
        lcWrapper.Disable();
    }
    slEffect.IsEnabled = tsEffectEnabled.IsOn;
}

protected void OnEffectSliderValueChanged(object sender, RoutedEventArgs e)
{
    lcWrapper.UpdateDsp(Convert.ToInt32(slEffect.Value));
}
アプリのテスト
This section describes how to install a UWP device app that provides a custom flyout for More options of a camera, as demonstrated in the UWP device app for camera sample.
UWP デバイス アプリをテストする前に、デバイス メタデータを使用してカメラにリンクする必要があります。
- デバイス アプリ情報をプリンターに追加するには、プリンターのデバイス メタデータ パッケージのコピーが必要です。 デバイス メタデータがない場合は、「UWP デバイス アプリのデバイス メタデータを作成する」のトピックの説明に従って、デバイス メタデータ作成ウィザードを使用して作成できます。
Note
デバイス メタデータ作成ウィザードを使用するには、このトピックの手順を完了する前に、Microsoft Visual Studio Professional、Microsoft Visual Studio Ultimate、または Windows 8.1 用スタンドアロン SDK をインストールする必要があります。 Microsoft Visual Studio Express for Windows をインストールすると、ウィザードを含まないバージョンの SDK がインストールされます。
次の手順では、アプリをビルドし、デバイス メタデータをインストールします。
テスト署名を有効にします。
%ProgramFiles(x86)%\Windows Kits\8.1\bin\x86 から、DeviceMetadataWizard.exe をダブルクリックしてデバイス メタデータ作成ウィザードを起動してください。
From the Tools menu, select Enable Test Signing.
コンピューターを再起動する
ソリューション (.sln) ファイルを開いてソリューションをビルドします。 F7 キーを押すか、サンプルが読み込まれた後、上部のメニューから Build->Build ソリューション に移動します。
プリンターを取り外してアンインストールします。 この手順は、次回デバイスが検出されるときに更新されたデバイス メタデータを Windows が読み取るようにする必要があります。
デバイス メタデータを編集して保存します。 デバイス アプリをデバイスにリンクするには、デバイス アプリをデバイスに関連付ける必要があります。
Note
デバイス メタデータをまだ作成していない場合は、「 UWP デバイス アプリのデバイス メタデータを作成する」を参照してください。
デバイス メタデータ作成ウィザードがまだ開いていない場合は、DeviceMetadataWizard.exeをダブルクリックして、%ProgramFiles(x86)%\Windows Kits\8.1\bin\x86 から起動します。
[ デバイス メタデータの編集] をクリックします。 これにより、既存のデバイス メタデータ パッケージを編集できます。
In the Open dialog box, locate the device metadata package associated with your UWP device app. (It has a devicemetadata-ms file extension.)
[ UWP デバイス アプリ情報の指定 ] ページで、[ UWP デバイス アプリ] ボックスに Microsoft Store アプリ情報を入力します。 「インポート UWP アプリ マニフェスト ファイル をクリックすると、パッケージ名、発行元名、および UWP アプリ ID が自動的に入力されます。」
When you're done, click Next until you get to the Finish page.
[ デバイス メタデータ パッケージの確認 ] ページで、すべての設定が正しいことを確認し、[ ローカル コンピューター上のメタデータ ストアにデバイス メタデータ パッケージをコピー する] チェック ボックスをオンにします。 Then click Save.
デバイスが接続されているときに Windows が更新されたデバイス メタデータを読み取るように、デバイスを再接続します。
外部カメラがある場合は、カメラを接続するだけです。
内蔵カメラがある場合は、[デバイスとプリンター] フォルダーの PC を更新します。 デバイス マネージャーを使用してハードウェアの変更をスキャンします。 デバイスが検出されると、Windows は更新されたメタデータを読み取る必要があります。
Note
カメラ ドライバー MFT のインストールの詳細については、「カメラ ドライバー MFT の作成」の「テスト」セクションを参照してください。
サンプルのテスト
カメラ オプション エクスペリエンスをテストするには、まず次のサンプルをダウンロードします。
次に、 Driver MFT サンプル ページで提供されているサンプル テスト手順に従います。