이전: Markdown 콘텐츠 표시
이제 기본 markdown 콘텐츠를 제공하는 방법을 알아보고 적응형 카드의 기능을 활용하여 더 의미 있는 내용을 표시해 보겠습니다. 양식을 만들거나 더 복잡한 콘텐츠를 표시하는 데 유용합니다.
양식 작업
인터페이스를 사용하여 명령 팔레트 IFormContent 에서 카드를 만들 수 있습니다(도구 키트 구현에 대한 FormContent 참조). 이를 통해 적응형 카드 JSON을 제공할 수 있으며 명령 팔레트가 이를 렌더링합니다. 사용자가 양식을 제출하면 명령 팔레트는 양식의 SubmitForm JSON 페이로드 및 입력을 사용하여 양식에서 메서드를 호출합니다.
팁 (조언)
적응형 카드 페이로드는 적응형 카드 디자이너를 사용하여 만들 수 있습니다. 해당 장소에서 카드를 디자인하고, 그런 다음 JSON 페이로드를 확장에 복사할 수 있습니다.
-
Pages디렉터리에서 새 클래스를 추가합니다. - 클래스 이름 지정
FormPage - 클래스를 업데이트합니다.
FormPage
internal sealed partial class FormPage : ContentPage
{
    private readonly SampleContentForm sampleForm = new();

    public override IContent[] GetContent() => [sampleForm];

    public FormPage()
    {
        Name = "Open";
        Title = "Sample Content";
        Icon = new IconInfo("\uECA5"); // Tiles
    }
}
FormPage는 사용자에게 양식(SampleContentForm)을 표시하는 콘텐츠 페이지입니다.
SampleContentForm의 인스턴스를 생성하여 사용자 입력 폼에 대한 UI 및 논리를 설명하는 양식을 정의합니다(이 양식은 나중에 정의됩니다).
- 파일의 맨 아래에(클래스 아래) 다음을
FormPage추가합니다.
internal sealed partial class SampleContentForm : FormContent
{
public SampleContentForm()
{
TemplateJson = $$"""
{
"$schema": "http://adaptivecards.io/schemas/adaptive-card.json",
"type": "AdaptiveCard",
"version": "1.6",
"body": [
{
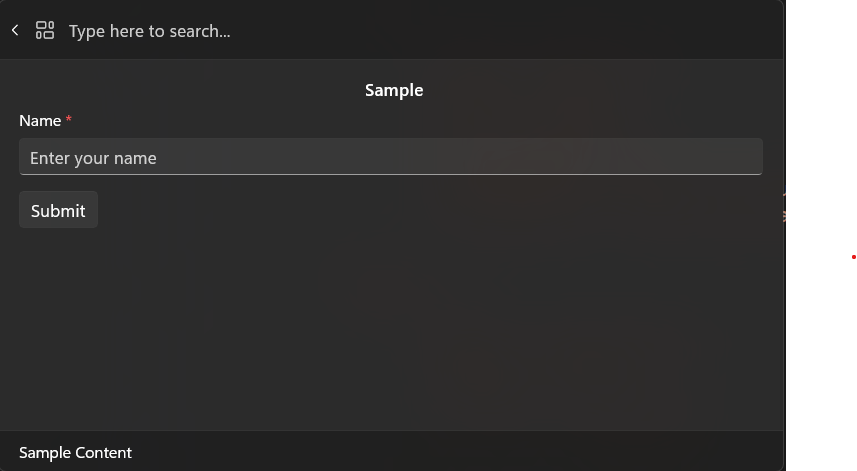
"type": "TextBlock",
"size": "medium",
"weight": "bolder",
"text": " Sample",
"horizontalAlignment": "center",
"wrap": true,
"style": "heading"
},
{
"type": "Input.Text",
"label": "Name",
"style": "text",
"id": "SimpleVal",
"isRequired": true,
"errorMessage": "Name is required",
"placeholder": "Enter your name"
}
],
"actions": [
{
"type": "Action.Submit",
"title": "Submit",
"data": {
"id": "1234567890"
}
}
]
}
""";
}
public override CommandResult SubmitForm(string payload)
{
var formInput = JsonNode.Parse(payload)?.AsObject();
Debug.WriteLine($"Form submitted with formInput: {formInput}");
if (formInput == null)
{
return CommandResult.GoHome();
}
ConfirmationArgs confirmArgs = new()
{
PrimaryCommand = new AnonymousCommand(
() =>
{
string? name = formInput["Name"]?.ToString();
ToastStatusMessage t = new($"Hi {name}" ?? "No name entered");
t.Show();
})
{
Name = "Confirm",
Result = CommandResult.KeepOpen(),
},
Title = "You can set a title for the dialog",
Description = "Are you really sure you want to do the thing?",
};
return CommandResult.Confirm(confirmArgs);
}
}
SampleContentForm 양식 및 양식 제출 논리가 포함됩니다.
TemplateJson 양식 구조 및 동작이 포함됩니다. 이 예제에서는 ID가 "Name"이고 양식을 제출하는 작업이 하나 있는 텍스트 입력을 하나만 포함합니다.
SubmitForm는 페이로드를 구문 분석을 처리합니다. 잘못된 경우 명령을 홈으로 반환하고, 그렇지 않으면 확인 대화 상자와 토스트 알림을 표시합니다.
-
<ExtensionName>CommandsProvider.cs열기 -
MarkdownPage을FormPage로 교체:
public <ExtensionName>CommandsProvider()
{
    DisplayName = "My sample extension";
    Icon = IconHelpers.FromRelativePath("Assets\\StoreLogo.png");
    _commands = [
+       new CommandItem(new FormPage()) { Title = DisplayName },
    ];
}
- 확장 배포
- 명령 팔레트에서
Reload
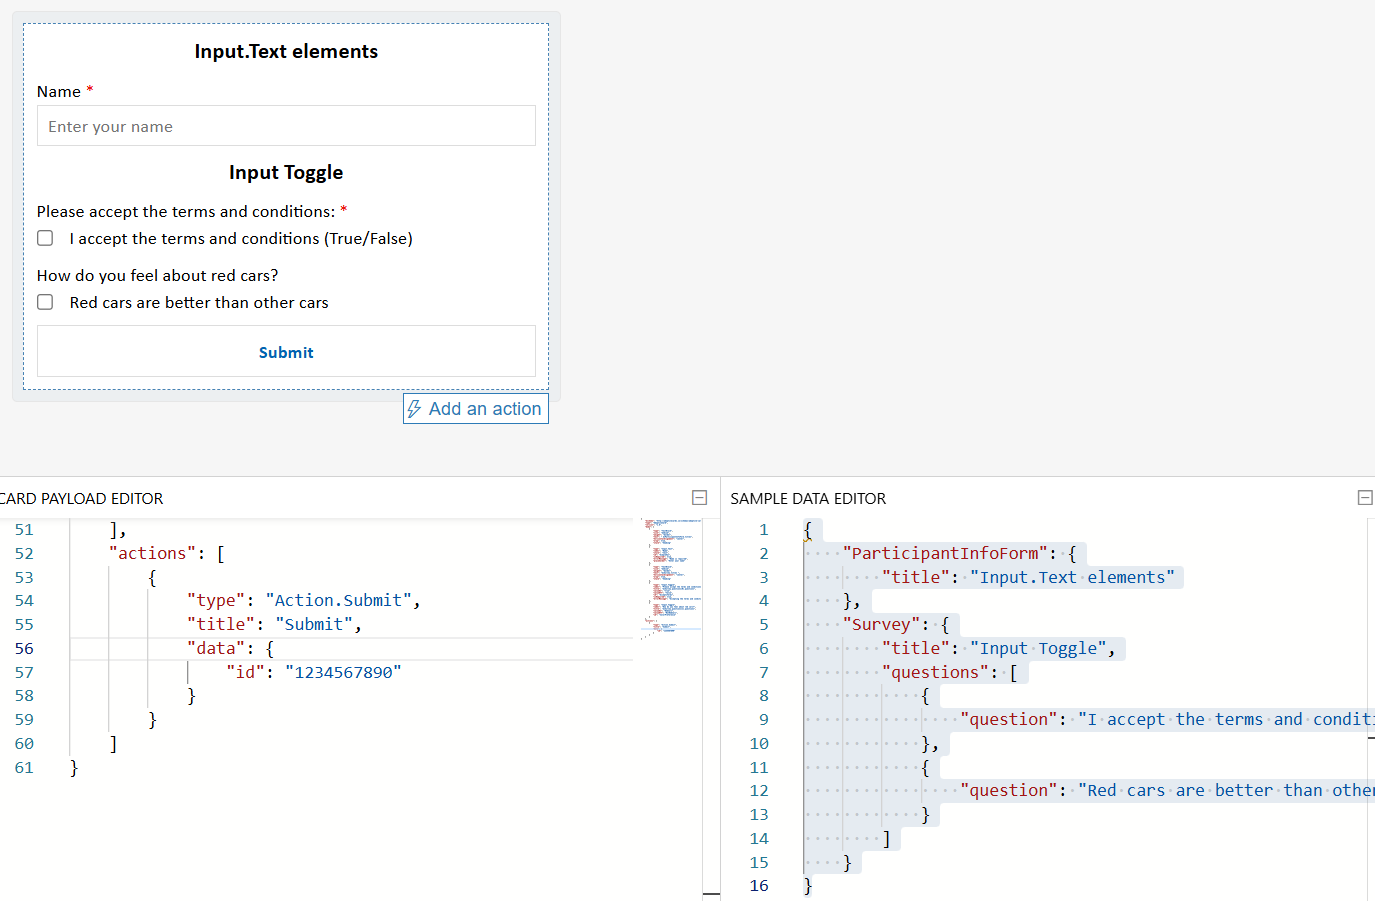
적응형 카드는 다른 json 개체를 사용하여 사용자 지정 양식을 동적으로 만드는 것을 포함하여 더 복잡한 양식을 수행할 수 있습니다. 먼저 적응형 카드 디자이너 를 사용하여 양식을 설정한 다음 명령을 업데이트합니다.
- https://adaptivecards.io/designer/ 열기
- json을
CARD PAYLOAD EDITOR다음으로 바꿉다.
{
    "$schema": "http://adaptivecards.io/schemas/adaptive-card.json",
    "type": "AdaptiveCard",
    "version": "1.6",
    "body": [
        {
            "type": "TextBlock",
            "size": "medium",
            "weight": "bolder",
            "text": " ${ParticipantInfoForm.title}",
            "horizontalAlignment": "center",
            "wrap": true,
            "style": "heading"
        },
        {
            "type": "Input.Text",
            "label": "Name",
            "style": "text",
            "id": "Name",
            "isRequired": true,
            "errorMessage": "Name is required",
            "placeholder": "Enter your name"
        },
        {
            "type": "TextBlock",
            "size": "medium",
            "weight": "bolder",
            "text": "${Survey.title} ",
            "horizontalAlignment": "center",
            "wrap": true,
            "style": "heading"
        },
        {
            "type": "Input.Toggle",
            "label": "Please accept the terms and conditions:",
            "title": "${Survey.questions[0].question}",
            "valueOn": "true",
            "valueOff": "false",
            "id": "AcceptsTerms",
            "isRequired": true,
            "errorMessage": "Accepting the terms and conditions is required"
        },
        {
            "type": "Input.Toggle",
            "label": "How do you feel about red cars?",
            "title": "${Survey.questions[1].question}",
            "valueOn": "RedCars",
            "valueOff": "NotRedCars",
            "id": "ColorPreference"
        }
    ],
    "actions": [
        {
            "type": "Action.Submit",
            "title": "Submit",
            "data": {
                "id": "1234567890"
            }
        }
    ]
}
- json을
SAMPLE DATA EDITOR다음의 내용으로 바꾸세요.
{
    "ParticipantInfoForm": {
        "title": "Input.Text elements"
    },
    "Survey": {
        "title": "Input Toggle",
        "questions": [
            {
                "question": "I accept the terms and conditions (True/False)"
            },
            {
                "question": "Red cars are better than other cars"
            }
        ]
    }
}
디자이너 도구는 다음과 같이 표시됩니다.
확장에 이 콘텐츠를 추가하려면 다음을 수행합니다.
-
TemplateJson에CARD PAYLOAD EDITOR콘텐츠 업데이트 - 아래에서 다음을 추가합니다.
TemplateJson
        DataJson = $$"""
{
    "ParticipantInfoForm": {
        "title": "Input.Text elements"
    },
    "Survey": {
        "title": "Input Toggle",
        "questions": [
            {
                "question": "I accept the terms and conditions (True/False)"
            },
            {
                "question": "Red cars are better than other cars"
            }
        ]
    }
}
""";
- 확장 배포
- 명령 팔레트에서
Reload
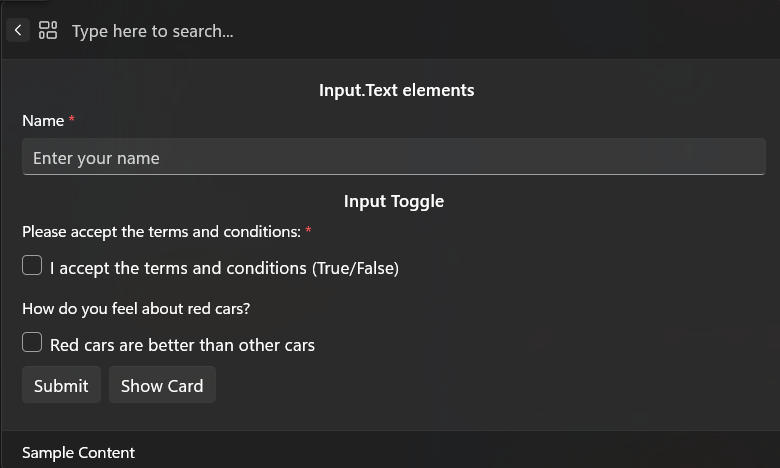
TemplateJson와 DataJson는 동적이고 데이터 기반의 양식을 만들기 위해 함께 작업합니다.
TemplateJson 는 fhe Form Blueprint 및 DataJson 동적 콘텐츠 원본으로 작동할 수 있습니다.
전체 샘플
양식 및 콘텐츠 페이지를 사용하는 전체 예제를 보려면 다음을 참조하세요 SamplePagesExtension/Pages/SampleContentPage.cs.
키 항목
FormContent의TemplateJson속성을 사용하여 양식 레이아웃을 정의합니다. 이것은 https://adaptivecards.io/designer/의 카드 페이로드 편집기에서 JSON 페이로드입니다. 귀하의 양식의 구조 및 UI를 설명합니다.필요에 따라 속성을 사용하여 동적 데이터를 바인딩합니다
DataJson. 적응형 카드 디자이너의 샘플 데이터 편집기에서 JSON입니다. ${...} 자리 표시자를 사용하여 카드에 동적 값을 삽입할 수 있으므로 양식을 보다 쉽게 지역화하고 유지 관리할 수 있습니다.SubmitForm메서드를 구현하여 양식 제출을 처리합니다. 이 메서드는 사용자가 양식을 제출할 때 호출됩니다. 폼의 페이로드를 JSON 문자열로 받게 됩니다. 이 문자열은 구문 분석하여 작업을 트리거하거나 확인 대화 상자를 표시하거나 탐색 결과를 반환하는 데 사용할 수 있습니다.
public override CommandResult SubmitForm(string payload)
{
    var formInput = JsonNode.Parse(payload)?.AsObject();
    if (formInput == null)
    {
        return CommandResult.GoHome();
    }

    // retrieve the value of the input field with the id "name"
    var name = formInput["name"]?.AsString();

    // do something with the data

    // and eventually
    return CommandResult.GoBack();
}
비고
확장에서 다양한 IContent 형식을 혼합하고 일치시킬 수 있습니다. 예를 들어 MarkdownContent 블록을 사용하여 게시물을 표시한 다음, FormContent 블록을 사용하여 회신을 수집할 수 있습니다.
관련 콘텐츠
GitHub에서 Microsoft와 공동 작업
이 콘텐츠의 원본은 GitHub에서 찾을 수 있으며, 여기서 문제와 끌어오기 요청을 만들고 검토할 수도 있습니다. 자세한 내용은 참여자 가이드를 참조하세요.

Windows developer