Nuta
Dostęp do tej strony wymaga autoryzacji. Możesz spróbować się zalogować lub zmienić katalog.
Dostęp do tej strony wymaga autoryzacji. Możesz spróbować zmienić katalogi.
Jest to pierwsza część pełnego przewodnika dotyczącego tworzenia spakowanej aplikacji systemu Windows, która używa funkcji Windows Hello jako alternatywy dla tradycyjnych systemów uwierzytelniania nazw użytkowników i haseł. W takim przypadku aplikacja jest aplikacją WinUI, ale to samo podejście może być używane z dowolną spakowaną aplikacją dla Windows, w tym aplikacjami WPF i Windows Forms. Aplikacja używa nazwy użytkownika do logowania i tworzy klucz hello dla każdego konta. Te konta będą chronione przez numer PIN skonfigurowany w ustawieniach systemu Windows w konfiguracji usługi Windows Hello.
Ten przewodnik jest podzielony na dwie części: kompilowanie aplikacji i łączenie usługi zaplecza. Po zakończeniu pracy z tym artykułem przejdź do części 2: usługi logowania Windows Hello.
Przed rozpoczęciem należy zapoznać się z omówieniem Windows Hello, aby uzyskać ogólne informacje na temat działania usługi Windows Hello.
Rozpocznij
Aby skompilować ten projekt, potrzebujesz doświadczenia z językiem C# i XAML. Musisz również używać programu Visual Studio 2022 na komputerze z systemem Windows 10 lub Windows 11. Zobacz Rozpoczynanie tworzenia aplikacji systemu Windows , aby uzyskać pełne instrukcje dotyczące konfigurowania środowiska deweloperskiego.
- W programie Visual Studio wybierz pozycje Plik>Nowy>Projekt.
- W filtrach listy rozwijanej Nowy projekt wybierz odpowiednio pozycje C#/C++, Windows i WinUI.
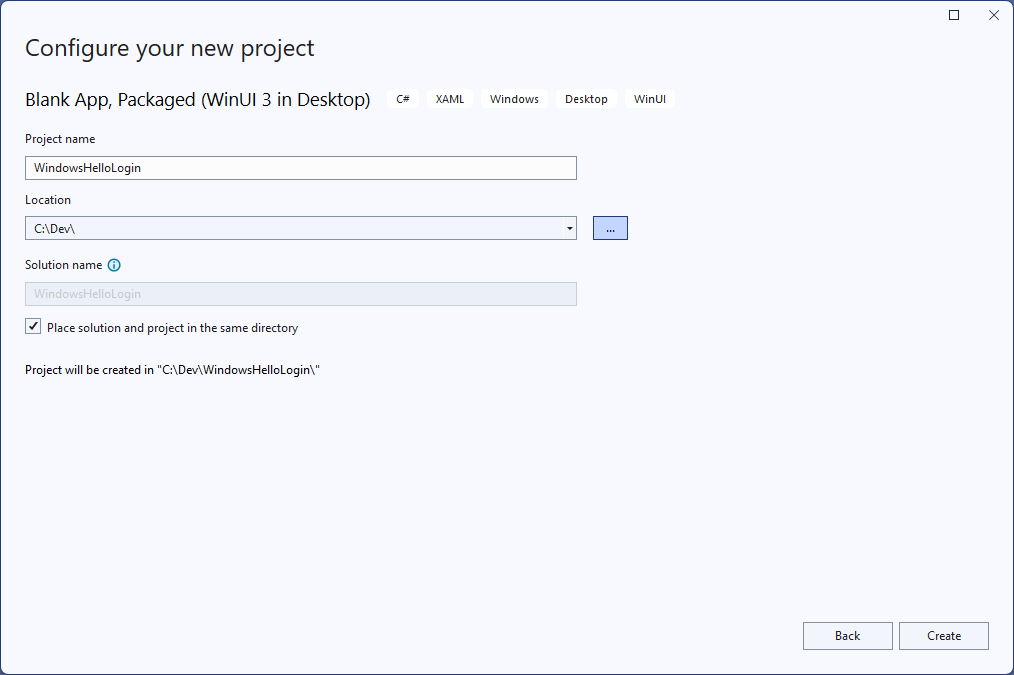
- Wybierz pozycję Pusta aplikacja, Spakowana (WinUI 3 w programie Desktop) i nadaj aplikacji nazwę "WindowsHelloLogin".
- Skompiluj i uruchom nową aplikację (F5), powinno zostać wyświetlone puste okno na ekranie. Zamknij aplikację.
Ćwiczenie 1. Logowanie przy użyciu funkcji Windows Hello
W tym ćwiczeniu dowiesz się, jak sprawdzić, czy usługa Windows Hello jest skonfigurowana na maszynie i jak zalogować się do konta przy użyciu funkcji Windows Hello.
W nowym projekcie utwórz nowy folder w rozwiązaniu o nazwie "Widoki". Ten folder będzie zawierać strony, do których nastąpi przejście w tym przykładzie. Kliknij prawym przyciskiem myszy projekt w Eksploratorze rozwiązań, wybierz polecenie Dodaj>nowy folder, a następnie zmień nazwę folderu na Views.

Otwórz plik MainWindow.xaml i zastąp
Windowzawartość pustąStackPanellubGridkontrolką. Wdrożymy nawigację po stronie i przejdziemy do nowej strony po załadowaniu okna MainWindow , więc nie potrzebujemy żadnej zawartości w systemie MainWindow.TitleDodaj właściwość do mainWindow w języku XAML. Atrybut powinien wyglądać następująco:Title="Windows Hello Login".Usuń program obsługi zdarzeń myButton_Click z MainWindow.xaml.cs, aby uniknąć błędów kompilacji. Ta procedura obsługi zdarzeń nie jest wymagana dla tego przykładu.
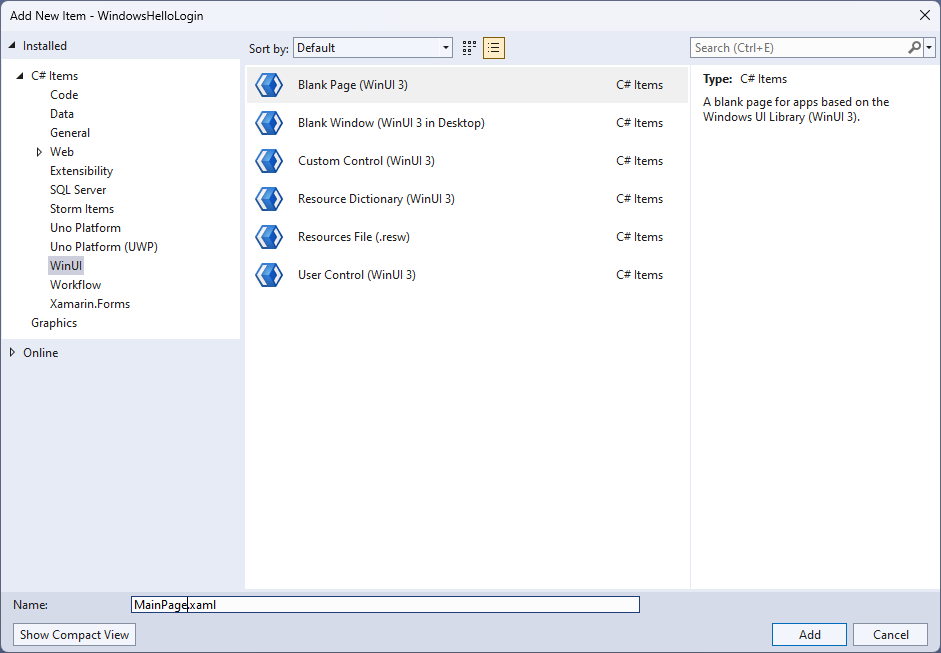
Kliknij prawym przyciskiem myszy nowy folder Widoki , wybierz pozycję Dodaj>nowy element i wybierz szablon Pusta strona . Nadaj tej stronie nazwę "MainPage.xaml".
Otwórz plik App.xaml.cs i zaktualizuj program obsługi OnLaunched , aby zaimplementować nawigację po stronie dla aplikacji. Należy również dodać metodę obsługi RootFrame_NavigationFailed , aby poradzić sobie z błędami występującymi podczas ładowania stron.
protected override void OnLaunched(Microsoft.UI.Xaml.LaunchActivatedEventArgs args)
{
    m_window = new MainWindow();
    var rootFrame = new Frame();
    rootFrame.NavigationFailed += RootFrame_NavigationFailed;
    rootFrame.Navigate(typeof(MainPage), args);
    m_window.Content = rootFrame;
    m_window.Activate();
}

private void RootFrame_NavigationFailed(object sender, NavigationFailedEventArgs e)
{
    throw new Exception($"Error loading page {e.SourcePageType.FullName}");
}
Należy również dodać cztery instrukcje using na początku pliku App.xaml.cs, aby usunąć błędy kompilacji w kodzie.
using Microsoft.UI.Xaml.Controls;
using Microsoft.UI.Xaml.Navigation;
using System;
using WindowsHelloLogin.Views;
Kliknij prawym przyciskiem myszy nowy folder Widoki , wybierz pozycję Dodaj>nowy element i wybierz szablon Pusta strona . Nadaj tej stronie nazwę "Login.xaml".
Aby zdefiniować interfejs użytkownika dla nowej strony logowania, dodaj następujący kod XAML. Ten XAML definiuje
StackPanel, aby wyrównać następujące elementy podrzędne:Element
TextBlock, który będzie zawierać tytuł.A
TextBlockdla komunikatów o błędach.Wartość
TextBoxdo wprowadzenia nazwy użytkownika.A
Buttonaby przejść do strony rejestracji.Element
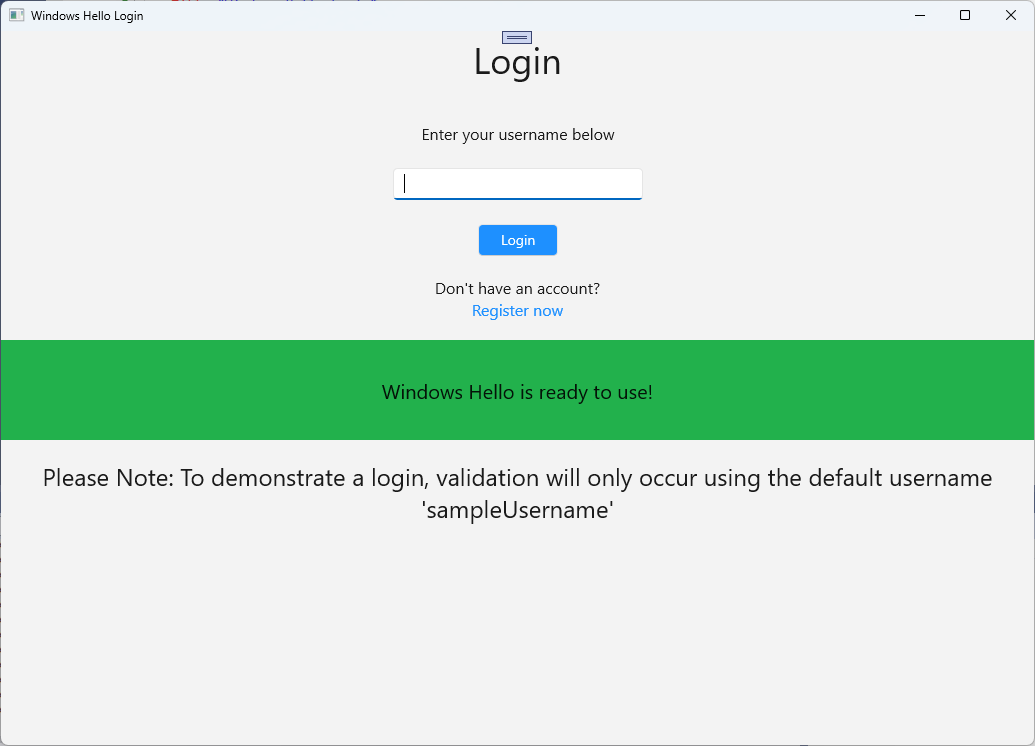
TextBlockzawierający stan funkcji Windows Hello.TextBlockw celu wyjaśnienia strony logowania, ponieważ jeszcze nie ma zaplecza ani skonfigurowanych użytkowników.<Grid> <StackPanel> <TextBlock Text="Login" FontSize="36" Margin="4" TextAlignment="Center"/> <TextBlock x:Name="ErrorMessage" Text="" FontSize="20" Margin="4" Foreground="Red" TextAlignment="Center"/> <TextBlock Text="Enter your username below" Margin="0,0,0,20" TextWrapping="Wrap" Width="300" TextAlignment="Center" VerticalAlignment="Center" FontSize="16"/> <TextBox x:Name="UsernameTextBox" Margin="4" Width="250"/> <Button x:Name="LoginButton" Content="Login" Background="DodgerBlue" Foreground="White" Click="LoginButton_Click" Width="80" HorizontalAlignment="Center" Margin="0,20"/> <TextBlock Text="Don't have an account?" TextAlignment="Center" VerticalAlignment="Center" FontSize="16"/> <TextBlock x:Name="RegisterButtonTextBlock" Text="Register now" PointerPressed="RegisterButtonTextBlock_OnPointerPressed" Foreground="DodgerBlue" TextAlignment="Center" VerticalAlignment="Center" FontSize="16"/> <Border x:Name="WindowsHelloStatus" Background="#22B14C" Margin="0,20" Height="100" > <TextBlock x:Name="WindowsHelloStatusText" Text="Windows Hello is ready to use!" Margin="4" TextAlignment="Center" VerticalAlignment="Center" FontSize="20"/> </Border> <TextBlock x:Name="LoginExplanation" FontSize="24" TextAlignment="Center" TextWrapping="Wrap" Text="Please Note: To demonstrate a login, validation will only occur using the default username 'sampleUsername'"/> </StackPanel> </Grid>
Żeby skompilować rozwiązanie, należy dodać kilka metod do pliku code-behind. Naciśnij F7 lub użyj Eksploratora rozwiązań , aby edytować plik Login.xaml.cs. Dodaj następujące dwie metody zdarzeń, aby obsługiwać zdarzenia Logowania i Rejestrowanie . Na razie te metody ustawią
ErrorMessage.Textna pusty ciąg. Pamiętaj, aby uwzględnić następujące instrukcje using. Będą one potrzebne do następnych kroków.using Microsoft.UI.Xaml; using Microsoft.UI.Xaml.Controls; using Microsoft.UI.Xaml.Input; using Microsoft.UI.Xaml.Media; using Microsoft.UI.Xaml.Navigation; using System; namespace WindowsHelloLogin.Views { public sealed partial class Login : Page { public Login() { this.InitializeComponent(); } private void LoginButton_Click(object sender, RoutedEventArgs e) { ErrorMessage.Text = ""; } private void RegisterButtonTextBlock_OnPointerPressed(object sender, PointerRoutedEventArgs e) { ErrorMessage.Text = ""; } } }Aby renderować stronę Logowania , zmodyfikuj kod MainPage , aby przejść do strony Logowania po załadowaniu strony MainPage . Otwórz plik MainPage.xaml.cs. W Eksploratorze rozwiązań kliknij dwukrotnie MainPage.xaml.cs. Jeśli nie możesz tego znaleźć, kliknij małą strzałkę obok MainPage.xaml, aby wyświetlić plik zawierający kod. Utwórz metodę obsługi zdarzeń Załadowane , która przejdzie do strony Logowania .
namespace WindowsHelloLogin.Views
{
    public sealed partial class MainPage : Page
    {
        public MainPage()
        {
            this.InitializeComponent();
            Loaded += MainPage_Loaded;
        }

        private void MainPage_Loaded(object sender, RoutedEventArgs e)
        {
            Frame.Navigate(typeof(Login));
        }
    }
}
Na stronie Logowanie należy obsłużyć
OnNavigatedTozdarzenie, aby sprawdzić, czy usługa Windows Hello jest dostępna na bieżącej maszynie. W Login.xaml.cs zaimplementuj następujący kod. Zauważysz, że obiekt WindowsHelloHelper wskazuje, że wystąpił błąd. Dzieje się tak, ponieważ nie utworzyliśmy jeszcze tej klasy pomocniczej.public sealed partial class Login : Page { public Login() { this.InitializeComponent(); } protected override async void OnNavigatedTo(NavigationEventArgs e) { // Check if Windows Hello is set up and available on this machine if (await WindowsHelloHelper.WindowsHelloAvailableCheckAsync()) { } else { // Windows Hello isn't set up, so inform the user WindowsHelloStatus.Background = new SolidColorBrush(Windows.UI.Color.FromArgb(255, 50, 170, 207)); WindowsHelloStatusText.Text = $"Windows Hello is not set up!{Environment.NewLine}Please go to Windows Settings and set up a PIN to use it."; LoginButton.IsEnabled = false; } } }Aby utworzyć klasę WindowsHelloHelper, kliknij prawym przyciskiem myszy projekt WindowsHelloLogin i kliknij polecenie Dodaj>nowy folder. Nadaj temu folderowi nazwę Utils.
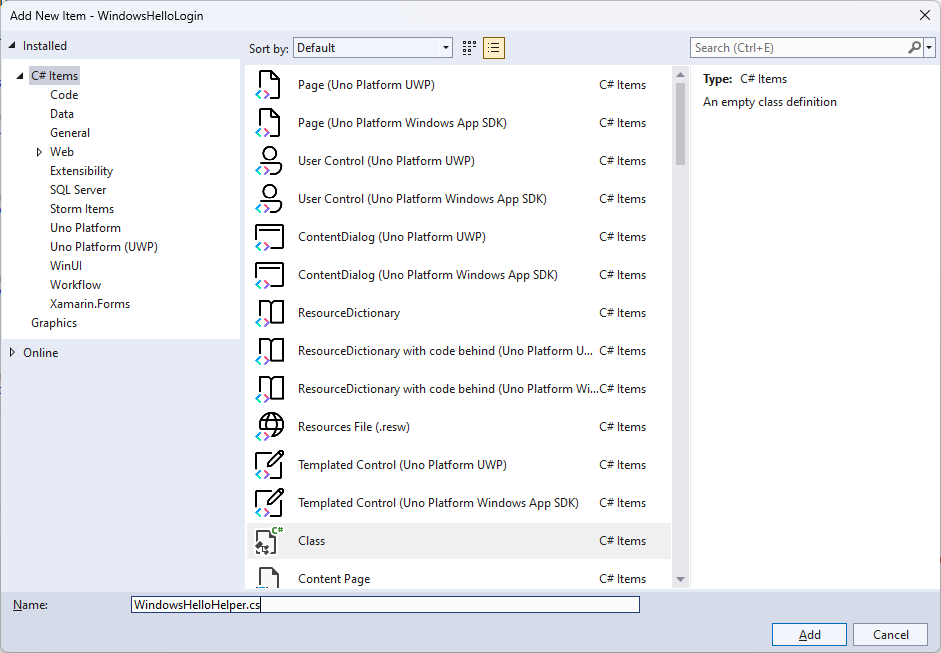
Kliknij prawym przyciskiem myszy folder Utils i wybierz polecenie Dodaj>klasę. Nadaj nowej klasie nazwę "WindowsHelloHelper.cs".
Zmień zakres klasy WindowsHelloHelper na
public static, a następnie dodaj następującą metodę, aby poinformować użytkownika, czy funkcja Windows Hello jest gotowa do użycia, czy nie. Należy dodać wymagane przestrzenie nazw.using System; using System.Diagnostics; using System.Threading.Tasks; using Windows.Security.Credentials; namespace WindowsHelloLogin.Utils { public static class WindowsHelloHelper { /// <summary> /// Checks to see if Windows Hello is ready to be used. /// /// Windows Hello has dependencies on: /// 1. Having a connected Microsoft Account /// 2. Having a Windows PIN set up for that account on the local machine /// </summary> public static async Task<bool> WindowsHelloAvailableCheckAsync() { bool keyCredentialAvailable = await KeyCredentialManager.IsSupportedAsync(); if (keyCredentialAvailable == false) { // Key credential is not enabled yet as user // needs to connect to a Microsoft Account and select a PIN in the connecting flow. Debug.WriteLine("Windows Hello is not set up!\nPlease go to Windows Settings and set up a PIN to use it."); return false; } return true; } } }W pliku Login.xaml.cs dodaj odwołanie do przestrzeni nazw
WindowsHelloLogin.Utils. Spowoduje to rozwiązanie błędu w metodzieOnNavigatedTo.using WindowsHelloLogin.Utils;Skompiluj i uruchom aplikację. Nastąpi przejście do strony logowania, a baner Windows Hello będzie wskazywać, czy usługa Windows Hello jest gotowa do użycia. Powinien zostać wyświetlony zielony lub niebieski baner wskazujący stan funkcji Windows Hello na maszynie.
Następną rzeczą, którą należy wykonać, jest utworzenie logiki logowania. Utwórz nowy folder w projekcie o nazwie "Modele".
W folderze Models utwórz nową klasę o nazwie "Account.cs". Ta klasa będzie działać jako model konta. Ponieważ jest to przykładowy projekt, będzie on zawierać tylko nazwę użytkownika. Zmień zakres klasy na
publici dodajUsernamewłaściwość .namespace WindowsHelloLogin.Models { public class Account { public string Username { get; set; } } }Aplikacja wymaga sposobu obsługi kont. W przypadku tego laboratorium praktycznego, ponieważ nie ma serwera ani bazy danych, lista użytkowników jest zapisywana i ładowana lokalnie. Kliknij prawym przyciskiem myszy folder Utils i dodaj nową klasę o nazwie "AccountHelper.cs". Zmień zakres klasy na
public static. AccountHelper to statyczna klasa zawierająca wszystkie niezbędne metody zapisywania i ładowania listy kont lokalnie. Zapisywanie i ładowanie działa przy użyciu narzędzia XmlSerializer. Należy również pamiętać plik, który został zapisany i gdzie został zapisany.using System; using System.Collections.Generic; using System.IO; using System.Text; using System.Threading.Tasks; using System.Xml.Serialization; using Windows.Storage; using WindowsHelloLogin.Models; namespace WindowsHelloLogin.Utils { public static class AccountHelper { // In the real world this would not be needed as there would be a server implemented that would host a user account database. // For this tutorial we will just be storing accounts locally. private const string USER_ACCOUNT_LIST_FILE_NAME = "accountlist.txt"; private static string _accountListPath = Path.Combine(ApplicationData.Current.LocalFolder.Path, USER_ACCOUNT_LIST_FILE_NAME); public static List<Account> AccountList = []; /// <summary> /// Create and save a useraccount list file. (Updating the old one) /// </summary> private static async void SaveAccountListAsync() { string accountsXml = SerializeAccountListToXml(); if (File.Exists(_accountListPath)) { StorageFile accountsFile = await StorageFile.GetFileFromPathAsync(_accountListPath); await FileIO.WriteTextAsync(accountsFile, accountsXml); } else { StorageFile accountsFile = await ApplicationData.Current.LocalFolder.CreateFileAsync(USER_ACCOUNT_LIST_FILE_NAME); await FileIO.WriteTextAsync(accountsFile, accountsXml); } } /// <summary> /// Gets the useraccount list file and deserializes it from XML to a list of useraccount objects. /// </summary> /// <returns>List of useraccount objects</returns> public static async Task<List<Account>> LoadAccountListAsync() { if (File.Exists(_accountListPath)) { StorageFile accountsFile = await StorageFile.GetFileFromPathAsync(_accountListPath); string accountsXml = await FileIO.ReadTextAsync(accountsFile); DeserializeXmlToAccountList(accountsXml); } return AccountList; } /// <summary> /// Uses the local list of accounts and returns an XML formatted string representing the list /// </summary> /// <returns>XML formatted list of accounts</returns> public static string SerializeAccountListToXml() { var xmlizer = new XmlSerializer(typeof(List<Account>)); var writer = new StringWriter(); xmlizer.Serialize(writer, AccountList); return writer.ToString(); } /// <summary> /// Takes an XML formatted string representing a list of accounts and returns a list object of accounts /// </summary> /// <param name="listAsXml">XML formatted list of accounts</param> /// <returns>List object of accounts</returns> public static List<Account> DeserializeXmlToAccountList(string listAsXml) { var xmlizer = new XmlSerializer(typeof(List<Account>)); TextReader textreader = new StreamReader(new MemoryStream(Encoding.UTF8.GetBytes(listAsXml))); return AccountList = (xmlizer.Deserialize(textreader)) as List<Account>; } } }Następnie zaimplementuj sposób dodawania i usuwania konta z lokalnej listy kont. Każde z tych działań zapisze listę. Ostateczną metodą, która będzie potrzebna w tym laboratorium praktycznym, jest metoda walidacji. Ponieważ nie ma serwera autoryzacji ani bazy danych użytkowników, będzie to weryfikowane względem pojedynczego użytkownika, który jest zakodowany na twardo. Te metody należy dodać do klasy AccountHelper .
public static Account AddAccount(string username)
{
    // Create a new account with the username
    var account = new Account() { Username = username };
    // Add it to the local list of accounts
    AccountList.Add(account);
    // SaveAccountList and return the account
    SaveAccountListAsync();
    return account;
}

public static void RemoveAccount(Account account)
{
    // Remove the account from the accounts list
    AccountList.Remove(account);
    // Re save the updated list
    SaveAccountListAsync();
}

public static bool ValidateAccountCredentials(string username)
{
    // In the real world, this method would call the server to authenticate that the account exists and is valid.
    // However, for this tutorial, we'll just have an existing sample user that's named "sampleUsername".
    // If the username is null or does not match "sampleUsername" validation will fail.
    // In this case, the user should register a new Windows Hello user.

    if (string.IsNullOrEmpty(username))
    {
        return false;
    }

    if (!string.Equals(username, "sampleUsername"))
    {
        return false;
    }

    return true;
}
Następną czynnością, którą należy wykonać, jest obsługa żądania logowania od użytkownika. W Login.xaml.cs utwórz nową zmienną prywatną, która będzie przechowywać bieżące logowanie do konta. Następnie dodaj nową metodę o nazwie SignInWindowsHelloAsync. Spowoduje to zweryfikowanie poświadczeń konta przy użyciu metody AccountHelper.ValidateAccountCredentials . Ta metoda zwróci wartość logiczną , jeśli wprowadzona nazwa użytkownika jest taka sama jak zakodowana wartość ciągu, która została skonfigurowana w poprzednim kroku. Zakodowana wartość dla tego przykładu to "sampleUsername".
using WindowsHelloLogin.Models;
using WindowsHelloLogin.Utils;
using System.Diagnostics;
using System.Threading.Tasks;

namespace WindowsHelloLogin.Views
{
    public sealed partial class Login : Page
    {
        private Account _account;

        public Login()
        {
            this.InitializeComponent();
        }

        protected override async void OnNavigatedTo(NavigationEventArgs e)
        {
            // Check if Windows Hello is set up and available on this machine
            if (await WindowsHelloHelper.WindowsHelloAvailableCheckAsync())
            {
            }
            else
            {
                // Windows Hello is not set up, so inform the user
                WindowsHelloStatus.Background = new SolidColorBrush(Windows.UI.Color.FromArgb(255, 50, 170, 207));
                WindowsHelloStatusText.Text = "Windows Hello is not set up!\nPlease go to Windows Settings and set up a PIN to use it.";
                LoginButton.IsEnabled = false;
            }
        }

        private async void LoginButton_Click(object sender, RoutedEventArgs e)
        {
            ErrorMessage.Text = "";
            await SignInWindowsHelloAsync();
        }

        private void RegisterButtonTextBlock_OnPointerPressed(object sender, PointerRoutedEventArgs e)
        {
            ErrorMessage.Text = "";
        }

        private async Task SignInWindowsHelloAsync()
        {
            if (AccountHelper.ValidateAccountCredentials(UsernameTextBox.Text))
            {
                // Create and add a new local account
                _account = AccountHelper.AddAccount(UsernameTextBox.Text);
                Debug.WriteLine("Successfully signed in with traditional credentials and created local account instance!");

                //if (await WindowsHelloHelper.CreateWindowsHelloKeyAsync(UsernameTextBox.Text))
                //{
                //    Debug.WriteLine("Successfully signed in with Windows Hello!");
                //}
            }
            else
            {
                ErrorMessage.Text = "Invalid Credentials";
            }
        }
    }
}
Być może zauważono kod z komentarzem, który odwołuje się do metody w systemie WindowsHelloHelper. W WindowsHelloHelper.cs dodaj nową metodę o nazwie CreateWindowsHelloKeyAsync. Ta metoda używa interfejsu API Windows Hello w KeyCredentialManager. Wywołanie RequestCreateAsync spowoduje utworzenie klucza Windows Hello specyficznego dla accountId i komputera lokalnego. Zwróć uwagę na komentarze w instrukcji switch, jeśli chcesz zaimplementować to w rzeczywistym scenariuszu.
/// <summary>
/// Creates a Windows Hello key on the machine using the account ID provided.
/// </summary>
/// <param name="accountId">The account ID associated with the account that we are enrolling into Windows Hello</param>
/// <returns>Boolean indicating if creating the Windows Hello key succeeded</returns>
public static async Task<bool> CreateWindowsHelloKeyAsync(string accountId)
{
    KeyCredentialRetrievalResult keyCreationResult = await KeyCredentialManager.RequestCreateAsync(accountId, KeyCredentialCreationOption.ReplaceExisting);

    switch (keyCreationResult.Status)
    {
        case KeyCredentialStatus.Success:
            Debug.WriteLine("Successfully created key");

            // In the real world, authentication would take place on a server.
            // So, every time a user migrates or creates a new Windows Hello
            // account, details should be pushed to the server.
            // The details that would be pushed to the server include:
            // The public key, keyAttestation (if available),
            // certificate chain for attestation endorsement key (if available),
            // status code of key attestation result: keyAttestationIncluded or
            // keyAttestationCanBeRetrievedLater and keyAttestationRetryType.
            // As this sample has no concept of a server, it will be skipped for now.
            // For information on how to do this, refer to the second sample.

            // For this sample, just return true
            return true;
        case KeyCredentialStatus.UserCanceled:
            Debug.WriteLine("User cancelled sign-in process.");
            break;
        case KeyCredentialStatus.NotFound:
            // User needs to set up Windows Hello
            Debug.WriteLine("Windows Hello is not set up!\nPlease go to Windows Settings and set up a PIN to use it.");
            break;
        default:
            break;
    }

    return false;
}
Po utworzeniu metody CreateWindowsHelloKeyAsync wróć do pliku Login.xaml.cs i odkomentuj kod wewnątrz metody SignInWindowsHelloAsync.
private async void SignInWindowsHelloAsync()
{
    if (AccountHelper.ValidateAccountCredentials(UsernameTextBox.Text))
    {
        //Create and add a new local account
        _account = AccountHelper.AddAccount(UsernameTextBox.Text);
        Debug.WriteLine("Successfully signed in with traditional credentials and created local account instance!");

        if (await WindowsHelloHelper.CreateWindowsHelloKeyAsync(UsernameTextBox.Text))
        {
            Debug.WriteLine("Successfully signed in with Windows Hello!");
        }
    }
    else
    {
        ErrorMessage.Text = "Invalid Credentials";
    }
}
Skompiluj i uruchom aplikację. Nastąpi przekierowanie na stronę logowania. Wprowadź nazwę użytkownika jako "sampleUsername", a następnie kliknij pozycję Zaloguj. Zostanie wyświetlony monit funkcji Windows Hello z prośbą o wprowadzenie numeru PIN. Po poprawnym wprowadzeniu numeru PIN metoda CreateWindowsHelloKeyAsync będzie mogła utworzyć klucz funkcji Windows Hello. Monitoruj okna danych wyjściowych, aby sprawdzić, czy są wyświetlane komunikaty wskazujące powodzenie.

Ćwiczenie 2: Strony powitania i wyboru użytkownika
W tym ćwiczeniu będziesz kontynuować działanie z poprzedniego ćwiczenia. Gdy użytkownik pomyślnie się zaloguje, powinien zostać przewieziony do strony powitalnej, na której może wylogować się lub usunąć swoje konto. Gdy funkcja Windows Hello tworzy klucz dla każdej maszyny, można utworzyć ekran wyboru użytkownika, który wyświetla wszystkich użytkowników, którzy zostali zalogowani na tym komputerze. Użytkownik może następnie wybrać jedno z tych kont i przejść bezpośrednio do ekranu powitalnego bez konieczności ponownego wprowadzania hasła, ponieważ zostało już uwierzytelnione w celu uzyskania dostępu do maszyny.
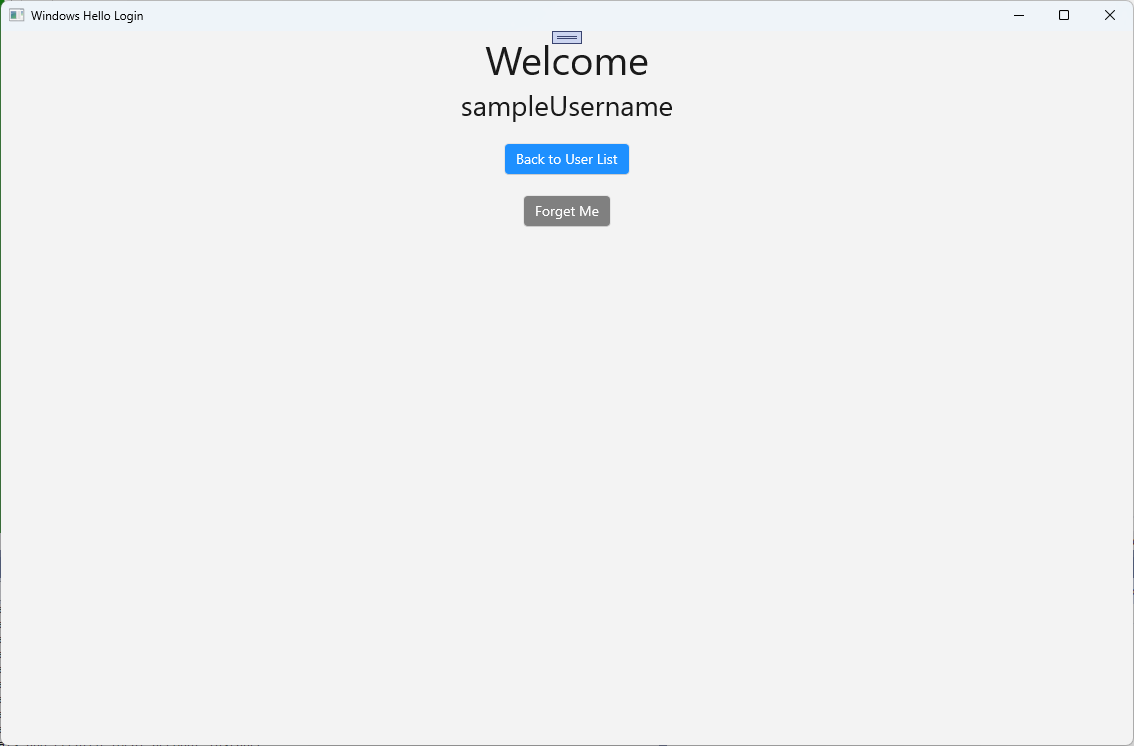
W folderze Views dodaj nową pustą stronę o nazwie "Welcome.xaml". Dodaj następujący kod XAML, aby ukończyć interfejs użytkownika dla strony. Spowoduje to wyświetlenie tytułu, zalogowanej nazwy użytkownika i dwóch przycisków. Jeden z przycisków powróci do listy użytkowników (którą utworzysz później), a drugi przycisk będzie obsługiwać zapomnianie tego użytkownika.
<Grid>
  <StackPanel>
    <TextBlock x:Name="Title" Text="Welcome" FontSize="40" TextAlignment="Center"/>
    <TextBlock x:Name="UserNameText" FontSize="28" TextAlignment="Center"/>

    <Button x:Name="BackToUserListButton" Content="Back to User List" Click="Button_Restart_Click"
            HorizontalAlignment="Center" Margin="0,20" Foreground="White" Background="DodgerBlue"/>

    <Button x:Name="ForgetButton" Content="Forget Me" Click="Button_Forget_User_Click"
            Foreground="White"
            Background="Gray"
            HorizontalAlignment="Center"/>
  </StackPanel>
</Grid>
W pliku kodu zaplecza Welcome.xaml.cs dodaj nową zmienną prywatną, która będzie przechowywać konto zalogowanego użytkownika. Należy zaimplementować metodę, aby zastąpić
OnNavigateTozdarzenie, co spowoduje zapisanie konta przekazanego do strony Welcome. Należy również zaimplementowaćClickzdarzenie dla dwóch przycisków zdefiniowanych w języku XAML. Należy dodać instrukcje using dla przestrzeni nazwWindowsHelloLogin.ModelsiWindowsHelloLogin.Utils.using WindowsHelloLogin.Models; using WindowsHelloLogin.Utils; using System.Diagnostics; namespace WindowsHelloLogin.Views { public sealed partial class Welcome : Page { private Account _activeAccount; public Welcome() { InitializeComponent(); } protected override void OnNavigatedTo(NavigationEventArgs e) { _activeAccount = (Account)e.Parameter; if (_activeAccount != null) { UserNameText.Text = _activeAccount.Username; } } private void Button_Restart_Click(object sender, RoutedEventArgs e) { } private void Button_Forget_User_Click(object sender, RoutedEventArgs e) { // Remove the account from Windows Hello // WindowsHelloHelper.RemoveWindowsHelloAccountAsync(_activeAccount); // Remove it from the local accounts list and re-save the updated list AccountHelper.RemoveAccount(_activeAccount); Debug.WriteLine($"User {_activeAccount.Username} deleted."); } } }Być może zauważyłeś, że w procedurze obsługi zdarzeń
Button_Forget_User_Clicklinia została skomentowana. Konto jest usuwane z listy lokalnej, ale obecnie nie ma możliwości usunięcia z usługi Windows Hello. Należy zaimplementować nową metodę w WindowsHelloHelper.cs, która będzie obsługiwać usuwanie użytkownika usługi Windows Hello. Ta metoda będzie używać innych interfejsów API usługi Windows Hello do otwierania i usuwania konta. W świecie rzeczywistym po usunięciu konta serwer lub baza danych powinna być powiadamiana, aby baza danych użytkownika pozostała prawidłowa. Będzie potrzebna deklaracja using odwołująca się do przestrzeni nazwWindowsHelloLogin.Models.using WindowsHelloLogin.Models; /// <summary> /// Function to be called when user requests deleting their account. /// Checks the KeyCredentialManager to see if there is a Windows Hello /// account for the current user. /// It then deletes the local key associated with the account. /// </summary> public static async void RemoveWindowsHelloAccountAsync(Account account) { // Open the account with Windows Hello KeyCredentialRetrievalResult keyOpenResult = await KeyCredentialManager.OpenAsync(account.Username); if (keyOpenResult.Status == KeyCredentialStatus.Success) { // In the real world you would send key information to server to unregister //for example, RemoveWindowsHelloAccountOnServer(account); } // Then delete the account from the machine's list of Windows Hello accounts await KeyCredentialManager.DeleteAsync(account.Username); }Wróć do Welcome.xaml.cs i usuń komentarz z linii wywołującej RemoveWindowsHelloAccountAsync.
private void Button_Forget_User_Click(object sender, RoutedEventArgs e)
{
    // Remove it from Windows Hello
    WindowsHelloHelper.RemoveWindowsHelloAccountAsync(_activeAccount);

    // Remove it from the local accounts list and re-save the updated list
    AccountHelper.RemoveAccount(_activeAccount);

    Debug.WriteLine($"User {_activeAccount.Username} deleted.");
}
W metodzie SignInWindowsHelloAsync (w Login.xaml.cs), po pomyślnym zakończeniu operacji CreateWindowsHelloKeyAsync, powinna przejść do strony Powitalnej i przekazać Konto.
private async void SignInWindowsHelloAsync()
{
    if (AccountHelper.ValidateAccountCredentials(UsernameTextBox.Text))
    {
        // Create and add a new local account
        _account = AccountHelper.AddAccount(UsernameTextBox.Text);
        Debug.WriteLine("Successfully signed in with traditional credentials and created local account instance!");

        if (await WindowsHelloHelper.CreateWindowsHelloKeyAsync(UsernameTextBox.Text))
        {
            Debug.WriteLine("Successfully signed in with Windows Hello!");
            Frame.Navigate(typeof(Welcome), _account);
        }
    }
    else
    {
        ErrorMessage.Text = "Invalid Credentials";
    }
}
Skompiluj i uruchom aplikację. Zaloguj się używając "sampleUsername" i kliknij Zaloguj. Wprowadź numer PIN, a jeśli zakończy się powodzeniem, powinieneś zostać przekierowany na ekran powitalny. Spróbuj kliknąć pozycję Zapomnij użytkownika i monitorować okno Dane wyjściowe programu Visual Studio, aby sprawdzić, czy użytkownik został usunięty. Zwróć uwagę, że po usunięciu użytkownika pozostaniesz na stronie powitalnej . Musisz utworzyć stronę wyboru użytkownika, do której aplikacja może nawigować.
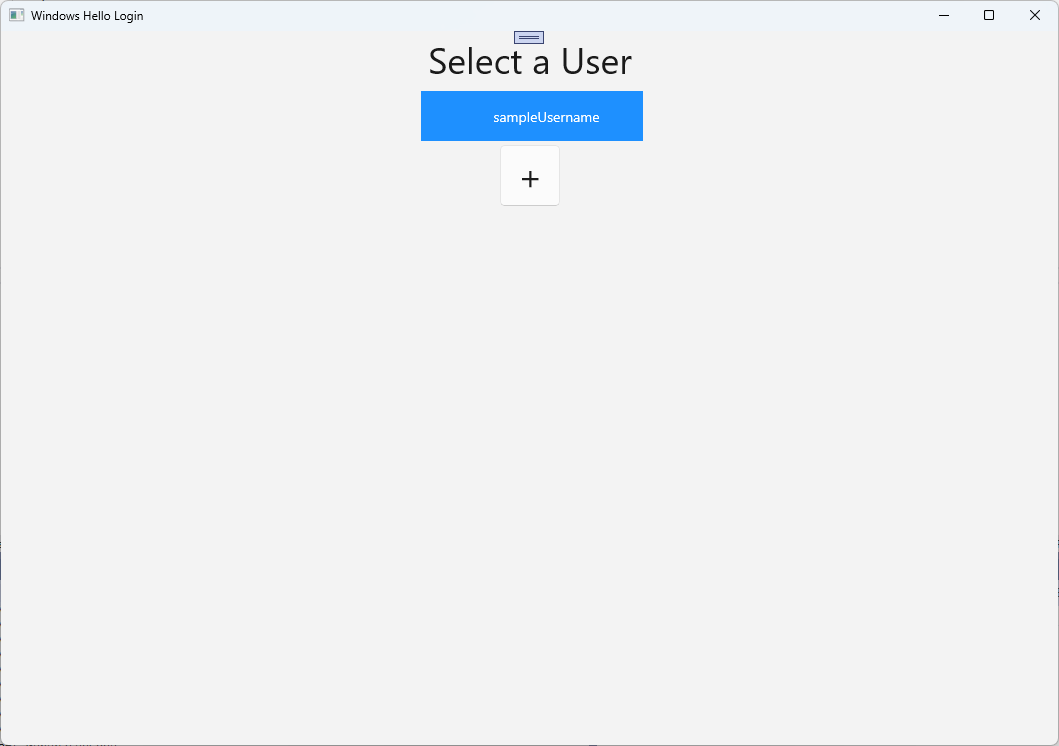
W folderze Views utwórz nową pustą stronę o nazwie "UserSelection.xaml" i dodaj następujący kod XAML, aby zdefiniować interfejs użytkownika. Ta strona będzie zawierać widok ListView , który wyświetla wszystkich użytkowników na liście kont lokalnych, a element
Button, który przejdzie do strony Logowania , aby umożliwić użytkownikowi dodanie innego konta.<Grid> <StackPanel> <TextBlock x:Name="Title" Text="Select a User" FontSize="36" Margin="4" TextAlignment="Center" HorizontalAlignment="Center"/> <ListView x:Name="UserListView" Margin="4" MaxHeight="200" MinWidth="250" Width="250" HorizontalAlignment="Center"> <ListView.ItemTemplate> <DataTemplate> <Grid Background="DodgerBlue" Height="50" Width="250" HorizontalAlignment="Stretch" VerticalAlignment="Stretch"> <TextBlock Text="{Binding Username}" HorizontalAlignment="Center" TextAlignment="Center" VerticalAlignment="Center" Foreground="White"/> </Grid> </DataTemplate> </ListView.ItemTemplate> </ListView> <Button x:Name="AddUserButton" Content="+" FontSize="36" Width="60" Click="AddUserButton_Click" HorizontalAlignment="Center"/> </StackPanel> </Grid>W UserSelection.xaml.cs zaimplementuj
Loadedmetodę, która przejdzie do strony Logowania , jeśli na liście lokalnej nie ma żadnych kont. Zaimplementuj także zdarzenieSelectionChangeddlaListVieworaz zdarzenieClickdlaButton.using System.Diagnostics; using WindowsHelloLogin.Models; using WindowsHelloLogin.Utils; namespace WindowsHelloLogin.Views { public sealed partial class UserSelection : Page { public UserSelection() { InitializeComponent(); Loaded += UserSelection_Loaded; } private void UserSelection_Loaded(object sender, RoutedEventArgs e) { if (AccountHelper.AccountList.Count == 0) { // If there are no accounts, navigate to the Login page Frame.Navigate(typeof(Login)); } UserListView.ItemsSource = AccountHelper.AccountList; UserListView.SelectionChanged += UserSelectionChanged; } /// <summary> /// Function called when an account is selected in the list of accounts /// Navigates to the Login page and passes the chosen account /// </summary> private void UserSelectionChanged(object sender, RoutedEventArgs e) { if (((ListView)sender).SelectedValue != null) { Account account = (Account)((ListView)sender).SelectedValue; if (account != null) { Debug.WriteLine($"Account {account.Username} selected!"); } Frame.Navigate(typeof(Login), account); } } /// <summary> /// Function called when the "+" button is clicked to add a new user. /// Navigates to the Login page with nothing filled out /// </summary> private void AddUserButton_Click(object sender, RoutedEventArgs e) { Frame.Navigate(typeof(Login)); } } }W aplikacji znajduje się kilka miejsc, w których chcesz przejść do strony UserSelection . W MainPage.xaml.cs przejdź do strony UserSelection zamiast strony Logowania . Podczas ładowania zdarzenia w programie MainPage musisz załadować listę kont, aby strona UserSelection mogła sprawdzić, czy istnieją jakieś konta. Będzie to wymagało zmiany metody
Loadedna asynchroniczną oraz dodania instrukcji using dla przestrzeni nazwWindowsHelloLogin.Utils.using WindowsHelloLogin.Utils; private async void MainPage_Loaded(object sender, RoutedEventArgs e) { // Load the local account list before navigating to the UserSelection page await AccountHelper.LoadAccountListAsync(); Frame.Navigate(typeof(UserSelection)); }Następnie aplikacja będzie musiała przejść do strony UserSelection ze strony powitalnej . W obu
Clickwypadkach należy wrócić do strony UserSelection.private void Button_Restart_Click(object sender, RoutedEventArgs e) { Frame.Navigate(typeof(UserSelection)); } private void Button_Forget_User_Click(object sender, RoutedEventArgs e) { // Remove it from Windows Hello WindowsHelloHelper.RemoveWindowsHelloAccountAsync(_activeAccount); // Remove it from the local accounts list and re-save the updated list AccountHelper.RemoveAccount(_activeAccount); Debug.WriteLine($"User {_activeAccount.Username} deleted."); // Navigate back to UserSelection page. Frame.Navigate(typeof(UserSelection)); }Na stronie Logowanie potrzebujesz kodu, aby zalogować się do konta wybranego z listy na stronie WybórUżytkownika. W przypadku
OnNavigatedTozapisz konto przekazane podczas nawigacji. Zacznij od dodania nowej zmiennej prywatnej, która określi, czy konto jest istniejącym kontem. Następnie zajmij się zdarzeniemOnNavigatedTo.namespace WindowsHelloLogin.Views { public sealed partial class Login : Page { private Account _account; private bool _isExistingAccount; public Login() { InitializeComponent(); } /// <summary> /// Function called when this frame is navigated to. /// Checks to see if Windows Hello is available and if an account was passed in. /// If an account was passed in set the "_isExistingAccount" flag to true and set the _account. /// </summary> protected override async void OnNavigatedTo(NavigationEventArgs e) { // Check Windows Hello is set up and available on this machine if (await WindowsHelloHelper.WindowsHelloAvailableCheckAsync()) { if (e.Parameter != null) { _isExistingAccount = true; // Set the account to the existing account being passed in _account = (Account)e.Parameter; UsernameTextBox.Text = _account.Username; await SignInWindowsHelloAsync(); } } else { // Windows Hello is not set up, so inform the user WindowsHelloStatus.Background = new SolidColorBrush(Windows.UI.Color.FromArgb(255, 50, 170, 207)); WindowsHelloStatusText.Text = $"Windows Hello is not set up!{Environment.NewLine}Please go to Windows Settings and set up a PIN to use it."; LoginButton.IsEnabled = false; } } } }Aby zalogować się do wybranego konta, należy zaktualizować metodę SignInWindowsHelloAsync . WindowsHelloHelper będzie potrzebować innej metody, aby otworzyć konto za pomocą funkcji Windows Hello, ponieważ konto ma już utworzony klucz konta. Zaimplementuj nową metodę w WindowsHelloHelper.cs, aby zalogować istniejącego użytkownika za pomocą usługi Windows Hello. Aby uzyskać informacje na temat każdej części kodu, zapoznaj się z komentarzami do kodu.
/// <summary>
/// Attempts to sign a message using the account key on the system for the accountId passed.
/// </summary>
/// <returns>Boolean representing if creating the Windows Hello authentication message succeeded</returns>
public static async Task<bool> GetWindowsHelloAuthenticationMessageAsync(Account account)
{
    KeyCredentialRetrievalResult openKeyResult = await KeyCredentialManager.OpenAsync(account.Username);
    // Calling OpenAsync will allow the user access to what is available in the app and will not require user credentials again.
    // If you wanted to force the user to sign in again you can use the following:
    // var consentResult = await Windows.Security.Credentials.UI.UserConsentVerifier.RequestVerificationAsync(account.Username);
    // This will ask for the either the password of the currently signed in Microsoft Account or the PIN used for Windows Hello.

    if (openKeyResult.Status == KeyCredentialStatus.Success)
    {
        // If OpenAsync has succeeded, the next thing to think about is whether the client application requires access to backend services.
        // If it does here you would request a challenge from the server. The client would sign this challenge and the server
        // would check the signed challenge. If it is correct, it would allow the user access to the backend.
        // You would likely make a new method called RequestSignAsync to handle all this.
        // For example, RequestSignAsync(openKeyResult);
        // Refer to the second Windows Hello sample for information on how to do this.

        // For this sample, there is not concept of a server implemented so just return true.
        return true;
    }
    else if (openKeyResult.Status == KeyCredentialStatus.NotFound)
    {
        // If the account is not found at this stage. It could be one of two errors.
        // 1. Windows Hello has been disabled
        // 2. Windows Hello has been disabled and re-enabled cause the Windows Hello Key to change.
        // Calling CreateWindowsHelloKeyAsync and passing through the account will attempt to replace the existing Windows Hello Key for that account.
        // If the error really is that Windows Hello is disabled then the CreateWindowsHelloKeyAsync method will output that error.
        if (await CreateWindowsHelloKeyAsync(account.Username))
        {
            // If the Hello Key was again successfully created, Windows Hello has just been reset.
            // Now that the Hello Key has been reset for the account retry sign in.
            return await GetWindowsHelloAuthenticationMessageAsync(account);
        }
    }

    // Can't use Windows Hello right now, try again later
    return false;
}
Zaktualizuj metodę SignInWindowsHelloAsync w Login.xaml.cs, aby obsłużyć istniejące konto. Spowoduje to użycie nowej metody w WindowsHelloHelper.cs. Jeśli konto zakończy się pomyślnie, zostanie zalogowane, a użytkownik przejdzie do strony powitalnej .
private async Task SignInWindowsHelloAsync()
{
    if (_isExistingAccount)
    {
        if (await WindowsHelloHelper.GetWindowsHelloAuthenticationMessageAsync(_account))
        {
            Frame.Navigate(typeof(Welcome), _account);
        }
    }
    else if (AccountHelper.ValidateAccountCredentials(UsernameTextBox.Text))
    {
        //Create and add a new local account
        _account = AccountHelper.AddAccount(UsernameTextBox.Text);
        Debug.WriteLine("Successfully signed in with traditional credentials and created local account instance!");

        if (await WindowsHelloHelper.CreateWindowsHelloKeyAsync(UsernameTextBox.Text))
        {
            Debug.WriteLine("Successfully signed in with Windows Hello!");
            Frame.Navigate(typeof(Welcome), _account);
        }
    }
    else
    {
        ErrorMessage.Text = "Invalid Credentials";
    }
}
Skompiluj i uruchom aplikację. Zaloguj się przy użyciu nazwy "sampleUsername". Wpisz numer PIN i jeśli zakończy się powodzeniem, nastąpi przejście do strony powitalnej . Kliknij z powrotem do listy użytkowników. Na liście powinien być teraz widoczny użytkownik. Po kliknięciu tej opcji system WindowsHello umożliwia ponowne zalogowanie się bez konieczności ponownego wprowadzania haseł itp.
Ćwiczenie 3. Rejestrowanie nowego użytkownika funkcji Windows Hello
W tym ćwiczeniu utworzysz nową stronę, która może utworzyć nowe konto za pomocą usługi Windows Hello. Działa to podobnie do sposobu działania strony Logowania . Strona logowania jest implementowana dla istniejącego użytkownika migrującego do korzystania z usługi Windows Hello. Strona WindowsHelloRegister utworzy rejestrację usługi Windows Hello dla nowego użytkownika.
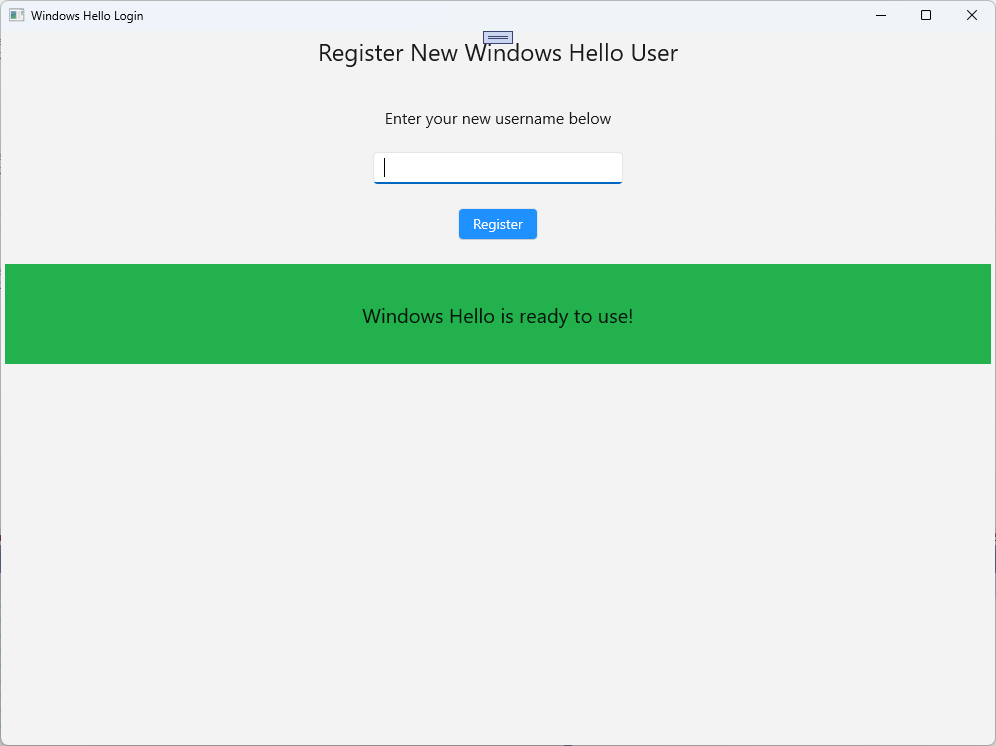
W folderze Views utwórz nową pustą stronę o nazwie "WindowsHelloRegister.xaml". W pliku XAML dodaj następujący kod, aby skonfigurować interfejs użytkownika. Interfejs na tej stronie jest podobny do strony Logowania .
<Grid>
  <StackPanel>
    <TextBlock x:Name="Title" Text="Register New Windows Hello User" FontSize="24" Margin="4" TextAlignment="Center"/>

    <TextBlock x:Name="ErrorMessage" Text="" FontSize="20" Margin="4" Foreground="Red" TextAlignment="Center"/>

    <TextBlock Text="Enter your new username below" Margin="0,0,0,20"
               TextWrapping="Wrap" Width="300"
               TextAlignment="Center" VerticalAlignment="Center" FontSize="16"/>

    <TextBox x:Name="UsernameTextBox" Margin="4" Width="250"/>

    <Button x:Name="RegisterButton" Content="Register" Background="DodgerBlue" Foreground="White"
            Click="RegisterButton_Click_Async" Width="80" HorizontalAlignment="Center" Margin="0,20"/>

    <Border x:Name="WindowsHelloStatus" Background="#22B14C" Margin="4" Height="100">
      <TextBlock x:Name="WindowsHelloStatusText" Text="Windows Hello is ready to use!" FontSize="20"
                 Margin="4" TextAlignment="Center" VerticalAlignment="Center"/>
    </Border>
  </StackPanel>
</Grid>
W pliku kodu zaplecza WindowsHelloRegister.xaml.cs zaimplementuj prywatną zmienną
Accountoraz zdarzenieClickdla przycisku rejestracji. Spowoduje to dodanie nowego konta lokalnego i utworzenie klucza funkcji Windows Hello.using Microsoft.UI.Xaml.Controls; using Microsoft.UI.Xaml; using WindowsHelloLogin.Models; using WindowsHelloLogin.Utils; namespace WindowsHelloLogin.Views { public sealed partial class WindowsHelloRegister : Page { private Account _account; public WindowsHelloRegister() { InitializeComponent(); } private async void RegisterButton_Click_Async(object sender, RoutedEventArgs e) { ErrorMessage.Text = ""; // In the real world, you would validate the entered credentials and information before // allowing a user to register a new account. // For this sample, we'll skip that step and just register an account if the username is not null. if (!string.IsNullOrEmpty(UsernameTextBox.Text)) { // Register a new account _account = AccountHelper.AddAccount(UsernameTextBox.Text); // Register new account with Windows Hello await WindowsHelloHelper.CreateWindowsHelloKeyAsync(_account.Username); // Navigate to the Welcome page. Frame.Navigate(typeof(Welcome), _account); } else { ErrorMessage.Text = "Please enter a username"; } } } }Po kliknięciu rejestracji musisz przejść do tej strony ze strony Logowania .
private void RegisterButtonTextBlock_OnPointerPressed(object sender, PointerRoutedEventArgs e)
{
    ErrorMessage.Text = "";
    Frame.Navigate(typeof(WindowsHelloRegister));
}
Skompiluj i uruchom aplikację. Spróbuj zarejestrować nowego użytkownika. Następnie wróć do listy użytkowników i sprawdź, czy możesz wybrać tego użytkownika i zalogować się.
W tym laboratorium przedstawiono podstawowe umiejętności potrzebne do używania nowego interfejsu API usługi Windows Hello do uwierzytelniania istniejących użytkowników i tworzenia kont dla nowych użytkowników. Dzięki tej nowej wiedzy możesz zacząć usuwać potrzebę zapamiętywania haseł dla aplikacji przez użytkowników, ale nadal mieć pewność, że aplikacje pozostaną chronione przez uwierzytelnianie użytkowników. System Windows używa nowej technologii uwierzytelniania usługi Windows Hello do obsługi opcji logowania biometrycznego.
Tematy pokrewne
Współpracuj z nami na GitHub
Źródło tej treści można znaleźć na GitHubie, gdzie można także tworzyć i przeglądać problemy oraz pull requesty. Więcej informacji znajdziesz w naszym przewodniku dla współautorów.

Windows developer