在上一教程中,你创建了一个全 88 键钢琴键盘模型。 现在,你可以使其在 XR 空间中可玩。
在本教程中,你将了解如何:
- 使用指针事件添加交互式钢琴功能
- 将网格缩放为不同的大小
- 在 XR 中启用传送和多指针支持
开始之前
请确保完成 本系列中的上一教程 ,并准备好继续向代码添加内容。
index.html
<html>
    <head>
        <title>Piano in BabylonJS</title>
        <script src="https://cdn.babylonjs.com/babylon.js"></script>
        <script src="scene.js"></script>
        <style>
            body,#renderCanvas { width: 100%; height: 100%;}
        </style>
    </head>
    <body>
        <canvas id="renderCanvas"></canvas>
        <script type="text/javascript">
            const canvas = document.getElementById("renderCanvas");
            const engine = new BABYLON.Engine(canvas, true);

            createScene(engine).then(sceneToRender => {
                engine.runRenderLoop(() => sceneToRender.render());
            });

            // Watch for browser/canvas resize events
            window.addEventListener("resize", function () {
                engine.resize();
            });
        </script>
    </body>
</html>
scene.js
const buildKey = function (scene, parent, props) {
    if (props.type === "white") {
        /*
        Props for building a white key should contain:
        note, topWidth, bottomWidth, topPositionX, wholePositionX, register, referencePositionX

        As an example, the props for building the middle C white key would be
        {type: "white", note: "C", topWidth: 1.4, bottomWidth: 2.3, topPositionX: -0.45, wholePositionX: -14.4, register: 4, referencePositionX: 0}
        */

        // Create bottom part
        const bottom = BABYLON.MeshBuilder.CreateBox("whiteKeyBottom", {width: props.bottomWidth, height: 1.5, depth: 4.5}, scene);

        // Create top part
        const top = BABYLON.MeshBuilder.CreateBox("whiteKeyTop", {width: props.topWidth, height: 1.5, depth: 5}, scene);
        top.position.z =  4.75;
        top.position.x += props.topPositionX;

        // Merge bottom and top parts
        // Parameters of BABYLON.Mesh.MergeMeshes: (arrayOfMeshes, disposeSource, allow32BitsIndices, meshSubclass, subdivideWithSubMeshes, multiMultiMaterials)
        const key = BABYLON.Mesh.MergeMeshes([bottom, top], true, false, null, false, false);
        key.position.x = props.referencePositionX + props.wholePositionX;
        key.name = props.note + props.register;
        key.parent = parent;

        return key;
    }
    else if (props.type === "black") {
        /*
        Props for building a black key should contain:
        note, wholePositionX, register, referencePositionX

        As an example, the props for building the C#4 black key would be
        {type: "black", note: "C#", wholePositionX: -13.45, register: 4, referencePositionX: 0}
        */

        // Create black color material
        const blackMat = new BABYLON.StandardMaterial("black");
        blackMat.diffuseColor = new BABYLON.Color3(0, 0, 0);

        // Create black key
        const key = BABYLON.MeshBuilder.CreateBox(props.note + props.register, {width: 1.4, height: 2, depth: 5}, scene);
        key.position.z += 4.75;
        key.position.y += 0.25;
        key.position.x = props.referencePositionX + props.wholePositionX;
        key.material = blackMat;
        key.parent = parent;

        return key;
    }
}

const createScene = async function(engine) {
    const scene = new BABYLON.Scene(engine);

    const alpha =  3*Math.PI/2;
    const beta = Math.PI/50;
    const radius = 220;
    const target = new BABYLON.Vector3(0, 0, 0);

    const camera = new BABYLON.ArcRotateCamera("Camera", alpha, beta, radius, target, scene);
    camera.attachControl(canvas, true);

    const light = new BABYLON.HemisphericLight("light", new BABYLON.Vector3(0, 1, 0), scene);
    light.intensity = 0.6;

    const keyParams = [
        {type: "white", note: "C", topWidth: 1.4, bottomWidth: 2.3, topPositionX: -0.45, wholePositionX: -14.4},
        {type: "black", note: "C#", wholePositionX: -13.45},
        {type: "white", note: "D", topWidth: 1.4, bottomWidth: 2.4, topPositionX: 0, wholePositionX: -12},
        {type: "black", note: "D#", wholePositionX: -10.6},
        {type: "white", note: "E", topWidth: 1.4, bottomWidth: 2.3, topPositionX: 0.45, wholePositionX: -9.6},
        {type: "white", note: "F", topWidth: 1.3, bottomWidth: 2.4, topPositionX: -0.55, wholePositionX: -7.2},
        {type: "black", note: "F#", wholePositionX: -6.35},
        {type: "white", note: "G", topWidth: 1.3, bottomWidth: 2.3, topPositionX: -0.2, wholePositionX: -4.8},
        {type: "black", note: "G#", wholePositionX: -3.6},
        {type: "white", note: "A", topWidth: 1.3, bottomWidth: 2.3, topPositionX: 0.2, wholePositionX: -2.4},
        {type: "black", note: "A#", wholePositionX: -0.85},
        {type: "white", note: "B", topWidth: 1.3, bottomWidth: 2.4, topPositionX: 0.55, wholePositionX: 0},
    ]

    // Transform Node that acts as the parent of all piano keys
    const keyboard = new BABYLON.TransformNode("keyboard");

    // Register 1 through 7
    var referencePositionX = -2.4*14;
    for (let register = 1; register <= 7; register++) {
        keyParams.forEach(key => {
            buildKey(scene, keyboard, Object.assign({register: register, referencePositionX: referencePositionX}, key));
        })
        referencePositionX += 2.4*7;
    }

    // Register 0
    buildKey(scene, keyboard, {type: "white", note: "A", topWidth: 1.9, bottomWidth: 2.3, topPositionX: -0.20, wholePositionX: -2.4, register: 0, referencePositionX: -2.4*21});
    keyParams.slice(10, 12).forEach(key => {
        buildKey(scene, keyboard, Object.assign({register: 0, referencePositionX: -2.4*21}, key));
    })

    // Register 8
    buildKey(scene, keyboard, {type: "white", note: "C", topWidth: 2.3, bottomWidth: 2.3, topPositionX: 0, wholePositionX: -2.4*6, register: 8, referencePositionX: 84});

    // Transform node that acts as the parent of all piano components
    const piano = new BABYLON.TransformNode("piano");
    keyboard.parent = piano;

    // Import and scale piano frame
    BABYLON.SceneLoader.ImportMesh("frame", "https://raw.githubusercontent.com/MicrosoftDocs/mixed-reality/docs/mixed-reality-docs/mr-dev-docs/develop/javascript/tutorials/babylonjs-webxr-piano/files/", "pianoFrame.babylon", scene, function(meshes) {
        const frame = meshes[0];
        frame.parent = piano;
    });

    // Lift the piano keyboard
    keyboard.position.y += 80;

    const xrHelper = await scene.createDefaultXRExperienceAsync();

    return scene;
}
使钢琴键盘可播放
现在,我们创建的钢琴键盘是一个静态模型,不会响应任何用户交互。 在本部分中,我们将对键进行编程,以在有人按下键时向下移动并播放声音。
Babylon.js 提供了我们可以与之交互的不同类型的事件或 可观测对象。 在本例中,我们将处理
onPointerObservable,因为我们希望通过指针(可以是鼠标单击、触摸、XR 控制器按钮单击等)对键进行编程以执行作。下面是如何将任何行为添加到
onPointerObservable的基本结构:scene.onPointerObservable.add((pointerInfo) => { // do something });虽然 Babylon.js 提供了 许多不同类型的指针事件,但我们仅使用
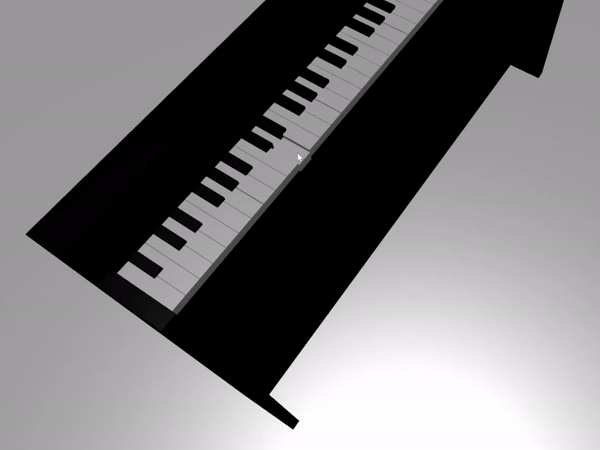
POINTERDOWN和POINTERUP事件来编程钢琴键的行为,并使用以下结构:scene.onPointerObservable.add((pointerInfo) => { switch (pointerInfo.type) { case BABYLON.PointerEventTypes.POINTERDOWN: // When the pointer is down on a piano key, // move the piano key downward (to show that it is pressed) // and play the sound of the note break; case BABYLON.PointerEventTypes.POINTERUP: // When the pointer is released, // move the piano key upward to its original position // and stop the sound of the note of the key that is released break; } });首先,让我们在按下并松开琴键时向下和向上移动钢琴键。
在指针向下事件中,我们需要检测正在单击的网格,确保它是钢琴键,并少量地更改网格的 y 坐标,使其看起来像按下了键。
对于指针向上事件,它稍微复杂一点,因为按下键的指针可能不会在键上释放。 例如,有人可能会单击 C4 键,将鼠标拖到 E4,然后松开单击。 在这种情况下,我们仍希望释放 (C4) 按下的键,而不是在 E4) (发生事件的位置
pointerUp。让我们看看以下代码如何实现我们想要的内容:
const pointerToKey = new Map(); scene.onPointerObservable.add((pointerInfo) => { switch (pointerInfo.type) { case BABYLON.PointerEventTypes.POINTERDOWN: if(pointerInfo.pickInfo.hit) { const pickedMesh = pointerInfo.pickInfo.pickedMesh; const pointerId = pointerInfo.event.pointerId; if (pickedMesh.parent === keyboard) { pickedMesh.position.y -= 0.5; // play the sound of the note pointerToKey.set(pointerId, { mesh: pickedMesh }); } } break; case BABYLON.PointerEventTypes.POINTERUP: const pointerId = pointerInfo.event.pointerId; if (pointerToKey.has(pointerId)) { pointerToKey.get(pointerId).mesh.position.y += 0.5; // stop the sound of the note of the key that is released pointerToKey.delete(pointerId); } break; } });pointerId对于每个指针来说都是唯一的,当我们有多个控制器或使用触摸屏时,可以帮助我们识别指针。 在这里,我们初始化了一个名为MappointerToKey的对象,以存储哪个指针在哪个键上按下的关系,以便我们知道在释放指针时要释放哪个键,而不管释放的位置如何。下面是与上述代码交互的外观:
现在,我们来了解如何在按下和释放某个键时播放和停止声音。 为了实现这一点,我们将利用名为 soundfont-player 的 Javascript 库,它使我们能够轻松播放所选乐器的 MIDI 声音。
下载库的缩小代码,将其保存在 与index.html相同的文件夹中,并将其包含在
<header>index.html中的 标记中:<head> <title>Babylon Template</title> <script src="https://cdn.babylonjs.com/babylon.js"></script> <script src="scene.js"></script> <script src="soundfont-player.min.js"></script> <style> body,#renderCanvas { width: 100%; height: 100%;} </style> </head>导入库后,下面介绍如何使用库初始化乐器并播放/停止 MIDI 声音:
const pianoSound = await Soundfont.instrument(new AudioContext(), 'acoustic_grand_piano'); const C4 = piano.play("C4"); // Play note C4 C4.stop(); // Stop note C4现在,让我们将其合并到指针事件中,并完成此部分的代码:
const pointerToKey = new Map() const piano = await Soundfont.instrument(new AudioContext(), 'acoustic_grand_piano'); scene.onPointerObservable.add((pointerInfo) => { switch (pointerInfo.type) { case BABYLON.PointerEventTypes.POINTERDOWN: if(pointerInfo.pickInfo.hit) { let pickedMesh = pointerInfo.pickInfo.pickedMesh; let pointerId = pointerInfo.event.pointerId; if (keys.has(pickedMesh)) { pickedMesh.position.y -= 0.5; // Move the key downward pointerToKey.set(pointerId, { mesh: pickedMesh, note: pianoSound.play(pointerInfo.pickInfo.pickedMesh.name) // Play the sound of the note }); } } break; case BABYLON.PointerEventTypes.POINTERUP: let pointerId = pointerInfo.event.pointerId; if (pointerToKey.has(pointerId)) { pointerToKey.get(pointerId).mesh.position.y += 0.5; // Move the key upward pointerToKey.get(pointerId).note.stop(); // Stop the sound of the note pointerToKey.delete(pointerId); } break; } });由于我们按它所表示的注释来命名每个键的网格,因此可以通过将网格的名称传递给
pianoSound.play()函数来轻松指示要播放的注释。 另请注意,我们将声音存储在地图中pointerToKey,以便我们知道在释放键时要停止的声音。
缩放沉浸式 VR 模式的钢琴
到目前为止,你可能已经使用鼠标 (甚至触摸屏) 弹钢琴,因为你添加了交互功能。 在本部分中,我们将进入沉浸式 VR 空间。
若要在沉浸式 VR 头戴显示设备中打开页面,必须先将头戴显示设备连接到开发人员计算机,并确保将其设置为在 Windows Mixed Reality 应用中使用。 如果使用Windows Mixed Reality模拟器,请确保已启用该模拟器。
现在,你将在网页右下角看到沉浸式 VR 按钮。 单击它,你将能够在连接到的 XR 设备中看到钢琴。

一旦你进入虚拟空间,你可能会注意到,我们建造的钢琴是极其巨大的。 在 VR 世界中,我们只能站在它的底部,并通过将指针指向远处的键来播放它。

让我们缩小钢琴的规模,使其大小更像现实生活中的普通站立钢琴。 为此,我们需要使用一个实用工具函数,该函数允许我们 相对于空间中的某个点缩放网格。 将此函数添加到 ) 外部
createScene()scene.js(:const scaleFromPivot = function(transformNode, pivotPoint, scale) { const _sx = scale / transformNode.scaling.x; const _sy = scale / transformNode.scaling.y; const _sz = scale / transformNode.scaling.z; transformNode.scaling = new BABYLON.Vector3(_sx, _sy, _sz); transformNode.position = new BABYLON.Vector3(pivotPoint.x + _sx * (transformNode.position.x - pivotPoint.x), pivotPoint.y + _sy * (transformNode.position.y - pivotPoint.y), pivotPoint.z + _sz * (transformNode.position.z - pivotPoint.z)); }此函数采用 3 个参数:
-
transformNode:
TransformNode要缩放的 -
pivotPoint:一个
Vector3对象,指示缩放相对于的点 - scale:缩放因子
-
transformNode:
我们将使用此函数将钢琴框架和键缩放为 0.015,并在原点有一个透视点。 将函数调用追加到 函数,
createScene()方法是将其放在 后面keyboard.position.y += 80;:// Put this line at the beginning of createScene() const scale = 0.015;// Put this function call after keyboard.position.y += 80; // Scale the entire piano scaleFromPivot(piano, new BABYLON.Vector3(0, 0, 0), scale);我们不要忘记缩放相机位置:
const alpha = 3*Math.PI/2; const beta = Math.PI/50; const radius = 220*scale; // scale the radius const target = new BABYLON.Vector3(0, 0, 0); const camera = new BABYLON.ArcRotateCamera("Camera", alpha, beta, radius, target, scene); camera.attachControl(canvas, true);现在,当我们再次进入VR空间时,钢琴将具有普通站立钢琴的大小。

启用 WebXR 功能
现在,我们已在 VR 空间中将钢琴缩放到合适的大小,接下来让我们启用一些很酷的 WebXR 功能来改善我们的钢琴演奏体验。
如果你一直在使用沉浸式 VR 控制器演奏钢琴,你可能已经注意到一次只能使用一个控制器。 让我们使用 Babylon.js 的 WebXR 功能管理器在 XR 空间中启用多指针支持。
在初始化行之后
xrHelper,createScene()将以下代码添加到 函数中:const featuresManager = xrHelper.baseExperience.featuresManager; const pointerSelection = featuresManager.enableFeature(BABYLON.WebXRFeatureName.POINTER_SELECTION, "stable", { xrInput: xrHelper.input, enablePointerSelectionOnAllControllers: true });此外,根据起点在哪里,你可能会发现将自己定位在钢琴前有点困难。 如果你熟悉沉浸式 VR 环境,你可能已经了解 了传送,这是一项功能,通过指向它,可以立即移动到空间中的另一个位置。
为了使用 Babylon.js 的 传送功能,我们首先需要一个可以在 VR 空间中“站立”的地面网格。 将以下代码添加到 函数以
createScene()创建地面:const ground = BABYLON.MeshBuilder.CreateGround("ground", {width: 400, height: 400});传送支持还附带了一个非常有用的功能,称为 对齐位置。 简而言之,贴靠位置是我们希望用户着陆的特定位置。
例如,我们可以在钢琴前面设置一个对齐位置,以便当用户将指针指向钢琴附近时,可以轻松地传送到该位置。
追加以下代码以启用传送功能并指定对齐点:
const teleportation = featuresManager.enableFeature(BABYLON.WebXRFeatureName.TELEPORTATION, "stable", { xrInput: xrHelper.input, floorMeshes: [ground], snapPositions: [new BABYLON.Vector3(2.4*3.5*scale, 0, -10*scale)], });现在,你应该能够通过传送到钢琴前面的对齐点来轻松地将自己定位在钢琴前面,并且应该能够同时使用两个控制器一次播放两个键。

摘要
恭喜! 你已完成我们的系列 Babylon.js 钢琴构建教程,并学习了如何:
- 创建、定位和合并网格以生成钢琴键盘模型
- 导入站立钢琴框架的 Babylon.js 模型
- 向每个钢琴键添加指针交互
- 根据透视点缩放网格大小
- 启用关键 WebXR 功能,例如传送和多点支持
下面是 scene.js 和 index.html的最终代码:
scene.js
const buildKey = function (scene, parent, props) {
if (props.type === "white") {
/*
Props for building a white key should contain:
note, topWidth, bottomWidth, topPositionX, wholePositionX, register, referencePositionX
As an example, the props for building the middle C white key would be
{type: "white", note: "C", topWidth: 1.4, bottomWidth: 2.3, topPositionX: -0.45, wholePositionX: -14.4, register: 4, referencePositionX: 0}
*/
// Create bottom part
const bottom = BABYLON.MeshBuilder.CreateBox("whiteKeyBottom", {width: props.bottomWidth, height: 1.5, depth: 4.5}, scene);
// Create top part
const top = BABYLON.MeshBuilder.CreateBox("whiteKeyTop", {width: props.topWidth, height: 1.5, depth: 5}, scene);
top.position.z = 4.75;
top.position.x += props.topPositionX;
// Merge bottom and top parts
// Parameters of BABYLON.Mesh.MergeMeshes: (arrayOfMeshes, disposeSource, allow32BitsIndices, meshSubclass, subdivideWithSubMeshes, multiMultiMaterials)
const key = BABYLON.Mesh.MergeMeshes([bottom, top], true, false, null, false, false);
key.position.x = props.referencePositionX + props.wholePositionX;
key.name = props.note + props.register;
key.parent = parent;
return key;
}
else if (props.type === "black") {
/*
Props for building a black key should contain:
note, wholePositionX, register, referencePositionX
As an example, the props for building the C#4 black key would be
{type: "black", note: "C#", wholePositionX: -13.45, register: 4, referencePositionX: 0}
*/
// Create black color material
const blackMat = new BABYLON.StandardMaterial("black");
blackMat.diffuseColor = new BABYLON.Color3(0, 0, 0);
// Create black key
const key = BABYLON.MeshBuilder.CreateBox(props.note + props.register, {width: 1.4, height: 2, depth: 5}, scene);
key.position.z += 4.75;
key.position.y += 0.25;
key.position.x = props.referencePositionX + props.wholePositionX;
key.material = blackMat;
key.parent = parent;
return key;
}
}
const scaleFromPivot = function(transformNode, pivotPoint, scale) {
const _sx = scale / transformNode.scaling.x;
const _sy = scale / transformNode.scaling.y;
const _sz = scale / transformNode.scaling.z;
transformNode.scaling = new BABYLON.Vector3(_sx, _sy, _sz);
transformNode.position = new BABYLON.Vector3(pivotPoint.x + _sx * (transformNode.position.x - pivotPoint.x), pivotPoint.y + _sy * (transformNode.position.y - pivotPoint.y), pivotPoint.z + _sz * (transformNode.position.z - pivotPoint.z));
}
const createScene = async function(engine) {
const scale = 0.015;
const scene = new BABYLON.Scene(engine);
const alpha = 3*Math.PI/2;
const beta = Math.PI/50;
const radius = 220*scale;
const target = new BABYLON.Vector3(0, 0, 0);
const camera = new BABYLON.ArcRotateCamera("Camera", alpha, beta, radius, target, scene);
camera.attachControl(canvas, true);
const light = new BABYLON.HemisphericLight("light", new BABYLON.Vector3(0, 1, 0), scene);
light.intensity = 0.6;
const keyParams = [
{type: "white", note: "C", topWidth: 1.4, bottomWidth: 2.3, topPositionX: -0.45, wholePositionX: -14.4},
{type: "black", note: "C#", wholePositionX: -13.45},
{type: "white", note: "D", topWidth: 1.4, bottomWidth: 2.4, topPositionX: 0, wholePositionX: -12},
{type: "black", note: "D#", wholePositionX: -10.6},
{type: "white", note: "E", topWidth: 1.4, bottomWidth: 2.3, topPositionX: 0.45, wholePositionX: -9.6},
{type: "white", note: "F", topWidth: 1.3, bottomWidth: 2.4, topPositionX: -0.55, wholePositionX: -7.2},
{type: "black", note: "F#", wholePositionX: -6.35},
{type: "white", note: "G", topWidth: 1.3, bottomWidth: 2.3, topPositionX: -0.2, wholePositionX: -4.8},
{type: "black", note: "G#", wholePositionX: -3.6},
{type: "white", note: "A", topWidth: 1.3, bottomWidth: 2.3, topPositionX: 0.2, wholePositionX: -2.4},
{type: "black", note: "A#", wholePositionX: -0.85},
{type: "white", note: "B", topWidth: 1.3, bottomWidth: 2.4, topPositionX: 0.55, wholePositionX: 0},
]
// Transform Node that acts as the parent of all piano keys
const keyboard = new BABYLON.TransformNode("keyboard");
// Register 1 through 7
var referencePositionX = -2.4*14;
for (let register = 1; register <= 7; register++) {
keyParams.forEach(key => {
buildKey(scene, keyboard, Object.assign({register: register, referencePositionX: referencePositionX}, key));
})
referencePositionX += 2.4*7;
}
// Register 0
buildKey(scene, keyboard, {type: "white", note: "A", topWidth: 1.9, bottomWidth: 2.3, topPositionX: -0.20, wholePositionX: -2.4, register: 0, referencePositionX: -2.4*21});
keyParams.slice(10, 12).forEach(key => {
buildKey(scene, keyboard, Object.assign({register: 0, referencePositionX: -2.4*21}, key));
})
// Register 8
buildKey(scene, keyboard, {type: "white", note: "C", topWidth: 2.3, bottomWidth: 2.3, topPositionX: 0, wholePositionX: -2.4*6, register: 8, referencePositionX: 84});
// Transform node that acts as the parent of all piano components
const piano = new BABYLON.TransformNode("piano");
keyboard.parent = piano;
// Import and scale piano frame
BABYLON.SceneLoader.ImportMesh("frame", "https://raw.githubusercontent.com/MicrosoftDocs/mixed-reality/docs/mixed-reality-docs/mr-dev-docs/develop/javascript/tutorials/babylonjs-webxr-piano/files/", "pianoFrame.babylon", scene, function(meshes) {
const frame = meshes[0];
frame.parent = piano;
});
// Lift the piano keyboard
keyboard.position.y += 80;
// Scale the entire piano
scaleFromPivot(piano, new BABYLON.Vector3(0, 0, 0), scale);
const pointerToKey = new Map()
const pianoSound = await Soundfont.instrument(new AudioContext(), 'acoustic_grand_piano');
scene.onPointerObservable.add((pointerInfo) => {
switch (pointerInfo.type) {
case BABYLON.PointerEventTypes.POINTERDOWN:
// Only take action if the pointer is down on a mesh
if(pointerInfo.pickInfo.hit) {
let pickedMesh = pointerInfo.pickInfo.pickedMesh;
let pointerId = pointerInfo.event.pointerId;
if (pickedMesh.parent === keyboard) {
pickedMesh.position.y -= 0.5; // Move the key downward
pointerToKey.set(pointerId, {
mesh: pickedMesh,
note: pianoSound.play(pointerInfo.pickInfo.pickedMesh.name) // Play the sound of the note
});
}
}
break;
case BABYLON.PointerEventTypes.POINTERUP:
let pointerId = pointerInfo.event.pointerId;
// Only take action if the released pointer was recorded in pointerToKey
if (pointerToKey.has(pointerId)) {
pointerToKey.get(pointerId).mesh.position.y += 0.5; // Move the key upward
pointerToKey.get(pointerId).note.stop(); // Stop the sound of the note
pointerToKey.delete(pointerId);
}
break;
}
});
const xrHelper = await scene.createDefaultXRExperienceAsync();
const featuresManager = xrHelper.baseExperience.featuresManager;
featuresManager.enableFeature(BABYLON.WebXRFeatureName.POINTER_SELECTION, "stable", {
xrInput: xrHelper.input,
enablePointerSelectionOnAllControllers: true
});
const ground = BABYLON.MeshBuilder.CreateGround("ground", {width: 400, height: 400});
featuresManager.enableFeature(BABYLON.WebXRFeatureName.TELEPORTATION, "stable", {
xrInput: xrHelper.input,
floorMeshes: [ground],
snapPositions: [new BABYLON.Vector3(2.4*3.5*scale, 0, -10*scale)],
});
return scene;
}
index.html
<html>
<head>
    <title>Babylon Template</title>
    <script src="https://cdn.babylonjs.com/babylon.js"></script>
    <script src="scene.js"></script>
    <script src="soundfont-player.min.js"></script>
    <style>
            body,#renderCanvas { width: 100%; height: 100%;}
    </style>
</head>
<body>
<canvas id="renderCanvas"></canvas>
<script>
const canvas = document.getElementById("renderCanvas"); // Get the canvas element
const engine = new BABYLON.Engine(canvas, true); // Generate the BABYLON 3D engine
// Register a render loop to repeatedly render the scene
createScene(engine).then(sceneToRender => {
engine.runRenderLoop(() => sceneToRender.render());
});
// Watch for browser/canvas resize events
window.addEventListener("resize", function () {
engine.resize();
});
</script>
</body>
</html>
后续步骤
有关 javaScript 开发混合现实的详细信息,请参阅 JavaScript 开发概述。