在本系列的上一个教程中,你设置了一个网页,其中包含具有相机和光线的 Babylon.js 场景。 在本教程中,你将生成钢琴模型并将其添加到场景中。

在本教程中,你将了解如何:
- 创建、定位和合并网格
- 从框网格构建钢琴键盘
- 导入钢琴框架的 3D 模型
开始之前
请确保已完成 该系列中的上一教程 ,并且已准备好继续向代码添加内容。
index.html
<html>
    <head>
        <title>Piano in BabylonJS</title>
        <script src="https://cdn.babylonjs.com/babylon.js"></script>
        <script src="scene.js"></script>
        <style>
            body,#renderCanvas { width: 100%; height: 100%;}
        </style>
    </head>
    <body>
        <canvas id="renderCanvas"></canvas>
        <script type="text/javascript">
            const canvas = document.getElementById("renderCanvas");
            const engine = new BABYLON.Engine(canvas, true);

            createScene(engine).then(sceneToRender => {
                engine.runRenderLoop(() => sceneToRender.render());
            });

            // Watch for browser/canvas resize events
            window.addEventListener("resize", function () {
                engine.resize();
            });
        </script>
    </body>
</html>
scene.js
const createScene = async function(engine) {
    const scene = new BABYLON.Scene(engine);

    const alpha =  3*Math.PI/2;
    const beta = Math.PI/50;
    const radius = 220;
    const target = new BABYLON.Vector3(0, 0, 0);

    const camera = new BABYLON.ArcRotateCamera("Camera", alpha, beta, radius, target, scene);
    camera.attachControl(canvas, true);

    const light = new BABYLON.HemisphericLight("light", new BABYLON.Vector3(0, 1, 0), scene);
    light.intensity = 0.6;

    const xrHelper = await scene.createDefaultXRExperienceAsync();

    return scene;
}
入门
让我们首先制作一个具有此结构的简单钢琴键盘:

在此图像中,有 7 个白色键和 5 个黑色键,每个键都标有笔记的名称。 全 88 键钢琴键盘包含此选择的七个完整重复键, (也称为寄存器) 和四个额外的键。 每个寄存器的频率是其上一个寄存器的两倍。 例如,C5 的音调频率 (这意味着第五个寄存器) 中的 C 音符是 C4 的两倍,D5 的音调频率是 D4 的两倍,依此推。
从视觉上看,每个寄存器看起来与另一个寄存器完全相同,因此我们可以开始研究如何使用此选择的键创建简单的钢琴键盘。 稍后,我们可以找到一种方法,将范围扩展到 88 键全钢琴键盘。
构建简单的钢琴键盘
注意
虽然可以从联机源中找到预制的 3D 钢琴键盘模型并将其导入到我们的网页中,但在本教程中,我们将从头开始构建键盘,以实现最大的可自定义性,并展示如何通过 Babylon.js 创建 3D 模型。
在开始创建用于构建键盘的任何网格之前,请注意,每个黑色键在两个白色键的中间并不完全对齐,并且并非每个键具有相同的宽度。 这意味着,我们必须单独为每个键创建和定位网格。

对于白色键,我们可以观察到每个白色键由两部分组成: (1) 黑键下方的下部 () , (2) 黑键 (s) 旁边的顶部部分。 这两个部分具有不同的尺寸,但堆叠在一起以创建一个完整的白色键。

下面是用于为注释 C 创建单个白键的代码, (不必担心将其添加到 scene.js 但) :
const whiteKeyBottom = BABYLON.MeshBuilder.CreateBox("whiteKeyBottom", {width: 2.3, height: 1.5, depth: 4.5}, scene);
const whiteKeyTop = BABYLON.MeshBuilder.CreateBox("whiteKeyTop", {width: 1.4, height: 1.5, depth: 5}, scene);
whiteKeyTop.position.z += 4.75;
whiteKeyTop.position.x -= 0.45;

// Parameters of BABYLON.Mesh.MergeMeshes:
// (arrayOfMeshes, disposeSource, allow32BitsIndices, meshSubclass, subdivideWithSubMeshes, multiMultiMaterials)
const whiteKeyV1 = BABYLON.Mesh.MergeMeshes([whiteKeyBottom, whiteKeyTop], true, false, null, false, false);
whiteKeyV1.material = whiteMat;
whiteKeyV1.name = "C4";
在这里,我们创建了两个 Box 网格,一个用于底部,一个用于白色键的上部。 然后,我们修改顶部部分的位置,使其堆叠在底部的顶部,并将其向左移动,以便为相邻的黑色键 (C#) 留出空间。
最后,使用 MergeMeshes 函数合并了这两个部分,成为一个完整的白键。 这是此代码将生成的网格:

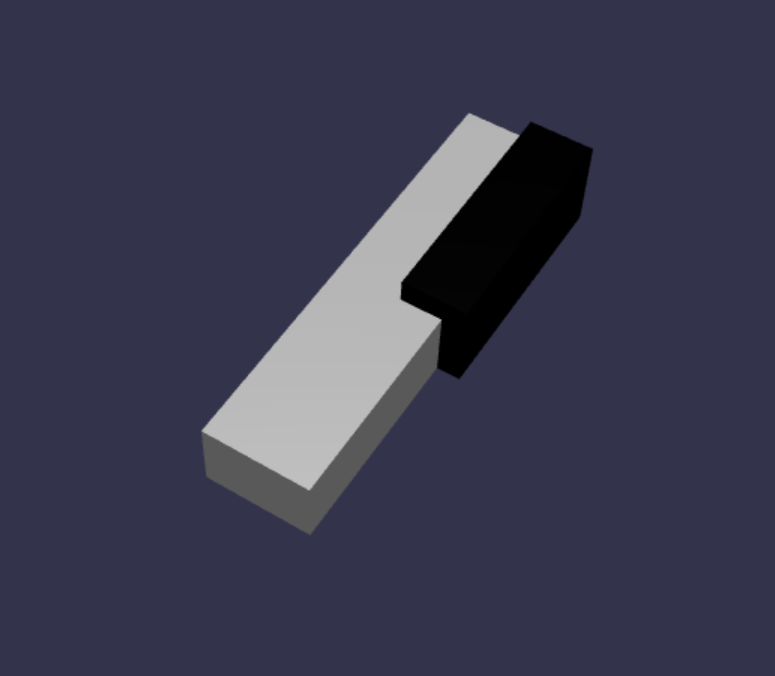
创建黑键更简单。 由于所有黑色键都是一个框的形状,因此我们只需创建带有黑色 StandardMaterial 的框网格即可创建黑色键。
注意
由于默认网格颜色是类似于白色的浅灰色,因此本教程不包括向白色键添加白色材料的步骤。 但是,如果你希望白色键上具有真实明亮的白色,请随意添加材料。
下面是用于创建黑键 C# 的代码, (不必担心将它添加到 scene.js) :
const blackMat = new BABYLON.StandardMaterial("black");
blackMat.diffuseColor = new BABYLON.Color3(0, 0, 0);

const blackKey = BABYLON.MeshBuilder.CreateBox("C#4", {width: 1.4, height: 2, depth: 5}, scene);
blackKey.position.z += 4.75;
blackKey.position.y += 0.25;
blackKey.position.x += 0.95;
blackKey.material = blackMat;
此代码生成的黑色键 (以及以前的白色键) 如下所示:
如你所看到的,创建每个键可能会导致许多类似的代码,因为我们必须指定每个键的尺寸和位置。 让我们在下一部分尝试提高创建过程的效率。
高效构建简单的钢琴键盘
虽然每个白色键的形状略有不同,但可以通过组合顶部和底部部分来创建所有这些形状。 让我们实现一个泛型函数,以创建和定位任何白键。
将以下函数添加到 函数外部
createScene()的scene.js:const buildKey = function (scene, parent, props) { if (props.type === "white") { /* Props for building a white key should contain: note, topWidth, bottomWidth, topPositionX, wholePositionX, register, referencePositionX As an example, the props for building the middle C white key would be {type: "white", note: "C", topWidth: 1.4, bottomWidth: 2.3, topPositionX: -0.45, wholePositionX: -14.4, register: 4, referencePositionX: 0} */ // Create bottom part const bottom = BABYLON.MeshBuilder.CreateBox("whiteKeyBottom", {width: props.bottomWidth, height: 1.5, depth: 4.5}, scene); // Create top part const top = BABYLON.MeshBuilder.CreateBox("whiteKeyTop", {width: props.topWidth, height: 1.5, depth: 5}, scene); top.position.z = 4.75; top.position.x += props.topPositionX; // Merge bottom and top parts // Parameters of BABYLON.Mesh.MergeMeshes: (arrayOfMeshes, disposeSource, allow32BitsIndices, meshSubclass, subdivideWithSubMeshes, multiMultiMaterials) const key = BABYLON.Mesh.MergeMeshes([bottom, top], true, false, null, false, false); key.position.x = props.referencePositionX + props.wholePositionX; key.name = props.note + props.register; key.parent = parent; return key; } }在此代码块中,我们创建了一个名为 的
buildKey()函数,如果props.type为"white",该函数将生成并返回一个白键。 通过在 参数props中标识键的类型,我们可以通过使用 if 语句进行分支,在同一函数中创建黑键和白键。的参数
buildKey()为:- 场景:键位于的场景
- 父级:网格的父级 (这允许我们将所有键分组到单个父)
- props:将生成的键的属性
props白色键的 将包含以下项:- 类型:“white”
- name:键表示的注释的名称
- topWidth:顶部部分的宽度
- bottomWidth:底部部分的宽度
- topPositionX:顶部部分相对于底部部件的 x 位置
- wholePositionX:整个键相对于寄存器的终点的 x 位置, (键 B) 的右边缘。
- register:注册密钥属于 (介于 0 和 8 之间的数字)
- referencePositionX:寄存器的终点的 x 坐标, (用作) 的参考点。
通过将 和
referencePositionX分隔wholePositionX开来,我们可以初始化props创建特定类型的密钥 (所需的参数,例如,在任何寄存器中创建特定类型的密钥(例如 C4、C5) ) ),然后在特定寄存器 (中创建该密钥时,将 和propsreferencePositionX添加到register) 。同样,我们还可以编写泛型函数来创建黑色键。 让我们展开 函数以
buildKey()包含该逻辑:const buildKey = function (scene, parent, props) { if (props.type === "white") { /* Props for building a white key should contain: note, topWidth, bottomWidth, topPositionX, wholePositionX, register, referencePositionX As an example, the props for building the middle C white key would be {type: "white", note: "C", topWidth: 1.4, bottomWidth: 2.3, topPositionX: -0.45, wholePositionX: -14.4, register: 4, referencePositionX: 0} */ // Create bottom part const bottom = BABYLON.MeshBuilder.CreateBox("whiteKeyBottom", {width: props.bottomWidth, height: 1.5, depth: 4.5}, scene); // Create top part const top = BABYLON.MeshBuilder.CreateBox("whiteKeyTop", {width: props.topWidth, height: 1.5, depth: 5}, scene); top.position.z = 4.75; top.position.x += props.topPositionX; // Merge bottom and top parts // Parameters of BABYLON.Mesh.MergeMeshes: (arrayOfMeshes, disposeSource, allow32BitsIndices, meshSubclass, subdivideWithSubMeshes, multiMultiMaterials) const key = BABYLON.Mesh.MergeMeshes([bottom, top], true, false, null, false, false); key.position.x = props.referencePositionX + props.wholePositionX; key.name = props.note + props.register; key.parent = parent; return key; } else if (props.type === "black") { /* Props for building a black key should contain: note, wholePositionX, register, referencePositionX As an example, the props for building the C#4 black key would be {type: "black", note: "C#", wholePositionX: -13.45, register: 4, referencePositionX: 0} */ // Create black color material const blackMat = new BABYLON.StandardMaterial("black"); blackMat.diffuseColor = new BABYLON.Color3(0, 0, 0); // Create black key const key = BABYLON.MeshBuilder.CreateBox(props.note + props.register, {width: 1.4, height: 2, depth: 5}, scene); key.position.z += 4.75; key.position.y += 0.25; key.position.x = props.referencePositionX + props.wholePositionX; key.material = blackMat; key.parent = parent; return key; } }props黑色键的 包含以下项:- 类型:“黑色”
- name:键表示的注释的名称
- wholePositionX:相对于寄存器的终点的整个键的 x 位置 (键 B 的右边缘)
- register:注册密钥属于 (介于 0 和 8 之间的数字)
- referencePositionX:寄存器的终点的 x 坐标, (用作) 的参考点。
props创建黑键的 要简单得多,因为创建黑键仅涉及创建框,并且每个黑键的宽度和 z 位置相同。现在,我们已经有了一种更高效的键创建方法,让我们初始化一个数组,该数组存储
props对应于寄存器中笔记的每个键的 ,然后使用每个键调用buildKey()函数,以便在第四个寄存器中创建一个简单的键盘。我们还将创建一个名为 的
keyboardTransformNode,以充当所有钢琴键的父级。 由于应用于父级的任何位置或缩放更改也将应用于子级,因此以这种方式对键进行分组将允许我们将其作为一个整体进行缩放或移动。在 函数中
createScene()追加以下代码行:const keyParams = [ {type: "white", note: "C", topWidth: 1.4, bottomWidth: 2.3, topPositionX: -0.45, wholePositionX: -14.4}, {type: "black", note: "C#", wholePositionX: -13.45}, {type: "white", note: "D", topWidth: 1.4, bottomWidth: 2.4, topPositionX: 0, wholePositionX: -12}, {type: "black", note: "D#", wholePositionX: -10.6}, {type: "white", note: "E", topWidth: 1.4, bottomWidth: 2.3, topPositionX: 0.45, wholePositionX: -9.6}, {type: "white", note: "F", topWidth: 1.3, bottomWidth: 2.4, topPositionX: -0.55, wholePositionX: -7.2}, {type: "black", note: "F#", wholePositionX: -6.35}, {type: "white", note: "G", topWidth: 1.3, bottomWidth: 2.3, topPositionX: -0.2, wholePositionX: -4.8}, {type: "black", note: "G#", wholePositionX: -3.6}, {type: "white", note: "A", topWidth: 1.3, bottomWidth: 2.3, topPositionX: 0.2, wholePositionX: -2.4}, {type: "black", note: "A#", wholePositionX: -0.85}, {type: "white", note: "B", topWidth: 1.3, bottomWidth: 2.4, topPositionX: 0.55, wholePositionX: 0}, ] // Transform Node that acts as the parent of all piano keys const keyboard = new BABYLON.TransformNode("keyboard"); keyParams.forEach(key => { buildKey(scene, keyboard, Object.assign({register: 4, referencePositionX: 0}, key)); })你可能已经注意到,在此代码块中,我们将放置所有相对于空间原点的键。
下面是 到目前为止scene.js 包含的代码:
const buildKey = function (scene, parent, props) { if (props.type === "white") { /* Props for building a white key should contain: note, topWidth, bottomWidth, topPositionX, wholePositionX, register, referencePositionX As an example, the props for building the middle C white key would be {type: "white", note: "C", topWidth: 1.4, bottomWidth: 2.3, topPositionX: -0.45, wholePositionX: -14.4, register: 4, referencePositionX: 0} */ // Create bottom part const bottom = BABYLON.MeshBuilder.CreateBox("whiteKeyBottom", {width: props.bottomWidth, height: 1.5, depth: 4.5}, scene); // Create top part const top = BABYLON.MeshBuilder.CreateBox("whiteKeyTop", {width: props.topWidth, height: 1.5, depth: 5}, scene); top.position.z = 4.75; top.position.x += props.topPositionX; // Merge bottom and top parts // Parameters of BABYLON.Mesh.MergeMeshes: (arrayOfMeshes, disposeSource, allow32BitsIndices, meshSubclass, subdivideWithSubMeshes, multiMultiMaterials) const key = BABYLON.Mesh.MergeMeshes([bottom, top], true, false, null, false, false); key.position.x = props.referencePositionX + props.wholePositionX; key.name = props.note + props.register; key.parent = parent; return key; } else if (props.type === "black") { /* Props for building a black key should contain: note, wholePositionX, register, referencePositionX As an example, the props for building the C#4 black key would be {type: "black", note: "C#", wholePositionX: -13.45, register: 4, referencePositionX: 0} */ // Create black color material const blackMat = new BABYLON.StandardMaterial("black"); blackMat.diffuseColor = new BABYLON.Color3(0, 0, 0); // Create black key const key = BABYLON.MeshBuilder.CreateBox(props.note + props.register, {width: 1.4, height: 2, depth: 5}, scene); key.position.z += 4.75; key.position.y += 0.25; key.position.x = props.referencePositionX + props.wholePositionX; key.material = blackMat; key.parent = parent; return key; } } const createScene = async function(engine) { const scene = new BABYLON.Scene(engine); const alpha = 3*Math.PI/2; const beta = Math.PI/50; const radius = 220; const target = new BABYLON.Vector3(0, 0, 0); const camera = new BABYLON.ArcRotateCamera("Camera", alpha, beta, radius, target, scene); camera.attachControl(canvas, true); const light = new BABYLON.HemisphericLight("light", new BABYLON.Vector3(0, 1, 0), scene); light.intensity = 0.6; const keyParams = [ {type: "white", note: "C", topWidth: 1.4, bottomWidth: 2.3, topPositionX: -0.45, wholePositionX: -14.4}, {type: "black", note: "C#", wholePositionX: -13.45}, {type: "white", note: "D", topWidth: 1.4, bottomWidth: 2.4, topPositionX: 0, wholePositionX: -12}, {type: "black", note: "D#", wholePositionX: -10.6}, {type: "white", note: "E", topWidth: 1.4, bottomWidth: 2.3, topPositionX: 0.45, wholePositionX: -9.6}, {type: "white", note: "F", topWidth: 1.3, bottomWidth: 2.4, topPositionX: -0.55, wholePositionX: -7.2}, {type: "black", note: "F#", wholePositionX: -6.35}, {type: "white", note: "G", topWidth: 1.3, bottomWidth: 2.3, topPositionX: -0.2, wholePositionX: -4.8}, {type: "black", note: "G#", wholePositionX: -3.6}, {type: "white", note: "A", topWidth: 1.3, bottomWidth: 2.3, topPositionX: 0.2, wholePositionX: -2.4}, {type: "black", note: "A#", wholePositionX: -0.85}, {type: "white", note: "B", topWidth: 1.3, bottomWidth: 2.4, topPositionX: 0.55, wholePositionX: 0}, ] // Transform Node that acts as the parent of all piano keys const keyboard = new BABYLON.TransformNode("keyboard"); keyParams.forEach(key => { buildKey(scene, keyboard, Object.assign({register: 4, referencePositionX: 0}, key)); }) const xrHelper = await scene.createDefaultXRExperienceAsync(); return scene; }生成的键盘如下所示:

扩展到 88 键钢琴
在本部分中,我们将扩展键创建函数的用法,以生成完整的 88 键钢琴键盘。
如前所述,一个完整的88键钢琴键盘包含七个重复寄存器和四个其他音符。 其中三条额外笔记位于键盘) 左端的寄存器 0 (,1 位于键盘) 右端的寄存器 8 (中。

我们将首先通过围绕前面编写的循环添加一个附加循环来构建七个完整重复项。 将 函数的上一个循环
buildKey()替换为以下代码:// Register 1 through 7 var referencePositionX = -2.4*14; for (let register = 1; register <= 7; register++) { keyParams.forEach(key => { buildKey(scene, keyboard, Object.assign({register: register, referencePositionX: referencePositionX}, key)); }) referencePositionX += 2.4*7; }在此循环中,我们生成寄存器 1 到 7 的键,并在每次移动到下一个寄存器时递增引用位置。
接下来,让我们创建其余的密钥。 将以下代码片段添加到
createScene()函数:// Register 0 buildKey(scene, keyboard, {type: "white", note: "A", topWidth: 1.9, bottomWidth: 2.3, topPositionX: -0.20, wholePositionX: -2.4, register: 0, referencePositionX: -2.4*21}); keyParams.slice(10, 12).forEach(key => { buildKey(scene, keyboard, Object.assign({register: 0, referencePositionX: -2.4*21}, key)); }) // Register 8 buildKey(scene, keyboard, {type: "white", note: "C", topWidth: 2.3, bottomWidth: 2.3, topPositionX: 0, wholePositionX: -2.4*6, register: 8, referencePositionX: 84});请注意,钢琴键盘的最左键和最右键不适合 (中
keyParams定义的道具的尺寸,因为它们不在) 边缘的黑色键旁边,因此我们需要为每个属性定义一个新props对象,以指定其特殊形状。在进行更改后,生成的键盘应如下所示:

添加钢琴框架
场景看起来有点奇怪,只有一个键盘漂浮在空间中。 让我们在键盘周围添加一个钢琴框架,以创建站立钢琴的外观。
与创建键的方式类似,我们还可以通过定位和组合一组框网格来创建框架。
但是,我们将把挑战留给你自己尝试并使用 巴比伦。SceneLoader.ImportMesh 用于导入站立钢琴框架的预制网格。 将此代码片段追加到
createScene():// Transform node that acts as the parent of all piano components const piano = new BABYLON.TransformNode("piano"); keyboard.parent = piano; // Import and scale piano frame BABYLON.SceneLoader.ImportMesh("frame", "https://raw.githubusercontent.com/MicrosoftDocs/mixed-reality/docs/mixed-reality-docs/mr-dev-docs/develop/javascript/tutorials/babylonjs-webxr-piano/files/", "pianoFrame.babylon", scene, function(meshes) { const frame = meshes[0]; frame.parent = piano; });请注意,我们再次创建一个名为 的
piano父级TransformNode,以将键盘和框架作为一个整体组合在一起。 如果我们需要这样做,这将使得移动或缩放整个钢琴要容易得多。导入帧后,请注意键盘位于框架 (底部,因为键的 y 坐标默认为 0) 。 让我们抬起键盘,使其适合站立钢琴框架:
// Lift piano keys
keyboard.position.y += 80;
由于
keyboard是所有钢琴键的父级,因此只需更改 的keyboardy 位置即可提升所有钢琴键。scene.js 的最终代码应如下所示:
const buildKey = function (scene, parent, props) {
    if (props.type === "white") {
        /*
        Props for building a white key should contain:
        note, topWidth, bottomWidth, topPositionX, wholePositionX, register, referencePositionX

        As an example, the props for building the middle C white key would be
        {type: "white", note: "C", topWidth: 1.4, bottomWidth: 2.3, topPositionX: -0.45, wholePositionX: -14.4, register: 4, referencePositionX: 0}
        */

        // Create bottom part
        const bottom = BABYLON.MeshBuilder.CreateBox("whiteKeyBottom", {width: props.bottomWidth, height: 1.5, depth: 4.5}, scene);

        // Create top part
        const top = BABYLON.MeshBuilder.CreateBox("whiteKeyTop", {width: props.topWidth, height: 1.5, depth: 5}, scene);
        top.position.z =  4.75;
        top.position.x += props.topPositionX;

        // Merge bottom and top parts
        // Parameters of BABYLON.Mesh.MergeMeshes: (arrayOfMeshes, disposeSource, allow32BitsIndices, meshSubclass, subdivideWithSubMeshes, multiMultiMaterials)
        const key = BABYLON.Mesh.MergeMeshes([bottom, top], true, false, null, false, false);
        key.position.x = props.referencePositionX + props.wholePositionX;
        key.name = props.note + props.register;
        key.parent = parent;

        return key;
    }
    else if (props.type === "black") {
        /*
        Props for building a black key should contain:
        note, wholePositionX, register, referencePositionX

        As an example, the props for building the C#4 black key would be
        {type: "black", note: "C#", wholePositionX: -13.45, register: 4, referencePositionX: 0}
        */

        // Create black color material
        const blackMat = new BABYLON.StandardMaterial("black");
        blackMat.diffuseColor = new BABYLON.Color3(0, 0, 0);

        // Create black key
        const key = BABYLON.MeshBuilder.CreateBox(props.note + props.register, {width: 1.4, height: 2, depth: 5}, scene);
        key.position.z += 4.75;
        key.position.y += 0.25;
        key.position.x = props.referencePositionX + props.wholePositionX;
        key.material = blackMat;
        key.parent = parent;

        return key;
    }
}

const createScene = async function(engine) {
    const scene = new BABYLON.Scene(engine);

    const alpha =  3*Math.PI/2;
    const beta = Math.PI/50;
    const radius = 220;
    const target = new BABYLON.Vector3(0, 0, 0);

    const camera = new BABYLON.ArcRotateCamera("Camera", alpha, beta, radius, target, scene);
    camera.attachControl(canvas, true);

    const light = new BABYLON.HemisphericLight("light", new BABYLON.Vector3(0, 1, 0), scene);
    light.intensity = 0.6;

    const keyParams = [
        {type: "white", note: "C", topWidth: 1.4, bottomWidth: 2.3, topPositionX: -0.45, wholePositionX: -14.4},
        {type: "black", note: "C#", wholePositionX: -13.45},
        {type: "white", note: "D", topWidth: 1.4, bottomWidth: 2.4, topPositionX: 0, wholePositionX: -12},
        {type: "black", note: "D#", wholePositionX: -10.6},
        {type: "white", note: "E", topWidth: 1.4, bottomWidth: 2.3, topPositionX: 0.45, wholePositionX: -9.6},
        {type: "white", note: "F", topWidth: 1.3, bottomWidth: 2.4, topPositionX: -0.55, wholePositionX: -7.2},
        {type: "black", note: "F#", wholePositionX: -6.35},
        {type: "white", note: "G", topWidth: 1.3, bottomWidth: 2.3, topPositionX: -0.2, wholePositionX: -4.8},
        {type: "black", note: "G#", wholePositionX: -3.6},
        {type: "white", note: "A", topWidth: 1.3, bottomWidth: 2.3, topPositionX: 0.2, wholePositionX: -2.4},
        {type: "black", note: "A#", wholePositionX: -0.85},
        {type: "white", note: "B", topWidth: 1.3, bottomWidth: 2.4, topPositionX: 0.55, wholePositionX: 0},
    ]

    // Transform Node that acts as the parent of all piano keys
    const keyboard = new BABYLON.TransformNode("keyboard");

    // Register 1 through 7
    var referencePositionX = -2.4*14;
    for (let register = 1; register <= 7; register++) {
        keyParams.forEach(key => {
            buildKey(scene, keyboard, Object.assign({register: register, referencePositionX: referencePositionX}, key));
        })
        referencePositionX += 2.4*7;
    }

    // Register 0
    buildKey(scene, keyboard, {type: "white", note: "A", topWidth: 1.9, bottomWidth: 2.3, topPositionX: -0.20, wholePositionX: -2.4, register: 0, referencePositionX: -2.4*21});
    keyParams.slice(10, 12).forEach(key => {
        buildKey(scene, keyboard, Object.assign({register: 0, referencePositionX: -2.4*21}, key));
    })

    // Register 8
    buildKey(scene, keyboard, {type: "white", note: "C", topWidth: 2.3, bottomWidth: 2.3, topPositionX: 0, wholePositionX: -2.4*6, register: 8, referencePositionX: 84});

    // Transform node that acts as the parent of all piano components
    const piano = new BABYLON.TransformNode("piano");
    keyboard.parent = piano;

    // Import and scale piano frame
    BABYLON.SceneLoader.ImportMesh("frame", "https://raw.githubusercontent.com/MicrosoftDocs/mixed-reality/docs/mixed-reality-docs/mr-dev-docs/develop/javascript/tutorials/babylonjs-webxr-piano/files/", "pianoFrame.babylon", scene, function(meshes) {
        const frame = meshes[0];
        frame.parent = piano;
    });

    // Lift the piano keyboard
    keyboard.position.y += 80;

    const xrHelper = await scene.createDefaultXRExperienceAsync();

    return scene;
}
现在,我们应该有一个站立钢琴,如下所示: