Note
Access to this page requires authorization. You can try signing in or changing directories.
Access to this page requires authorization. You can try changing directories.
This tutorial describes how to back up (vaulted backup) Azure Data Lake Storage using the Azure portal.
Azure Backup provides a simple, secure, and cost-effective solution to protect your Azure Data Lake Storage accounts without the need to deploy and manage backup infrastructure. With vaulted backup, your data is stored in an isolated Backup vault, offering offsite protection, and long-term retention (10 years). This approach ensures resilience against accidental deletions and ransomware attacks. You can back up your data to a Backup vault in Azure and restore it when needed. Learn about Azure Data Lake Storage vaulted backup and restore, and the supported scenarios.
Prerequisites
Before you back up Azure Data Lake Storage, ensure the following prerequisites are met:
- The storage account must be of the required types and located in a supported region; this feature is currently available only in specific regions. See the supported regions.
- The target account mustn't have containers with the names same as the containers in a recovery point; otherwise, the restore operation fails.
- Identify or create a Backup vault in the same region as the Azure Data Lake Storage account.
- Create a backup policy for Azure Data Lake Storage to configure the backup schedule and retention.
Note
You can restore vaulted backups to a different storage account only.
Grant permissions to the Backup vault on storage accounts
A Backup vault needs specific permissions on the storage account for backup operations. The Storage Account Backup Contributor role consolidates these permissions for easy assignment. We recommend you grant this role to the Backup vault before configuring backup.
You can assign roles to the vault at the Subscription or Resource Group level based on your convenience. The role assignment can also be performed while configuring backup.
To assign the required role for storage accounts that you want to protect, follow these steps:
In the Azure portal, go to the storage account, and then select Access Control (IAM).
On the Access Control (IAM) pane, select Add role assignments to assign the required role.
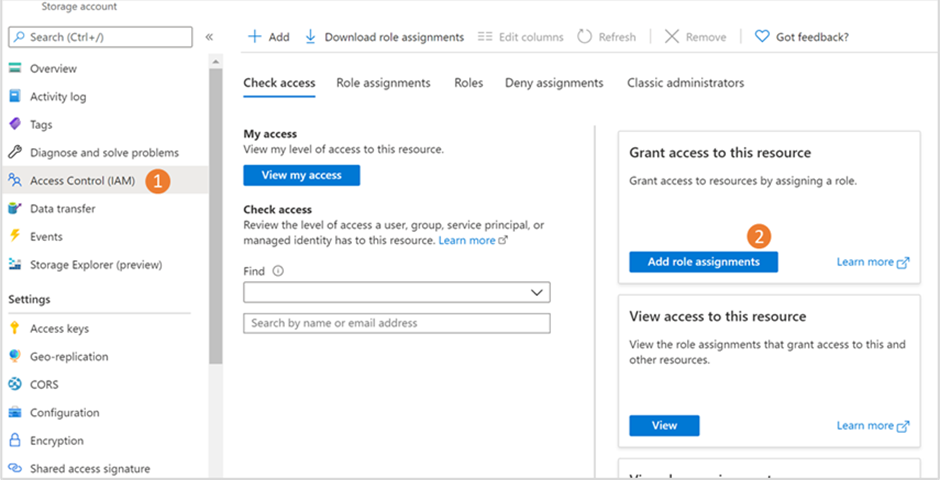
On the Add role assignment pane, do the following steps:
- Role: Select Storage Account Backup Contributor.
- Assign access to: Select User, group, or service principal.
- Members: Click + Select members and search for the Backup vault you created, and then select it from the search result to back up blobs in the underlying storage account.
Select Save to finish the role assignment.

The role assignment might take up to 30 minutes to become effective.
Configure vaulted backup for the Azure Data Lake Storage
You can configure backup on multiple Azure Data Lake Storage.
To configure vaulted backup, follow these steps:
In the Azure portal, go to the Backup vault, and then select + Backup.
On the Configure Backup pane, on the Basics tab, review the Datasource type is selected as Azure Data Lake Storage.
On the Backup policy tab, under Backup policy, select the policy you want to use for data retention, and then select Next. If you want to create a new backup policy, select Create new. learn how to create a backup policy.
On the Datasources tab, Select Add.

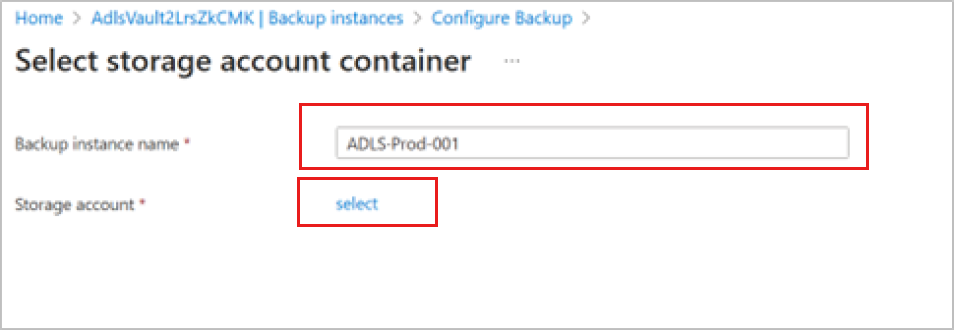
On the Select storage account container pane, provide the Backup instance name, and then click select under Storage account.
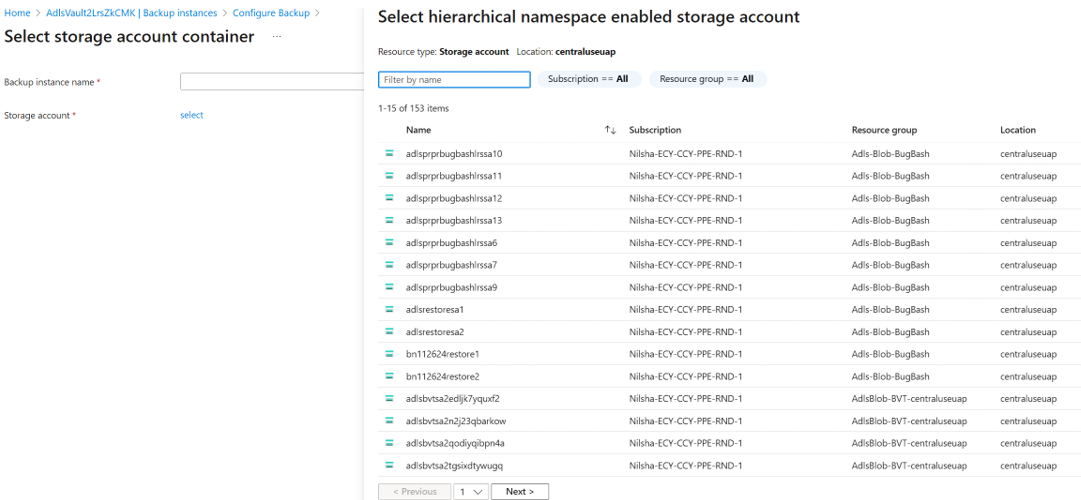
On the Select hierarchical namespace enabled storage account pane, select the storage accounts with Azure Data Lake Storage across subscriptions from the list that are in the region same as the vault.
On the Select storage account container pane, you can back up all containers or select specific ones.
After you add the resources, backup readiness validation starts. If the required roles are assigned, the validation succeeds with the Success message.
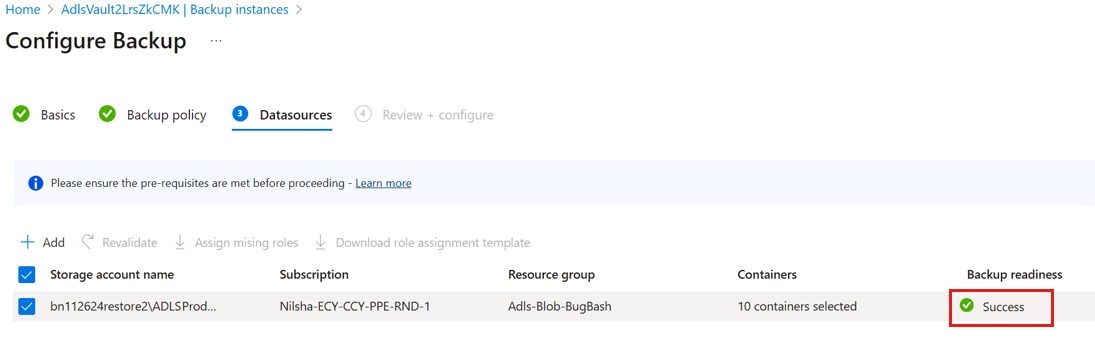
Error messages appear when access permissions are missing. See the Grant permissions section.
Validation errors appear if the selected storage accounts don't have the Storage Account Backup Contributor role. Review the error messages and take necessary actions.
Error Cause Recommended action Role assignment not done The Storage account backup contributor role and the other required roles for the storage account to the vault aren't assigned. Select the roles, and then select Assign missing roles to automatically assign the required role to the Backup vault and trigger an auto revalidation.
If the role propagation takes more than 10 minutes, then the validation might fail. In this scenario, you need to wait for a few minutes and select Revalidate to retry validation.
You need to assign the following types of permissions for various operations:
- Resource-level permissions: For backing up a single account within a resource group.
- Resource group or Subscription-level permissions: For backing up multiple accounts within a resource group.
- Higher-level permissions: For reducing the number of role assignments needed.
The maximum count of role assignments supported at the subscription level is 4,000. Learn more about Azure Role-Based Access Control Limits.Insufficient permissions for role assignment The vault doesn't have the required role to configure backups, and you don't have enough permissions to assign the required role. Download the role assignment template, and then share with users with permissions to assign roles for storage accounts. Review the configuration details, and then select Configure Backup.


You can track the progress of the backup configuration under Backup instances. After the configuration of backup is complete, Azure Backup triggers the backup operation as per the backup policy schedule to create the recovery points. Backup might take a minimum of 30–40 minutes, as backups rely on snapshots, which are taken in every 15 minutes and require two snapshots to detect changes before triggering the backup.
Monitor an Azure Data Lake Storage backup job
The Azure Backup service creates a job for a scheduled backup or when you trigger an on-demand backup operation, allowing you to monitor the job progress.
To check the backup job status, follow these steps:
In the Azure portal, go to the Backup vault > Backup jobs.

On the Backup jobs pane, select the required time range and apply filters to narrow down the list of jobs.
The Backup jobs dashboard shows the operation and status for the past seven days.
