Note
Access to this page requires authorization. You can try signing in or changing directories.
Access to this page requires authorization. You can try changing directories.
Integrating Azure API Management (APIM) with Microsoft Fabric's API for GraphQL significantly enhances your API's capabilities by providing robust scalability and security features. APIM acts as an enterprise-grade gateway that adds advanced capabilities including identity management, rate limiting, response caching, threat protection, and centralized monitoring—all without modifying your Fabric API configuration.
By routing your GraphQL requests through APIM, you can scale to handle increased traffic, implement sophisticated security policies, and gain visibility into API usage patterns across your organization.
This article guides you through integrating APIM with Fabric API for GraphQL, configuring managed identity authentication, and implementing caching and rate limiting policies.
Who uses Azure API Management with GraphQL
APIM integration is valuable for:
- Enterprise architects exposing Fabric data through a centralized, governed API gateway for organization-wide access
- Fabric administrators implementing rate limiting, caching, and security policies to protect Fabric capacity and data
- IT security teams requiring advanced authentication, authorization, and threat protection for Fabric data access
- Platform teams managing and governing multiple Fabric GraphQL APIs across departments and business units
Use APIM integration when you need enterprise-grade API management features like rate limiting, caching, security policies, and centralized governance for your Fabric GraphQL APIs.
Prerequisites
Before you begin, ensure you have:
- A Fabric API for GraphQL already created. If not, see Create an API for GraphQL or use Start with sample SQL database in the API for GraphQL portal
- An Azure API Management instance. For setup instructions, see Create an API Management instance
- Permissions to create managed identities and configure APIM policies
Add a Fabric GraphQL API to Azure API Management
The first step in integrating APIM with Fabric is to import your GraphQL API into Azure API Management. This process creates a proxy that routes requests through APIM while maintaining the connection to your Fabric data sources. By importing the API, you establish the foundation for adding enterprise features like authentication policies, caching, and rate limiting.
The import process requires two pieces of information from your Fabric GraphQL API: the endpoint URL (where APIM sends requests) and the schema file (which defines the API structure and available operations).
Export your GraphQL API details
First, gather the required information from your Fabric GraphQL API:
Open your GraphQL API in the Fabric portal
In the ribbon, select Copy endpoint to get your API's URL
Select Export schema to download the GraphQL schema file to your local device


Import the API into APIM
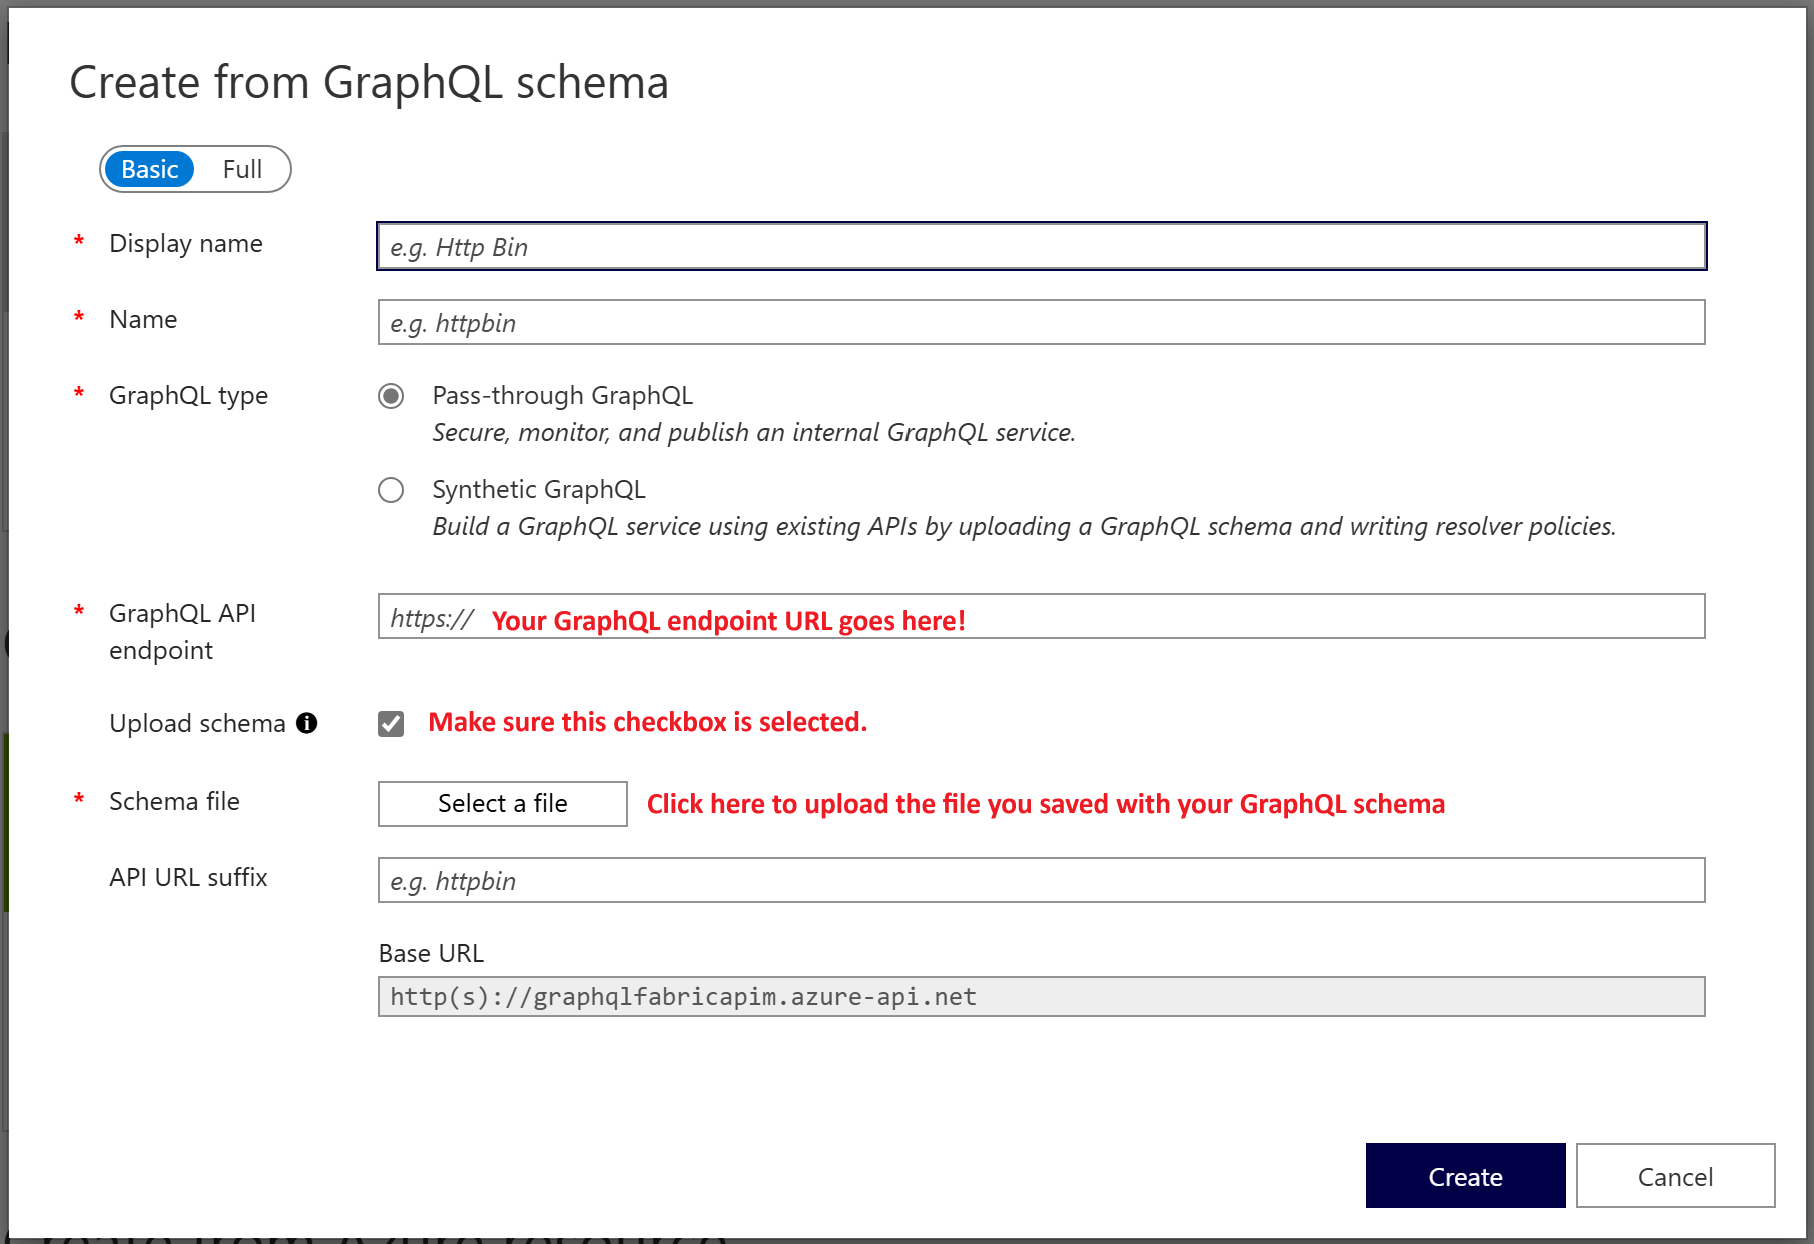
With your endpoint URL and schema file ready, you can now register the GraphQL API in APIM. This creates an API definition that APIM uses to validate requests, generate documentation, and apply policies. The schema you upload defines what queries and mutations clients can execute.
Navigate to your API Management instance in the Azure portal
Select APIs > + Add API
Select the GraphQL icon
In the Create from GraphQL schema screen, provide:
- Display name: A friendly name for the API
- Name: The API identifier
- GraphQL API endpoint: The endpoint URL you copied from Fabric
Select Upload schema and choose the schema file you downloaded

Configure managed identity authentication
Now that your GraphQL API is registered in APIM, you need to configure how APIM authenticates with Fabric. Managed identities provide a secure, password-free authentication method that eliminates the need to store credentials in your APIM configuration. Azure automatically manages the identity lifecycle and handles token acquisition, making this approach both more secure and easier to maintain than traditional authentication methods.
The authentication setup involves three main steps: creating the managed identity in Azure, granting it permissions to access your Fabric workspace and data sources, and configuring APIM to use this identity when making requests to Fabric.
Create and assign a managed identity
First, create the managed identity that APIM uses to authenticate:
- Create a user-assigned managed identity in Azure portal.
- Note the Client ID of the managed identity—you need the client ID for the policy configuration.
Grant the managed identity permissions in Fabric
After creating the managed identity, you must grant it permissions to access your Fabric resources. The managed identity needs access to both the GraphQL API item itself and any data sources it connects to (such as lakehouses or warehouses). Adding the identity as a workspace member is the simplest approach because it grants access to all items in the workspace at once.
- Open the Fabric workspace containing your GraphQL API
- Select Manage access
- Add the managed identity (for example, apim-id) with at least Contributor role

Tip
For more granular control, you can grant permissions directly to individual Fabric items (the API and its data sources) instead of workspace-level access. Granular control is especially important if your API uses single sign-on (SSO) authentication. For more information, see Authentication and permissions summary.
Configure APIM to use the managed identity
With permissions granted in Fabric, you need to tell APIM which managed identity to use. This association allows APIM to authenticate as that identity when making requests to your Fabric GraphQL API.
- In the Azure portal, navigate to your APIM instance
- Go to Security > Managed identities
- Add the user-assigned managed identity you created earlier
Add authentication policy
The final authentication step is adding an APIM policy that obtains an access token using the managed identity and includes it in requests to Fabric. This policy runs on every request, automatically handling token acquisition and renewal. The policy uses the authentication-managed-identity element to get a token for the Fabric API resource, then adds it to the Authorization header.
In your GraphQL API in APIM, select the API Policies tab
Edit the inbound processing policy
Add the following XML under
<inbound><base/>:<authentication-managed-identity resource="https://analysis.windows.net/powerbi/api" client-id="YOUR-MANAGED-IDENTITY-CLIENT-ID" output-token-variable-name="token-variable" ignore-error="false" /> <set-header name="Authorization" exists-action="override"> <value>@("Bearer " + (string)context.Variables["token-variable"])</value> </set-header>Replace
YOUR-MANAGED-IDENTITY-CLIENT-IDwith your managed identity's Client IDSave the policy
Test the connection
Before proceeding to add caching and rate limiting, verify that the authentication setup works correctly. Testing now ensures that any issues you encounter later aren't related to authentication configuration.
- In APIM, navigate to your GraphQL API
- Go to the Test tab
- Execute a sample query or mutation to confirm the connection works

Configure response caching
Response caching significantly reduces latency for API callers and decreases backend load on your Fabric data sources. APIM supports built-in caching or external Redis instances. For GraphQL APIs, caching uses the request body (the GraphQL query) as the cache key, ensuring that identical queries return cached responses.
Benefits of caching GraphQL responses:
- Reduced latency: Cached responses return instantly without querying Fabric
- Lower capacity consumption: Fewer requests to Fabric reduce CU (capacity unit) usage
- Better scalability: Handle more concurrent users without increasing backend load
Add caching policy
To implement caching, you modify the existing authentication policy to add cache lookup and storage logic. The policy checks for cached responses before forwarding requests to Fabric and stores successful responses for future use. This complete policy example shows how authentication and caching work together:
<policies>
<inbound>
<base />
<!-- Authenticate with managed identity -->
<authentication-managed-identity
    resource="https://analysis.windows.net/powerbi/api"
    client-id="YOUR-MANAGED-IDENTITY-CLIENT-ID"
    output-token-variable-name="token-variable"
    ignore-error="false" />
<set-header name="Authorization" exists-action="override">
    <value>@("Bearer " + (string)context.Variables["token-variable"])</value>
</set-header>
<!-- Check if response is cached -->
<cache-lookup-value
key="@(context.Request.Body.As<String>(preserveContent: true))"
variable-name="cachedResponse"
default-value="not_exists" />
</inbound>
<backend>
<!-- Only forward request if not cached -->
<choose>
<when condition="@(context.Variables.GetValueOrDefault<string>("cachedResponse") == "not_exists")">
<forward-request />
</when>
</choose>
</backend>
<outbound>
<base />
<choose>
<!-- Return cached response if it exists -->
<when condition="@(context.Variables.GetValueOrDefault<string>("cachedResponse") != "not_exists")">
<set-body>@(context.Variables.GetValueOrDefault<string>("cachedResponse"))</set-body>
</when>
<!-- Cache successful responses for 60 seconds -->
<when condition="@((context.Response.StatusCode == 200) && (context.Variables.GetValueOrDefault<string>("cachedResponse") == "not_exists"))">
<cache-store-value
key="@(context.Request.Body.As<String>(preserveContent: true))"
value="@(context.Response.Body.As<string>(preserveContent: true))"
duration="60" />
</when>
</choose>
</outbound>
<on-error>
<base />
</on-error>
</policies>
How this policy works:
- Inbound: Authenticates with managed identity and checks if the response is cached based on the GraphQL query
- Backend: Skips forwarding the request to Fabric if a cached response exists
- Outbound: Returns cached responses or caches new successful responses for 60 seconds
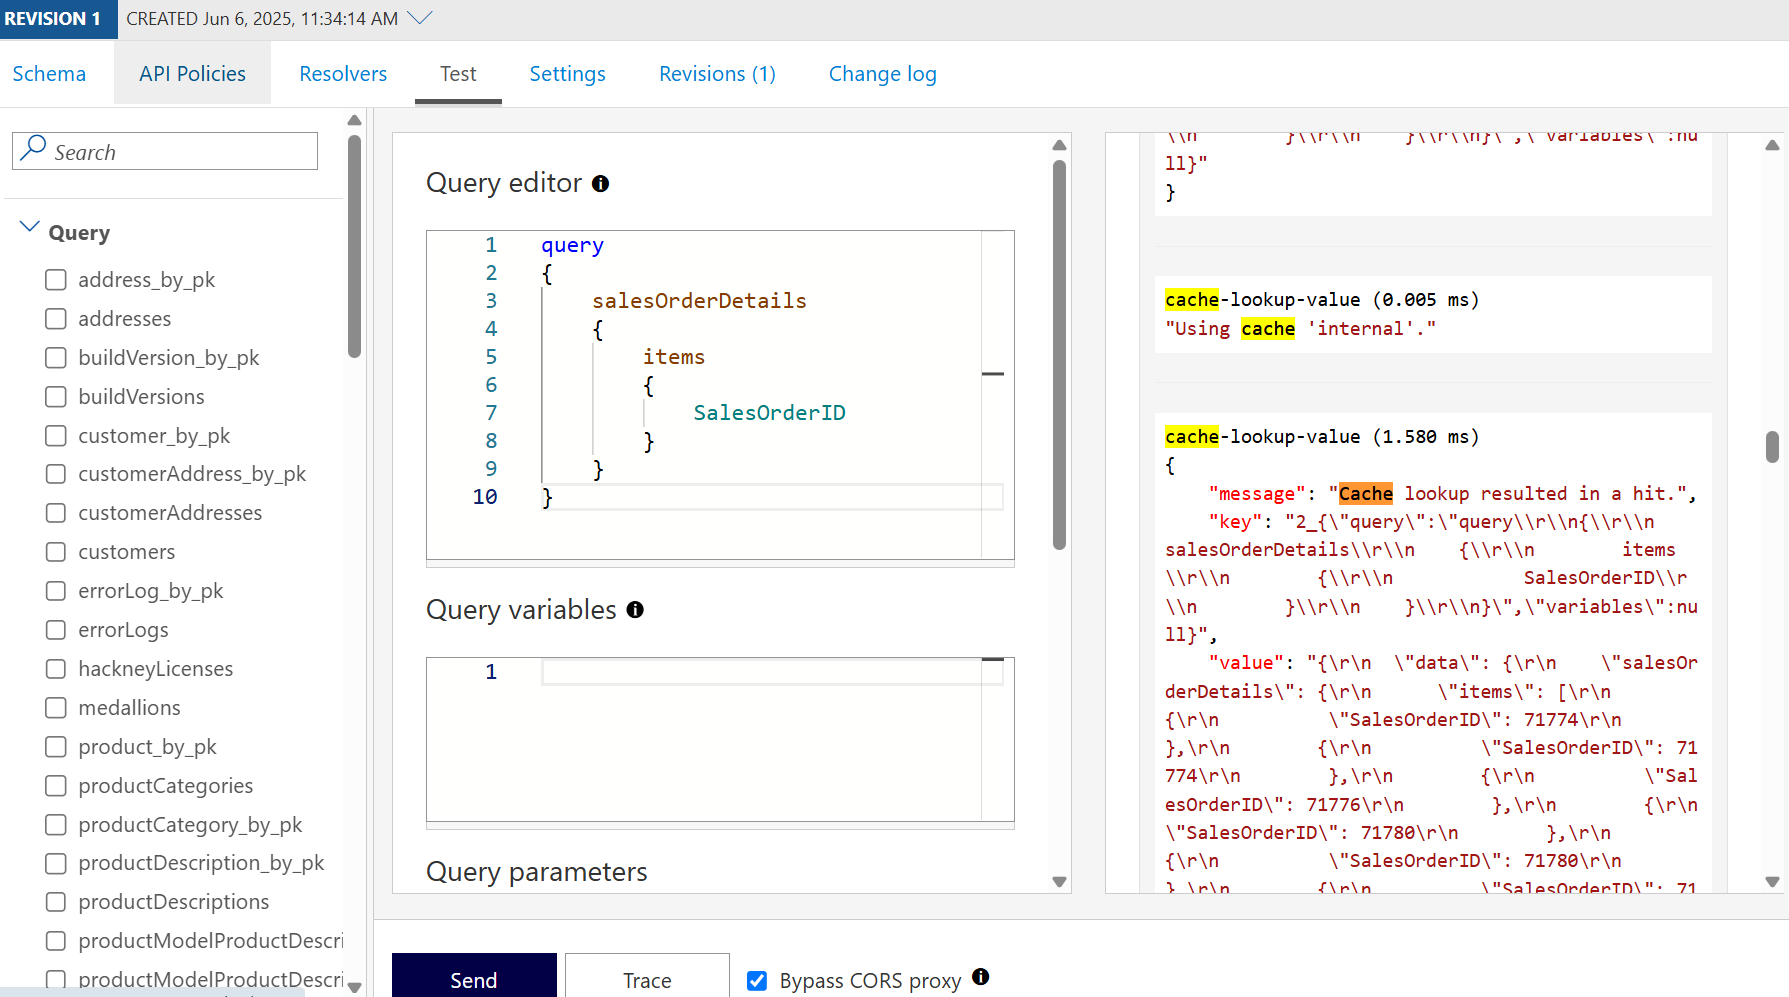
Verify caching is working
To confirm requests are being cached:
In APIM, execute the same GraphQL query twice
Trace the API call to see cache hits

Optimize cache duration
The example uses a 60-second cache duration. Adjust the duration based on your data freshness requirements:
- High-frequency updates: Use shorter durations (10-30 seconds) for frequently changing data
- Static or reference data: Use longer durations (5-60 minutes) for data that changes infrequently
- Real-time requirements: Don't cache queries that must always return the latest data
For advanced caching scenarios, including cache invalidation and external Redis configuration, see APIM caching policies.
Rate limiting
You can limit the number of API calls a client can make in a specific time period. Here's a sample rate limiting policy entry you can add below <inbound><base/> that enforces no more than two calls every 60 seconds for a given user:
<rate-limit-by-key
    calls="2"
    renewal-period="60"
    counter-key="@(context.Request.Headers.GetValueOrDefault("Authorization"))"
    increment-condition="@(context.Response.StatusCode == 200)"
    remaining-calls-variable-name="remainingCallsPerUser" />
After sending more than two API calls in a minute, you'll receive an error message:
{
    "statusCode": 429,
    "message": "Rate limit is exceeded. Try again in 58 seconds."
}
For more information on how to configure rate limiting policies in APIM, see the documentation.
Best practices
When integrating APIM with Fabric API for GraphQL, follow these recommendations:
Security
- Use managed identities: Prefer managed identities over API keys or connection strings for authentication
- Implement least privilege: Grant only the minimum permissions needed for the managed identity
- Enable HTTPS only: Configure APIM to reject HTTP requests and enforce HTTPS
- Validate inputs: Use APIM policies to validate GraphQL queries before forwarding to Fabric
Performance
- Cache frequently accessed data: Identify common queries and set appropriate cache durations
- Monitor cache hit rates: Use APIM analytics to track cache effectiveness
- Optimize rate limits: Balance user experience with capacity protection
- Use regional deployment: Deploy APIM in the same region as your Fabric capacity
Monitoring and governance
- Enable diagnostics: Configure APIM diagnostic logging to track API usage
- Set up alerts: Create alerts for rate limit violations and errors
- Version your APIs: Use APIM versioning to manage any breaking changes
- Document your APIs: Use APIM's developer portal to provide API documentation
Cost optimization
- Right-size rate limits: Set limits that align with your capacity tier
- Monitor capacity consumption: Track both APIM and Fabric capacity usage
- Use caching strategically: Balance freshness requirements with capacity savings
- Review usage patterns: Regularly analyze which queries consume the most resources
Summary
Integrating Microsoft Fabric API for GraphQL with Azure API Management brings together Fabric's powerful data capabilities with APIM's enterprise-grade API gateway features. This combination provides:
- Enhanced security: Managed identity authentication, threat protection, and policy-based access control
- Improved scalability: Response caching, rate limiting, and load distribution across multiple backends
- Better performance: Reduced latency through caching and optimized request routing
- Centralized governance: Unified monitoring, versioning, and management across multiple APIs
- Cost control: Rate limiting and caching reduce Fabric capacity consumption
By following the configuration steps and best practices in this article, you can build a robust, secure, and scalable API layer that supports production workloads across your organization.